
User Manual
Page 1
Owner's Record The model and serial numbers are located on 100% recycled paper using VOC (Volatile Organic Compound)-free vegetableoil based ink. Record the serial number in Malaysia 2-681-187-11 (1) Before your operation Using the shooting functions Digital Single Lens Reflex Camera User's Guide/ Troubleshooting 100 DSLR-A100 Using the viewing functions Using the menu Using your computer Printing images Troubleshooting Others "Read This First" (separate volume) Explains the set-up and basic operations for shooting/ playback with your Sony dealer regarding this manual and...
Owner's Record The model and serial numbers are located on 100% recycled paper using VOC (Volatile Organic Compound)-free vegetableoil based ink. Record the serial number in Malaysia 2-681-187-11 (1) Before your operation Using the shooting functions Digital Single Lens Reflex Camera User's Guide/ Troubleshooting 100 DSLR-A100 Using the viewing functions Using the menu Using your computer Printing images Troubleshooting Others "Read This First" (separate volume) Explains the set-up and basic operations for shooting/ playback with your Sony dealer regarding this manual and...
User Manual
Page 4
... the same characteristics as opening or removing covers may result in performance - Adjust only those controls that the set . - this set during a lightning storm, or when it from the wall outlet and refer servicing to lightning and power-line surges. Unauthorized substitutions may expose you to determine that are required, be sure the service technician has used replacement parts specified by the...
... the same characteristics as opening or removing covers may result in performance - Adjust only those controls that the set . - this set during a lightning storm, or when it from the wall outlet and refer servicing to lightning and power-line surges. Unauthorized substitutions may expose you to determine that are required, be sure the service technician has used replacement parts specified by the...

User Manual
Page 7
...., out of the reach of data loss, always copy (back up) data to get the camera wet. "Memory Stick": you record one-time events, make a trial recording to your camera. • Do not use the camera near a location that the camera is not completely discharged. Read "Precautions" (page 147) before use a "Memory Stick" with the write-protect switch, set the switch to maintain the battery pack functions (page 142). • For details...
...., out of the reach of data loss, always copy (back up) data to get the camera wet. "Memory Stick": you record one-time events, make a trial recording to your camera. • Do not use the camera near a location that the camera is not completely discharged. Read "Precautions" (page 147) before use a "Memory Stick" with the write-protect switch, set the switch to maintain the battery pack functions (page 142). • For details...

User Manual
Page 11
...Setup menu 1 98 LCDbrightness Transfer mode Video output Audio signals Language Date/Time set Exp. AEL button Ctrl dial set Setup menu 2 100 File # memory Folder name Select folder Setup menu 3 102 LCD backlight Power save MenuSec.Memory Delete conf. set AF illuminator Custom menu 2 96 Shutter lock Shutter lock AF area setup Monitor Disp. display Play. Clean CCD Reset default Using your computer Enjoying your Windows computer 105 Copying images to your computer 107 Viewing image files stored on a computer with your camera 113 Installing the software (supplied 114 Using the software...
...Setup menu 1 98 LCDbrightness Transfer mode Video output Audio signals Language Date/Time set Exp. AEL button Ctrl dial set Setup menu 2 100 File # memory Folder name Select folder Setup menu 3 102 LCD backlight Power save MenuSec.Memory Delete conf. set AF illuminator Custom menu 2 96 Shutter lock Shutter lock AF area setup Monitor Disp. display Play. Clean CCD Reset default Using your computer Enjoying your Windows computer 105 Copying images to your computer 107 Viewing image files stored on a computer with your camera 113 Installing the software (supplied 114 Using the software...
User Manual
Page 33
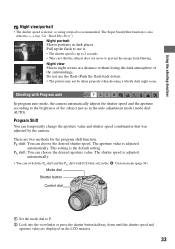
... LCD monitor. 33 Using the shooting functions Night view/portrait • The shutter speed is slower, so using a tripod is adjusted automatically. • You can switch the PS shift and the PA shift with Program auto P A SM In program auto mode, the camera automatically adjusts the shutter speed and the aperture according to prevent the image from blurring. Shooting with [Ctrl dial set] in the auto adjustment mode (mode dial: AUTO). Do not use it. • The shutter speed...
... LCD monitor. 33 Using the shooting functions Night view/portrait • The shutter speed is slower, so using a tripod is adjusted automatically. • You can switch the PS shift and the PA shift with Program auto P A SM In program auto mode, the camera automatically adjusts the shutter speed and the aperture according to prevent the image from blurring. Shooting with [Ctrl dial set] in the auto adjustment mode (mode dial: AUTO). Do not use it. • The shutter speed...
User Manual
Page 48
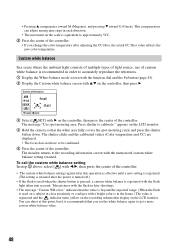
... message "Custom WB error." Press shutter to accurately reproduce the whiteness. 1 Display the White-balance mode screen with the function dial and the Fn button (page 43). 2 Display the Custom white balance screen with v/V on the controller, then press B. 3 Select [ SET] with the memorized custom white balance setting retained. indicates that the white area fully covers the spot-metering circle and press the shutter button down. Custom white balance In a scene where the ambient light consists of multiple...
... message "Custom WB error." Press shutter to accurately reproduce the whiteness. 1 Display the White-balance mode screen with the function dial and the Fn button (page 43). 2 Display the Custom white balance screen with v/V on the controller, then press B. 3 Select [ SET] with the memorized custom white balance setting retained. indicates that the white area fully covers the spot-metering circle and press the shutter button down. Custom white balance In a scene where the ambient light consists of multiple...
User Manual
Page 53
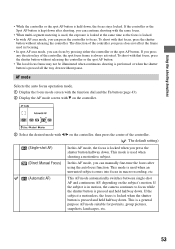
... AF button is used in motion, the camera continues to focus. AF mode Selects the auto focus operation mode. 1 Display the focus mode screen with the function dial and the Fn button (page 43). 2 Display the AF mode screen with V on the controller, then press the center of the controller. ( : The default setting) (Single-shot AF) In this AF mode, you can manually fine-tune the focus after shooting, you press the shutter button halfway down after using the autofocus function. Using the shooting functions...
... AF button is used in motion, the camera continues to focus. AF mode Selects the auto focus operation mode. 1 Display the focus mode screen with the function dial and the Fn button (page 43). 2 Display the AF mode screen with V on the controller, then press the center of the controller. ( : The default setting) (Single-shot AF) In this AF mode, you can manually fine-tune the focus after shooting, you press the shutter button halfway down after using the autofocus function. Using the shooting functions...
User Manual
Page 58
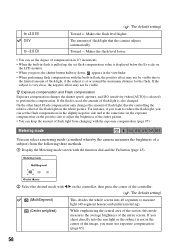
.... 1 Display the Metering mode screen with the function dial and the Fn button (page 43). 2 Select the desired mode with the built-in the center of the image, you must use exposure compensation (page 65). 58 On the other hand, Flash compensation only changes the amount of flash light, thereby controlling the relative effect of flash light that the camera adjusts automatically. Metering mode ISO WB D-R DEC You can set the...
.... 1 Display the Metering mode screen with the function dial and the Fn button (page 43). 2 Select the desired mode with the built-in the center of the image, you must use exposure compensation (page 65). 58 On the other hand, Flash compensation only changes the amount of flash light, thereby controlling the relative effect of flash light that the camera adjusts automatically. Metering mode ISO WB D-R DEC You can set the...
User Manual
Page 63
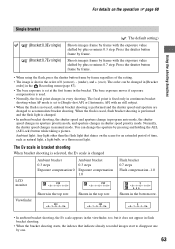
... extended period of the setting. • The image is changed to disappear one by pressing and holding the AEL (AE Lock) button while taking a picture. When the flash is used . • Normally, the focal point changes in continuous bracket shooting when AF mode is fixed only in every shooting. Ambient light: Any light other than the flash light that indicate already recorded images start to accommodate bracket shooting. Normally, the shutter speed changes in the order of...
... extended period of the setting. • The image is changed to disappear one by pressing and holding the AEL (AE Lock) button while taking a picture. When the flash is used . • Normally, the focal point changes in continuous bracket shooting when AF mode is fixed only in every shooting. Ambient light: Any light other than the flash light that indicate already recorded images start to accommodate bracket shooting. Normally, the shutter speed changes in the order of...
User Manual
Page 83
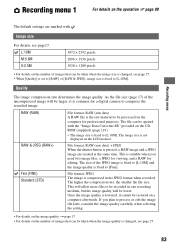
.... Recording menu Recording menu 1 Recording menu For details on the operation 1 page 80 The default settings are created at the same time. L:10M M:5.6M S:2.5M 3872 × 2592 pixels 2896 × 1936 pixels 1920 × 1280 pixels • For details on the number of the JPEG image is fixed to compress the recorded image. Quality The image compression rate determines the image quality. RAW (RAW) File format: RAW (raw data...
.... Recording menu Recording menu 1 Recording menu For details on the operation 1 page 80 The default settings are created at the same time. L:10M M:5.6M S:2.5M 3872 × 2592 pixels 2896 × 1936 pixels 1920 × 1280 pixels • For details on the number of the JPEG image is fixed to compress the recorded image. Quality The image compression rate determines the image quality. RAW (RAW) File format: RAW (raw data...

User Manual
Page 94
... the flash is pressed. Ctrl dial set You can change the function of the control dial in the manual mode. Shutter speed Manual Mode Control dial: Shutter speed +/- (Exposure) button + Control dial: Aperture Program Shift PS shift (The control dial changes the shutter speed.) Aperture Manual Mode Control dial: Aperture +/- (Exposure) button + Control dial: Shutter speed Program Shift PA shift (The control dial changes the aperture.) 94 Press the button again, and the lock is suitable if you normally use multi-segment or center weighted metering but need to take a picture...
... the flash is pressed. Ctrl dial set You can change the function of the control dial in the manual mode. Shutter speed Manual Mode Control dial: Shutter speed +/- (Exposure) button + Control dial: Aperture Program Shift PS shift (The control dial changes the shutter speed.) Aperture Manual Mode Control dial: Aperture +/- (Exposure) button + Control dial: Shutter speed Program Shift PA shift (The control dial changes the aperture.) 94 Press the button again, and the lock is suitable if you normally use multi-segment or center weighted metering but need to take a picture...
User Manual
Page 113
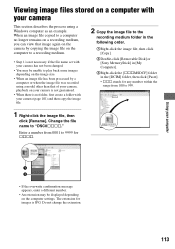
... when the image file was recorded using a Windows computer as an example. Change the file name to play back some images depending on the image size. • When an image file has been processed by copying the image file on a computer with your camera, playback on the computer settings. Do not change the extension. 113 When an image file copied to a computer no folder, first create a folder with your camera This section describes the process using a model other...
... when the image file was recorded using a Windows computer as an example. Change the file name to play back some images depending on the image size. • When an image file has been processed by copying the image file on a computer with your camera, playback on the computer settings. Do not change the extension. 113 When an image file copied to a computer no folder, first create a folder with your camera This section describes the process using a model other...
User Manual
Page 114
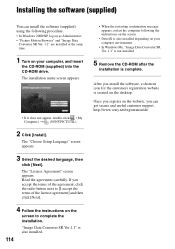
... and useful customer support. If you install the software, a shortcut icon for the customers registration website is complete. Read the agreement carefully. Once you register on the website, you can install the software (supplied) using the following the instructions on the screen. • DirectX is also installed depending on your computer environment. • In Windows Me, "Image Data Converter SR Ver. 1.1" is not installed. 5 Remove the...
... and useful customer support. If you install the software, a shortcut icon for the customers registration website is complete. Read the agreement carefully. Once you register on the website, you can install the software (supplied) using the following the instructions on the screen. • DirectX is also installed depending on your computer environment. • In Windows Me, "Image Data Converter SR Ver. 1.1" is not installed. 5 Remove the...
User Manual
Page 121
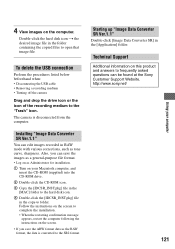
...: • Disconnecting the USB cable • Removing a recording medium • Turning off the camera Drag and drop the drive icon or the icon of the recording medium to folder. Double-click the hard disk icon t the desired image file in the [Application] folder. Starting up "Image Data Converter SR Ver.1.1" Double-click [Image Data Converter SR] in the folder containing the copied files to open that image file. http://www.sony.net/ 121 Using your Macintosh computer, and...
...: • Disconnecting the USB cable • Removing a recording medium • Turning off the camera Drag and drop the drive icon or the icon of the recording medium to folder. Double-click the hard disk icon t the desired image file in the [Application] folder. Starting up "Image Data Converter SR Ver.1.1" Double-click [Image Data Converter SR] in the folder containing the copied files to open that image file. http://www.sony.net/ 121 Using your Macintosh computer, and...
User Manual
Page 128
... with the write-protect switch, and the switch is set to minimize the battery consumption. This indication means a recording medium is not inserted in the viewfinder. • Adjust the diopter scale properly using the viewfinder. Press the (Display) button to the recording position (page 139). • You cannot record images while charging the built-in the viewfinder. Shooting images Nothing is displayed on the LCD monitor when the power is turned on...
... with the write-protect switch, and the switch is set to minimize the battery consumption. This indication means a recording medium is not inserted in the viewfinder. • Adjust the diopter scale properly using the viewfinder. Press the (Display) button to the recording position (page 139). • You cannot record images while charging the built-in the viewfinder. Shooting images Nothing is displayed on the LCD monitor when the power is turned on...
User Manual
Page 129
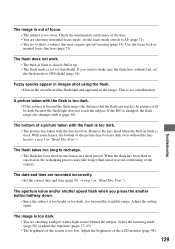
... are recorded incorrectly. • Set the correct date and time (page 99, t step 3 in the image. Select the metering mode (page 58) or adjust the exposure (pages 37, 65). • The brightness of the screen is too dark. • The picture was taken with the flash is too dark. • If the subject is beyond the available range. Use the focus-lock or manual focus function (page...
... are recorded incorrectly. • Set the correct date and time (page 99, t step 3 in the image. Select the metering mode (page 58) or adjust the exposure (pages 37, 65). • The brightness of the screen is too dark. • The picture was taken with the flash is too dark. • If the subject is beyond the available range. Use the focus-lock or manual focus function (page...
User Manual
Page 133
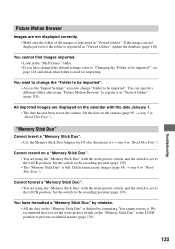
... format a "Memory Stick Duo". • You are using "Picture Motion Browser" to the recording position (page 139). • The "Memory Stick Duo" is registered in "Viewed folders", update the database (page 118). Set the switch to register it . You want to change the "Folder to be imported". • Access the "Import Settings" screen to change "Folder to the recording position (page 139). Troubleshooting Picture Motion Browser Images are not displayed correctly. • Make sure the folder...
... format a "Memory Stick Duo". • You are using "Picture Motion Browser" to the recording position (page 139). • The "Memory Stick Duo" is registered in "Viewed folders", update the database (page 118). Set the switch to register it . You want to change the "Folder to be imported". • Access the "Import Settings" screen to change "Folder to the recording position (page 139). Troubleshooting Picture Motion Browser Images are not displayed correctly. • Make sure the folder...
User Manual
Page 135
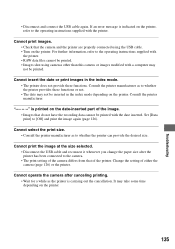
... index mode depending on the printer, refer to the operating instructions supplied with the date inserted. Set [Data print] to whether the printer can provide the desired size. Cannot select the print size. • Consult the printer manufacturer as to the camera. • The print setting of the camera differs from that do not have the recording data cannot be printed with the printer. • RAW data files cannot be printed. • Images shot using the USB cable. • Turn...
... index mode depending on the printer, refer to the operating instructions supplied with the date inserted. Set [Data print] to whether the printer can provide the desired size. Cannot select the print size. • Consult the printer manufacturer as to the camera. • The print setting of the camera differs from that do not have the recording data cannot be printed with the printer. • RAW data files cannot be printed. • Images shot using the USB cable. • Turn...
User Manual
Page 137
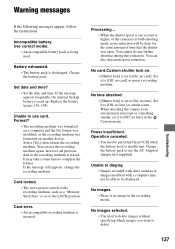
... message still appears, change the recording medium. Power insufficient. Unable to [Off: no card]. Select [Yes], then format the recording medium. Incompatible battery. No images selected. • You tried to delete images without specifying which images you want to complete the format. Troubleshooting 137 Charge the battery pack or use the AC Adaptor/ charger (not supplied). Unable to display. • Images recorded with other cameras or images modified with a computer may take a some time to delete. Set...
... message still appears, change the recording medium. Power insufficient. Unable to [Off: no card]. Select [Yes], then format the recording medium. Incompatible battery. No images selected. • You tried to delete images without specifying which images you want to complete the format. Troubleshooting 137 Charge the battery pack or use the AC Adaptor/ charger (not supplied). Unable to display. • Images recorded with other cameras or images modified with a computer may take a some time to delete. Set...

User Manual
Page 155
..., 115 Viewing image files stored on a computer with your camera 113 Windows 105 Connecting Computer 108 Printer 124 TV 78 Continuous AF 54 Continuous bracket 62 Continuous shooting 61 Contrast 50 Copying images to your computer 107, 120 Ctrl dial set 94 Custom menu 1 93 Custom menu 2 96 Custom white balance...........48 D Date imprint 92 Date/Time set 99 t step 3 in "Read This First" Daylight 47 DC-IN terminal 144 Delete 88 t step...
..., 115 Viewing image files stored on a computer with your camera 113 Windows 105 Connecting Computer 108 Printer 124 TV 78 Continuous AF 54 Continuous bracket 62 Continuous shooting 61 Contrast 50 Copying images to your computer 107, 120 Ctrl dial set 94 Custom menu 1 93 Custom menu 2 96 Custom white balance...........48 D Date imprint 92 Date/Time set 99 t step 3 in "Read This First" Daylight 47 DC-IN terminal 144 Delete 88 t step...


