
User Manual
Page 1
...asked questions can be found at our Customer Support Website. Model No. DSLR-A100 Serial No © 2006 Sony Corporation Index Operating Instructions Before operating the unit, please read this product... the bottom. Additional information on this product and answers to these numbers whenever you call upon your Sony dealer regarding this manual and "Read This First" (separate volume) thoroughly, and retain it for ... Using the shooting functions Digital Single Lens Reflex Camera User's Guide/ Troubleshooting 100 DSLR-A100 Using the viewing functions Using the menu Using your...
...asked questions can be found at our Customer Support Website. Model No. DSLR-A100 Serial No © 2006 Sony Corporation Index Operating Instructions Before operating the unit, please read this product... the bottom. Additional information on this product and answers to these numbers whenever you call upon your Sony dealer regarding this manual and "Read This First" (separate volume) thoroughly, and retain it for ... Using the shooting functions Digital Single Lens Reflex Camera User's Guide/ Troubleshooting 100 DSLR-A100 Using the viewing functions Using the menu Using your...

User Manual
Page 7
...Be careful not to the flash surface, resulting in a cool, dry place. Read "Precautions" (page 147) before use the partially charged capacity of your camera. Notes on "Memory Stick", see page 142. If such a problem occurs, consult a doctor immediately. 7 "Memory Stick": you record one-time events...charged even if it may cause malfunctions. • If moisture condensation occurs, remove it in insufficient light emission. • Keep the camera, supplied accessories, etc., out of the reach of flash emission may not be swallowed. This is neither dust-proof, nor splashproof, ...
...Be careful not to the flash surface, resulting in a cool, dry place. Read "Precautions" (page 147) before use the partially charged capacity of your camera. Notes on "Memory Stick", see page 142. If such a problem occurs, consult a doctor immediately. 7 "Memory Stick": you record one-time events...charged even if it may cause malfunctions. • If moisture condensation occurs, remove it in insufficient light emission. • Keep the camera, supplied accessories, etc., out of the reach of flash emission may not be swallowed. This is neither dust-proof, nor splashproof, ...
User Manual
Page 8
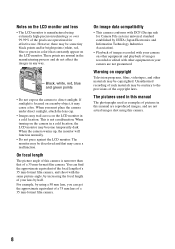
... and Information Technology Industries Association). • Playback of images recorded with the same picture angle, by increasing the focal length of your camera are normal in the manufacturing process and do not affect the images in a cold location, the LCD monitor may cause a malfunction.... a fire. If sunlight is not a malfunction. The monitor may be contrary to direct sunlight. On image data compatibility • This camera conforms with other materials may trail across on the LCD monitor in a cold location. These points are not guaranteed. Unauthorized recording of the...
... and Information Technology Industries Association). • Playback of images recorded with the same picture angle, by increasing the focal length of your camera are normal in the manufacturing process and do not affect the images in a cold location, the LCD monitor may cause a malfunction.... a fire. If sunlight is not a malfunction. The monitor may be contrary to direct sunlight. On image data compatibility • This camera conforms with other materials may trail across on the LCD monitor in a cold location. These points are not guaranteed. Unauthorized recording of the...
User Manual
Page 9
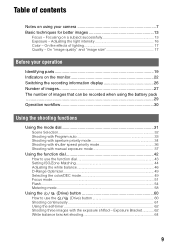
Table of images that can be recorded when using your camera 7 Basic techniques for better images 13 Focus - Exposure Bracket 62 White balance bracket shooting 64 9 On "image quality" and "image size 17 Before your operation ...
Table of images that can be recorded when using your camera 7 Basic techniques for better images 13 Focus - Exposure Bracket 62 White balance bracket shooting 64 9 On "image quality" and "image size 17 Before your operation ...

User Manual
Page 11
... CCD Reset default Using your computer Enjoying your Windows computer 105 Copying images to your computer 107 Viewing image files stored on a computer with your camera 113 Installing the software (supplied 114 Using the software (supplied 115 Using your Macintosh computer 120 11 Custom menu 1 93 Priority setup FocusHoldButt.
... CCD Reset default Using your computer Enjoying your Windows computer 105 Copying images to your computer 107 Viewing image files stored on a computer with your camera 113 Installing the software (supplied 114 Using the software (supplied 115 Using your Macintosh computer 120 11 Custom menu 1 93 Priority setup FocusHoldButt.
User Manual
Page 13
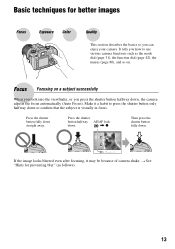
..."Hints for better images Focus Exposure Color Quality This section describes the basics so you press the shutter button halfway down to use various camera functions such as follows). 13 It tells you how to confirm that the subject is visually in focus. If the image looks blurred ...even after focusing, it a habit to press the shutter button only halfway down , the camera adjusts the focus automatically (Auto Focus). Focus Focusing on . Basic techniques for preventing blur" (as the mode dial (page 31), the function dial...
..."Hints for better images Focus Exposure Color Quality This section describes the basics so you press the shutter button halfway down to use various camera functions such as follows). 13 It tells you how to confirm that the subject is visually in focus. If the image looks blurred ...even after focusing, it a habit to press the shutter button only halfway down , the camera adjusts the focus automatically (Auto Focus). Focus Focusing on . Basic techniques for preventing blur" (as the mode dial (page 31), the function dial...
User Manual
Page 14
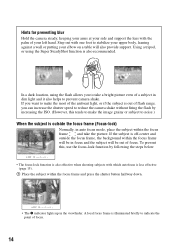
... your upper body, leaning against a wall or putting your left hand. A local focus frame is also recommended. Hints for preventing blur Hold the camera steady, keeping your arms at your side and support the lens with the palm of your elbow on a table will be out of focus. Using... frame will be in focus and the subject will also provide support. In a dark location, using the Super SteadyShot function is illuminated briefly to prevent camera shake. If the subject is less effective (page 15). 1 Place the subject within the focus frame and take a bright picture even of focus. ...
... your upper body, leaning against a wall or putting your left hand. A local focus frame is also recommended. Hints for preventing blur Hold the camera steady, keeping your arms at your side and support the lens with the palm of your elbow on a table will be out of focus. Using... frame will be in focus and the subject will also provide support. In a dark location, using the Super SteadyShot function is illuminated briefly to prevent camera shake. If the subject is less effective (page 15). 1 Place the subject within the focus frame and take a bright picture even of focus. ...
User Manual
Page 15
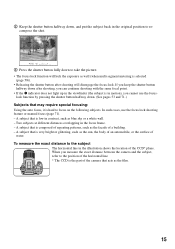
... disengage the focus-lock. A subject that is very bright or glittering, such as the sun, the body of an automobile, or the surface of the camera that is low in contrast, such as the facade of the CCD* plane. lock function by pressing the shutter button halfway down after shooting, you... focal point. • If the z indicator does not light up in the viewfinder (the subject is in motion), you measure the exact distance between the camera and the subject, refer to the subject The horizontal line in the focus frame. - In such cases, use the focus- If you keep the shutter...
... disengage the focus-lock. A subject that is very bright or glittering, such as the sun, the body of an automobile, or the surface of the camera that is low in contrast, such as the facade of the CCD* plane. lock function by pressing the shutter button halfway down after shooting, you... focal point. • If the z indicator does not light up in the viewfinder (the subject is in motion), you measure the exact distance between the camera and the subject, refer to the subject The horizontal line in the focus frame. - In such cases, use the focus- If you keep the shutter...
User Manual
Page 16
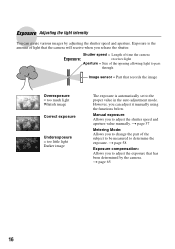
... intensity You can adjust it manually using the functions below. t page 58 Exposure compensation: Allows you to adjust the exposure that the camera will receive when you to change the part of the subject to be measured to adjust the shutter speed and aperture value manually. Shutter... speed = Length of time the camera Exposure: receives light Aperture = Size of light that has been determined by adjusting the shutter speed and aperture. Exposure is automatically set to...
... intensity You can adjust it manually using the functions below. t page 58 Exposure compensation: Allows you to adjust the exposure that the camera will receive when you to change the part of the subject to be measured to adjust the shutter speed and aperture value manually. Shutter... speed = Length of time the camera Exposure: receives light Aperture = Size of light that has been determined by adjusting the shutter speed and aperture. Exposure is automatically set to...

User Manual
Page 17
However, you cannot see the differences on the screen of the camera, the fine detail and data processing time differ when the image is printed or displayed on a computer screen. Although you can adjust color tones manually ...
However, you cannot see the differences on the screen of the camera, the fine detail and data processing time differ when the image is printed or displayed on a computer screen. Although you can adjust color tones manually ...
User Manual
Page 18
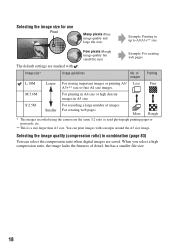
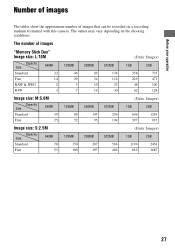
... ratio when digital images are saved. Image size* Usage guidelines No. of images Smaller For creating web pages More Rough * The images recorded using the camera are marked with a margin around the A3 size image. When you select a high compression ratio, the image lacks the fineness of detail, but small file...
... ratio when digital images are saved. Image size* Usage guidelines No. of images Smaller For creating web pages More Rough * The images recorded using the camera are marked with a margin around the A3 size image. When you select a high compression ratio, the image lacks the fineness of detail, but small file...
User Manual
Page 20
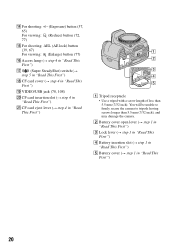
...") E Battery cover (t step 1 in "Read This First") A Tripod receptacle • Use a tripod with a screw length of less than 5.5 mm (7/32 inch), and may damage the camera. You will be unable to firmly secure the camera to tripods having screws longer than 5.5 mm (7/32 inch).
...") E Battery cover (t step 1 in "Read This First") A Tripod receptacle • Use a tripod with a screw length of less than 5.5 mm (7/32 inch), and may damage the camera. You will be unable to firmly secure the camera to tripods having screws longer than 5.5 mm (7/32 inch).

User Manual
Page 21
... When threading the strap through the holder ring, hold the tip of the strap with the remote commander clip on the grip side of the camera. Notched side 21 Attach the other end of the strap on the strap from the notched side. Holder Ring If the holder ring comes off... the strap, put it back on the other side of the camera. Before your finger, as shown below, and slide the holder ring rather than the tip of the strap into position to attach the shoulder strap...
... When threading the strap through the holder ring, hold the tip of the strap with the remote commander clip on the grip side of the camera. Notched side 21 Attach the other end of the strap on the strap from the notched side. Holder Ring If the holder ring comes off... the strap, put it back on the other side of the camera. Before your finger, as shown below, and slide the holder ring rather than the tip of the strap into position to attach the shoulder strap...
User Manual
Page 22
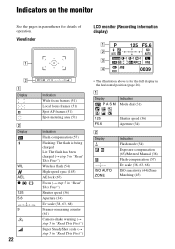
... sync (145) AE lock (67) Focus (t step 5 in "Read This First") Shutter speed (36) Aperture (34) Ev scale (38, 63, 68) Frames-remaining counter (61) Camera-shake warning (t step 5 in "Read This First") Super SteadyShot scale (t step 5 in "Read This First") • The illustration above is for the full display in...
... sync (145) AE lock (67) Focus (t step 5 in "Read This First") Shutter speed (36) Aperture (34) Ev scale (38, 63, 68) Frames-remaining counter (61) Camera-shake warning (t step 5 in "Read This First") Super SteadyShot scale (t step 5 in "Read This First") • The illustration above is for the full display in...
User Manual
Page 26
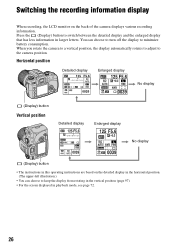
...vertical position (page 97). • For the screen displayed in playback mode, see page 72. 26 When you rotate the camera to a vertical position, the display automatically rotates to adjust to minimize battery consumption. Switching the recording information display When recording,... display in the horizontal position. (The upper-left illustration.) • You can choose to turn off the display to the camera position. Horizontal position Detailed display Enlarged display No display (Display) button Vertical position Detailed display Enlarged display No display (Display) ...
...vertical position (page 97). • For the screen displayed in playback mode, see page 72. 26 When you rotate the camera to a vertical position, the display automatically rotates to adjust to minimize battery consumption. Switching the recording information display When recording,... display in the horizontal position. (The upper-left illustration.) • You can choose to turn off the display to the camera position. Horizontal position Detailed display Enlarged display No display (Display) button Vertical position Detailed display Enlarged display No display (Display) ...
User Manual
Page 27
... 287 197 512MB 586 402 (Units: Images) 1GB 2GB 1196 822 2454 1687 27 The values may vary depending on a recording medium formatted with this camera.
... 287 197 512MB 586 402 (Units: Images) 1GB 2GB 1196 822 2454 1687 27 The values may vary depending on a recording medium formatted with this camera.
User Manual
Page 29
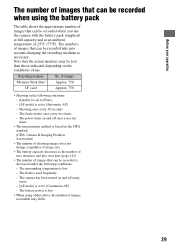
... may differ. 29 Shooting once every 30 seconds. - of images recordable may be less than those indicated depending on the CIPA standard. (CIPA: Camera & Imaging Products Association) • The number of shooting images does not change, regardless of image size. • The battery capacity decreases as necessary...the conditions of 25°C (77°F). The flash is low. - The numbers of images that can be recorded when you use the camera with the battery pack (supplied) at full capacity and at an ambient temperature of use. The flash strobes once every two times. - The...
... may differ. 29 Shooting once every 30 seconds. - of images recordable may be less than those indicated depending on the CIPA standard. (CIPA: Camera & Imaging Products Association) • The number of shooting images does not change, regardless of image size. • The battery capacity decreases as necessary...the conditions of 25°C (77°F). The flash is low. - The numbers of images that can be recorded when you use the camera with the battery pack (supplied) at full capacity and at an ambient temperature of use. The flash strobes once every two times. - The...

User Manual
Page 30
..., bracket, white balance bracket) • Adjusting the exposure (page 65) • Locking the exposure (page 67) • Focusing manually (page 71) Shooting • Holding the camera (t step 5 in "Read This First", page 14) • Look into the viewfinder (t step 5 in "Read This First") • When using a zoom lens, turn the zoom...
..., bracket, white balance bracket) • Adjusting the exposure (page 65) • Locking the exposure (page 67) • Focusing manually (page 71) Shooting • Holding the camera (t step 5 in "Read This First", page 14) • Look into the viewfinder (t step 5 in "Read This First") • When using a zoom lens, turn the zoom...
User Manual
Page 31
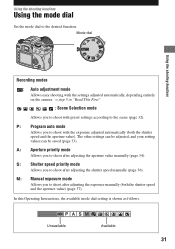
... scene (page 32). M: Manual exposure mode Allows you to shoot with preset settings according to shoot with the settings adjusted automatically, depending entirely on the camera. P: Program auto mode Allows you to the desired function. The other settings can be adjusted, and your setting values can be saved (page 33). Unavailable...
... scene (page 32). M: Manual exposure mode Allows you to shoot with preset settings according to shoot with the settings adjusted automatically, depending entirely on the camera. P: Program auto mode Allows you to the desired function. The other settings can be adjusted, and your setting values can be saved (page 33). Unavailable...
User Manual
Page 32
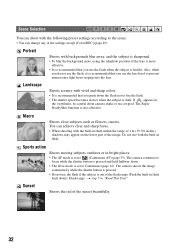
...Shoots moving subjects outdoors or in bright places. • The AF mode is set to prevent unnecessary light from seeping into the lens. The camera shoots the image continuously while the shutter button is pressed. • Do not use the lens hood to Continuous (page 61). Portrait Shoots with...• The shutter speed becomes slower when the subject is dark. If appears in the viewfinder, be careful about camera shake or use with the built-in flash. The camera continues to focus while the shutter button is pressed and held halfway down the flash not to (Continuous AF) (page...
...Shoots moving subjects outdoors or in bright places. • The AF mode is set to prevent unnecessary light from seeping into the lens. The camera shoots the image continuously while the shutter button is pressed. • Do not use the lens hood to Continuous (page 61). Portrait Shoots with...• The shutter speed becomes slower when the subject is dark. If appears in the viewfinder, be careful about camera shake or use with the built-in flash. The camera continues to focus while the shutter button is pressed and held halfway down the flash not to (Continuous AF) (page...


