
Instruction Manual
Page 1
Additional information on a computer Printing images Printed using VOC (Volatile Organic Compound)-free vegetable oil based ink. Digital Single Lens Reflex Camera Instruction Manual DSLR-A230 Preparing the camera Before your operation Shooting images Using the shooting function Using the viewing function Changing your setup Viewing images on this product and answers to frequently asked questions can be found at our Customer Support Website.
Additional information on a computer Printing images Printed using VOC (Volatile Organic Compound)-free vegetable oil based ink. Digital Single Lens Reflex Camera Instruction Manual DSLR-A230 Preparing the camera Before your operation Shooting images Using the shooting function Using the viewing function Changing your setup Viewing images on this product and answers to frequently asked questions can be found at our Customer Support Website.

Instruction Manual
Page 3
... with Part 15 of Conformity Trade Name: SONY Model No.: DSLR-A230 Responsible Party: Sony Electronics Inc. If some trouble occurs while using the battery charger, immediately shut off the power by disconnecting the plug from the AC power source (mains) as long as it is an internationally recognized safety organization. This product has received UL Listing. For Customers in the U.S.A. UL is connected to...
... with Part 15 of Conformity Trade Name: SONY Model No.: DSLR-A230 Responsible Party: Sony Electronics Inc. If some trouble occurs while using the battery charger, immediately shut off the power by disconnecting the plug from the AC power source (mains) as long as it is an internationally recognized safety organization. This product has received UL Listing. For Customers in the U.S.A. UL is connected to...

Instruction Manual
Page 8
... a lens 18 Inserting a memory card 20 Preparing the camera 23 Using the accessories supplied 25 Checking the number of recordable images 27 Cleaning 29 Identifying parts and screen indicators 32 Front side 32 Rear side 33 Sides/Bottom 34 Switching the recording information display (DISP 35 LCD monitor (Graphic Display 36 LCD monitor (Standard Display 38 Viewfinder 40 Selecting a function/setting 41 The functions selected by the Control button 42 The functions selected by the Fn (Function) button...
... a lens 18 Inserting a memory card 20 Preparing the camera 23 Using the accessories supplied 25 Checking the number of recordable images 27 Cleaning 29 Identifying parts and screen indicators 32 Front side 32 Rear side 33 Sides/Bottom 34 Switching the recording information display (DISP 35 LCD monitor (Graphic Display 36 LCD monitor (Standard Display 38 Viewfinder 40 Selecting a function/setting 41 The functions selected by the Control button 42 The functions selected by the Fn (Function) button...

Instruction Manual
Page 10
... 89 Using the self-timer 90 Shooting images with the exposure shifted (Exposure bracket 91 Shooting with the Remote Commander 93 Using the viewing Playing back images 94 function Checking the information of recorded images 98 Protecting images (Protect 101 Deleting images (Delete 102 Viewing images on a TV screen 104 Changing your setup Setting image size and image quality 108 Setting the method for recording on a memory card ..... 110 Changing the noise reduction setting 112 Changing the functions of the control dial 113 Changing other settings 114 Setting the LCD...
... 89 Using the self-timer 90 Shooting images with the exposure shifted (Exposure bracket 91 Shooting with the Remote Commander 93 Using the viewing Playing back images 94 function Checking the information of recorded images 98 Protecting images (Protect 101 Deleting images (Delete 102 Viewing images on a TV screen 104 Changing your setup Setting image size and image quality 108 Setting the method for recording on a memory card ..... 110 Changing the noise reduction setting 112 Changing the functions of the control dial 113 Changing other settings 114 Setting the LCD...
Instruction Manual
Page 60
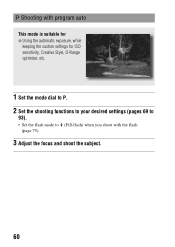
Shooting with program auto This mode is suitable for z Using the automatic exposure, while keeping the custom settings for ISO sensitivity, Creative Style, D-Range optimizer, etc. 1 Set the mode dial to P. 2 Set the shooting functions to your desired settings (pages 69 to 93). • Set the flash mode to (Fill-flash) when you shoot with the flash (page 75). 3 Adjust the focus and shoot the subject. 60
Shooting with program auto This mode is suitable for z Using the automatic exposure, while keeping the custom settings for ISO sensitivity, Creative Style, D-Range optimizer, etc. 1 Set the mode dial to P. 2 Set the shooting functions to your desired settings (pages 69 to 93). • Set the flash mode to (Fill-flash) when you shoot with the flash (page 75). 3 Adjust the focus and shoot the subject. 60
Instruction Manual
Page 80
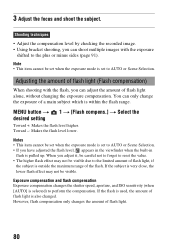
.... Exposure compensation and flash compensation Exposure compensation changes the shutter speed, aperture, and ISO sensitivity (when [AUTO] is set when the exposure mode is selected) to reset the value. • The higher flash effect may not be visible. When you have adjusted the flash level, appears in the viewfinder when the built-in flash is very close, the lower flash effect may not be set to the limited amount of flash light, if...
.... Exposure compensation and flash compensation Exposure compensation changes the shutter speed, aperture, and ISO sensitivity (when [AUTO] is set when the exposure mode is selected) to reset the value. • The higher flash effect may not be visible. When you have adjusted the flash level, appears in the viewfinder when the built-in flash is very close, the lower flash effect may not be set to the limited amount of flash light, if...
Instruction Manual
Page 90
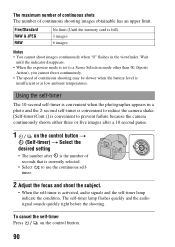
... in the viewfinder. The self-timer lamp flashes quickly and the audio signal sounds quickly right before the shooting. The maximum number of continuous shots The number of seconds that is currently selected. • Select to use the continuous selftimer. 2 Adjust the focus and shoot the subject. • When the self-timer is activated, audio signals and the self-timer lamp indicate the condition. Fine/Standard RAW & JPEG RAW No limit (Until the memory card is...
... in the viewfinder. The self-timer lamp flashes quickly and the audio signal sounds quickly right before the shooting. The maximum number of continuous shots The number of seconds that is currently selected. • Select to use the continuous selftimer. 2 Adjust the focus and shoot the subject. • When the self-timer is activated, audio signals and the self-timer lamp indicate the condition. Fine/Standard RAW & JPEG RAW No limit (Until the memory card is...
Instruction Manual
Page 91
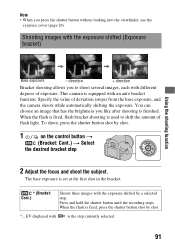
... brightness you like after shooting is set at the first shot in the bracket. * (Bracket: Cont.) Shoots three images with the exposure shifted by a selected step. To shoot, press the shutter button shot by shot. * _ EV displayed with is equipped with an auto bracket function. When the flash is fired, press the shutter button shot by shot. 1 on the control button t (Bracket: Cont.) t Select the desired bracket step 2 Adjust the focus and shoot the subject. This camera is the step...
... brightness you like after shooting is set at the first shot in the bracket. * (Bracket: Cont.) Shoots three images with the exposure shifted by a selected step. To shoot, press the shutter button shot by shot. * _ EV displayed with is equipped with an auto bracket function. When the flash is fired, press the shutter button shot by shot. 1 on the control button t (Bracket: Cont.) t Select the desired bracket step 2 Adjust the focus and shoot the subject. This camera is the step...

Instruction Manual
Page 113
Changing the functions of the control dial Changing the function of the control dial When the recording mode is convenient if you can set the camera so that the adjustable item (the shutter speed or the aperture value) can be selected using only the control dial. MENU button t 1 t [Ctrl dial setup] t Select the desired setting 113 Changing your setup It is M (Manual exposure), you select the most commonly-used item when adjusting the exposure.
Changing the functions of the control dial Changing the function of the control dial When the recording mode is convenient if you can set the camera so that the adjustable item (the shutter speed or the aperture value) can be selected using only the control dial. MENU button t 1 t [Ctrl dial setup] t Select the desired setting 113 Changing your setup It is M (Manual exposure), you select the most commonly-used item when adjusting the exposure.

Instruction Manual
Page 114
MENU button t 1 t [Display Color] t Select the desired setting Removing the Help Guide from [Black], [White], [Brown], or [Pink]. MENU button t 1 t [Help Guide disp.] t [Off] Setting the time to turn off Selects the sound produced when the shutter is locked, during self-timer countdown, etc. MENU button t 1 t [Power save] t Select the desired time Note • Regardless of the LCD monitor from the screen You can set to the power save ). Pressing the shutter button halfway down returns the camera to perform the next operation quickly. This is...
MENU button t 1 t [Display Color] t Select the desired setting Removing the Help Guide from [Black], [White], [Brown], or [Pink]. MENU button t 1 t [Help Guide disp.] t [Off] Setting the time to turn off Selects the sound produced when the shutter is locked, during self-timer countdown, etc. MENU button t 1 t [Power save] t Select the desired time Note • Regardless of the LCD monitor from the screen You can set to the power save ). Pressing the shutter button halfway down returns the camera to perform the next operation quickly. This is...
Instruction Manual
Page 119
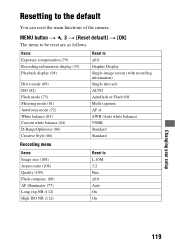
...) Flash mode (75) Metering mode (81) Autofocus mode (72) White balance (83) Custom white balance (84) D-RangeOptimizer (86) Creative Style (86) Recording menu Reset to L:10M 3:2 Fine ±0.0 Auto On On Changing your setup 119 AUTO Autoflash or Flash Off Multi segment AF-A AWB (Auto white balance) 5500K Standard Standard Items Image size (108) Aspect ratio (108) Quality (109) Flash compens. (80) AF illuminator (77) Long exp.NR (112) High ISO NR (112) Reset to ±0.0 Graphic Display Single-image screen (with recording...
...) Flash mode (75) Metering mode (81) Autofocus mode (72) White balance (83) Custom white balance (84) D-RangeOptimizer (86) Creative Style (86) Recording menu Reset to L:10M 3:2 Fine ±0.0 Auto On On Changing your setup 119 AUTO Autoflash or Flash Off Multi segment AF-A AWB (Auto white balance) 5500K Standard Standard Items Image size (108) Aspect ratio (108) Quality (109) Flash compens. (80) AF illuminator (77) Long exp.NR (112) High ISO NR (112) Reset to ±0.0 Graphic Display Single-image screen (with recording...

Instruction Manual
Page 121
...; Connecting your camera using a USB cable. x Windows OS (pre-installed): Microsoft Windows 2000 Professional SP4/ Windows XP*1 SP3/Windows Vista*2 SP1 • Operation is not assured in an environment based on an upgrade of USB devices you are using. • Operations are not supported. *2 Starter (Edition) is recommended for all the recommended computer environments mentioned above or in a memory card to a computer connected using a USB interface that is compatible with Hi-Speed USB (USB 2.0 compliant...
...; Connecting your camera using a USB cable. x Windows OS (pre-installed): Microsoft Windows 2000 Professional SP4/ Windows XP*1 SP3/Windows Vista*2 SP1 • Operation is not assured in an environment based on an upgrade of USB devices you are using. • Operations are not supported. *2 Starter (Edition) is recommended for all the recommended computer environments mentioned above or in a memory card to a computer connected using a USB interface that is compatible with Hi-Speed USB (USB 2.0 compliant...
Instruction Manual
Page 131
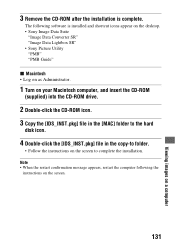
... instructions on the screen. 131 Viewing images on the screen to folder. • Follow the instructions on a computer Note • When the restart confirmation message appears, restart the computer following software is complete. 3 Remove the CD-ROM after the installation is installed and shortcut icons appear on the desktop. • Sony Image Data Suite "Image Data Converter SR" "Image Data Lightbox SR" • Sony Picture Utility "PMB" "PMB Guide" x Macintosh • Log on as Administrator. 1 Turn...
... instructions on the screen. 131 Viewing images on the screen to folder. • Follow the instructions on a computer Note • When the restart confirmation message appears, restart the computer following software is complete. 3 Remove the CD-ROM after the installation is installed and shortcut icons appear on the desktop. • Sony Image Data Suite "Image Data Converter SR" "Image Data Lightbox SR" • Sony Picture Utility "PMB" "PMB Guide" x Macintosh • Log on as Administrator. 1 Turn...

Instruction Manual
Page 147
... the red eye reduction function (page 77). • Get close to appear too dark (insufficient light). The image is too bright or too dark, it off and try shooting again. • In the following cases, the image may cause the periphery of the image to the subject, and shoot the subject within the flash range using the flash (page 77). Adjust the setting again. Attach a lens...
... the red eye reduction function (page 77). • Get close to appear too dark (insufficient light). The image is too bright or too dark, it off and try shooting again. • In the following cases, the image may cause the periphery of the image to the subject, and shoot the subject within the flash range using the flash (page 77). Adjust the setting again. Attach a lens...
Instruction Manual
Page 148
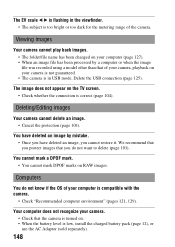
Delete the USB connection (page 125). Computers You do not want to delete (page 101). Viewing images Your camera cannot play back images. • The folder/file name has been changed on your computer (page 127). • When an image file has been processed by mistake. • Once you have deleted an image by a computer or when the image file was recorded using a model other than that the camera is turned on RAW images. We...
Delete the USB connection (page 125). Computers You do not want to delete (page 101). Viewing images Your camera cannot play back images. • The folder/file name has been changed on your computer (page 127). • When an image file has been processed by mistake. • Once you have deleted an image by a computer or when the image file was recorded using a model other than that the camera is turned on RAW images. We...

Instruction Manual
Page 152
... it to flash, consult your Sony dealer or local authorized Sony service facility. If this corrective procedure. Others The lens gets fogged. • Moisture condensation has occurred. If the camera is reset without the resetting operation. • The battery pack was removed when the power switch was set the date again (pages 23, 156). If the camera does not work . Turn off the indication, format the memory card. 152 The message "Set date and time?" You...
... it to flash, consult your Sony dealer or local authorized Sony service facility. If this corrective procedure. Others The lens gets fogged. • Moisture condensation has occurred. If the camera is reset without the resetting operation. • The battery pack was removed when the power switch was set the date again (pages 23, 156). If the camera does not work . Turn off the indication, format the memory card. 152 The message "Set date and time?" You...

Instruction Manual
Page 153
... message still appears, change the type of time that the shutter was open. Reinsert SD memory card. • The inserted memory card cannot be done for a long time, charge the internal rechargeable battery (pages 23, 156). Insert a memory card, or change the memory card. Incompatible battery. Use correct model. • An incompatible battery pack is insufficient. Power insufficient • You tried to use "Memory Stick." Unable to perform [Cleaning mode] when the battery level is being used in the memory card is locked. No "Memory...
... message still appears, change the type of time that the shutter was open. Reinsert SD memory card. • The inserted memory card cannot be done for a long time, charge the internal rechargeable battery (pages 23, 156). Insert a memory card, or change the memory card. Incompatible battery. Use correct model. • An incompatible battery pack is insufficient. Power insufficient • You tried to use "Memory Stick." Unable to perform [Cleaning mode] when the battery level is being used in the memory card is locked. No "Memory...
Quick Setup Guide
Page 1
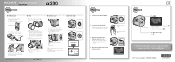
... part When inserting a memory card, turn the camera off . Date/time setup 1 Turn the camera on the control button. Hold the grip of the lens. For customers in the U.S.A. The memory card 1 Open the memory card cover. 2 Insert a memory card and select the type of the viewfinder is not achieved. 3 Press the shutter button halfway down to focus. Pressing the shutter button halfway down to shoot. To return to the shooting mode: To delete the image Press . Quick Start Guide DSLR-A230 Preparation The battery pack 1 Charge the battery...
... part When inserting a memory card, turn the camera off . Date/time setup 1 Turn the camera on the control button. Hold the grip of the lens. For customers in the U.S.A. The memory card 1 Open the memory card cover. 2 Insert a memory card and select the type of the viewfinder is not achieved. 3 Press the shutter button halfway down to focus. Pressing the shutter button halfway down to shoot. To return to the shooting mode: To delete the image Press . Quick Start Guide DSLR-A230 Preparation The battery pack 1 Charge the battery...
Marketing Specifications (DSLR-A230Y Kit)
Page 1
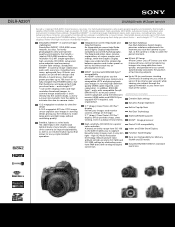
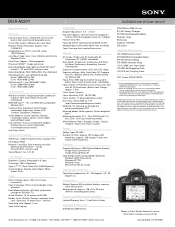
...; Sync™ compatibility An HDMI™ terminal gives you control camera playback using the television's remote (HDMI cable and BRAVIA Sync capable HDTV required, sold separately)1. 2.7" (diag.) Clear Photo LCD Plus™ display Review your images in Pop-Up Flash Anti-Dust Technology Stamina® Battery power BIONZ™ image processor High sensitivity (ISO 3200) for Memory Stick® and SD media Included SAL1855 18-55mm standard zoom lens Eye-Start Autofocus Eye-Start Autofocus System begins precision autofocus adjustments...
...; Sync™ compatibility An HDMI™ terminal gives you control camera playback using the television's remote (HDMI cable and BRAVIA Sync capable HDTV required, sold separately)1. 2.7" (diag.) Clear Photo LCD Plus™ display Review your images in Pop-Up Flash Anti-Dust Technology Stamina® Battery power BIONZ™ image processor High sensitivity (ISO 3200) for Memory Stick® and SD media Included SAL1855 18-55mm standard zoom lens Eye-Start Autofocus Eye-Start Autofocus System begins precision autofocus adjustments...
Marketing Specifications (DSLR-A230Y Kit)
Page 2
...) Modes: Auto, Fill-flash, Red-eye reduction, Rear sync, Slow sync, Hi-speed sync*., Wireless Recycling Time: Approx. 4 sec. Non-metric weights and measurements are trademarks of Sony. Reproduction in whole or in meters at ISO100 with F1.4 lens, (EV3 - 20 in spot metering mode) White Balance: Auto, Daylight, Shade, Cloudy, Tungsten, Fluorescent, Flash, Custom Power Battery Type: NP-FH50 Number of HDMI Licencing LLC. Specifications of View: 95% Focusing Screen: Spherical Acute Matte Screen Magnification: 0.83x (with 50mm lens at infinity) Type: Fixed eye-level...
...) Modes: Auto, Fill-flash, Red-eye reduction, Rear sync, Slow sync, Hi-speed sync*., Wireless Recycling Time: Approx. 4 sec. Non-metric weights and measurements are trademarks of Sony. Reproduction in whole or in meters at ISO100 with F1.4 lens, (EV3 - 20 in spot metering mode) White Balance: Auto, Daylight, Shade, Cloudy, Tungsten, Fluorescent, Flash, Custom Power Battery Type: NP-FH50 Number of HDMI Licencing LLC. Specifications of View: 95% Focusing Screen: Spherical Acute Matte Screen Magnification: 0.83x (with 50mm lens at infinity) Type: Fixed eye-level...


