
Instruction Manual
Page 2
... of in fire. • Do not handle damaged or leaking lithium ion batteries. • Be sure to charge the battery pack using a genuine Sony battery charger or a device that can burst, cause a fire or even chemical burns. DSLR-A230 Serial No WARNING To reduce fire or shock hazard, do not expose the... battery pack to any shock or force such as in direct sunlight or in a...
... of in fire. • Do not handle damaged or leaking lithium ion batteries. • Be sure to charge the battery pack using a genuine Sony battery charger or a device that can burst, cause a fire or even chemical burns. DSLR-A230 Serial No WARNING To reduce fire or shock hazard, do not expose the... battery pack to any shock or force such as in direct sunlight or in a...

Instruction Manual
Page 3
... as it is connected to the wall outlet (wall socket). Regulatory Information Declaration of Conformity Trade Name: SONY Model No.: DSLR-A230 Responsible Party: Sony Electronics Inc. Battery charger Even if the CHARGE lamp is not lit, the battery charger is not disconnected from the wall outlet (wall socket). For more information regarding recycling of rechargeable...
... as it is connected to the wall outlet (wall socket). Regulatory Information Declaration of Conformity Trade Name: SONY Model No.: DSLR-A230 Responsible Party: Sony Electronics Inc. Battery charger Even if the CHARGE lamp is not lit, the battery charger is not disconnected from the wall outlet (wall socket). For more information regarding recycling of rechargeable...

Instruction Manual
Page 5
...will help to the applicable collection point for safety, performance or data integrity reasons require a permanent connection with an incorporated battery, this battery should be replaced by qualified service staff only. The recycling of the materials will help prevent potentially negative consequences for ...for the environment and human health which could otherwise be caused by inappropriate waste handling of this product. By ensuring these batteries are disposed of correctly, you purchased the product. For all other European countries with this product shall not be treated ...
...will help to the applicable collection point for safety, performance or data integrity reasons require a permanent connection with an incorporated battery, this battery should be replaced by qualified service staff only. The recycling of the materials will help prevent potentially negative consequences for ...for the environment and human health which could otherwise be caused by inappropriate waste handling of this product. By ensuring these batteries are disposed of correctly, you purchased the product. For all other European countries with this product shall not be treated ...
Instruction Manual
Page 7
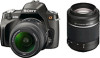
.... These points are not actual images shot using this Instruction Manual: at an ordinary ambient temperature of 25ºC (77°F), and using a fully charged battery pack. Unauthorized recording of such materials may be contrary to direct sunlight. This is defined under direct sunlight, attach the lens cap. • Images may...
.... These points are not actual images shot using this Instruction Manual: at an ordinary ambient temperature of 25ºC (77°F), and using a fully charged battery pack. Unauthorized recording of such materials may be contrary to direct sunlight. This is defined under direct sunlight, attach the lens cap. • Images may...

Instruction Manual
Page 8
Table of Contents Preparing the camera Before your operation Shooting images Notes on using your camera 7 Checking the accessories supplied 11 Preparing the battery pack 12 Attaching a lens 18 Inserting a memory card 20 Preparing the camera 23 Using the accessories supplied 25 Checking the number of recordable images 27 ...
Table of Contents Preparing the camera Before your operation Shooting images Notes on using your camera 7 Checking the accessories supplied 11 Preparing the battery pack 12 Attaching a lens 18 Inserting a memory card 20 Preparing the camera 23 Using the accessories supplied 25 Checking the number of recordable images 27 ...

Instruction Manual
Page 11
... NPFH50 (1) • Eyecup (1) (Attached on the camera) • Power cord (mains lead) (1) (not supplied in parentheses indicates the number of pieces. • BC-VH1 Battery charger (1) • Body cap (1) (Attached on the camera) • CD-ROM (Application Software for α camera) (1) • Quick Start Guide (1) • Instruction Manual (This manual) (1) &#...
... NPFH50 (1) • Eyecup (1) (Attached on the camera) • Power cord (mains lead) (1) (not supplied in parentheses indicates the number of pieces. • BC-VH1 Battery charger (1) • Body cap (1) (Attached on the camera) • CD-ROM (Application Software for α camera) (1) • Quick Start Guide (1) • Instruction Manual (This manual) (1) &#...

Instruction Manual
Page 12
Charging the battery pack The "InfoLITHIUM" battery pack can also be sure to charge the NP-FH50 "InfoLITHIUM" battery pack (supplied). Push the battery pack until it has not been fully depleted. Preparing the battery pack When using the camera for the first time, be used when it has not been fully charged. 1 Insert the battery pack on the battery charger. It can be charged even when it clicks. 12
Charging the battery pack The "InfoLITHIUM" battery pack can also be sure to charge the NP-FH50 "InfoLITHIUM" battery pack (supplied). Push the battery pack until it has not been fully depleted. Preparing the battery pack When using the camera for the first time, be used when it has not been fully charged. 1 Insert the battery pack on the battery charger. It can be charged even when it clicks. 12
Instruction Manual
Page 13
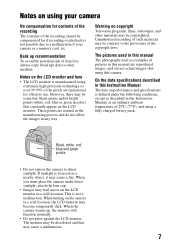
...(wall socket) Preparing the camera CHARGE lamp For customers in either way: - When the CHARGE lamp flashes • The CHARGE lamp of the supplied battery charger flashes in countries/regions other than the U.S.A. Slow flashing: Turns the light on and off repeatedly at a temperature of 25°C (77°F)... is turned off repeatedly at the interval of the battery back or charging conditions. Light on the remaining capacity of 1.5 seconds. 13 Full charge Normal charge Approx. 265 min.
...(wall socket) Preparing the camera CHARGE lamp For customers in either way: - When the CHARGE lamp flashes • The CHARGE lamp of the supplied battery charger flashes in countries/regions other than the U.S.A. Slow flashing: Turns the light on and off repeatedly at a temperature of 25°C (77°F)... is turned off repeatedly at the interval of the battery back or charging conditions. Light on the remaining capacity of 1.5 seconds. 13 Full charge Normal charge Approx. 265 min.

Instruction Manual
Page 14
...Hz. To use an electronic transformer (travel converter), as this may not be decreased. • Do not charge any battery pack other than the "InfoLITHIUM" H series battery pack in any country or region where the power supply is outside of between 10°C to 30°C (50... the CHARGE lamp flashes fast, remove the battery pack being charged, and then insert the same battery pack into the battery charger securely again. Check that a battery pack other than the specified type has been inserted. If the battery charger operates correctly, a battery error may leak, overheat, or explode if...
...Hz. To use an electronic transformer (travel converter), as this may not be decreased. • Do not charge any battery pack other than the "InfoLITHIUM" H series battery pack in any country or region where the power supply is outside of between 10°C to 30°C (50... the CHARGE lamp flashes fast, remove the battery pack being charged, and then insert the same battery pack into the battery charger securely again. Check that a battery pack other than the specified type has been inserted. If the battery charger operates correctly, a battery error may leak, overheat, or explode if...

Instruction Manual
Page 15
Be careful not to drop the battery pack. To remove the battery pack Turn off the camera and slide the lock lever in the direction of the battery. 3 Close the battery cover. Lock lever Lock lever 15 Preparing the camera Inserting the charged battery pack 1 While sliding the battery cover open lever, open the battery cover. 2 Firmly insert the battery pack all the way while pressing the lock lever with the tip of the arrow.
Be careful not to drop the battery pack. To remove the battery pack Turn off the camera and slide the lock lever in the direction of the battery. 3 Close the battery cover. Lock lever Lock lever 15 Preparing the camera Inserting the charged battery pack 1 While sliding the battery cover open lever, open the battery cover. 2 Firmly insert the battery pack all the way while pressing the lock lever with the tip of the arrow.

Instruction Manual
Page 16
...in a car or under certain circumstances. • Do not expose the battery pack to how it is used . Buy a new battery pack. • The battery life varies according to water. An "InfoLITHIUM" battery pack is an "InfoLITHIUM" battery pack? We recommend that the NP-FH30 and NP-FH40 cannot be ... your body to ON and check the level on and off frequently. Battery life • The battery life is that the battery pack can be used with your camera immediately before you start shooting. • The battery pack will run out quickly if you use continuous shooting often, or...
...in a car or under certain circumstances. • Do not expose the battery pack to how it is used . Buy a new battery pack. • The battery life varies according to water. An "InfoLITHIUM" battery pack is an "InfoLITHIUM" battery pack? We recommend that the NP-FH30 and NP-FH40 cannot be ... your body to ON and check the level on and off frequently. Battery life • The battery life is that the battery pack can be used with your camera immediately before you start shooting. • The battery pack will run out quickly if you use continuous shooting often, or...

Instruction Manual
Page 17
Preparing the camera How to store the battery pack If the battery pack is not to be used for a long time, fully charge it and then fully use it up once a year on your camera before storing the battery pack in a dry, cool place to prolong the battery life. 17
Preparing the camera How to store the battery pack If the battery pack is not to be used for a long time, fully charge it and then fully use it up once a year on your camera before storing the battery pack in a dry, cool place to prolong the battery life. 17
Instruction Manual
Page 21
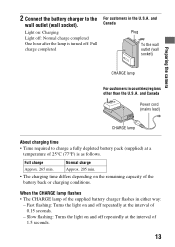
... be corrupted. • Data may be hot just after it . • When the access lamp is lit, do not remove the memory card or the battery pack, or turn off the power. Locations exposed to the LOCK position, you handle it has been used for a long time. To remove the memory...
... be corrupted. • Data may be hot just after it . • When the access lamp is lit, do not remove the memory card or the battery pack, or turn off the power. Locations exposed to the LOCK position, you handle it has been used for a long time. To remove the memory...

Instruction Manual
Page 25
Eyepiece cover 25 and Canada) (page 12) • USB cable (pages 122, 138) • CD-ROM (page 130) Attaching the shoulder strap Attach both ends of the strap onto the camera. • You can also attach the eyepiece cover (page 26) on the strap. Preparing the camera Using the accessories supplied This section describes how to use the shoulder strap, the eyepiece cover, and eyecup. The other accessories are described in the following pages. • Rechargeable battery pack (page 12) • Battery charger (page 12) • Power cord (mains lead) (not supplied in the U.S.A.
Eyepiece cover 25 and Canada) (page 12) • USB cable (pages 122, 138) • CD-ROM (page 130) Attaching the shoulder strap Attach both ends of the strap onto the camera. • You can also attach the eyepiece cover (page 26) on the strap. Preparing the camera Using the accessories supplied This section describes how to use the shoulder strap, the eyepiece cover, and eyecup. The other accessories are described in the following pages. • Rechargeable battery pack (page 12) • Battery charger (page 12) • Power cord (mains lead) (not supplied in the U.S.A.

Instruction Manual
Page 28
... & Imaging Products Association) 28 Note that the actual numbers may be recorded is set to [16:9], you use . • The number is calculated with the battery pack (supplied) at full capacity and in the table above. The flash strobes once every two times. - At an ambient temperature of 25°C (77... AF). - The power turns on and off once every ten times. • The measurement method is based on the conditions of use the camera with a battery pack at full capacity. However, if it is set to [RAW], the number is set to [Fine]. - [Autofocus mode] is 510 when you can ...
... & Imaging Products Association) 28 Note that the actual numbers may be recorded is set to [16:9], you use . • The number is calculated with the battery pack (supplied) at full capacity and in the table above. The flash strobes once every two times. - At an ambient temperature of 25°C (77... AF). - The power turns on and off once every ten times. • The measurement method is based on the conditions of use the camera with a battery pack at full capacity. However, if it is set to [RAW], the number is set to [Fine]. - [Autofocus mode] is 510 when you can ...

Instruction Manual
Page 30
Cleaning the image sensor If dust or debris enters the camera and lands on the image sensor (the part that the battery is (three remaining battery icons) or more. MENU button 3 Select [Cleaning mode] with v on the control button. You can be completed quickly. Notes • ... use a commercially available blower and clean the image sensor following the steps below. Continue?" Low battery power during cleaning can cause damage to the shutter. The cleaning should be performed only when the battery level is fully charged (page 16). 2 Press the MENU button, then select 3 with b/B...
Cleaning the image sensor If dust or debris enters the camera and lands on the image sensor (the part that the battery is (three remaining battery icons) or more. MENU button 3 Select [Cleaning mode] with v on the control button. You can be completed quickly. Notes • ... use a commercially available blower and clean the image sensor following the steps below. Continue?" Low battery power during cleaning can cause damage to the shutter. The cleaning should be performed only when the battery level is fully charged (page 16). 2 Press the MENU button, then select 3 with b/B...

Instruction Manual
Page 31
... tip of a blower into the cavity beyond the mount. 7 Attach the lens and turn the camera off . Note • The camera starts beeping if the battery pack becomes low during cleaning. Stop cleaning immediately and turn the camera off . 31 Preparing the camera 5 Detach the lens (page 19). 6 Use the blower...
... tip of a blower into the cavity beyond the mount. 7 Attach the lens and turn the camera off . Note • The camera starts beeping if the battery pack becomes low during cleaning. Stop cleaning immediately and turn the camera off . 31 Preparing the camera 5 Detach the lens (page 19). 6 Use the blower...

Instruction Manual
Page 34
J Battery cover (15) K Tripod receptacle • Use a tripod with a screw length of the AC Adaptor to the DC IN terminal on the camera. You will be ...
J Battery cover (15) K Tripod receptacle • Use a tripod with a screw length of the AC Adaptor to the DC IN terminal on the camera. You will be ...

Instruction Manual
Page 37
D Display Indication Remaining battery (16) Image quality (109) Image size (108)/Aspect ratio (108) Memory card (20) 100 Remaining number of recordable images (27) Before your operation 37
D Display Indication Remaining battery (16) Image quality (109) Image size (108)/Aspect ratio (108) Memory card (20) 100 Remaining number of recordable images (27) Before your operation 37

Instruction Manual
Page 39
C Display Indication Remaining battery (16) Image quality (109) Image size (108)/Aspect ratio (108) Memory card (20) 100 Remaining number of recordable images (27) Before your operation 39
C Display Indication Remaining battery (16) Image quality (109) Image size (108)/Aspect ratio (108) Memory card (20) 100 Remaining number of recordable images (27) Before your operation 39


