
Instruction Manual
Page 1
Additional information on a computer Printing images Digital Single Lens Reflex Camera Instruction Manual DSLR-A230 Preparing the camera Before your operation Shooting images Using the shooting function Using the viewing function Changing your setup Viewing images on this product and answers to frequently asked questions can be found at our Customer Support Website. Printed using VOC (Volatile Organic Compound)-free vegetable oil based ink.
Additional information on a computer Printing images Digital Single Lens Reflex Camera Instruction Manual DSLR-A230 Preparing the camera Before your operation Shooting images Using the shooting function Using the viewing function Changing your setup Viewing images on this product and answers to frequently asked questions can be found at our Customer Support Website. Printed using VOC (Volatile Organic Compound)-free vegetable oil based ink.
Instruction Manual
Page 7
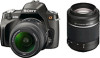
... To avoid the potential risk of the pixels are normal in the manufacturing process and do not affect the images in this manual are reproduced images, and are not actual images shot using this Instruction Manual The data on performance and specifications is defined under direct sunlight, attach the lens... cap. • Images may become temporarily dark. Notes on the LCD monitor and lens • The LCD monitor is not possible due to a malfunction of ...
... To avoid the potential risk of the pixels are normal in the manufacturing process and do not affect the images in this manual are reproduced images, and are not actual images shot using this Instruction Manual The data on performance and specifications is defined under direct sunlight, attach the lens... cap. • Images may become temporarily dark. Notes on the LCD monitor and lens • The LCD monitor is not possible due to a malfunction of ...

Instruction Manual
Page 8
...12 Attaching a lens 18 Inserting a memory card 20 Preparing the camera 23 Using the accessories supplied 25 Checking the number of recordable images 27 Cleaning 29 Identifying parts and screen indicators 32 Front side 32 Rear side 33 Sides/Bottom 34 Switching the recording information display ...the Control button 42 The functions selected by the Fn (Function) button ... 43 The functions selected by the MENU button 43 Shooting an image without camera shake 45 Correct posture 45 Using the SteadyShot function 46 Using a tripod 47 / Shooting with the automatic setting 48 Shooting ...
...12 Attaching a lens 18 Inserting a memory card 20 Preparing the camera 23 Using the accessories supplied 25 Checking the number of recordable images 27 Cleaning 29 Identifying parts and screen indicators 32 Front side 32 Rear side 33 Sides/Bottom 34 Switching the recording information display ...the Control button 42 The functions selected by the Fn (Function) button ... 43 The functions selected by the MENU button 43 Shooting an image without camera shake 45 Correct posture 45 Using the SteadyShot function 46 Using a tripod 47 / Shooting with the automatic setting 48 Shooting ...

Instruction Manual
Page 9
Shooting an image the way you want it (Exposure mode 58 Shooting with program auto 60 Shooting by controlling the blur of the background (Aperture priority 61 Shooting a ... the focus manually (Manual focus 74 Using the flash 75 Performing wireless flash shooting 78 Adjusting the brightness of the image (Exposure, Flash compensation, Metering 79 Using brightness compensation for the entire image (Exposure compensation 79 Adjusting the amount of flash light (Flash compensation) 80 Selecting the method for measuring the brightness...
Shooting an image the way you want it (Exposure mode 58 Shooting with program auto 60 Shooting by controlling the blur of the background (Aperture priority 61 Shooting a ... the focus manually (Manual focus 74 Using the flash 75 Performing wireless flash shooting 78 Adjusting the brightness of the image (Exposure, Flash compensation, Metering 79 Using brightness compensation for the entire image (Exposure compensation 79 Adjusting the amount of flash light (Flash compensation) 80 Selecting the method for measuring the brightness...

Instruction Manual
Page 10
... Commander 93 Using the viewing Playing back images 94 function Checking the information of recorded images 98 Protecting images (Protect 101 Deleting images (Delete 102 Viewing images on a TV screen 104 Changing your setup Setting image size and image quality 108 Setting the method for recording ...the camera 118 Resetting to the default 119 Viewing images Copying images to your computer 121 on a computer Viewing images on your computer 125 Using the software 129 Printing images Specifying DPOF 135 Printing images by connecting the camera to a PictBridge compliant printer...
... Commander 93 Using the viewing Playing back images 94 function Checking the information of recorded images 98 Protecting images (Protect 101 Deleting images (Delete 102 Viewing images on a TV screen 104 Changing your setup Setting image size and image quality 108 Setting the method for recording ...the camera 118 Resetting to the default 119 Viewing images Copying images to your computer 121 on a computer Viewing images on your computer 125 Using the software 129 Printing images Specifying DPOF 135 Printing images by connecting the camera to a PictBridge compliant printer...

Instruction Manual
Page 19
.... Setup menu 19 However, quickly change the lens away from landing on the image sensor Clean the image sensor using [Cleaning mode] in and turn the lens counterclockwise until it may appear on the image, depending on the shooting environment. The camera is equipped with an anti-dust function to the camera. •... button Note on changing the lens When changing the lens, if dust or debris gets inside the camera and lands on the surface of the image sensor (the part that acts as the film), it stops. 2 Replace the packaging lid on the lens and attach the body cap to prevent dust...
.... Setup menu 19 However, quickly change the lens away from landing on the image sensor Clean the image sensor using [Cleaning mode] in and turn the lens counterclockwise until it may appear on the image, depending on the shooting environment. The camera is equipped with an anti-dust function to the camera. •... button Note on changing the lens When changing the lens, if dust or debris gets inside the camera and lands on the surface of the image sensor (the part that acts as the film), it stops. 2 Replace the packaging lid on the lens and attach the body cap to prevent dust...
Instruction Manual
Page 21
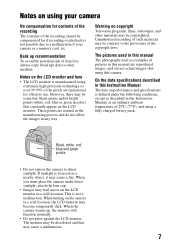
... the memory card near stronglymagnetized material or use or store the memory card under the following conditions: - High temperature locations such as recording or deleting images. 21 Locations exposed to the LOCK position, you carry or store the memory card, put it has been used for a long time. Access lamp Notes...
... the memory card near stronglymagnetized material or use or store the memory card under the following conditions: - High temperature locations such as recording or deleting images. 21 Locations exposed to the LOCK position, you carry or store the memory card, put it has been used for a long time. Access lamp Notes...

Instruction Manual
Page 27
... the camera Checking the number of recordable images Once you continue to ON, the number of images that can be recorded (should you insert a memory card into the camera and set the power switch to shoot using Sony standard memory cards for testing. Image size: L 10M Aspect ratio: 3:2* ..."Memory Stick PRO Duo" media (Units: Images) Size Capacity 1GB 2GB 4GB 8GB 16GB Standard 320 647 1281 2575 5221 Fine 237...
... the camera Checking the number of recordable images Once you continue to ON, the number of images that can be recorded (should you insert a memory card into the camera and set the power switch to shoot using Sony standard memory cards for testing. Image size: L 10M Aspect ratio: 3:2* ..."Memory Stick PRO Duo" media (Units: Images) Size Capacity 1GB 2GB 4GB 8GB 16GB Standard 320 647 1281 2575 5221 Fine 237...

Instruction Manual
Page 28
...and in the table above. Note that the actual numbers may be recorded is 510 when you can record more images than those indicated depending on the CIPA standard. (CIPA: Camera & Imaging Products Association) 28 The power turns on and off once every ten times. • The measurement method is... on the conditions of the [3:2] aspect ratio. Shooting once every 30 seconds. - The flash strobes once every two times. - The number of images that can be recorded using a battery pack The approximate number of images that of use the camera with a battery pack at full capacity.
...and in the table above. Note that the actual numbers may be recorded is 510 when you can record more images than those indicated depending on the CIPA standard. (CIPA: Camera & Imaging Products Association) 28 The power turns on and off once every ten times. • The measurement method is... on the conditions of the [3:2] aspect ratio. Shooting once every 30 seconds. - The flash strobes once every two times. - The number of images that can be recorded using a battery pack The approximate number of images that of use the camera with a battery pack at full capacity.

Instruction Manual
Page 29
... with rubber or vinyl for a long time. 29 In case of the camera, such as thinner, or benzine. If dust lands on the image sensor, it may appear on the mirror or around the mirror may cause a malfunction. • Do not use a cleaning solution containing organic solvents..., such as lens contacts, or the mirror. Since dust on the photo image. Preparing the camera Cleaning Cleaning the LCD monitor Wipe the screen surface with a commercially available LCD cleaning kit to the surface, wipe it off with...
... with rubber or vinyl for a long time. 29 In case of the camera, such as thinner, or benzine. If dust lands on the image sensor, it may appear on the mirror or around the mirror may cause a malfunction. • Do not use a cleaning solution containing organic solvents..., such as lens contacts, or the mirror. Since dust on the photo image. Preparing the camera Cleaning Cleaning the LCD monitor Wipe the screen surface with a commercially available LCD cleaning kit to the surface, wipe it off with...

Instruction Manual
Page 30
...time, the mirror in front is recommended. • Do not use a commercially available blower and clean the image sensor following the steps below. Continue?" If there is dust on the image sensor, use a spray blower because it may scatter water droplets inside the camera body. 1 Confirm that ...the shooting environment. You can be completed quickly. The message "After cleaning, turn camera off. Notes • Cleaning can easily clean the image sensor using only the blower and the anti-dust function. The use of the control button. MENU button 3 Select [Cleaning mode] with...
...time, the mirror in front is recommended. • Do not use a commercially available blower and clean the image sensor following the steps below. Continue?" If there is dust on the image sensor, use a spray blower because it may scatter water droplets inside the camera body. 1 Confirm that ...the shooting environment. You can be completed quickly. The message "After cleaning, turn camera off. Notes • Cleaning can easily clean the image sensor using only the blower and the anti-dust function. The use of the control button. MENU button 3 Select [Cleaning mode] with...

Instruction Manual
Page 31
... and turn the camera off . 31 Complete the cleaning quickly. • Hold the camera's face downward to clean the image sensor surface and the surrounding area. • Do not touch the image sensor with the tip of a blower into the cavity beyond the mount. 7 Attach the lens and turn the camera off... . Preparing the camera 5 Detach the lens (page 19). 6 Use the blower to prevent the dust from resettling in the camera. • When cleaning the image sensor, do not put the tip of the blower.
... and turn the camera off . 31 Complete the cleaning quickly. • Hold the camera's face downward to clean the image sensor surface and the surrounding area. • Do not touch the image sensor with the tip of a blower into the cavity beyond the mount. 7 Attach the lens and turn the camera off... . Preparing the camera 5 Detach the lens (page 19). 6 Use the blower to prevent the dust from resettling in the camera. • When cleaning the image sensor, do not put the tip of the blower.

Instruction Manual
Page 32
Before your operation Identifying parts and screen indicators See the pages in flash* (75) J Image sensor position mark (71) K Mode dial (48 - 68) L Lens release button (19) 32 M Focus mode switch (69, 74) * Do not directly touch these parts. Front side A Shutter button (48) B Power switch (23) C Control dial (62, 113) D Self-timer lamp (90) E Lens contacts* F Remote sensor G Mirror* H Mount I Built-in parentheses for details of operation.
Before your operation Identifying parts and screen indicators See the pages in flash* (75) J Image sensor position mark (71) K Mode dial (48 - 68) L Lens release button (19) 32 M Focus mode switch (69, 74) * Do not directly touch these parts. Front side A Shutter button (48) B Power switch (23) C Control dial (62, 113) D Self-timer lamp (90) E Lens contacts* F Remote sensor G Mirror* H Mount I Built-in parentheses for details of operation.

Instruction Manual
Page 37
D Display Indication Remaining battery (16) Image quality (109) Image size (108)/Aspect ratio (108) Memory card (20) 100 Remaining number of recordable images (27) Before your operation 37
D Display Indication Remaining battery (16) Image quality (109) Image size (108)/Aspect ratio (108) Memory card (20) 100 Remaining number of recordable images (27) Before your operation 37

Instruction Manual
Page 39
C Display Indication Remaining battery (16) Image quality (109) Image size (108)/Aspect ratio (108) Memory card (20) 100 Remaining number of recordable images (27) Before your operation 39
C Display Indication Remaining battery (16) Image quality (109) Image size (108)/Aspect ratio (108) Memory card (20) 100 Remaining number of recordable images (27) Before your operation 39

Instruction Manual
Page 43
Recording menu Image size (108) Aspect ratio (108) 1 Quality (109) Flash compens. (80) AF illuminator (77) SteadyShot (46) Color Space (88) Long exp.NR (112) 2 High ISO NR (... (117) 43 Shooting mode Autofocus mode (72) Metering mode (81) White balance (83) AF area (73) D-RangeOptimizer (86) Creative Style (86) Viewing mode Delete (102) Image Index (96) Specify Printing (135) Slide show (97) Protect (101) Rotate (95) The functions selected by the Fn (Function) button This button calls up the...
Recording menu Image size (108) Aspect ratio (108) 1 Quality (109) Flash compens. (80) AF illuminator (77) SteadyShot (46) Color Space (88) Long exp.NR (112) 2 High ISO NR (... (117) 43 Shooting mode Autofocus mode (72) Metering mode (81) White balance (83) AF area (73) D-RangeOptimizer (86) Creative Style (86) Viewing mode Delete (102) Image Index (96) Specify Printing (135) Slide show (97) Protect (101) Rotate (95) The functions selected by the Fn (Function) button This button calls up the...

Instruction Manual
Page 45
... that keeps the camera from moving. Point 3 Lightly tuck your elbows against your knee. 45 When shooting in a blurred image. To reduce camera shake, follow the instructions below. Shooting images Shooting images Shooting an image without camera shake "Camera shake" refers to unwanted movement of the camera, and the other hand supports the lens.
... that keeps the camera from moving. Point 3 Lightly tuck your elbows against your knee. 45 When shooting in a blurred image. To reduce camera shake, follow the instructions below. Shooting images Shooting images Shooting an image without camera shake "Camera shake" refers to unwanted movement of the camera, and the other hand supports the lens.

Instruction Manual
Page 47
Shooting images Using a tripod In the following cases, we recommend that you mount the camera on a tripod. • Shooting without a flash under dark conditions. • Shooting with slow shutter speeds, which are typically used in night-time shooting. • Shooting a close subject, such as in macro shooting. • Shooting with a telescopic lens. Note • When using a tripod, deactivate the SteadyShot function because there is a potential for malfunction of the SteadyShot function (page 46). 47
Shooting images Using a tripod In the following cases, we recommend that you mount the camera on a tripod. • Shooting without a flash under dark conditions. • Shooting with slow shutter speeds, which are typically used in night-time shooting. • Shooting a close subject, such as in macro shooting. • Shooting with a telescopic lens. Note • When using a tripod, deactivate the SteadyShot function because there is a potential for malfunction of the SteadyShot function (page 46). 47

Instruction Manual
Page 49
Focus indicator (SteadyShot scale) indicator 49 When the focus is confirmed, z or (Focus indicator) lights up (page 70). Zoom ring Shooting images 6 Press the shutter button fully down to shoot. • Pressing the shutter button after the (SteadyShot scale) indicator becomes low makes the SteadyShot function more effective. 4 When using a zoom lens, turn the zoom ring, then decide on your shot. 5 Press the shutter button halfway down to focus.
Focus indicator (SteadyShot scale) indicator 49 When the focus is confirmed, z or (Focus indicator) lights up (page 70). Zoom ring Shooting images 6 Press the shutter button fully down to shoot. • Pressing the shutter button after the (SteadyShot scale) indicator becomes low makes the SteadyShot function more effective. 4 When using a zoom lens, turn the zoom ring, then decide on your shot. 5 Press the shutter button halfway down to focus.

Instruction Manual
Page 51
... on the screen (Help Guide disp.). When you to adjust the settings. Note • The camera makes appropriate judgments on the situation to shoot the image with a suitable setting for the subject or the shooting conditions allows you turn the mode dial, the explanation of the selected mode and methods of...
... on the screen (Help Guide disp.). When you to adjust the settings. Note • The camera makes appropriate judgments on the situation to shoot the image with a suitable setting for the subject or the shooting conditions allows you turn the mode dial, the explanation of the selected mode and methods of...


