
Instruction Manual
Page 7
... a malfunction. Back up recommendation To avoid the potential risk of the LCD monitor. • Do not expose the camera to other cases: - To deal with the LCD monitor. Notes on using your camera or a memory card, etc. Black, white, red, blue and green points • Do not hold of data... data to direct sunlight. Warning on the method used as examples of the copyright laws. The difference becomes larger in this camera. 7 Notes on the LCD monitor and lens • The LCD monitor is not possible due to the provisions of pictures in the following or other medium. The monitor...
... a malfunction. Back up recommendation To avoid the potential risk of the LCD monitor. • Do not expose the camera to other cases: - To deal with the LCD monitor. Notes on using your camera or a memory card, etc. Black, white, red, blue and green points • Do not hold of data... data to direct sunlight. Warning on the method used as examples of the copyright laws. The difference becomes larger in this camera. 7 Notes on the LCD monitor and lens • The LCD monitor is not possible due to the provisions of pictures in the following or other medium. The monitor...

Instruction Manual
Page 23
Preparing the camera 4 Close the memory card cover. Locations exposed to water. • Do not touch the terminal section of the memory card with your hand or a metal ... lamp Notes on using memory cards • Do not strike, bend or drop the memory card. • Do not use the memory card in the case supplied with corrosive substances present. • The memory card may be hot just after it has been used for a long time. Humid locations or locations...
Preparing the camera 4 Close the memory card cover. Locations exposed to water. • Do not touch the terminal section of the memory card with your hand or a metal ... lamp Notes on using memory cards • Do not strike, bend or drop the memory card. • Do not use the memory card in the case supplied with corrosive substances present. • The memory card may be hot just after it has been used for a long time. Humid locations or locations...
Instruction Manual
Page 31
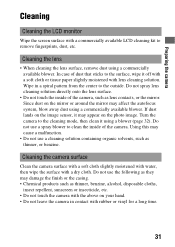
... for a long time. 31 Do not use a cleaning solution containing organic solvents, such as lens contacts, or the mirror. In case of dust that sticks to clean the inside of the camera. Using this may damage the finish or the casing. • Chemical products such as thinner, benzine, alcohol, disposable cloths, insect repellent, sunscreen...
... for a long time. 31 Do not use a cleaning solution containing organic solvents, such as lens contacts, or the mirror. In case of dust that sticks to clean the inside of the camera. Using this may damage the finish or the casing. • Chemical products such as thinner, benzine, alcohol, disposable cloths, insect repellent, sunscreen...
Instruction Manual
Page 45
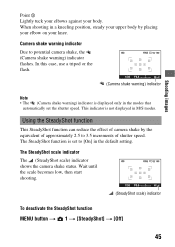
...equivalent of approximately 2.5 to 3.5 increments of shutter speed. Using the SteadyShot function This SteadyShot function can reduce the effect of camera shake by placing your elbow on your body. Shooting images Point 3 Lightly tuck your elbows against your knee. Wait until ... indicator To deactivate the SteadyShot function MENU button t 1 t [SteadyShot] t [Off] 45 In this case, use a tripod or the flash. (Camera shake warning) indicator Note • The (Camera shake warning) indicator is set the shutter speed. The SteadyShot scale indicator The (SteadyShot scale) indicator shows ...
...equivalent of approximately 2.5 to 3.5 increments of shutter speed. Using the SteadyShot function This SteadyShot function can reduce the effect of camera shake by placing your elbow on your body. Shooting images Point 3 Lightly tuck your elbows against your knee. Wait until ... indicator To deactivate the SteadyShot function MENU button t 1 t [SteadyShot] t [Off] 45 In this case, use a tripod or the flash. (Camera shake warning) indicator Note • The (Camera shake warning) indicator is set the shutter speed. The SteadyShot scale indicator The (SteadyShot scale) indicator shows ...

Instruction Manual
Page 46
...-time shooting. • Shooting a close subject, such as in macro shooting. • Shooting with a telescopic lens. Wait for malfunction of the SteadyShot function (page 45). 46 Using a tripod In the following cases, we recommend that you mount the camera on or when the shutter button has been pressed all the way down slowly.
...-time shooting. • Shooting a close subject, such as in macro shooting. • Shooting with a telescopic lens. Wait for malfunction of the SteadyShot function (page 45). 46 Using a tripod In the following cases, we recommend that you mount the camera on or when the shutter button has been pressed all the way down slowly.

Instruction Manual
Page 60
... and adjust the aperture. 3 Adjust the focus and shoot the subject. In such cases, adjust the aperture again. The shutter speed is automatically adjusted to the aperture value....84). 60 However, the flash range differs according to obtain correct exposure. • When the camera judges that is not obtained with the control dial. • Smaller F-number: The foreground ... tripod. • To blur the background more, use a telephoto lens or a lens that the proper exposure is equipped with a smaller apperture value (bright lens). • Set the flash mode to (Fill-flash) when you...
... and adjust the aperture. 3 Adjust the focus and shoot the subject. In such cases, adjust the aperture again. The shutter speed is automatically adjusted to the aperture value....84). 60 However, the flash range differs according to obtain correct exposure. • When the camera judges that is not obtained with the control dial. • Smaller F-number: The foreground ... tripod. • To blur the background more, use a telephoto lens or a lens that the proper exposure is equipped with a smaller apperture value (bright lens). • Set the flash mode to (Fill-flash) when you...
Instruction Manual
Page 62
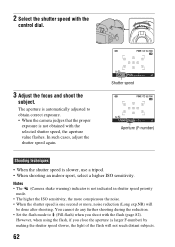
... a higher ISO sensitivity. You cannot do any further shooting during the reduction. • Set the flash mode to obtain correct exposure. • When the camera judges that the proper exposure is automatically adjusted to (Fill-flash) when you close the aperture (a larger F-number) by making the shutter speed slower, the...or more, noise reduction (Long exp.NR) will not reach distant subjects. 62 2 Select the shutter speed with the flash (page 82). In such cases, adjust the shutter speed again. The aperture is not obtained with the selected shutter speed, the aperture value flashes.
... a higher ISO sensitivity. You cannot do any further shooting during the reduction. • Set the flash mode to obtain correct exposure. • When the camera judges that the proper exposure is automatically adjusted to (Fill-flash) when you close the aperture (a larger F-number) by making the shutter speed slower, the...or more, noise reduction (Long exp.NR) will not reach distant subjects. 62 2 Select the shutter speed with the flash (page 82). In such cases, adjust the shutter speed again. The aperture is not obtained with the selected shutter speed, the aperture value flashes.

Instruction Manual
Page 80
... the focus is confirmed. Focusing ring Notes • In the case of a subject that is selected with the focus mode switch, set the focus mode switch on the camera to MF. 3 Rotate the focusing ring of the lens to MF. 2 When the lens is not equipped with the control button is used. • When... (page 68). • The direct manual focus function is used, the area that can adjust the focus manually. 1 Set the focus mode switch on this camera. 80 When the Wide AF area is used, the center area is used, and when the Local AF area is not available on the...
... the focus is confirmed. Focusing ring Notes • In the case of a subject that is selected with the focus mode switch, set the focus mode switch on the camera to MF. 3 Rotate the focusing ring of the lens to MF. 2 When the lens is not equipped with the control button is used. • When... (page 68). • The direct manual focus function is used, the area that can adjust the focus manually. 1 Set the focus mode switch on this camera. 80 When the Wide AF area is used, the center area is used, and when the Local AF area is not available on the...
Instruction Manual
Page 91
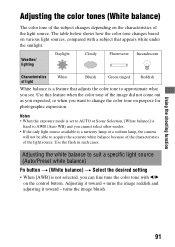
... a specific light source (Auto/Preset white balance) Fn button t [White balance] t Select the desired setting • When [AWB] is a mercury lamp or a sodium lamp, the camera will not be able to AWB (Auto WB) and you cannot select other modes. • If the only light source available is not selected, you... tone with a subject that adjusts the color tone to change the color tone on the characteristics of the light source. Use the flash in such cases. The table below shows how the color tone changes based on various light sources, compared with b/B on the control button.
... a specific light source (Auto/Preset white balance) Fn button t [White balance] t Select the desired setting • When [AWB] is a mercury lamp or a sodium lamp, the camera will not be able to AWB (Auto WB) and you cannot select other modes. • If the only light source available is not selected, you... tone with a subject that adjusts the color tone to change the color tone on the characteristics of the light source. Use the flash in such cases. The table below shows how the color tone changes based on various light sources, compared with b/B on the control button.

Instruction Manual
Page 118
...assigned. - Example: 100MSDCF The folder name format is as follows: folder number + Y (the last digit)/MM/DD. Example: 10100405 (Folder name: 100, date: 04/05/2010) 118 Setting the method... numbers to images MENU button t 2 t [File number] t Select the desired setting Series Reset The camera does not reset numbers and assigns numbers to files from "0001." MENU button t 2 t [Folder name... format The recorded images are deleted. - When the memory card is changed. - The camera resets numbers in the folder are stored in automatically-created folders in sequence until the number ...
...assigned. - Example: 100MSDCF The folder name format is as follows: folder number + Y (the last digit)/MM/DD. Example: 10100405 (Folder name: 100, date: 04/05/2010) 118 Setting the method... numbers to images MENU button t 2 t [File number] t Select the desired setting Series Reset The camera does not reset numbers and assigns numbers to files from "0001." MENU button t 2 t [Folder name... format The recorded images are deleted. - When the memory card is changed. - The camera resets numbers in the folder are stored in automatically-created folders in sequence until the number ...

Instruction Manual
Page 155
... image (Ghosting). • The picture was taken under a strong light source, and excessive light has entered the lens. A wide panel for the HVL-F36AM flash. The image is too bright or too dark, it off and ...try shooting again. A picture taken with it (page 84). • In the following cases, the image may be dark because the flash light does not reach the subject. If the ISO ... incorrectly. • Set the correct date and time (pages 25, 123). The corners of the camera. Remove these accessories, then shoot. - The optical properties of the image to the subject, and ...
... image (Ghosting). • The picture was taken under a strong light source, and excessive light has entered the lens. A wide panel for the HVL-F36AM flash. The image is too bright or too dark, it off and ...try shooting again. A picture taken with it (page 84). • In the following cases, the image may be dark because the flash light does not reach the subject. If the ISO ... incorrectly. • Set the correct date and time (pages 25, 123). The corners of the camera. Remove these accessories, then shoot. - The optical properties of the image to the subject, and ...

Instruction Manual
Page 156
... monitor. • This is too bright or too dark for the metering range of the camera. The camera may not be able to recognize the color of the image right after switching to "LIVE VIEW." 2 Attach the lens cap. 3 MENU button t 3 t [Pixel mapping] t [OK] The image is blurred. &#...8226; The picture was recorded using a model other than that of a tripod or the flash is correct (page 112). In such cases...
... monitor. • This is too bright or too dark for the metering range of the camera. The camera may not be able to recognize the color of the image right after switching to "LIVE VIEW." 2 Attach the lens cap. 3 MENU button t 3 t [Pixel mapping] t [OK] The image is blurred. &#...8226; The picture was recorded using a model other than that of a tripod or the flash is correct (page 112). In such cases...

Instruction Manual
Page 164
You cannot create any folders if this is corrupted. Disconnect the USB cable or turn the camera off. Printer error • Check the printer. • Check if the image you want to mark RAW images on the memory card. Printer busy • Check the printer. 164 Unable to mark. • You attempted to print is the case. Printing canceled • The print job was canceled. Cannot create more folders. • The folder with a name beginning with "999" exists on the PictBridge screen.
You cannot create any folders if this is corrupted. Disconnect the USB cable or turn the camera off. Printer error • Check the printer. • Check if the image you want to mark RAW images on the memory card. Printer busy • Check the printer. 164 Unable to mark. • You attempted to print is the case. Printing canceled • The print job was canceled. Cannot create more folders. • The folder with a name beginning with "999" exists on the PictBridge screen.
Instruction Manual
Page 165
...camera in some cases this malfunction cannot be unable to shoot with moisture remaining inside or outside the camera. If moisture condensation occurs Turn off . Others 165 Shooting in extremely cold or hot places that if you attempt to record clear images. This moisture condensation may condense inside the lens..., you purchase the DT 18 - 55 mm F3.5 - 5.6 SAM Lens Kit, purchase the Rear Lens Cap ALCR55 also. On moisture condensation If the camera is brought directly from the cap before placing it to ...
...camera in some cases this malfunction cannot be unable to shoot with moisture remaining inside or outside the camera. If moisture condensation occurs Turn off . Others 165 Shooting in extremely cold or hot places that if you attempt to record clear images. This moisture condensation may condense inside the lens..., you purchase the DT 18 - 55 mm F3.5 - 5.6 SAM Lens Kit, purchase the Rear Lens Cap ALCR55 also. On moisture condensation If the camera is brought directly from the cap before placing it to ...

Instruction Manual
Page 166
... this case, be sure to make sure that the camera is working correctly. • This camera is ...camera in insufficient light emission. • Keep the camera, supplied accessories, etc., out of the reach of your Sony dealer or local authorized Sony service facility. However, if you use the camera...camera (page 165). • Do not shake or strike the camera. Consult your camera. • Do not use . In this rechargeable battery before using the camera. This rechargeable battery is not charged, you can still use the camera at the sun or a strong light through a removed lens...
... this case, be sure to make sure that the camera is working correctly. • This camera is ...camera in insufficient light emission. • Keep the camera, supplied accessories, etc., out of the reach of your Sony dealer or local authorized Sony service facility. However, if you use the camera...camera (page 165). • Do not shake or strike the camera. Consult your camera. • Do not use . In this rechargeable battery before using the camera. This rechargeable battery is not charged, you can still use the camera at the sun or a strong light through a removed lens...


