Operating Instructions
Page 3
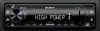
... Name: SONY Model: DSX-GS80 Responsible Party: Sony Electronics Inc. Keep new and used batteries away from children. If you have been swallowed or placed inside any other antenna or transmitter. Sony does not bear any interference received, including interference that may not cause harmful interference, and (2) this product: Visit: https://www.sony.com/electronics/ support Contact: Sony Customer Information Service Center at 1-800...
... Name: SONY Model: DSX-GS80 Responsible Party: Sony Electronics Inc. Keep new and used batteries away from children. If you have been swallowed or placed inside any other antenna or transmitter. Sony does not bear any interference received, including interference that may not cause harmful interference, and (2) this product: Visit: https://www.sony.com/electronics/ support Contact: Sony Customer Information Service Center at 1-800...

Operating Instructions
Page 5
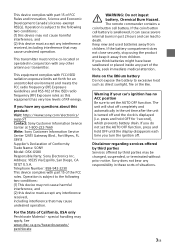
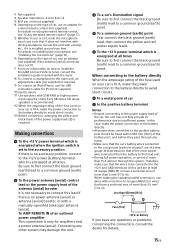
... the Siri function (iPhone only). Display window USB port / (SEEK -/+) Tunes in Android™ mode or iPod is not available. Control dial Adjusts the volume. Guide to turn the source off and display the clock. Press and hold for more than 2 seconds to Parts and Controls Main Unit and Remote Commander Main unit Front panel removed (inner panel) PTY (program type) Selects PTY in RDS...
... the Siri function (iPhone only). Display window USB port / (SEEK -/+) Tunes in Android™ mode or iPod is not available. Control dial Adjusts the volume. Guide to turn the source off and display the clock. Press and hold for more than 2 seconds to Parts and Controls Main Unit and Remote Commander Main unit Front panel removed (inner panel) PTY (program type) Selects PTY in RDS...
Operating Instructions
Page 6
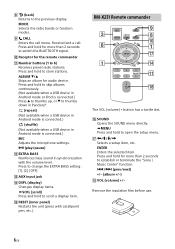
... available when a USB device in Android mode is connected.) (shuffle) (Not available when a USB device in Android mode is connected.) MIC Adjusts the microphone settings. (play/pause) EXTRA BASS Reinforces bass sound in Android mode or iPod is connected.) Press to thumbs up, or to 6) Receives preset radio stations. Press and hold for more than 2 seconds to the previous display. ENTER Enters the selected item. MODE Selects the radio bands or function modes. ...
... available when a USB device in Android mode is connected.) (shuffle) (Not available when a USB device in Android mode is connected.) MIC Adjusts the microphone settings. (play/pause) EXTRA BASS Reinforces bass sound in Android mode or iPod is connected.) Press to thumbs up, or to 6) Receives preset radio stations. Press and hold for more than 2 seconds to the previous display. ENTER Enters the selected item. MODE Selects the radio bands or function modes. ...

Operating Instructions
Page 7
...so it detects this unit. 3 Select your model name shown in pairing standby mode. * [DEVICE 1] or [DEVICE 2] will be changed to recognize each other. Attaching the front panel 1 Press MENU, then rotate and press the control dial to remove. flashes while the unit is in the display of this ...Front Panel You can connect two BLUETOOTH devices (two mobile phones, or a mobile phone and an audio device). Pairing enables this unit to prevent theft. 1 Press and hold OFF until the unit turns off, press the front panel release button , then pull the panel towards you to select [...
...so it detects this unit. 3 Select your model name shown in pairing standby mode. * [DEVICE 1] or [DEVICE 2] will be changed to recognize each other. Attaching the front panel 1 Press MENU, then rotate and press the control dial to remove. flashes while the unit is in the display of this ...Front Panel You can connect two BLUETOOTH devices (two mobile phones, or a mobile phone and an audio device). Pairing enables this unit to prevent theft. 1 Press and hold OFF until the unit turns off, press the front panel release button , then pull the panel towards you to select [...
Operating Instructions
Page 8
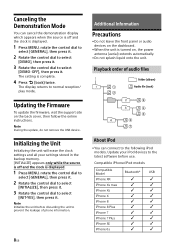
... The setting is turned on the back cover, then follow the online instructions. The display returns to normal reception/ play mode. Update your settings stored in the backup memory. [INITIALIZE] appears only while the source is off and the clock is displayed. 1 Press MENU, rotate the control dial to select [GENERAL], then press it. 2 Rotate the control dial to select [INITIALIZE], then press it...
... The setting is turned on the back cover, then follow the online instructions. The display returns to normal reception/ play mode. Update your settings stored in the backup memory. [INITIALIZE] appears only while the source is off and the clock is displayed. 1 Press MENU, rotate the control dial to select [GENERAL], then press it. 2 Rotate the control dial to select [INITIALIZE], then press it...
Operating Instructions
Page 15
... antenna (aerial) booster, or with a manually-operated telescopic antenna (aerial). *1 Not supplied *2 Speaker impedance: 4 Ω to 8 Ω × 4 *3 RCA pin cord (not supplied) *4 Depending on the type of more than 2 mm² (3/32 in). For details on installing the microphone, see "Installing the microphone" (page 16). *6 Depending on using the wired remote control, see "Using the wired remote control" (page 17). *5 Whether in use or not, route the microphone input...
... antenna (aerial) booster, or with a manually-operated telescopic antenna (aerial). *1 Not supplied *2 Speaker impedance: 4 Ω to 8 Ω × 4 *3 RCA pin cord (not supplied) *4 Depending on the type of more than 2 mm² (3/32 in). For details on installing the microphone, see "Installing the microphone" (page 16). *6 Depending on using the wired remote control, see "Using the wired remote control" (page 17). *5 Whether in use or not, route the microphone input...
Operating Instructions
Page 16
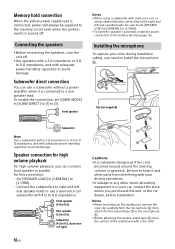
... volume playback For high volume playback, you can use a dual voice coil subwoofer with adequate power handling capacities to avoid damage. For this unit, or the car dealer, before installation. Connecting the speakers • Before connecting the speakers, turn the unit off . Front speaker Subwoofer Note Use a subwoofer with a 2 Ω impedance or 4 Ω to 8 Ω impedance, and with 4 Ω to 8 Ω impedance. To enable the connection, set [SPEAKER LOAD] in [GENERAL] to [2 OHM...
... volume playback For high volume playback, you can use a dual voice coil subwoofer with adequate power handling capacities to avoid damage. For this unit, or the car dealer, before installation. Connecting the speakers • Before connecting the speakers, turn the unit off . Front speaker Subwoofer Note Use a subwoofer with a 2 Ω impedance or 4 Ω to 8 Ω impedance, and with 4 Ω to 8 Ω impedance. To enable the connection, set [SPEAKER LOAD] in [GENERAL] to [2 OHM...

Help Guide
Page 3
... a Call by Voice Tags Available Operations during Call Useful Functions "Sony | Music Center" with iPhone/Android™ Smartphone "Sony | Music Center" with iPhone/Android™ Smartphone Establishing the "Sony | Music Center" Connection Selecting the Source or Application Using Voice Recognition (Android Smartphone Only) Using "Siri Eyes Free" Settings Basic Setting Operation General Setup (GENERAL) Sound Setup (SOUND) Display Setup (DISPLAY) BLUETOOTH Setup (BLUETOOTH) "Sony | Music Center" Setup (SONY APP) Additional Information Canceling the Demonstration Mode Updating the Firmware 3
... a Call by Voice Tags Available Operations during Call Useful Functions "Sony | Music Center" with iPhone/Android™ Smartphone "Sony | Music Center" with iPhone/Android™ Smartphone Establishing the "Sony | Music Center" Connection Selecting the Source or Application Using Voice Recognition (Android Smartphone Only) Using "Siri Eyes Free" Settings Basic Setting Operation General Setup (GENERAL) Sound Setup (SOUND) Display Setup (DISPLAY) BLUETOOTH Setup (BLUETOOTH) "Sony | Music Center" Setup (SONY APP) Additional Information Canceling the Demonstration Mode Updating the Firmware 3

Help Guide
Page 8
...) Returns to turn off the power and the display. USB port 7. / (SEEK -/+) Tunes in synchronization with the volume level. 8 CALL Enters the call . Control dial Adjusts the volume. Press and hold for 1 second to the previous display. Display window 6. ALBUM / Skips an album for the remote commander 11. Front panel release button 3. MENU Opens the setup menu. Receptor for audio device. PTY (program type) Selects PTY in RDS. (browse) Enters the browse mode...
...) Returns to turn off the power and the display. USB port 7. / (SEEK -/+) Tunes in synchronization with the volume level. 8 CALL Enters the call . Control dial Adjusts the volume. Press and hold for 1 second to the previous display. Display window 6. ALBUM / Skips an album for the remote commander 11. Front panel release button 3. MENU Opens the setup menu. Receptor for audio device. PTY (program type) Selects PTY in RDS. (browse) Enters the browse mode...

Help Guide
Page 24
Related Topic Sound Setup (SOUND) 5-006-642-11(2) Copyright 2019 Sony Corporation 24 Help Guide In-Car Receiver DSX-GS80 Connecting Other Portable Audio Device 1 Turn off the portable audio device. 2 Turn down the volume on the unit. 3 Connect the portable audio device to the AUX input jack (stereo mini jack) on the unit. Press MENU, then select [SOUND] [AUX VOLUME]. To match the volume level of the portable audio device at a moderate volume, and set your usual listening volume on the unit with a connecting cord...
Related Topic Sound Setup (SOUND) 5-006-642-11(2) Copyright 2019 Sony Corporation 24 Help Guide In-Car Receiver DSX-GS80 Connecting Other Portable Audio Device 1 Turn off the portable audio device. 2 Turn down the volume on the unit. 3 Connect the portable audio device to the AUX input jack (stereo mini jack) on the unit. Press MENU, then select [SOUND] [AUX VOLUME]. To match the volume level of the portable audio device at a moderate volume, and set your usual listening volume on the unit with a connecting cord...

Help Guide
Page 25
... Step (DSX-GS80(E)) General Setup (GENERAL) 5-006-642-11(2) Copyright 2019 Sony Corporation 25 Help Guide In-Car Receiver DSX-GS80 Listening to the Radio Make sure that you want to preset, press and hold / (SEEK -/+) to locate the approximate frequency, then press / (SEEK -/+) repeatedly to finely adjust to the desired frequency. To preset stations automatically (BTM) 1. To tune manually Press and hold a number button (1 to 6). Rotate the control dial to a station 1. To...
... Step (DSX-GS80(E)) General Setup (GENERAL) 5-006-642-11(2) Copyright 2019 Sony Corporation 25 Help Guide In-Car Receiver DSX-GS80 Listening to the Radio Make sure that you want to preset, press and hold / (SEEK -/+) to locate the approximate frequency, then press / (SEEK -/+) repeatedly to finely adjust to the desired frequency. To preset stations automatically (BTM) 1. To tune manually Press and hold a number button (1 to 6). Rotate the control dial to a station 1. To...

Help Guide
Page 26
... interrupt the currently selected source. Related Topic General Setup (GENERAL) 5-006-642-11(2) Copyright 2019 Sony Corporation 26 Set AF/TA, then preset the station with an AF/TA setting. To adjust the volume level during FM reception. (This function does not work in a network, and Traffic Announcement (TA) provides current traffic information or traffic programs (TP) if received. 1 Press MENU, rotate the control dial to select [GENERAL], then...
... interrupt the currently selected source. Related Topic General Setup (GENERAL) 5-006-642-11(2) Copyright 2019 Sony Corporation 26 Set AF/TA, then preset the station with an AF/TA setting. To adjust the volume level during FM reception. (This function does not work in a network, and Traffic Announcement (TA) provides current traffic information or traffic programs (TP) if received. 1 Press MENU, rotate the control dial to select [GENERAL], then...

Help Guide
Page 32
... mode. * e.g., a USB flash drive, digital media player, Android smartphone Note For details on the compatibility of the following files is already connected, to start playback, press SRC (source) to select [USB1] for the USB port on the front, [USB2] for the USB port on this unit. Adjust the volume on the rear. ([IPD] appears in the display when the iPod is recognized.) 2. Help Guide In-Car Receiver DSX-GS80 Playing a USB Device In these Operating Instructions, "iPod...
... mode. * e.g., a USB flash drive, digital media player, Android smartphone Note For details on the compatibility of the following files is already connected, to start playback, press SRC (source) to select [USB1] for the USB port on the front, [USB2] for the USB port on this unit. Adjust the volume on the rear. ([IPD] appears in the display when the iPod is recognized.) 2. Help Guide In-Car Receiver DSX-GS80 Playing a USB Device In these Operating Instructions, "iPod...

Help Guide
Page 34
... BLUETOOTH connection with the audio device. Press MENU, then select [SOUND] [BT AUDIO VOL]. Related Topic Connecting with a Paired BLUETOOTH Device". See "Connecting with a Paired BLUETOOTH Device Sound Setup (SOUND) BLUETOOTH Setup (BLUETOOTH) 5-006-642-11(2) Copyright 2019 Sony Corporation 34 To match the volume level of the BLUETOOTH audio device at a moderate volume, and set your usual listening volume on this unit. Help Guide In-Car Receiver DSX-GS80 Playing a BLUETOOTH Device You can play contents...
... BLUETOOTH connection with the audio device. Press MENU, then select [SOUND] [BT AUDIO VOL]. Related Topic Connecting with a Paired BLUETOOTH Device". See "Connecting with a Paired BLUETOOTH Device Sound Setup (SOUND) BLUETOOTH Setup (BLUETOOTH) 5-006-642-11(2) Copyright 2019 Sony Corporation 34 To match the volume level of the BLUETOOTH audio device at a moderate volume, and set your usual listening volume on this unit. Help Guide In-Car Receiver DSX-GS80 Playing a BLUETOOTH Device You can play contents...

Help Guide
Page 60
... on the compatibility of your car before use. [CUSTOM] (custom) Input mode for the steering wheel remote control. [PRESET] (preset) Input mode for the wired remote control excluding the steering wheel remote control. (Automatically selected when [RESET CUSTOM] is selected.) 60 While [REGISTER] is displayed. Restart registration from the function where the error occurred. When registration is complete, [REGISTERED] is blinking, press and hold the button on the unit is set to 8 Ω impedance. For...
... on the compatibility of your car before use. [CUSTOM] (custom) Input mode for the steering wheel remote control. [PRESET] (preset) Input mode for the wired remote control excluding the steering wheel remote control. (Automatically selected when [RESET CUSTOM] is selected.) 60 While [REGISTER] is displayed. Restart registration from the function where the error occurred. When registration is complete, [REGISTERED] is blinking, press and hold the button on the unit is set to 8 Ω impedance. For...

Help Guide
Page 61
... off and the clock is displayed.) FIRMWARE (firmware) (Available only while the source is off and the clock is displayed.) Checks/updates the firmware version. REGIONAL (regional) (DSX-GS80(EUR)) Restricts reception to a specific region: [ON], [OFF]. (Available only when FM is received.) BTM (best tuning memory) Presets stations automatically. (Available only when the radio is selected.) SXM PARENTAL (SiriusXM parental) (DSX-GS80(UC)) Sets the parental lock to...
... off and the clock is displayed.) FIRMWARE (firmware) (Available only while the source is off and the clock is displayed.) Checks/updates the firmware version. REGIONAL (regional) (DSX-GS80(EUR)) Restricts reception to a specific region: [ON], [OFF]. (Available only when FM is received.) BTM (best tuning memory) Presets stations automatically. (Available only when the radio is selected.) SXM PARENTAL (SiriusXM parental) (DSX-GS80(UC)) Sets the parental lock to...

Help Guide
Page 64
... setting to [OFF].) Item RBE MODE (rear bass enhancer mode) Detail Selects the rear bass enhancer mode: [1], [2], [3], [OFF]. 64 Item F/R POSITION (front/rear position) ADJ POSITION (adjust position) SUBW POS (subwoofer position) Detail Simulates a natural sound field by delaying the sound output from speakers to suit your position: [FRONT L] (front left), [FRONT R] (front right), [FRONT] (center front), [ALL] (center of all playback sources to the optimum level: [ON], [OFF]. AAV (advanced auto volume) Adjusts...
... setting to [OFF].) Item RBE MODE (rear bass enhancer mode) Detail Selects the rear bass enhancer mode: [1], [2], [3], [OFF]. 64 Item F/R POSITION (front/rear position) ADJ POSITION (adjust position) SUBW POS (subwoofer position) Detail Simulates a natural sound field by delaying the sound output from speakers to suit your position: [FRONT L] (front left), [FRONT R] (front right), [FRONT] (center front), [ALL] (center of all playback sources to the optimum level: [ON], [OFF]. AAV (advanced auto volume) Adjusts...

Help Guide
Page 65
...set to the rear speaker lead without a power amplifier. (Available only when [RBE MODE] is displayed at the lowest setting.) SUBW PHASE (subwoofer phase) Selects the subwoofer phase: [NORMAL], [REVERSE]. Selects the subwoofer phase: [NORMAL], [REVERSE]. Selects the LPF slope: [1], [2], [3]. Item Detail LPF FREQ (low pass filter frequency) Selects the subwoofer cut-off frequency: [50Hz], [60Hz], [80Hz], [100Hz], [120Hz]. SUBW DIRECT (subwoofer direct connection) Adjusts the settings for the subwoofer connected to other than [OFF].) Selects the subwoofer cut-off frequency...
...set to the rear speaker lead without a power amplifier. (Available only when [RBE MODE] is displayed at the lowest setting.) SUBW PHASE (subwoofer phase) Selects the subwoofer phase: [NORMAL], [REVERSE]. Selects the subwoofer phase: [NORMAL], [REVERSE]. Selects the LPF slope: [1], [2], [3]. Item Detail LPF FREQ (low pass filter frequency) Selects the subwoofer cut-off frequency: [50Hz], [60Hz], [80Hz], [100Hz], [120Hz]. SUBW DIRECT (subwoofer direct connection) Adjusts the settings for the subwoofer connected to other than [OFF].) Selects the subwoofer cut-off frequency...

Help Guide
Page 67
... the illumination control lead is connected, and the head lights are turned on the unit or the remote commander. DISPLAYCOLOR (display color) Sets a preset color or customized color for the buttons. BUTTON COLOR (button color) Sets a preset color or customized color for 5 seconds when any button on .) To set this function to be set [DIMMER] to [OFF], then adjust [BRIGHTNESS]. Help Guide In-Car Receiver DSX-GS80 Display Setup (DISPLAY) BLACK OUT (black out) (DSX-GS80(E)) Turns off the...
... the illumination control lead is connected, and the head lights are turned on the unit or the remote commander. DISPLAYCOLOR (display color) Sets a preset color or customized color for the buttons. BUTTON COLOR (button color) Sets a preset color or customized color for 5 seconds when any button on .) To set this function to be set [DIMMER] to [OFF], then adjust [BRIGHTNESS]. Help Guide In-Car Receiver DSX-GS80 Display Setup (DISPLAY) BLACK OUT (black out) (DSX-GS80(E)) Turns off the...

Help Guide
Page 82
Issues may be resolved by Sony" app on your nearest Sony dealer. 5-006-642-11(2) Copyright 2019 Sony Corporation 82 If none of the above works, consult your smartphone, you can get software update information conveniently. Visit our customer support home page. When you request a repair service. Help Guide In-Car Receiver DSX-GS80 Troubleshooting Do the following before you install the "Support by updating the software. Read the relevant instruction and troubleshooting topics in this Help Guide.
Issues may be resolved by Sony" app on your nearest Sony dealer. 5-006-642-11(2) Copyright 2019 Sony Corporation 82 If none of the above works, consult your smartphone, you can get software update information conveniently. Visit our customer support home page. When you request a repair service. Help Guide In-Car Receiver DSX-GS80 Troubleshooting Do the following before you install the "Support by updating the software. Read the relevant instruction and troubleshooting topics in this Help Guide.


