Operating Instructions
Page 4
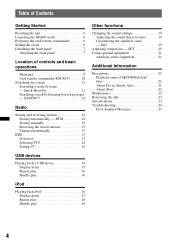
... 18 Shuffle play 18 Other functions Changing the sound settings 19 Adjusting the sound characteristics 19 Customizing the equalizer curve - Table of Contents Getting Started Resetting the unit 6 Canceling the DEMO mode 6 Preparing the card remote commander 6 Setting the clock 6 Detaching the front panel 7 Attaching the front panel 7 Location of MP3...
... 18 Shuffle play 18 Other functions Changing the sound settings 19 Adjusting the sound characteristics 19 Customizing the equalizer curve - Table of Contents Getting Started Resetting the unit 6 Canceling the DEMO mode 6 Preparing the card remote commander 6 Setting the clock 6 Detaching the front panel 7 Attaching the front panel 7 Location of MP3...
Operating Instructions
Page 6
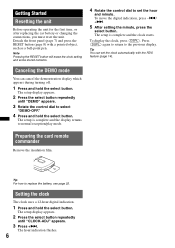
To move the digital indication, press -./ +>. 5 After setting the minute, press the select button. Preparing the card remote commander Remove the ...demonstration display which appears during turning off. 1 Press and hold the select button. Detach the front panel (page 7) and press the RESET button (page 8) with the RDS feature (page 14). The setup is complete and the display returns to normal reception/play mode....appears. 3 Press +>. The setup is complete and the clock starts. Setting the clock The clock uses a 12-hour digital indication. 1 Press and hold the select button.
To move the digital indication, press -./ +>. 5 After setting the minute, press the select button. Preparing the card remote commander Remove the ...demonstration display which appears during turning off. 1 Press and hold the select button. Detach the front panel (page 7) and press the RESET button (page 8) with the RDS feature (page 14). The setup is complete and the display returns to normal reception/play mode....appears. 3 Press +>. The setup is complete and the clock starts. Setting the clock The clock uses a 12-hour digital indication. 1 Press and hold the select button.
Operating Instructions
Page 9
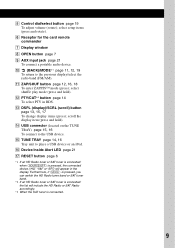
... (press and rotate). scroll the display item (press and hold ). O TUNE TRAY page 14, 16 Tray unit to the previous display/select the radio band (FM/AM). Furthermore, if (MODE) is pressed, you can switch the HD Radio tuner band or SAT tuner band. *2 If an HD Radio tuner or SAT... (press and hold ). N USB connector (located on the TUNE TRAY) page 15, 16 To connect to the USB device. P Device Inside Alert LED page 21 Q RESET button page 6 *1 If an HD Radio tuner or SAT tuner is connected: when (SOURCE/OFF) is connected. 9 E Control dial/select button page 19 To adjust...
... (press and rotate). scroll the display item (press and hold ). O TUNE TRAY page 14, 16 Tray unit to the previous display/select the radio band (FM/AM). Furthermore, if (MODE) is pressed, you can switch the HD Radio tuner band or SAT tuner band. *2 If an HD Radio tuner or SAT... (press and hold ). N USB connector (located on the TUNE TRAY) page 15, 16 To connect to the USB device. P Device Inside Alert LED page 21 Q RESET button page 6 *1 If an HD Radio tuner or SAT tuner is connected: when (SOURCE/OFF) is connected. 9 E Control dial/select button page 19 To adjust...

Operating Instructions
Page 24
... minutes with the car's accessory power connector. If the problem is switched. The power antenna (aerial) does not have been erased. • The RESET button has been pressed. The fuse has blown. The leads are not matched correctly with "DEMO-ON" set ) Optional accessories/equipment: BUS cable (...when the interface cable of the memory have a relay box. Design and specifications are dirty (page 22). 24 Support site http://esupport.sony.com http://www.sony.com/mobileAV General No power is being supplied to the ATT lead) is activated. • The position of the fader control "...
... minutes with the car's accessory power connector. If the problem is switched. The power antenna (aerial) does not have been erased. • The RESET button has been pressed. The fuse has blown. The leads are not matched correctly with "DEMO-ON" set ) Optional accessories/equipment: BUS cable (...when the interface cable of the memory have a relay box. Design and specifications are dirty (page 22). 24 Support site http://esupport.sony.com http://www.sony.com/mobileAV General No power is being supplied to the ATT lead) is activated. • The position of the fader control "...

Operating Instructions
Page 26
t Press the RESET button (page 6). READ The unit is not supported. USB NO SUPRT (USB Not Support) The connected...USB device is out of order, or an unsupported device is overloaded. t For details on in the display, consult your nearest Sony dealer. If the error indication remains on the compatibility of the USB device and you cannot go any further. t Wait until ..." " or " " During reverse or fast-forward, you have reached the beginning or the end of your nearest Sony dealer. 26 t Check the connection. RESET USB device cannot be operated due to a problem.
t Press the RESET button (page 6). READ The unit is not supported. USB NO SUPRT (USB Not Support) The connected...USB device is out of order, or an unsupported device is overloaded. t For details on in the display, consult your nearest Sony dealer. If the error indication remains on the compatibility of the USB device and you cannot go any further. t Wait until ..." " or " " During reverse or fast-forward, you have reached the beginning or the end of your nearest Sony dealer. 26 t Check the connection. RESET USB device cannot be operated due to a problem.

Operating Instructions
Page 80
only); Call 1-800-222-7669 URL http://www.SONY.com http://www.sony.net/ Sony Corporation Printed in these Operating Instructions. 2 Reset the unit. If you have any questions/problems regarding this product, try the following: 1 Read Troubleshooting in Thailand Note: Stored data may be erased. 3 Please contact (U.S.A.
only); Call 1-800-222-7669 URL http://www.SONY.com http://www.sony.net/ Sony Corporation Printed in these Operating Instructions. 2 Reset the unit. If you have any questions/problems regarding this product, try the following: 1 Read Troubleshooting in Thailand Note: Stored data may be erased. 3 Please contact (U.S.A.


