
Operating Instructions
Page 2
... installation. Record the model and serial numbers in a residential installation. Sony Customer Information Services Center 1-800-222-7669 or http://www.sony.com/ Declaration of the following two conditions: (1) This device may not cause harmful interference, and (2) this product, you carry the display unit, hold the unit itself, not the speakers. Bernardo Dr, San Diego, CA 92127 U.S.A. This equipment generates, uses...
... installation. Record the model and serial numbers in a residential installation. Sony Customer Information Services Center 1-800-222-7669 or http://www.sony.com/ Declaration of the following two conditions: (1) This device may not cause harmful interference, and (2) this product, you carry the display unit, hold the unit itself, not the speakers. Bernardo Dr, San Diego, CA 92127 U.S.A. This equipment generates, uses...

Operating Instructions
Page 3
...) Connecting the Speakers 15 (GB) Connecting the AC Power Cord 15 (GB) Cable management 16 (GB) Using On-screen Menus 17 (GB) Operating Through Menus 17 (GB) GB Menu Guide 17 (GB) Watching the Picture 23 (GB) Switching the Input Signal 23 (GB) Input Signal, Picture Mode and Display Status Information 24 (GB) Selecting Image Quality 26 (GB) Adjusting the Picture 26 (GB) Adjusting the Contrast, Brightness, Chroma, and Phase, etc 26 (GB) Restoring the Adjust Picture Menu...
...) Connecting the Speakers 15 (GB) Connecting the AC Power Cord 15 (GB) Cable management 16 (GB) Using On-screen Menus 17 (GB) Operating Through Menus 17 (GB) GB Menu Guide 17 (GB) Watching the Picture 23 (GB) Switching the Input Signal 23 (GB) Input Signal, Picture Mode and Display Status Information 24 (GB) Selecting Image Quality 26 (GB) Adjusting the Picture 26 (GB) Adjusting the Contrast, Brightness, Chroma, and Phase, etc 26 (GB) Restoring the Adjust Picture Menu...

Operating Instructions
Page 5
... remove the markings on the position of the way it is made, when this unit will never completely disappear. • To protect the plasma display, this plasma display panel is used for several days or more. • To disconnect the AC power cord, pull it . If ghosting occurs, use the screen saver function, or use the optional stand. After one of video or imaging software...
... remove the markings on the position of the way it is made, when this unit will never completely disappear. • To protect the plasma display, this plasma display panel is used for several days or more. • To disconnect the AC power cord, pull it . If ghosting occurs, use the screen saver function, or use the optional stand. After one of video or imaging software...

Operating Instructions
Page 7
... panel For details on the connector panel, see "Control Button Section (Top)" on page 8 (GB). 3Stand installation hooks Use these hooks to install the stand (not supplied). 4AC OUT socket (three brade type) You can connect a device consuming small power to this socket and supply power when setting up in red and the display goes into the standby mode. Once you connect the AC power cord, the POWER/STANDBY indicator lights up an audio/visual system (the power rating...
... panel For details on the connector panel, see "Control Button Section (Top)" on page 8 (GB). 3Stand installation hooks Use these hooks to install the stand (not supplied). 4AC OUT socket (three brade type) You can connect a device consuming small power to this socket and supply power when setting up in red and the display goes into the standby mode. Once you connect the AC power cord, the POWER/STANDBY indicator lights up an audio/visual system (the power rating...

Operating Instructions
Page 12
... restore sound. 4DISPLAY button Press to display the input signal information and the picture mode on the display. 2STANDBY button Press to change the aspect ratio (Wide Mode). 9M/m/ Location and Function of Parts and Controls Remote Commander RM-980 1 2 MUTING DISPLAY STBY ON 3 4 5 qf 6 qg 7 qh 8 qj 9 ENTER 123 0 456 789 qa 0 qk qs ON SET qd ql MONITOR RM-980 1POWER ON switch Press to power on the screen...
... restore sound. 4DISPLAY button Press to display the input signal information and the picture mode on the display. 2STANDBY button Press to change the aspect ratio (Wide Mode). 9M/m/ Location and Function of Parts and Controls Remote Commander RM-980 1 2 MUTING DISPLAY STBY ON 3 4 5 qf 6 qg 7 qh 8 qj 9 ENTER 123 0 456 789 qa 0 qk qs ON SET qd ql MONITOR RM-980 1POWER ON switch Press to power on the screen...

Operating Instructions
Page 13
Press this button and adjust the chroma with the M/m or qk CHROMA button Adjusts the chroma when the picture mode is set to any of "User1" to "User3."
Press this button and adjust the chroma with the M/m or qk CHROMA button Adjusts the chroma when the picture mode is set to any of "User1" to "User3."

Operating Instructions
Page 15
... the picture (Example: white to black, black to white) and corrects the image retention (afterimage) with displayed image on -screen menu displays 5 On-screen menus, channel numbers, etc., of equipment is turned off. • Use connecting cables suitable for an extended period of time, image retention (afterimage) in or after image cannot be completely removed once they occur. Caution / Connections Connections Before you start • First make sure that appear with wide video source (Letter box picture) 2 Black bars...
... the picture (Example: white to black, black to white) and corrects the image retention (afterimage) with displayed image on -screen menu displays 5 On-screen menus, channel numbers, etc., of equipment is turned off. • Use connecting cables suitable for an extended period of time, image retention (afterimage) in or after image cannot be completely removed once they occur. Caution / Connections Connections Before you start • First make sure that appear with wide video source (Letter box picture) 2 Black bars...

Operating Instructions
Page 17
The M/m and ENTER buttons on the Remote Commander have the same functions as the M/m and ENTER buttons on the display unit or the Remote Commander for the case of the unit is explained in some cases since there is no Note Operation may differ in these operating instructions for menu operations. Using On-screen Menus Operating Through Menus Menu operating buttons Use the buttons on the display. Remote Commander MENU Control button section ENTER Operation of operation using the Remote Commander.
The M/m and ENTER buttons on the Remote Commander have the same functions as the M/m and ENTER buttons on the display unit or the Remote Commander for the case of the unit is explained in some cases since there is no Note Operation may differ in these operating instructions for menu operations. Using On-screen Menus Operating Through Menus Menu operating buttons Use the buttons on the display. Remote Commander MENU Control button section ENTER Operation of operation using the Remote Commander.

Operating Instructions
Page 18
... Auto Wide function. Adjust Screen This menu is used for connecting multiple display units and forming a video wall in a 2 × 2, 3 × 3 or 4 × 4 arrangement. You can resize or adjust the position of the sound. Note You cannot adjust the following items when Picture Mode is a function which chooses from different signal sources, such as a computer and a video, side by side. Aspect Switches the wide screen display to "User3" first. The Auto Wide function is set to a wide screen image...
... Auto Wide function. Adjust Screen This menu is used for connecting multiple display units and forming a video wall in a 2 × 2, 3 × 3 or 4 × 4 arrangement. You can resize or adjust the position of the sound. Note You cannot adjust the following items when Picture Mode is a function which chooses from different signal sources, such as a computer and a video, side by side. Aspect Switches the wide screen display to "User3" first. The Auto Wide function is set to a wide screen image...

Operating Instructions
Page 19
... selected. CUSTOM SETUP menu You can reduce power consumption or set various kinds of RGB/COMPONENT connector. Standard: No energy saving Reduce: Save energy When you select "Reduce," the brightness of the picture. H/Comp: When a horizontal signal or a composite synchronous signal* is input Video: When a video signal is input Using On-screen Menus RGB Mode Sets the mode when a device that you may not be carried out for the synchronous mode setting, you turn on the level...
... selected. CUSTOM SETUP menu You can reduce power consumption or set various kinds of RGB/COMPONENT connector. Standard: No energy saving Reduce: Save energy When you select "Reduce," the brightness of the picture. H/Comp: When a horizontal signal or a composite synchronous signal* is input Video: When a video signal is input Using On-screen Menus RGB Mode Sets the mode when a device that you may not be carried out for the synchronous mode setting, you turn on the level...

Operating Instructions
Page 20
... DVI input connectors for the display using ENTER on the Remote Commander for setting, you can only make settings for setting, you want to switch the display unit on the Remote Commander to control it using . The display unit automatically enters the power saving mode when a signal is not input to display PAL60 signals Auto Shut Off When you set the Color System automatically. Using On-screen Menus Remote This menu is input. 20 (GB) Index Number Sets the index number of the Remote Commander. Control Mode...
... DVI input connectors for the display using ENTER on the Remote Commander for setting, you can only make settings for setting, you want to switch the display unit on the Remote Commander to control it using . The display unit automatically enters the power saving mode when a signal is not input to display PAL60 signals Auto Shut Off When you set the Color System automatically. Using On-screen Menus Remote This menu is input. 20 (GB) Index Number Sets the index number of the Remote Commander. Control Mode...

Operating Instructions
Page 21
... input signal on page 42 (GB). Auto Screen Adjust When "Auto Screen Adjust" is set to set an IP address. Operation Time Indicates the total number of hours of the Operation Time. Manual: Manual configuration to On, it saves the screen-settings for size and positioning for displaying various information, including information on page 38 (GB). Note Time spent in the factory setting. INITIAL SETUP/INFORMATION Information Model Name: Serial Number: Operation Time: Software Version: Using On-screen...
... input signal on page 42 (GB). Auto Screen Adjust When "Auto Screen Adjust" is set to set an IP address. Operation Time Indicates the total number of hours of the Operation Time. Manual: Manual configuration to On, it saves the screen-settings for size and positioning for displaying various information, including information on page 38 (GB). Note Time spent in the factory setting. INITIAL SETUP/INFORMATION Information Model Name: Serial Number: Operation Time: Software Version: Using On-screen...

Operating Instructions
Page 23
... the Picture Before you start • Power on the display. • Power on the connected equipment and play a video source. • To display the input signal information and Picture Mode on the screen when turning on the power or switching the input signal, set value (Only when the signal formats are input from multiple systems, the Picture Quality setting will default to the most recently set "Display" in the Custom Setup menu to On. • To select the language of...
... the Picture Before you start • Power on the display. • Power on the connected equipment and play a video source. • To display the input signal information and Picture Mode on the screen when turning on the power or switching the input signal, set value (Only when the signal formats are input from multiple systems, the Picture Quality setting will default to the most recently set "Display" in the Custom Setup menu to On. • To select the language of...

Operating Instructions
Page 25
... colors appear too light after inputting a DVD signal to the display unit, adjust the "Chroma" setting in the Adjust Picture menu. • When the phase is readjusted, the resolution will be reduced. • You cannot input the signal indicated with * to DVI IN. • You cannot input the signal indicated with ** to an analog RGB input connectors. The input signal is out of Range No Sync INPUT1 DVI INPUT2 RGB INPUT2 Component Option 1 Video Option 1 S Video Option 1 RGB Option...
... colors appear too light after inputting a DVD signal to the display unit, adjust the "Chroma" setting in the Adjust Picture menu. • When the phase is readjusted, the resolution will be reduced. • You cannot input the signal indicated with * to DVI IN. • You cannot input the signal indicated with ** to an analog RGB input connectors. The input signal is out of Range No Sync INPUT1 DVI INPUT2 RGB INPUT2 Component Option 1 Video Option 1 S Video Option 1 RGB Option...

Operating Instructions
Page 35
... of the video wall with M/m. PICTURE/SOUND CONTROL Picture Mode: Adjust Picture Adjust Sound Standard Select Set ENTER Exit MENU 2 Select "SCREEN CONTROL" with M/m and press ENTER. The following menu appears on the screen. Setting up the Multi Display 4 Select "Multi Display" with M/m and press ENTER. SCREEN CONTROL Multi Display Setup Wide Setup Wide Mode: Full Adjust Screen Select Set ENTER Exit MENU Note You can make settings for connecting multiple display units to setup with M/m/ The main menu appears on the screen. Off: Uses a single screen. 2 ×...
... of the video wall with M/m. PICTURE/SOUND CONTROL Picture Mode: Adjust Picture Adjust Sound Standard Select Set ENTER Exit MENU 2 Select "SCREEN CONTROL" with M/m and press ENTER. The following menu appears on the screen. Setting up the Multi Display 4 Select "Multi Display" with M/m and press ENTER. SCREEN CONTROL Multi Display Setup Wide Setup Wide Mode: Full Adjust Screen Select Set ENTER Exit MENU Note You can make settings for connecting multiple display units to setup with M/m/ The main menu appears on the screen. Off: Uses a single screen. 2 ×...

Operating Instructions
Page 43
... flashes, check the number of flashes and contact your authorized Sony dealer. 1 Check the flashing pattern of flashes. 1 In the INITIAL SETUP/INFORMATION menu, select "Speed Setup" with M/m, then press ENTER. For example, the indicator flashes twice, followed by the flashing of the display's current condition. This function shows the display's condition based on the display). The cursor moves to the next box. The following error codes will be set manually...
... flashes, check the number of flashes and contact your authorized Sony dealer. 1 Check the flashing pattern of flashes. 1 In the INITIAL SETUP/INFORMATION menu, select "Speed Setup" with M/m, then press ENTER. For example, the indicator flashes twice, followed by the flashing of the display's current condition. This function shows the display's condition based on the display). The cursor moves to the next box. The following error codes will be set manually...

Operating Instructions
Page 44
..., use the buttons on the screen. You cannot change the index number using the 0 - 9 buttons on the selected display change to operate using the Remote Commander. 1 Press MENU. PICTURE/SOUND CONTROL Picture Mode: Adjust Picture Adjust Sound Standard Index Number 117 . . . 2 Input the index number of each display. 123 456 789 0 ON SET OFF Input Number Index Number 117 117 3 Press ID MODE SET. The Remote menu appears on the Remote Commander. Operating a Specific Display With the Remote Commander Operating a Specific Display With the Remote Commander Using the supplied...
..., use the buttons on the screen. You cannot change the index number using the 0 - 9 buttons on the selected display change to operate using the Remote Commander. 1 Press MENU. PICTURE/SOUND CONTROL Picture Mode: Adjust Picture Adjust Sound Standard Index Number 117 . . . 2 Input the index number of each display. 123 456 789 0 ON SET OFF Input Number Index Number 117 117 3 Press ID MODE SET. The Remote menu appears on the Remote Commander. Operating a Specific Display With the Remote Commander Operating a Specific Display With the Remote Commander Using the supplied...

Pro Displays Brochure
Page 6
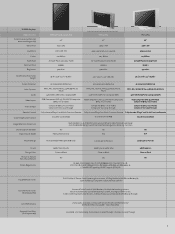
...fications LCD Displays Model Number Screen Size (viewable area measured diagonally) Resolution Pixel Pitch Colors Panel Type Contrast Ratio Brightness FWD-32LX2F/B & /S FWD-40LX2F/B & /S 32" / 40" 1366 x 768 WXGA 0.51 x 0.51 mm/ 0.648 x 0.648 mm 16.7 Million a-Si-TFT active matrix LCD panel 1300:1 500 cd/m2 Dimensions (W x H x D)/ Weight Screen Protector Anaglog Video Color Systems Audio Video Inputs Video Output Remote Control Color Temperature Control Viewing Angle Closed Caption Decoder High Altitude Capable Mount Design Power Design Color Picture and Picture 32LX2F = 31...
...fications LCD Displays Model Number Screen Size (viewable area measured diagonally) Resolution Pixel Pitch Colors Panel Type Contrast Ratio Brightness FWD-32LX2F/B & /S FWD-40LX2F/B & /S 32" / 40" 1366 x 768 WXGA 0.51 x 0.51 mm/ 0.648 x 0.648 mm 16.7 Million a-Si-TFT active matrix LCD panel 1300:1 500 cd/m2 Dimensions (W x H x D)/ Weight Screen Protector Anaglog Video Color Systems Audio Video Inputs Video Output Remote Control Color Temperature Control Viewing Angle Closed Caption Decoder High Altitude Capable Mount Design Power Design Color Picture and Picture 32LX2F = 31...
Pro Displays Brochure
Page 7
... or Black Yes Supplied Accessories Optional Accessories (Sold separately) Limited Warranty Optional Card Slots (Sold separately) DVI-D Cable, AC Power Cord, Operating Instructions, AC Plug Holder (2), AA/R6 size Battery (2), Cable Holder (4), Component Cable, Remote Control Universal Table Stands & Wall Brackets, Multiple Networking options which include Status Control/Streaming Content, Storing Content Tuners, Tuners with Hospitality Connections, Alternate Inputs, and Component/RGB Loop Through 2-year parts and labor, 1-year panel onsite service Limited...
... or Black Yes Supplied Accessories Optional Accessories (Sold separately) Limited Warranty Optional Card Slots (Sold separately) DVI-D Cable, AC Power Cord, Operating Instructions, AC Plug Holder (2), AA/R6 size Battery (2), Cable Holder (4), Component Cable, Remote Control Universal Table Stands & Wall Brackets, Multiple Networking options which include Status Control/Streaming Content, Storing Content Tuners, Tuners with Hospitality Connections, Alternate Inputs, and Component/RGB Loop Through 2-year parts and labor, 1-year panel onsite service Limited...
Pro Displays Brochure
Page 9
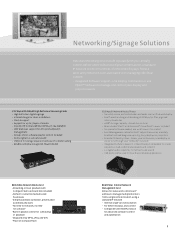
ICS-FW40 & ICS-FW40D High Definition Streaming Cards • High definition digital signage • Internal design for clean installation • Flash 6 support • Support for up to 255 Sony displays or projectors • Remote PC Desktop View - Networking/Signage Solutions Optional networking devices (sold separately) let you centrally control, deliver and troubleshoot digital content across a standard IP network to 5 layers of...
ICS-FW40 & ICS-FW40D High Definition Streaming Cards • High definition digital signage • Internal design for clean installation • Flash 6 support • Support for up to 255 Sony displays or projectors • Remote PC Desktop View - Networking/Signage Solutions Optional networking devices (sold separately) let you centrally control, deliver and troubleshoot digital content across a standard IP network to 5 layers of...


