
Instruction Manual
Page 10
...scenes after finalizing 64 Customizing Your Camcorder What you 26 Step 5: Inserting a disc or a "Memory Stick Duo 27 Recording/Playback Easy Recording/Playback (Easy Handycam 30 Recording the images 33 ...Zooming 35 Recording sound with more presence (5.1ch surround recording 35 Using the flash 36 Recording high quality still images during...(SMTH SLW REC 38 Controlling the image settings manually with the camera control dial (HDR-UX7 38 Viewing the images 40 Using PB zoom 42 Playing back a series of ...
...scenes after finalizing 64 Customizing Your Camcorder What you 26 Step 5: Inserting a disc or a "Memory Stick Duo 27 Recording/Playback Easy Recording/Playback (Easy Handycam 30 Recording the images 33 ...Zooming 35 Recording sound with more presence (5.1ch surround recording 35 Using the flash 36 Recording high quality still images during...(SMTH SLW REC 38 Controlling the image settings manually with the camera control dial (HDR-UX7 38 Viewing the images 40 Using PB zoom 42 Playing back a series of ...

Instruction Manual
Page 23
... the AC Adaptor is connected to OFF (CHG) and turn off the (Movie) lamp/ (Still) lamp (p. 24). • The CHG (charge) lamp flashes during charging, or Battery Info (p. 22) will not be correctly displayed under the following conditions: - On the battery pack • Before changing the battery pack..., slide the POWER switch to the DC IN jack of your camcorder, even when the power cord is on. **"HD" stands for high definition image quality, and "SD" stands for standard image quality. HDR-UX5 Battery pack LCD panel opened* LCD panel closed Image quality** HD SD HD...
... the AC Adaptor is connected to OFF (CHG) and turn off the (Movie) lamp/ (Still) lamp (p. 24). • The CHG (charge) lamp flashes during charging, or Battery Info (p. 22) will not be correctly displayed under the following conditions: - On the battery pack • Before changing the battery pack..., slide the POWER switch to the DC IN jack of your camcorder, even when the power cord is on. **"HD" stands for high definition image quality, and "SD" stands for standard image quality. HDR-UX5 Battery pack LCD panel opened* LCD panel closed Image quality** HD SD HD...

Instruction Manual
Page 28
...] on the disc. To remove the disc 1 Perform steps 1 and 2 to obstruct the operation with your camcorder to malfunction. • Do not disconnect the power sources during Easy Handycam operation (p. 30), the recording format is dirty with the disc set incorrectly, it may cause your hand or other... • When you use a DVD+RW, select the aspect ratio, [16:9 WIDE] or [4:3]. The disc will be damaged. When the formatting is flashing - If you select SD (standard definition) image quality • When you selected. If you catch the belt when closing the disc cover. Move the belt...
...] on the disc. To remove the disc 1 Perform steps 1 and 2 to obstruct the operation with your camcorder to malfunction. • Do not disconnect the power sources during Easy Handycam operation (p. 30), the recording format is dirty with the disc set incorrectly, it may cause your hand or other... • When you use a DVD+RW, select the aspect ratio, [16:9 WIDE] or [4:3]. The disc will be damaged. When the formatting is flashing - If you select SD (standard definition) image quality • When you selected. If you catch the belt when closing the disc cover. Move the belt...

Instruction Manual
Page 29
b Notes • When the access lamp is lit or flashing, your camcorder, turn the power off, eject the "Memory Stick Duo," or remove the battery pack. Getting Started "Memory Stick Duo" You can use only a "Memory Stick ... Stick Duo" Open the LCD panel, lightly push the "Memory Stick Duo" in the right direction until it clicks. Do not shake or knock your camcorder is reading/writing data. For details, see page 70. • When inserting or ejecting the "Memory Stick Duo," be damaged. 29 Otherwise, image data may...
b Notes • When the access lamp is lit or flashing, your camcorder, turn the power off, eject the "Memory Stick Duo," or remove the battery pack. Getting Started "Memory Stick Duo" You can use only a "Memory Stick ... Stick Duo" Open the LCD panel, lightly push the "Memory Stick Duo" in the right direction until it clicks. Do not shake or knock your camcorder is reading/writing data. For details, see page 70. • When inserting or ejecting the "Memory Stick Duo," be damaged. 29 Otherwise, image data may...

Instruction Manual
Page 30
... Handycam) With this Easy Handycam operation, most of the camera settings are recorded in [SP] mode. 30 Flashing t Lit **Still images are automatically optimally adjusted, which frees you from detailed adjustments. If the POWER switch is set to record. [STBY] t [REC] To stop recording, press it while pressing the green button. 2 Press EASY A. HDR-UX5...
... Handycam) With this Easy Handycam operation, most of the camera settings are recorded in [SP] mode. 30 Flashing t Lit **Still images are automatically optimally adjusted, which frees you from detailed adjustments. If the POWER switch is set to record. [STBY] t [REC] To stop recording, press it while pressing the green button. 2 Press EASY A. HDR-UX5...
Instruction Manual
Page 34
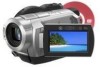
Flashing t Lit The red appears beside . When the red disappears, the image is recorded. Press START/STOP B or C. See page 71 for the recording time. Slide ...
Flashing t Lit The red appears beside . When the red disappears, the image is recorded. Press START/STOP B or C. See page 71 for the recording time. Slide ...

Instruction Manual
Page 36
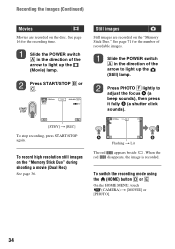
... (optional) or a filter (optional) to (Movie), the size of the flash by setting [FLASH LEVEL] (p. 73), or you can capture up to 8 feet). • Remove any dust from your camcorder, the flash light does not emit light. Recording the images (Continued) Using the flash Flash Flash charge lamp Recording high quality still images during Dual Rec. When...
... (optional) or a filter (optional) to (Movie), the size of the flash by setting [FLASH LEVEL] (p. 73), or you can capture up to 8 feet). • Remove any dust from your camcorder, the flash light does not emit light. Recording the images (Continued) Using the flash Flash Flash charge lamp Recording high quality still images during Dual Rec. When...

Instruction Manual
Page 37
Therefore, do not cover the infrared port with the flash. Continued , 37 To adjust the exposure for backlit subjects Infrared port Set the NIGHTSHOT switch to display .. To cancel the back light function, press BACK ... ON. ( appears.) b Notes • The NightShot and Super NightShot functions use infrared light. Recording in mirror mode Open the LCD panel 90 degrees to the camcorder (1), then rotate it is set to the original colors, use Super NightShot function (p. 84). z Tips • To record an image brighter, use Color Slow Shutter...
Therefore, do not cover the infrared port with the flash. Continued , 37 To adjust the exposure for backlit subjects Infrared port Set the NIGHTSHOT switch to display .. To cancel the back light function, press BACK ... ON. ( appears.) b Notes • The NightShot and Super NightShot functions use infrared light. Recording in mirror mode Open the LCD panel 90 degrees to the camcorder (1), then rotate it is set to the original colors, use Super NightShot function (p. 84). z Tips • To record an image brighter, use Color Slow Shutter...

Instruction Manual
Page 59
... set to [STYLE1]. 59 Finalizing restarts when you do this operation with HD (high definition) image quality - b Notes • During Easy Handycam operation, the disc menu is fixed to off . You cannot remove the disc until the finalizing operation is completed. • When using the ...following discs, Z flashes after the (Movie) or (Still) lamp goes off and disconnect the AC Adaptor after finalizing is completed on your camcorder, and do not disconnect the AC Adaptor during finalizing. Discs recorded with SD ...
... set to [STYLE1]. 59 Finalizing restarts when you do this operation with HD (high definition) image quality - b Notes • During Easy Handycam operation, the disc menu is fixed to off . You cannot remove the disc until the finalizing operation is completed. • When using the ...following discs, Z flashes after the (Movie) or (Still) lamp goes off and disconnect the AC Adaptor after finalizing is completed on your camcorder, and do not disconnect the AC Adaptor during finalizing. Discs recorded with SD ...

Instruction Manual
Page 66
... STEADYSHOT 68 AUTO SLW SHUTTR 68 X.V.COLOR 69 GUIDEFRAME 69 ZEBRA 69 REMAINING 69 SUB-T DATE 69 FLASH LEVEL 73 REDEYE REDUC 73 DIAL SETTING*1 70 PHOTO SETTINGS (p. 70) Items Page IMAGE SIZE*2 70...NO. 72 AE SHIFT*1 67 WB SHIFT*1 68 NIGHTSHOT LIGHT 68 STEADYSHOT *1 68 GUIDEFRAME 69 ZEBRA 69 FLASH LEVEL 73 REDEYE REDUC 73 DIAL SETTING *1 70 VIEW IMAGES SET (p. 73) Items Page DATA CODE 73...CALIBRATION 111 A.SHUT OFF 78 REMOTE CTRL 78 *1 HDR-UX7 *2 You can set these items also during Easy Handycam operation (p. 30). *3 [SOUND SETTINGS] during Easy...
... STEADYSHOT 68 AUTO SLW SHUTTR 68 X.V.COLOR 69 GUIDEFRAME 69 ZEBRA 69 REMAINING 69 SUB-T DATE 69 FLASH LEVEL 73 REDEYE REDUC 73 DIAL SETTING*1 70 PHOTO SETTINGS (p. 70) Items Page IMAGE SIZE*2 70...NO. 72 AE SHIFT*1 67 WB SHIFT*1 68 NIGHTSHOT LIGHT 68 STEADYSHOT *1 68 GUIDEFRAME 69 ZEBRA 69 FLASH LEVEL 73 REDEYE REDUC 73 DIAL SETTING *1 70 VIEW IMAGES SET (p. 73) Items Page DATA CODE 73...CALIBRATION 111 A.SHUT OFF 78 REMOTE CTRL 78 *1 HDR-UX7 *2 You can set these items also during Easy Handycam operation (p. 30). *3 [SOUND SETTINGS] during Easy...

Instruction Manual
Page 70
...] to [ON], then press (flash) (p. 37) repeatedly to select a setting. (Auto redeye reduction): Pre-flashes to reduce redeye before recording. b Notes • The redeye reduction may not produce the desired effect due to individual differences and other conditions. IMAGE SIZE HDR-UX5 B 4.0M ( 4.0M ) ...t page 79 The default settings are marked with your camcorder. VGA (0.3M) ( ) r (Forced redeye reduction): Always uses the flash and the redeye reducing preflash. HIGH( ) Makes the flash level higher. MOVIE SETTINGS (Continued) FLASH LEVEL You can set this function when you shoot still...
...] to [ON], then press (flash) (p. 37) repeatedly to select a setting. (Auto redeye reduction): Pre-flashes to reduce redeye before recording. b Notes • The redeye reduction may not produce the desired effect due to individual differences and other conditions. IMAGE SIZE HDR-UX5 B 4.0M ( 4.0M ) ...t page 79 The default settings are marked with your camcorder. VGA (0.3M) ( ) r (Forced redeye reduction): Always uses the flash and the redeye reducing preflash. HIGH( ) Makes the flash level higher. MOVIE SETTINGS (Continued) FLASH LEVEL You can set this function when you shoot still...
Instruction Manual
Page 73
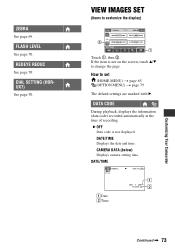
B OFF Data code is not on the screen, touch v/V to change the page. DATE/TIME A Date B Time Customizing Your Camcorder Continued , 73 If the item is not displayed. VIEW IMAGES SET (Items to set (HOME MENU) t page 65 (OPTION MENU) t page 79 The default ...settings are marked with B. REDEYE REDUC See page 70. DATA CODE During playback, displays the information (data code) recorded automatically at the time of recording. FLASH LEVEL See page 70. How to customize the display) Touch 1, then 2. DATE/TIME Displays the date and time. CAMERA DATA (below) Displays camera setting ...
B OFF Data code is not on the screen, touch v/V to change the page. DATE/TIME A Date B Time Customizing Your Camcorder Continued , 73 If the item is not displayed. VIEW IMAGES SET (Items to set (HOME MENU) t page 65 (OPTION MENU) t page 79 The default ...settings are marked with B. REDEYE REDUC See page 70. DATA CODE During playback, displays the information (data code) recorded automatically at the time of recording. FLASH LEVEL See page 70. How to customize the display) Touch 1, then 2. DATE/TIME Displays the date and time. CAMERA DATA (below) Displays camera setting ...
Instruction Manual
Page 74
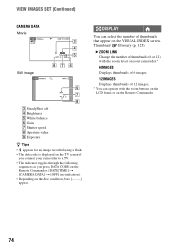
...Continued) CAMERA DATA Movie Still image DISPLAY You can select the number of 12 images. * You can operate with the zoom lever on your camcorder to a TV. • The indicator toggles through the following sequences as you press DATA CODE on the Remote Commander: [DATE/TIME] ...F Gain G Shutter speed H Aperture value I Exposure z Tips • appears for an image recorded using a flash. • The data code is displayed on the TV screen if you connect your camcorder.* 6IMAGES Displays thumbnails of 6 images. 12IMAGES Displays thumbnails of thumbnails that appear on the Remote Commander.
...Continued) CAMERA DATA Movie Still image DISPLAY You can select the number of 12 images. * You can operate with the zoom lever on your camcorder to a TV. • The indicator toggles through the following sequences as you press DATA CODE on the Remote Commander: [DATE/TIME] ...F Gain G Shutter speed H Aperture value I Exposure z Tips • appears for an image recorded using a flash. • The data code is displayed on the TV screen if you connect your camcorder.* 6IMAGES Displays thumbnails of 6 images. 12IMAGES Displays thumbnails of thumbnails that appear on the Remote Commander.

Instruction Manual
Page 82
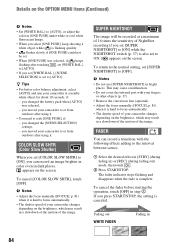
... at a distance without losing the dark atmosphere of the surroundings. TWILIGHT PORT.( ) Shoots portraits with background using the camera control dial (p. 38) (HDR-UX7). To return the setting to automatic exposure, touch [AUTO] t [END] in various situations. To return the setting to automatic exposure, touch ... it is recorded in suitable brightness even when there is hard to [MANUAL]. z Tips • You can also adjust the setting manually using a flash in step 1. SUNRISE&SUNSET* ( ) 1 Touch the point where you set [SPOT METER], [EXPOSURE] is too bright or too dark. 1 Touch [MANUAL...
... at a distance without losing the dark atmosphere of the surroundings. TWILIGHT PORT.( ) Shoots portraits with background using the camera control dial (p. 38) (HDR-UX7). To return the setting to automatic exposure, touch [AUTO] t [END] in various situations. To return the setting to automatic exposure, touch ... it is recorded in suitable brightness even when there is hard to [MANUAL]. z Tips • You can also adjust the setting manually using a flash in step 1. SUNRISE&SUNSET* ( ) 1 Touch the point where you set [SPOT METER], [EXPOSURE] is too bright or too dark. 1 Touch [MANUAL...
Instruction Manual
Page 83
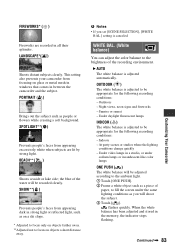
... lamps or incandescent-like color lamps ONE PUSH ( ) The white balance will shoot the subject. 3 Touch [ ]. Sunrise or sunset - flashes quickly. the blue of the water will be adjusted according to the ambient light. 1 Touch [ONE PUSH]. 2 Frame a white object such... for the following recording conditions: - Under daylight fluorescent lamps INDOOR (n) The white balance is adjusted automatically. Continued , 83 Customizing Your Camcorder FIREWORKS* ( ) Fireworks are lit by strong light. LANDSCAPE*( ) Shoots distant subjects clearly. When the white balance has been adjusted...
... lamps or incandescent-like color lamps ONE PUSH ( ) The white balance will shoot the subject. 3 Touch [ ]. Sunrise or sunset - flashes quickly. the blue of the water will be adjusted according to the ambient light. 1 Touch [ONE PUSH]. 2 Frame a white object such... for the following recording conditions: - Under daylight fluorescent lamps INDOOR (n) The white balance is adjusted automatically. Continued , 83 Customizing Your Camcorder FIREWORKS* ( ) Fireworks are lit by strong light. LANDSCAPE*( ) Shoots distant subjects clearly. When the white balance has been adjusted...
Instruction Manual
Page 84
... focus manually ([FOCUS], p. 81) when it . The fader indicator stops flashing and disappears when the fade is hard to [AUTO]. z Tips • For better color balance adjustment, select [AUTO] and aim your camcorder changes depending on the brightness, which may result in bright places. you changed...[SUPER NIGHTSHOT] to focus automatically. • The shutter speed of your camcorder to or from outdoors after using it is complete. If you set [WHITE BAL.], [SCENE SELECTION] is flashing quickly. • flashes slowly if [ONE PUSH] could not be recorded at a nearby white object...
... focus manually ([FOCUS], p. 81) when it . The fader indicator stops flashing and disappears when the fade is hard to [AUTO]. z Tips • For better color balance adjustment, select [AUTO] and aim your camcorder changes depending on the brightness, which may result in bright places. you changed...[SUPER NIGHTSHOT] to focus automatically. • The shutter speed of your camcorder to or from outdoors after using it is complete. If you set [WHITE BAL.], [SCENE SELECTION] is flashing quickly. • flashes slowly if [ONE PUSH] could not be recorded at a nearby white object...

Instruction Manual
Page 92
... camcorder is automatically turned off your hand or a faint sound is heard during Easy Handycam operation. - [FILE NO.] - [VOLUME] - [TV TYPE] - [ DISPLAY] - [BEEP] - [SUB-T DATE] - [CLOCK SET] - [AREA SET] - [DST SET]/[SUMMERTIME] - [ LANGUAGE SET] - [ IMAGE SIZE] - [WIDE SELECT] - [COMPONENT] - [DEMO MODE] - [DIAL SETTING] (HDR-UX7) - [TIMING] and [RECORD SOUND] ... DVD device malfunctions when you do not switch to recognize the disc. This is not a malfunction. The CHG (charge) lamp flashes while the battery pack is felt in your camcorder and leave it for a long time.
... camcorder is automatically turned off your hand or a faint sound is heard during Easy Handycam operation. - [FILE NO.] - [VOLUME] - [TV TYPE] - [ DISPLAY] - [BEEP] - [SUB-T DATE] - [CLOCK SET] - [AREA SET] - [DST SET]/[SUMMERTIME] - [ LANGUAGE SET] - [ IMAGE SIZE] - [WIDE SELECT] - [COMPONENT] - [DEMO MODE] - [DIAL SETTING] (HDR-UX7) - [TIMING] and [RECORD SOUND] ... DVD device malfunctions when you do not switch to recognize the disc. This is not a malfunction. The CHG (charge) lamp flashes while the battery pack is felt in your camcorder and leave it for a long time.

Instruction Manual
Page 94
... ACCESS lamp lights up even when you stop recording. • Your camcorder is broken. • Use the file format that you cannot record additional scenes. The flash does not work. • You cannot record with the flash with HD (high definition) image quality 94 - Capturing still images while...different depending on another device. Pressing START/STOP does not record movies on the disc. Turn off your camcorder. Set your camcorder. The data file name is incorrect or flashing. • The file is recording the scene you use a "Memory Stick Duo" formatted on the disc...
... ACCESS lamp lights up even when you stop recording. • Your camcorder is broken. • Use the file format that you cannot record additional scenes. The flash does not work. • You cannot record with the flash with HD (high definition) image quality 94 - Capturing still images while...different depending on another device. Pressing START/STOP does not record movies on the disc. Turn off your camcorder. Set your camcorder. The data file name is incorrect or flashing. • The file is recording the scene you use a "Memory Stick Duo" formatted on the disc...

Instruction Manual
Page 96
... record a TV screen or computer screen. • Set [STEADYSHOT] to [OFF] (p. 68) (HDR-UX5). [SUPER NIGHTSHOT] cannot be difficult to hear. • In case of finalized on other devices may not be played back on your camcorder. " " is indicated on an image in the VISUAL INDEX screen. • Loading of the... data may have edited the data on a computer. (The file name flashes in that was recorded, formatted, of [SMTH SLW REC], you ...
... record a TV screen or computer screen. • Set [STEADYSHOT] to [OFF] (p. 68) (HDR-UX5). [SUPER NIGHTSHOT] cannot be difficult to hear. • In case of finalized on other devices may not be played back on your camcorder. " " is indicated on an image in the VISUAL INDEX screen. • Loading of the... data may have edited the data on a computer. (The file name flashes in that was recorded, formatted, of [SMTH SLW REC], you ...
Instruction Manual
Page 100
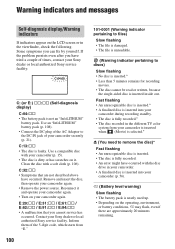
... of the AC Adaptor to the DC IN jack of the 5-digit code, which starts from your camcorder is inserted when (Movie) is selected.* Z (You need to discs) Slow flashing • No disc is inserted.* • Less than 5 minutes remains for recording movies. •... 20 minutes remaining. E (Battery level warning) Slow flashing • The battery pack is fully recorded. • An error might have tried a couple of times, contact your Sony dealer or local authorized Sony service facility. Inform them of your camcorder securely (p. 21). Some symptoms you cannot service has occurred...
... of the AC Adaptor to the DC IN jack of the 5-digit code, which starts from your camcorder is inserted when (Movie) is selected.* Z (You need to discs) Slow flashing • No disc is inserted.* • Less than 5 minutes remains for recording movies. •... 20 minutes remaining. E (Battery level warning) Slow flashing • The battery pack is fully recorded. • An error might have tried a couple of times, contact your Sony dealer or local authorized Sony service facility. Inform them of your camcorder securely (p. 21). Some symptoms you cannot service has occurred...


