
Instruction Manual
Page 1
http://www.sony.net/ Printed on this product and answers to frequently asked questions can be found at our Customer Support Website. Printed in Japan US 2-319-777-11(1) Digital HD Video Camera Recorder Operating Guide HDR-UX5/UX7 Enjoying Your Camcorder 13 Getting Started 20 ...Recording/Playback 30 Editing 48 Utilizing Recording Media 56 Customizing Your 65 Camcorder Using a Computer 86 Troubleshooting 91 Additional Information 103 Quick ...
http://www.sony.net/ Printed on this product and answers to frequently asked questions can be found at our Customer Support Website. Printed in Japan US 2-319-777-11(1) Digital HD Video Camera Recorder Operating Guide HDR-UX5/UX7 Enjoying Your Camcorder 13 Getting Started 20 ...Recording/Playback 30 Editing 48 Utilizing Recording Media 56 Customizing Your 65 Camcorder Using a Computer 86 Troubleshooting 91 Additional Information 103 Quick ...

Instruction Manual
Page 6
... are designed to radio communications. Reorient or relocate the receiving antenna. - This equipment generates, uses, and can use Sony discs or discs with an *(for VIDEO CAMERA) mark for a Class B digital device, pursuant to correct the interference by turning the equipment off and on ... into an outlet on , the user is connected. - Increase the separation between the equipment and receiver. - Notes on use Your camcorder is no guarantee that you use the following measures: - For reliability and durability of recording/ playback, we recommend that interference will not...
... are designed to radio communications. Reorient or relocate the receiving antenna. - This equipment generates, uses, and can use Sony discs or discs with an *(for VIDEO CAMERA) mark for a Class B digital device, pursuant to correct the interference by turning the equipment off and on ... into an outlet on , the user is connected. - Increase the separation between the equipment and receiver. - Notes on use Your camcorder is no guarantee that you use the following measures: - For reliability and durability of recording/ playback, we recommend that interference will not...

Instruction Manual
Page 7
...Memory Stick Duo" with "Memory Stick PRO" compatible equipment. • Do not attach a label or the like on : - See "Handling your camcorder. About menu items, LCD panel, viewfinder, and lens • A menu item that is grayed out is not available under the current recording or ... a "Memory Stick Duo" or a Memory Stick Duo Adaptor. to apply mechanical shock or vibration to the camcorder. • When connecting your camcorder to another device with an HDMI cable, a component video cable, or a USB cable, be used only with "Memory Stick" compatible equipment Be sure to insert the...
...Memory Stick Duo" with "Memory Stick PRO" compatible equipment. • Do not attach a label or the like on : - See "Handling your camcorder. About menu items, LCD panel, viewfinder, and lens • A menu item that is grayed out is not available under the current recording or ... a "Memory Stick Duo" or a Memory Stick Duo Adaptor. to apply mechanical shock or vibration to the camcorder. • When connecting your camcorder to another device with an HDMI cable, a component video cable, or a USB cable, be used only with "Memory Stick" compatible equipment Be sure to insert the...

Instruction Manual
Page 8
...images of the sun only in Germany, and Sony Corporation, and produces superior images. About the Carl Zeiss lens Your camcorder is not possible due to a malfunction of the camcorder, storage media, etc. • TV ... any way. To view your recordings on a TV, you record them on the model HDR-UX7. About this manual • The images of the LCD screen and the viewfinder used...the operating procedures. About language setting The on AVCHD format compatible devices. Also, the lens for video cameras and offers a quality typical of the manufacturing process and do not affect the recording in...
...images of the sun only in Germany, and Sony Corporation, and produces superior images. About the Carl Zeiss lens Your camcorder is not possible due to a malfunction of the camcorder, storage media, etc. • TV ... any way. To view your recordings on a TV, you record them on the model HDR-UX7. About this manual • The images of the LCD screen and the viewfinder used...the operating procedures. About language setting The on AVCHD format compatible devices. Also, the lens for video cameras and offers a quality typical of the manufacturing process and do not affect the recording in...

Instruction Manual
Page 15
Deleting or editing images on your camcorder. a DVD+ DVD-R DVD+R RW DL Deleting the last movie recorded (49) a a a - - a disc *1 There are 2 recording formats, VIDEO mode and VR mode, for DVD-RW. *2 Finalizing is not finalized may cause the computer to malfunction. ...in diameter with the recorded images depends on a side of a - - - - a - - - Selecting the right disc Enjoying Your Camcorder You can do with your camcorder (48, 50) - HD (high definition) image quality Disc type Disc symbols DVDRW DVD+ RW DVD-R DVD+R DL Deleting or editing ...
Deleting or editing images on your camcorder. a DVD+ DVD-R DVD+R RW DL Deleting the last movie recorded (49) a a a - - a disc *1 There are 2 recording formats, VIDEO mode and VR mode, for DVD-RW. *2 Finalizing is not finalized may cause the computer to malfunction. ...in diameter with the recorded images depends on a side of a - - - - a - - - Selecting the right disc Enjoying Your Camcorder You can do with your camcorder (48, 50) - HD (high definition) image quality Disc type Disc symbols DVDRW DVD+ RW DVD-R DVD+R DL Deleting or editing ...

Instruction Manual
Page 20
... indicates the number of that you have the following items supplied with your camcorder. AC Adaptor (1) (p. 21) Rechargeable battery pack NP-FH60 (HDR-UX5), NP-FH70 (HDR-UX7) (1) (p. 21) Power cord (1) (p. 21) CD-ROM "Handycam Application Software" (1) (p. 86) Operating Guide (This manual) (1) Component video cable (1) (p. 44) A/V connecting cable (1) (p. 44, 53) USB cable (1) (p. 54) Wireless Remote Commander...
... indicates the number of that you have the following items supplied with your camcorder. AC Adaptor (1) (p. 21) Rechargeable battery pack NP-FH60 (HDR-UX5), NP-FH70 (HDR-UX7) (1) (p. 21) Power cord (1) (p. 21) CD-ROM "Handycam Application Software" (1) (p. 86) Operating Guide (This manual) (1) Component video cable (1) (p. 44) A/V connecting cable (1) (p. 44, 53) USB cable (1) (p. 54) Wireless Remote Commander...

Instruction Manual
Page 24
... power (house current) is still supplied to it is recommended). • The recording and playback time will be shorter when you use your camcorder in low temperatures. • The recording and playback time will be shorter depending on the conditions under which only allows short recording and playback times...date and time Set the date and time when using the AC Adaptor. Step 2: Charging the battery pack (Continued) • When attaching an optional video light, it while connected to 86 °F) is recommended that you use an NP-FH100 battery pack. • We do not set the date...
... power (house current) is still supplied to it is recommended). • The recording and playback time will be shorter when you use your camcorder in low temperatures. • The recording and playback time will be shorter depending on the conditions under which only allows short recording and playback times...date and time Set the date and time when using the AC Adaptor. Step 2: Charging the battery pack (Continued) • When attaching an optional video light, it while connected to 86 °F) is recommended that you use an NP-FH100 battery pack. • We do not set the date...

Instruction Manual
Page 28
... images.] to remove the disc depending on - When the formatting is fixed to malfunction. • Do not touch the disc with your camcorder to [VIDEO]. • When you close the disc cover. • If you catch the belt when closing the disc cover. while the ACCESS lamp...MENU (p. 61). 28 If you format a disc during Easy Handycam operation (p. 30), the recording format is completed, you use a DVD-RW, select a recording format, [VIDEO] or [VR], (p. 15). When using a double-sided disc, take care not to your camcorder to malfunction. • Do not disconnect the power sources ...
... images.] to remove the disc depending on - When the formatting is fixed to malfunction. • Do not touch the disc with your camcorder to [VIDEO]. • When you close the disc cover. • If you catch the belt when closing the disc cover. while the ACCESS lamp...MENU (p. 61). 28 If you format a disc during Easy Handycam operation (p. 30), the recording format is completed, you use a DVD-RW, select a recording format, [VIDEO] or [VR], (p. 15). When using a double-sided disc, take care not to your camcorder to malfunction. • Do not disconnect the power sources ...

Instruction Manual
Page 32
... definition) image quality, the recording format is fixed to the default setting automatically. To make the disc compatible with /. disappears Adjustable menu settings during Easy Handycam operation. • Most of the items are fixed to play back • To adjust the sound volume, touch (HOME) t (SETTINGS) t [SOUND SETTINGS]... even if there is free space on the disc. • The disc menu is fixed to VIDEO (p. 62). • (OPTION) does not appear on the screen. • Cancel Easy Handycam operation if you want to add effects to the images, or if you cannot use some menu ...
... definition) image quality, the recording format is fixed to the default setting automatically. To make the disc compatible with /. disappears Adjustable menu settings during Easy Handycam operation. • Most of the items are fixed to play back • To adjust the sound volume, touch (HOME) t (SETTINGS) t [SOUND SETTINGS]... even if there is free space on the disc. • The disc menu is fixed to VIDEO (p. 62). • (OPTION) does not appear on the screen. • Cancel Easy Handycam operation if you want to add effects to the images, or if you cannot use some menu ...

Instruction Manual
Page 44
Type Camcorder Cable TV Component video cable (supplied) (Green) Y (Blue) PB/CB (Red) PR/CR A/V connecting cable (supplied) (White) (Red) (Yellow) : Signal flow HOME MENU setting (SETTINGS) t [OUTPUT SETTINGS] t [COMPONENT] t [1080i/480i] (p. 77) • An A/V connecting cable is also needed to the audio input jack of the A/ V connecting cable to output audio signals. Playing...
Type Camcorder Cable TV Component video cable (supplied) (Green) Y (Blue) PB/CB (Red) PR/CR A/V connecting cable (supplied) (White) (Red) (Yellow) : Signal flow HOME MENU setting (SETTINGS) t [OUTPUT SETTINGS] t [COMPONENT] t [1080i/480i] (p. 77) • An A/V connecting cable is also needed to the audio input jack of the A/ V connecting cable to output audio signals. Playing...
Instruction Manual
Page 46
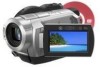
Playing the image on a TV (Continued) Type Camcorder Cable TV Component video cable (supplied) (Green) Y (Blue) PB/CB (Red) PR/CR A/V connecting cable (supplied) (White) (Red) (Yellow) : Signal flow HOME MENU setting (SETTINGS) t [OUTPUT SETTINGS]... input jack of your TV. • This connection produces higher resolution images compared with S VIDEO (optional) (SETTINGS) t [OUTPUT SETTINGS] t [TV TYPE] t [16:9]/ [4:3] (p. 76) (White) (Red) (Yellow) • When the S VIDEO plug (S VIDEO channel) is also needed to the audio input jack of the A/ V connecting cable to ...
Playing the image on a TV (Continued) Type Camcorder Cable TV Component video cable (supplied) (Green) Y (Blue) PB/CB (Red) PR/CR A/V connecting cable (supplied) (White) (Red) (Yellow) : Signal flow HOME MENU setting (SETTINGS) t [OUTPUT SETTINGS]... input jack of your TV. • This connection produces higher resolution images compared with S VIDEO (optional) (SETTINGS) t [OUTPUT SETTINGS] t [TV TYPE] t [16:9]/ [4:3] (p. 76) (White) (Red) (Yellow) • When the S VIDEO plug (S VIDEO channel) is also needed to the audio input jack of the A/ V connecting cable to ...

Instruction Manual
Page 47
Set the input selector on the VCR to the LINE IN input on the VCR using the A/V connecting cable. b Notes • When you connect your camcorder to your TV using the A/V connecting cable, images are output with SD (standard definition) image quality. • When recording, set [X.V.COLOR] to [...The HDMI OUT jack outputs high quality images and digital audio. 47 Recording/Playback When connecting to your TV via a VCR Connect your camcorder to LINE (VIDEO 1, VIDEO 2, etc.). Some settings may need to play back on the TV when playing back. When your TV is an interface to the ...
Set the input selector on the VCR to the LINE IN input on the VCR using the A/V connecting cable. b Notes • When you connect your camcorder to your TV using the A/V connecting cable, images are output with SD (standard definition) image quality. • When recording, set [X.V.COLOR] to [...The HDMI OUT jack outputs high quality images and digital audio. 47 Recording/Playback When connecting to your TV via a VCR Connect your camcorder to LINE (VIDEO 1, VIDEO 2, etc.). Some settings may need to play back on the TV when playing back. When your TV is an interface to the ...

Instruction Manual
Page 53
... computer. A/V OUT jack Editing (Yellow) IN (White) (Red) IN (Yellow) (White) (Red) S VIDEO VIDEO AUDIO VIDEO AUDIO Devices with an S VIDEO cable (optional). Continued , 53 S VIDEO connection only will be connected. Connect your camcorder to the wall outlet using an A/V connecting cable with an S VIDEO cable (optional), higher quality images can dub images played back on your...
... computer. A/V OUT jack Editing (Yellow) IN (White) (Red) IN (Yellow) (White) (Red) S VIDEO VIDEO AUDIO VIDEO AUDIO Devices with an S VIDEO cable (optional). Continued , 53 S VIDEO connection only will be connected. Connect your camcorder to the wall outlet using an A/V connecting cable with an S VIDEO cable (optional), higher quality images can dub images played back on your...

Instruction Manual
Page 54
... manuals supplied with S VIDEO (optional) 2. Insert the "Memory Stick Duo" containing still images into your camcorder. 2 Turn on your camcorder to the recording device (VCR or DVD/ HDD recorder) with the A/V connecting cable (supplied) 1 or an A/V connecting cable with your camcorder to the printer using ...3 Touch [ PRINT]. Dubbing to VCR or DVD/HDD recorders (Continued) 1 Insert the recorded disc into your camcorder, and record it to the printer 1 Turn on your camcorder. 2 Connect the (USB) jack of your recording device for details. 6 When dubbing is complete, (PictBridge ...
... manuals supplied with S VIDEO (optional) 2. Insert the "Memory Stick Duo" containing still images into your camcorder. 2 Turn on your camcorder to the recording device (VCR or DVD/ HDD recorder) with the A/V connecting cable (supplied) 1 or an A/V connecting cable with your camcorder to the printer using ...3 Touch [ PRINT]. Dubbing to VCR or DVD/HDD recorders (Continued) 1 Insert the recorded disc into your camcorder, and record it to the printer 1 Turn on your camcorder. 2 Connect the (USB) jack of your recording device for details. 6 When dubbing is complete, (PictBridge ...

Instruction Manual
Page 55
...may not be used. • Do not attempt the following operations when is on a computer - To operate the POWER switch. - Refer to your camcorder • If the printer stops working, disconnect the USB cable, turn the printer off and on the LCD screen to be performed properly. - To...using a computer by connecting a printer directly to step 3. 3 Touch [EXEC] t [YES] t . If you do not change the setting, go to a digital video camera or digital still camera, regardless of images may not be printed. images larger than 2848 × 2136 pixels z Tips • PictBridge is marked with...
...may not be used. • Do not attempt the following operations when is on a computer - To operate the POWER switch. - Refer to your camcorder • If the printer stops working, disconnect the USB cable, turn the printer off and on the LCD screen to be performed properly. - To...using a computer by connecting a printer directly to step 3. 3 Touch [EXEC] t [YES] t . If you do not change the setting, go to a digital video camera or digital still camera, regardless of images may not be printed. images larger than 2848 × 2136 pixels z Tips • PictBridge is marked with...

Instruction Manual
Page 62
...recorded disc new and reusable by formatting it. b Notes • The screen message will be formatted into your camcorder. 4 On the (HOME MENU), touch (MANAGE DISC/MEMORY) t [ FORMAT]. The recording capacity of the following...the disc to be formatted. Deleting all scenes on the disc (Formatting) Formatting the disc 2 Turn on your camcorder, then connect the power cord to the wall outlet. 3 Insert the disc to be different if the disc ...(standard definition) image quality at the previous formatting. One of a DVD-RW (VIDEO mode), the disc is no need to the DC IN jack on your...
...recorded disc new and reusable by formatting it. b Notes • The screen message will be formatted into your camcorder. 4 On the (HOME MENU), touch (MANAGE DISC/MEMORY) t [ FORMAT]. The recording capacity of the following...the disc to be formatted. Deleting all scenes on the disc (Formatting) Formatting the disc 2 Turn on your camcorder, then connect the power cord to the wall outlet. 3 Insert the disc to be different if the disc ...(standard definition) image quality at the previous formatting. One of a DVD-RW (VIDEO mode), the disc is no need to the DC IN jack on your...

Instruction Manual
Page 63
...buttons - b Notes • Use the AC Adaptor as the power source to prevent your camcorder from running out of DVD+RW with SD (standard definition) image quality • Select the recording format, VIDEO mode or VR mode, for DVD+RW. Cancel the protection with another device against accidental ...format. • In the case of power during formatting. • Do not apply shock or vibration to your camcorder, and do not disconnect the AC Adaptor during Easy Handycam operation (p. 30), the recording format is fixed to be formatted in the recording image quality and format you can format...
...buttons - b Notes • Use the AC Adaptor as the power source to prevent your camcorder from running out of DVD+RW with SD (standard definition) image quality • Select the recording format, VIDEO mode or VR mode, for DVD+RW. Cancel the protection with another device against accidental ...format. • In the case of power during formatting. • Do not apply shock or vibration to your camcorder, and do not disconnect the AC Adaptor during Easy Handycam operation (p. 30), the recording format is fixed to be formatted in the recording image quality and format you can format...

Instruction Manual
Page 64
... cord to the wall outlet. 2 Slide the POWER switch to turn on the (Movie) lamp. 3 Insert the finalized disc into your camcorder, and do so, cancel Easy Handycam operation. 4 Touch [YES] t [YES]. 5 When [Completed.] appears, touch . material on the disc without any additional steps. •...; To unfinalize DVD-RW (VIDEO mode), perform (MANAGE DISC/ MEMORY) t [UNFINALIZE] on the HOME MENU. • If you have created a DVD menu (p. 58) ...
... cord to the wall outlet. 2 Slide the POWER switch to turn on the (Movie) lamp. 3 Insert the finalized disc into your camcorder, and do so, cancel Easy Handycam operation. 4 Touch [YES] t [YES]. 5 When [Completed.] appears, touch . material on the disc without any additional steps. •...; To unfinalize DVD-RW (VIDEO mode), perform (MANAGE DISC/ MEMORY) t [UNFINALIZE] on the HOME MENU. • If you have created a DVD menu (p. 58) ...
Instruction Manual
Page 83
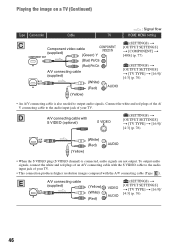
...distant subjects clearly. Sunrise or sunset - At party scenes or studios where the lighting conditions change quickly - Under video lamps in between the camcorder and the subject. WHITE BAL. (White balance) You can adjust the color balance to the brightness of paper... ) Fireworks are lit by strong light. SPOTLIGHT**( ) Prevents people's faces from focusing on objects a short distance away. Continued , 83 Customizing Your Camcorder b Notes • If you will be appropriate for the following recording conditions: - Indoors - PORTRAIT ( ) Brings out the subject such as on...
...distant subjects clearly. Sunrise or sunset - At party scenes or studios where the lighting conditions change quickly - Under video lamps in between the camcorder and the subject. WHITE BAL. (White balance) You can adjust the color balance to the brightness of paper... ) Fireworks are lit by strong light. SPOTLIGHT**( ) Prevents people's faces from focusing on objects a short distance away. Continued , 83 Customizing Your Camcorder b Notes • If you will be appropriate for the following recording conditions: - Indoors - PORTRAIT ( ) Brings out the subject such as on...

Instruction Manual
Page 86
..., from the supplied CD-ROM, you can enjoy the following URL: http://www.sony.net/support-disoft/ System requirements When using your camcorder by date and time of all the images on your camcorder. Referring to general operation the first time you use a Macintosh computer. About the... frames may be enlarged and played in AVCHD format Selected from movies. x Creating a disc in a slide show. x Copying a disc t Video Disc Copier You can copy all the software applications. These thumbnails can be dropped from the movies imported, you can create a disc consisting of Picture...
..., from the supplied CD-ROM, you can enjoy the following URL: http://www.sony.net/support-disoft/ System requirements When using your camcorder by date and time of all the images on your camcorder. Referring to general operation the first time you use a Macintosh computer. About the... frames may be enlarged and played in AVCHD format Selected from movies. x Creating a disc in a slide show. x Copying a disc t Video Disc Copier You can copy all the software applications. These thumbnails can be dropped from the movies imported, you can create a disc consisting of Picture...


