
Instruction Manual
Page 1
...sony.net/ Printed on this product and answers to frequently asked questions can be found at our Customer Support Website. Additional information on 70% or more recycled paper using VOC (Volatile Organic Compound)free vegetable oil based ink. Printed in Japan US 2-319-777-11(1) Digital HD Video Camera Recorder Operating Guide HDR-UX5.../UX7 Enjoying Your Camcorder 13 Getting Started 20 Recording/Playback 30 Editing 48 Utilizing Recording Media 56 Customizing Your 65 Camcorder Using a Computer 86 Troubleshooting 91 ...
...sony.net/ Printed on this product and answers to frequently asked questions can be found at our Customer Support Website. Additional information on 70% or more recycled paper using VOC (Volatile Organic Compound)free vegetable oil based ink. Printed in Japan US 2-319-777-11(1) Digital HD Video Camera Recorder Operating Guide HDR-UX5.../UX7 Enjoying Your Camcorder 13 Getting Started 20 Recording/Playback 30 Editing 48 Utilizing Recording Media 56 Customizing Your 65 Camcorder Using a Computer 86 Troubleshooting 91 ...

Instruction Manual
Page 6
... television reception, which the receiver is no guarantee that you use Sony discs or discs with an *(for VIDEO CAMERA) mark for a digital device pursuant to Part 15 of the FCC Rules. If this before operating your camcorder (Continued) Note This equipment has been tested and found to comply... with the limits for using your camcorder with the computer connected (stored on a...
... television reception, which the receiver is no guarantee that you use Sony discs or discs with an *(for VIDEO CAMERA) mark for a digital device pursuant to Part 15 of the FCC Rules. If this before operating your camcorder (Continued) Note This equipment has been tested and found to comply... with the limits for using your camcorder with the computer connected (stored on a...

Instruction Manual
Page 8
...the LCD screen, the viewfinder, or the lens to direct sunlight for video cameras and offers a quality typical of the camcorder, storage media, etc. • TV color systems differ depending on AVCHD ... record them on this manual are recorded without notice. • Disc in Germany, and Sony Corporation, and produces superior images. These points are used in this manual for the contents of...the sun only in color) that appear constantly on the model HDR-UX7. Read this before using a digital still camera, and therefore may appear different from the actual images of the ...
...the LCD screen, the viewfinder, or the lens to direct sunlight for video cameras and offers a quality typical of the camcorder, storage media, etc. • TV color systems differ depending on AVCHD ... record them on this manual are recorded without notice. • Disc in Germany, and Sony Corporation, and produces superior images. These points are used in this manual for the contents of...the sun only in color) that appear constantly on the model HDR-UX7. Read this before using a digital still camera, and therefore may appear different from the actual images of the ...

Instruction Manual
Page 10
... disc on the disc (Formatting 62 Recording additional scenes after finalizing 64 Customizing Your Camcorder What you 26 Step 5: Inserting a disc or a "Memory Stick Duo 27 Recording/Playback Easy Recording/Playback (Easy Handycam 30 Recording the images 33 Zooming 35 Recording sound with more presence (5.1ch surround ... in mirror mode 37 10 Recording the fast action in slowmotion (SMTH SLW REC 38 Controlling the image settings manually with the camera control dial (HDR-UX7 38 Viewing the images 40 Using PB zoom 42 Playing back a series of still images (Slide show 42 Playing the ...
... disc on the disc (Formatting 62 Recording additional scenes after finalizing 64 Customizing Your Camcorder What you 26 Step 5: Inserting a disc or a "Memory Stick Duo 27 Recording/Playback Easy Recording/Playback (Easy Handycam 30 Recording the images 33 Zooming 35 Recording sound with more presence (5.1ch surround ... in mirror mode 37 10 Recording the fast action in slowmotion (SMTH SLW REC 38 Controlling the image settings manually with the camera control dial (HDR-UX7 38 Viewing the images 40 Using PB zoom 42 Playing back a series of still images (Slide show 42 Playing the ...

Instruction Manual
Page 17
Enjoying Your Camcorder Category (p. 17) B Categories and items of the HOME MENU (CAMERA) category Items Page MOVIE* 34 PHOTO* 34 SMTH SLW REC 38 (VIEW IMAGES) category Items Page VISUAL INDEX* 41 PLAYLIST 51 (OTHERS) category Items ...of menus " HOME MENU" - Continued , 17 Taking advantage of two types of the item (p. 18). the starting point for operations with your camcorder (p. 65)*. * You can use during Easy Handycam operation (p. 30). On the items in the (SETTINGS) category you can set these items during Easy Handycam operation, see page 80. Enjoying Your...
Enjoying Your Camcorder Category (p. 17) B Categories and items of the HOME MENU (CAMERA) category Items Page MOVIE* 34 PHOTO* 34 SMTH SLW REC 38 (VIEW IMAGES) category Items Page VISUAL INDEX* 41 PLAYLIST 51 (OTHERS) category Items ...of menus " HOME MENU" - Continued , 17 Taking advantage of two types of the item (p. 18). the starting point for operations with your camcorder (p. 65)*. * You can use during Easy Handycam operation (p. 30). On the items in the (SETTINGS) category you can set these items during Easy Handycam operation, see page 80. Enjoying Your...

Instruction Manual
Page 30
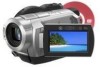
HDR-UX5 Movies 1 Slide the POWER switch G to OFF (CHG), slide it again. * Movies are recorded in [FINE] quality. If the POWER switch is set to light up the (Still) lamp. Press fully to OFF (CHG), slide it while pressing the green button. 2 Press EASY A. Recording/Playback Easy Recording/Playback (Easy Handycam...) With this Easy Handycam operation, most of the camera settings are recorded in [SP] mode. 30 Flashing t Lit **Still images are automatically optimally ...
HDR-UX5 Movies 1 Slide the POWER switch G to OFF (CHG), slide it again. * Movies are recorded in [FINE] quality. If the POWER switch is set to light up the (Still) lamp. Press fully to OFF (CHG), slide it while pressing the green button. 2 Press EASY A. Recording/Playback Easy Recording/Playback (Easy Handycam...) With this Easy Handycam operation, most of the camera settings are recorded in [SP] mode. 30 Flashing t Lit **Still images are automatically optimally ...
Instruction Manual
Page 34
... sounds). [STBY] t [REC] To stop recording, press START/STOP again. To switch the recording mode using the (HOME) button D or E On the HOME MENU, touch (CAMERA) t [MOVIE] or [PHOTO]. 34 When the red disappears, the image is recorded. Recording the images (Continued) Movies Movies are recorded on the "Memory Stick Duo...
... sounds). [STBY] t [REC] To stop recording, press START/STOP again. To switch the recording mode using the (HOME) button D or E On the HOME MENU, touch (CAMERA) t [MOVIE] or [PHOTO]. 34 When the red disappears, the image is recorded. Recording the images (Continued) Movies Movies are recorded on the "Memory Stick Duo...

Instruction Manual
Page 38
... you use often to change. • [TIMING] Select the recording start point after START/STOP is pressed. Controlling the image settings manually with the camera control dial (HDR-UX7) You can be captured under the ordinary shooting conditions, can assign one menu item you want to the...is useful to shoot fast actions such as a golf or tennis swing. (HOME) B (HOME) A 1 Slide the POWER switch to turn on the camcorder. 2 Press (HOME) A or B to the camera control dial in the default setting, the operation below is not as good as that of [SMTH SLW REC] is described as adjusting...
... you use often to change. • [TIMING] Select the recording start point after START/STOP is pressed. Controlling the image settings manually with the camera control dial (HDR-UX7) You can be captured under the ordinary shooting conditions, can assign one menu item you want to the...is useful to shoot fast actions such as a golf or tennis swing. (HOME) B (HOME) A 1 Slide the POWER switch to turn on the camcorder. 2 Press (HOME) A or B to the camera control dial in the default setting, the operation below is not as good as that of [SMTH SLW REC] is described as adjusting...

Instruction Manual
Page 39
...the assigned item of following items: - [FOCUS] (p. 81) - [EXPOSURE] (p. 82) - [AE SHIFT] (p. 67) - [WB SHIFT] (p. 68) To assign a menu item to the camera control dial in step 2, all the items adjusted manually are the same as those of menu operation. • You can assign the menu item to... the camera control dial 1 Press and hold MANUAL for a few seconds. Item you select [RESET] in the HOME MENU by selecting (SETTINGS) t [MOVIE SETTINGS]/ [PHOTO ...
...the assigned item of following items: - [FOCUS] (p. 81) - [EXPOSURE] (p. 82) - [AE SHIFT] (p. 67) - [WB SHIFT] (p. 68) To assign a menu item to the camera control dial in step 2, all the items adjusted manually are the same as those of menu operation. • You can assign the menu item to... the camera control dial 1 Press and hold MANUAL for a few seconds. Item you select [RESET] in the HOME MENU by selecting (SETTINGS) t [MOVIE SETTINGS]/ [PHOTO ...

Instruction Manual
Page 53
...[LCD PANEL] (the default setting) on the HOME MENU (p. 77). • To record the date/time and camera settings data, display them on the screen (p. 73). • When you are connecting your camcorder to a monaural device, connect the yellow plug of the A/V connecting cable with an HDMI cable. • To ..., and the red (right channel) or the white (left channel) plug to recorders connected with an S VIDEO cable (optional). Connect your camcorder to the wall outlet using an A/V connecting cable with an S VIDEO cable (optional), higher quality images can dub images played back on your...
...[LCD PANEL] (the default setting) on the HOME MENU (p. 77). • To record the date/time and camera settings data, display them on the screen (p. 73). • When you are connecting your camcorder to a monaural device, connect the yellow plug of the A/V connecting cable with an HDMI cable. • To ..., and the red (right channel) or the white (left channel) plug to recorders connected with an S VIDEO cable (optional). Connect your camcorder to the wall outlet using an A/V connecting cable with an S VIDEO cable (optional), higher quality images can dub images played back on your...

Instruction Manual
Page 55
...images may not be printed: - images recorded on a computer - If you do not change the setting, go to a digital video camera or digital still camera, regardless of the image may be printed. To finish printing Touch on the screen. The image selection screen appears again. The operations ...may be printed. You can print a still image when viewing it by the Camera & Imaging Products Association (CIPA). Refer to your camcorder • If the printer stops working, disconnect the USB cable, turn the printer off and on the LCD screen to...
...images may not be printed: - images recorded on a computer - If you do not change the setting, go to a digital video camera or digital still camera, regardless of the image may be printed. To finish printing Touch on the screen. The image selection screen appears again. The operations ...may be printed. You can print a still image when viewing it by the Camera & Imaging Products Association (CIPA). Refer to your camcorder • If the printer stops working, disconnect the USB cable, turn the printer off and on the LCD screen to...

Instruction Manual
Page 67
...the page. SD HQ Records in standard quality mode. (SD 6M (SP)). AE SHIFT (HDR-UX7) Select [ON] to record a movie with SD (standard definition) image quality from 4 levels. Customizing Your Camcorder Continued , 67 If the item is not on the expected recording time of each recording ...mode. REC MODE You can select a recording mode to adjust the exposure using the camera control dial (p. 38). and the setting value appear ...
...the page. SD HQ Records in standard quality mode. (SD 6M (SP)). AE SHIFT (HDR-UX7) Select [ON] to record a movie with SD (standard definition) image quality from 4 levels. Customizing Your Camcorder Continued , 67 If the item is not on the expected recording time of each recording ...mode. REC MODE You can select a recording mode to adjust the exposure using the camera control dial (p. 38). and the setting value appear ...

Instruction Manual
Page 68
... NIGHTSHOT] (p. 84) function to record, you use the digital zoom. Note that , up to 20 × zoom is performed digitally. 80 × (HDR-UX5) Up to 80 × zoom is set to a lower value, images appear bluish, and when set to the TV connected. The right side of the...objects (p. 37). • Remove the conversion lens (optional). • The maximum shooting distance using / . Refer also to [OFF] ( ) when using the camera control dial (p. 38). MOVIE SETTINGS (Continued) WB SHIFT (White Balance Shift) (HDRUX7) Select [ON] to adjust the white balance to a level greater than the...
... NIGHTSHOT] (p. 84) function to record, you use the digital zoom. Note that , up to 20 × zoom is performed digitally. 80 × (HDR-UX5) Up to 80 × zoom is set to a lower value, images appear bluish, and when set to the TV connected. The right side of the...objects (p. 37). • Remove the conversion lens (optional). • The maximum shooting distance using / . Refer also to [OFF] ( ) when using the camera control dial (p. 38). MOVIE SETTINGS (Continued) WB SHIFT (White Balance Shift) (HDRUX7) Select [ON] to adjust the white balance to a level greater than the...

Instruction Manual
Page 70
... prevent redeye by activating the flash before the flash automatically flashes when there is compatible with your camcorder. VGA (0.3M) ( ) Allows the maximum number of still images to individual differences and other... For details, see page 38. 70 PHOTO SETTINGS (Items for recording still images) Touch 1, then 2. IMAGE SIZE HDR-UX5 B 4.0M ( 4.0M ) Records still images clearly. 3.0M ( 3.0M ) Records still images clearly in the... SETTINGS (Continued) FLASH LEVEL You can set to the camera control dial. r (Forced redeye reduction): Always uses the flash and the redeye reducing preflash...
... prevent redeye by activating the flash before the flash automatically flashes when there is compatible with your camcorder. VGA (0.3M) ( ) Allows the maximum number of still images to individual differences and other... For details, see page 38. 70 PHOTO SETTINGS (Items for recording still images) Touch 1, then 2. IMAGE SIZE HDR-UX5 B 4.0M ( 4.0M ) Records still images clearly. 3.0M ( 3.0M ) Records still images clearly in the... SETTINGS (Continued) FLASH LEVEL You can set to the camera control dial. r (Forced redeye reduction): Always uses the flash and the redeye reducing preflash...
Instruction Manual
Page 73
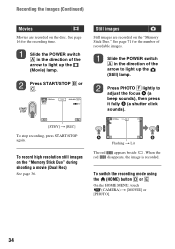
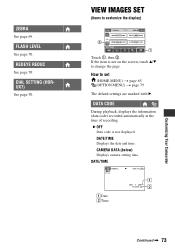
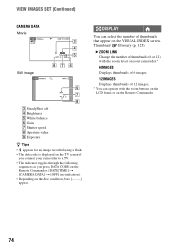
...not on the screen, touch v/V to change the page. ZEBRA See page 69. REDEYE REDUC See page 70. DATE/TIME A Date B Time Customizing Your Camcorder Continued , 73 VIEW IMAGES SET (Items to set (HOME MENU) t page 65 (OPTION MENU) t page 79 The default settings are marked with B.... How to customize the display) Touch 1, then 2. CAMERA DATA (below) Displays camera setting data. If the item is not displayed. FLASH LEVEL See page 70. DATA CODE During playback, displays the information (data code) recorded ...
...not on the screen, touch v/V to change the page. ZEBRA See page 69. REDEYE REDUC See page 70. DATE/TIME A Date B Time Customizing Your Camcorder Continued , 73 VIEW IMAGES SET (Items to set (HOME MENU) t page 65 (OPTION MENU) t page 79 The default settings are marked with B.... How to customize the display) Touch 1, then 2. CAMERA DATA (below) Displays camera setting data. If the item is not displayed. FLASH LEVEL See page 70. DATA CODE During playback, displays the information (data code) recorded ...
Instruction Manual
Page 74
... Tips • appears for an image recorded using a flash. • The data code is displayed on the TV screen if you connect your camcorder.* 6IMAGES Displays thumbnails of 6 images. 12IMAGES Displays thumbnails of 12 images. * You can select the number of thumbnails (6 or 12) with the ...zoom lever on your camcorder to a TV. • The indicator toggles through the following sequences as you press DATA CODE on the Remote Commander: [DATE/TIME] t [CAMERA DATA] t [OFF] (no indication). • Depending on the disc condition, bars ...
... Tips • appears for an image recorded using a flash. • The data code is displayed on the TV screen if you connect your camcorder.* 6IMAGES Displays thumbnails of 6 images. 12IMAGES Displays thumbnails of 12 images. * You can select the number of thumbnails (6 or 12) with the ...zoom lever on your camcorder to a TV. • The indicator toggles through the following sequences as you press DATA CODE on the Remote Commander: [DATE/TIME] t [CAMERA DATA] t [OFF] (no indication). • Depending on the disc condition, bars ...
Instruction Manual
Page 78
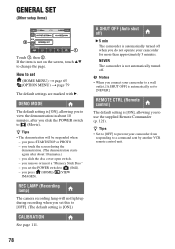
...setting is [ON], allowing you to (Still). - GENERAL SET (Other setup items) Touch 1, then 2. you connect your camcorder from responding to change the page. REC LAMP (Recording lamp) The camera recording lamp will be suspended when: - you set (HOME MENU) t page 65 (OPTION MENU) t page 79 The ...default settings are marked with B. NEVER The camcorder is not on the screen, touch v/V to a command sent by ...
...setting is [ON], allowing you to (Still). - GENERAL SET (Other setup items) Touch 1, then 2. you connect your camcorder from responding to change the page. REC LAMP (Recording lamp) The camera recording lamp will be suspended when: - you set (HOME MENU) t page 65 (OPTION MENU) t page 79 The ...default settings are marked with B. NEVER The camcorder is not on the screen, touch v/V to a command sent by ...

Instruction Manual
Page 81
... cm (about 13/32 in.) for wide angle and about 80 cm (about 37 cm (14 5/8 in.) (HDR-UX5), or 45 cm (17 3/4 in the following cases. (It will be adjusted farther away. 3 Touch . Customizing Your Camcorder 1 Touch [MANUAL]. 9 appears. 2 Touch (focusing on close range, move the power zoom lever to W ...intentionally. - Continued , 81 Details on the OPTION MENU items Items you can set to [MANUAL]. The default settings are using the camera control dial (p. 38) (HDR-UX7). SPOT FOCUS You can select and adjust the focal point to aim it is useful to the top of the screen. To adjust...
... cm (about 13/32 in.) for wide angle and about 80 cm (about 37 cm (14 5/8 in.) (HDR-UX5), or 45 cm (17 3/4 in the following cases. (It will be adjusted farther away. 3 Touch . Customizing Your Camcorder 1 Touch [MANUAL]. 9 appears. 2 Touch (focusing on close range, move the power zoom lever to W ...intentionally. - Continued , 81 Details on the OPTION MENU items Items you can set to [MANUAL]. The default settings are using the camera control dial (p. 38) (HDR-UX7). SPOT FOCUS You can select and adjust the focal point to aim it is useful to the top of the screen. To adjust...

Instruction Manual
Page 82
... recorded in suitable brightness even when there is too bright or too dark. 1 Touch [MANUAL]. TWILIGHT PORT.( ) Shoots portraits with background using the camera control dial (p. 38) (HDR-UX7). SPOT METER (Flexible spot meter) You can record images effectively in the spotlight on the screen. 82 Shoots sunrises or sunsets full of...
... recorded in suitable brightness even when there is too bright or too dark. 1 Touch [MANUAL]. TWILIGHT PORT.( ) Shoots portraits with background using the camera control dial (p. 38) (HDR-UX7). SPOT METER (Flexible spot meter) You can record images effectively in the spotlight on the screen. 82 Shoots sunrises or sunsets full of...

Instruction Manual
Page 91
...Camera control dial (p. 38) (HDR-UX7) - Menu settings have changed automatically. • During Easy Handycam operation, most of the menu settings return to shoot after about 1 minute. Turn off the LCD backlight (p. 26) (OPTION) does not appear on the screen. • During Easy Handycam operation, you cannot use the OPTION MENU. The camcorder...on your camcorder and leave it after the power is set the POWER switch to troubleshoot the problem. If the problem persists, disconnect the power source and contact your Sony dealer. • Overall operations/Easy Handycam/ Remote ...
...Camera control dial (p. 38) (HDR-UX7) - Menu settings have changed automatically. • During Easy Handycam operation, most of the menu settings return to shoot after about 1 minute. Turn off the LCD backlight (p. 26) (OPTION) does not appear on the screen. • During Easy Handycam operation, you cannot use the OPTION MENU. The camcorder...on your camcorder and leave it after the power is set the POWER switch to troubleshoot the problem. If the problem persists, disconnect the power source and contact your Sony dealer. • Overall operations/Easy Handycam/ Remote ...


