
Instruction Manual
Page 35
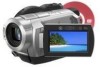
...recording/playback. Enjoy realistic sound when playing the disc on the power zoom lever. Move it further for recording 5.1ch surround sound. Your camcorder has Dolby Digital 5.1 Creator installed for a faster zoom. Continued , 35 Recording sound with the power zoom lever or the zoom buttons ...surround sound Glossary (page 125) b Notes • To play the disc recorded with HD (high definition) image quality and enjoy the sound in microphone Recording/Playback Wider range of the power zoom lever may also be recorded. • You cannot change the zoom speed with 5.1ch surround (p. 60...
...recording/playback. Enjoy realistic sound when playing the disc on the power zoom lever. Move it further for recording 5.1ch surround sound. Your camcorder has Dolby Digital 5.1 Creator installed for a faster zoom. Continued , 35 Recording sound with the power zoom lever or the zoom buttons ...surround sound Glossary (page 125) b Notes • To play the disc recorded with HD (high definition) image quality and enjoy the sound in microphone Recording/Playback Wider range of the power zoom lever may also be recorded. • You cannot change the zoom speed with 5.1ch surround (p. 60...
Instruction Manual
Page 85
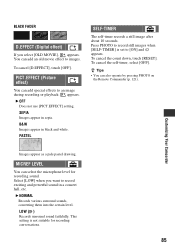
... concert hall, etc. B&W Images appear in sepia. To cancel the count down, touch [RESET]. z Tips • You can select the microphone level for recording conversations. 85 B NORMAL Records various surround sounds, converting them into the certain level. BLACK FADER D.EFFECT (Digital effect) If ...image during recording or playback. To cancel the self-timer, select [OFF]. B OFF Does not use [PICT.EFFECT] setting. Customizing Your Camcorder Images appear as a pale pastel drawing. You can add special effects to images. SEPIA Images appear in black and white. LOW ( )...
... concert hall, etc. B&W Images appear in sepia. To cancel the count down, touch [RESET]. z Tips • You can select the microphone level for recording conversations. 85 B NORMAL Records various surround sounds, converting them into the certain level. BLACK FADER D.EFFECT (Digital effect) If ...image during recording or playback. To cancel the self-timer, select [OFF]. B OFF Does not use [PICT.EFFECT] setting. Customizing Your Camcorder Images appear as a pale pastel drawing. You can add special effects to images. SEPIA Images appear in black and white. LOW ( )...
Instruction Manual
Page 118
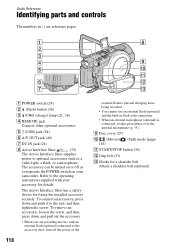
... to prevent charging noise being recorded. • You cannot use an external flash (optional) and the built-in ( ) are recording movies with your camcorder. The accessory can be turned on your accessory for details. The Active Interface Shoe has a safety device for a shoulder belt Attach a shoulder belt (...optional). To remove an accessory, loosen the screw, and then press down and push it takes precedence over the internal microphone (p. 35). Quick Reference Identifying parts and controls The numbers in flash at the same time. • When an external...
... to prevent charging noise being recorded. • You cannot use an external flash (optional) and the built-in ( ) are recording movies with your camcorder. The accessory can be turned on your accessory for details. The Active Interface Shoe has a safety device for a shoulder belt Attach a shoulder belt (...optional). To remove an accessory, loosen the screw, and then press down and push it takes precedence over the internal microphone (p. 35). Quick Reference Identifying parts and controls The numbers in flash at the same time. • When an external...

Instruction Manual
Page 119
For how to adjust the volume, see page 41. J i (headphones) jack (HDR-UX7) K Speaker Playback sounds come out from the speaker. L Viewfinder (26) M Viewfinder lens adjustment lever (26) N BATT (battery release) button (22) O Battery pack (21) P... (34) G Zoom buttons (35, 42) H (HOME) button (18, 65) I MIC (PLUG IN POWER) jack (HDRUX7) When an external microphone (optional) is connected, it takes precedence over the internal microphone (p. 35). HDR-UX5 A (VIEW IMAGES) button (40) B DISP/BATT INFO button (22) C EASY button (30) D RESET button Initializes all the settings, including the...
For how to adjust the volume, see page 41. J i (headphones) jack (HDR-UX7) K Speaker Playback sounds come out from the speaker. L Viewfinder (26) M Viewfinder lens adjustment lever (26) N BATT (battery release) button (22) O Battery pack (21) P... (34) G Zoom buttons (35, 42) H (HOME) button (18, 65) I MIC (PLUG IN POWER) jack (HDRUX7) When an external microphone (optional) is connected, it takes precedence over the internal microphone (p. 35). HDR-UX5 A (VIEW IMAGES) button (40) B DISP/BATT INFO button (22) C EASY button (30) D RESET button Initializes all the settings, including the...

Instruction Manual
Page 120
Flashes when remaining disc space or battery power is low. C Flash (36) D Lens (Carl Zeiss Lens) (8) E MANUAL button (38) (HDR-UX7) F Camera control dial (38) (HDR-UX7) G Power zoom lever (35, 42) H PHOTO button (34) I BACK LIGHT button (37) J NIGHTSHOT switch (37) K Camera recording...your camcorder. L Tripod receptacle Attach the tripod (optional: the length of the screw must be less than 5.5 mm (7/32 in red during recording. Identifying parts and controls (Continued) A Disc cover OPEN switch/ACCESS lamp (27) B Internal microphone (35) An Active Interface Shoe compatible microphone (...
Flashes when remaining disc space or battery power is low. C Flash (36) D Lens (Carl Zeiss Lens) (8) E MANUAL button (38) (HDR-UX7) F Camera control dial (38) (HDR-UX7) G Power zoom lever (35, 42) H PHOTO button (34) I BACK LIGHT button (37) J NIGHTSHOT switch (37) K Camera recording...your camcorder. L Tripod receptacle Attach the tripod (optional: the length of the screw must be less than 5.5 mm (7/32 in red during recording. Identifying parts and controls (Continued) A Disc cover OPEN switch/ACCESS lamp (27) B Internal microphone (35) An Active Interface Shoe compatible microphone (...


