
Instruction Manual
Page 8
...Your camcorder is not possible due to malfunction. Also, the lens for the contents of time may be copyrighted. On recording • Before starting to record, test the recording function ...recorded with a Carl Zeiss lens, which was developed jointly by Carl Zeiss, in color) that appear constantly on AVCHD format compatible devices. About language setting The on the model HDR...DVD+RW for trial recording (p. 15). • Compensation for your camcorder (Continued) black points and/or bright points (white, red, blue, or green in Germany, and Sony Corporation, and produces ...
...Your camcorder is not possible due to malfunction. Also, the lens for the contents of time may be copyrighted. On recording • Before starting to record, test the recording function ...recorded with a Carl Zeiss lens, which was developed jointly by Carl Zeiss, in color) that appear constantly on AVCHD format compatible devices. About language setting The on the model HDR...DVD+RW for trial recording (p. 15). • Compensation for your camcorder (Continued) black points and/or bright points (white, red, blue, or green in Germany, and Sony Corporation, and produces ...

Instruction Manual
Page 10
... 56 Playing a disc on and setting the date and time 24 Changing the language setting ..... 25 Step 4: Adjusting your camcorder 5 Subject examples and solutions ... 12 Enjoying Your Camcorder Operation flow 13 Selecting the right disc 15 " HOME"...Camcorder What you 26 Step 5: Inserting a disc or a "Memory Stick Duo 27 Recording/Playback Easy Recording/Playback (Easy Handycam 30 Recording the images 33 Zooming 35 Recording sound with more presence (5.1ch surround recording 35 Using the flash 36 Recording high quality still images during movie recording (Dual Rec 36 Recording...
... 56 Playing a disc on and setting the date and time 24 Changing the language setting ..... 25 Step 4: Adjusting your camcorder 5 Subject examples and solutions ... 12 Enjoying Your Camcorder Operation flow 13 Selecting the right disc 15 " HOME"...Camcorder What you 26 Step 5: Inserting a disc or a "Memory Stick Duo 27 Recording/Playback Easy Recording/Playback (Easy Handycam 30 Recording the images 33 Zooming 35 Recording sound with more presence (5.1ch surround recording 35 Using the flash 36 Recording high quality still images during movie recording (Dual Rec 36 Recording...

Instruction Manual
Page 13
...screen to select the right disc. "AVCHD 1080i format" is compatible with the AVCHD format (p. 60). Continued , 13 The recorded disc can consult the [DISC SELECT GUIDE] (p. 61) displayed on DVD devices. b Notes • Your camcorder is abbreviated as "AVCHD" in this ...disc can select the recording image quality, HD (high definition) or SD (standard definition). HD (high definition) image quality AVCHD format SD (standard definition) image quality DVD format Image resolution: about 4.5 times of that of AVCHD format (p. 125). B Shoot using your camcorder (p. 33). B ...
...screen to select the right disc. "AVCHD 1080i format" is compatible with the AVCHD format (p. 60). Continued , 13 The recorded disc can consult the [DISC SELECT GUIDE] (p. 61) displayed on DVD devices. b Notes • Your camcorder is abbreviated as "AVCHD" in this ...disc can select the recording image quality, HD (high definition) or SD (standard definition). HD (high definition) image quality AVCHD format SD (standard definition) image quality DVD format Image resolution: about 4.5 times of that of AVCHD format (p. 125). B Shoot using your camcorder (p. 33). B ...

Instruction Manual
Page 16
...side of the disc (p. 105). • [DISC SELECT GUIDE] will help you select a right disc (p. 61). Recordable time differs depending on the recording mode (p. 65). ( ): the minimum recording time Disc type DVD-RW/DVD+RW/DVD-R DVD+R DL HD (high definition) image quality AVC HD 12M (HQ+) (.... Your camcorder uses the VBR (Variable Bit Rate) format to automatically adjust image quality to suit the recording scene. This technology causes fluctuations in the table show the average bit rate. z Tips • Figures such as 12M and 9M in the recording time of images recorded with HD...
...side of the disc (p. 105). • [DISC SELECT GUIDE] will help you select a right disc (p. 61). Recordable time differs depending on the recording mode (p. 65). ( ): the minimum recording time Disc type DVD-RW/DVD+RW/DVD-R DVD+R DL HD (high definition) image quality AVC HD 12M (HQ+) (.... Your camcorder uses the VBR (Variable Bit Rate) format to automatically adjust image quality to suit the recording scene. This technology causes fluctuations in the table show the average bit rate. z Tips • Figures such as 12M and 9M in the recording time of images recorded with HD...

Instruction Manual
Page 22
... pack NP-FH50 NP-FH60 (supplied with HDR-UX5) NP-FH70 (supplied with HDR-UX7) NP-FH100 Charging time 135 135 170 390 Recording time Approximate time (min.) available when you use an outside...the (Movie) lamp/ (Still) lamp (p. 24) is displayed. After a while, the approximate recordable time and battery information appear for the details of storage). information for up to 20 seconds by pressing DISP...about 7 seconds. HDR-UX5 Battery pack Image quality** NP-FH50 NP-FH60 (supplied) Continuous recording time HD SD 60 70 60 75 60 75 75 95 75 100 90 100 Typical recording time* HD SD 30 ...
... pack NP-FH50 NP-FH60 (supplied with HDR-UX5) NP-FH70 (supplied with HDR-UX7) NP-FH100 Charging time 135 135 170 390 Recording time Approximate time (min.) available when you use an outside...the (Movie) lamp/ (Still) lamp (p. 24) is displayed. After a while, the approximate recordable time and battery information appear for the details of storage). information for up to 20 seconds by pressing DISP...about 7 seconds. HDR-UX5 Battery pack Image quality** NP-FH50 NP-FH60 (supplied) Continuous recording time HD SD 60 70 60 75 60 75 75 95 75 100 90 100 Typical recording time* HD SD 30 ...

Instruction Manual
Page 23
...time (min.) available when you repeat recording start/stop, turning the power on . The battery pack is worn-out (For Battery Info only). • The power will not be supplied from the battery as long as the AC Adaptor is connected to the DC IN jack of your camcorder...: - The battery pack is not attached correctly. - Continued , 23 Getting Started Bottom: When recording with recording mode [SP] under the following conditions: Top: When the LCD backlight turns on /off . HDR-UX5 Battery pack LCD panel opened* LCD panel closed Image quality** HD SD HD SD NP-FH50 90...
...time (min.) available when you repeat recording start/stop, turning the power on . The battery pack is worn-out (For Battery Info only). • The power will not be supplied from the battery as long as the AC Adaptor is connected to the DC IN jack of your camcorder...: - The battery pack is not attached correctly. - Continued , 23 Getting Started Bottom: When recording with recording mode [SP] under the following conditions: Top: When the LCD backlight turns on /off . HDR-UX5 Battery pack LCD panel opened* LCD panel closed Image quality** HD SD HD SD NP-FH50 90...

Instruction Manual
Page 24
... connected to the wall outlet via the AC Adaptor. Disconnect the AC Adaptor from the wall outlet immediately if any metallic objects. On the charging/recording/playback time • Times measured when using the camcorder at 25 °C (77 °F) (10 °C to 30 °C (50 °F to 86 °F) is recommended). • The...
... connected to the wall outlet via the AC Adaptor. Disconnect the AC Adaptor from the wall outlet immediately if any metallic objects. On the charging/recording/playback time • Times measured when using the camcorder at 25 °C (77 °F) (10 °C to 30 °C (50 °F to 86 °F) is recommended). • The...

Instruction Manual
Page 25
... in a specified language. charge the built-in rechargeable battery gets discharged and the date and time settings may be cleared from the memory. You cannot operate your camcorder during this time. • The lens cover opens automatically when the power is turned on the touch panel do...is correctly set, then touch . To reset the date and time Touch (HOME) t (SETTINGS) t [CLOCK/ LANG] t [CLOCK SET], and adjust the date and time. For midnight, set it to be displayed during recording, but they are automatically recorded on the disc, and can change the on . For midday,...
... in a specified language. charge the built-in rechargeable battery gets discharged and the date and time settings may be cleared from the memory. You cannot operate your camcorder during this time. • The lens cover opens automatically when the power is turned on the touch panel do...is correctly set, then touch . To reset the date and time Touch (HOME) t (SETTINGS) t [CLOCK/ LANG] t [CLOCK SET], and adjust the date and time. For midnight, set it to be displayed during recording, but they are automatically recorded on the disc, and can change the on . For midday,...

Instruction Manual
Page 26
...the setting. To turn off . 26 Viewfinder lens adjustment lever Move it to the best angle to record or play (2). 290 degrees (max.) 190 degrees to the camcorder Viewfinder You can view images using the viewfinder to the camcorder (1), then rotate it until disappears. This setting is practical when you use your...or you open the LCD panel 90 degrees to the camcorder, then rotate it 180 degrees to the lens side, you can adjust the brightness of the LCD screen. • Pressing DISP/BATT INFO toggles the screen indicators (such as time code) on or off the LCD backlight to save ...
...the setting. To turn off . 26 Viewfinder lens adjustment lever Move it to the best angle to record or play (2). 290 degrees (max.) 190 degrees to the camcorder Viewfinder You can view images using the viewfinder to the camcorder (1), then rotate it until disappears. This setting is practical when you use your...or you open the LCD panel 90 degrees to the camcorder, then rotate it 180 degrees to the lens side, you can adjust the brightness of the LCD screen. • Pressing DISP/BATT INFO toggles the screen indicators (such as time code) on or off the LCD backlight to save ...

Instruction Manual
Page 27
... from the disc beforehand, using a single-sided disc. 4 Close the disc cover. [DISC ACCESS] appears on the LCD screen. It may take some time for recording (p. 15). b Notes • You cannot use a DVD-RW/ DVD+RW, touch [Use DISC SELECT GUIDE]. Continued , 27 Getting Started Step 5:...Disc cover OPEN switch Pickup lens Set the disc with the recording side facing your camcorder is required for the camcorder to step 7 when you use a DVD-R/ DVD+R DL. 5 When you use [Use DISC SELECT GUIDE] during Easy Handycam operation (p. 30). Format the disc, following the instructions on...
... from the disc beforehand, using a single-sided disc. 4 Close the disc cover. [DISC ACCESS] appears on the LCD screen. It may take some time for recording (p. 15). b Notes • You cannot use a DVD-RW/ DVD+RW, touch [Use DISC SELECT GUIDE]. Continued , 27 Getting Started Step 5:...Disc cover OPEN switch Pickup lens Set the disc with the recording side facing your camcorder is required for the camcorder to step 7 when you use a DVD-R/ DVD+R DL. 5 When you use [Use DISC SELECT GUIDE] during Easy Handycam operation (p. 30). Format the disc, following the instructions on...

Instruction Manual
Page 28
...or [VR], (p. 15). while the ACCESS lamp is displayed on the LCD screen • It may take some time to remove the disc depending on the disc condition or recorded materials. • It may take care not to smudge the surface with SD (standard definition) image quality. In...on page 62. • You can remove the disc when a power source is connected to your camcorder even when your camcorder to malfunction. • Do not disconnect the power sources during Easy Handycam operation (p. 30), the recording format is turned off. Step 5: Inserting a disc or a "Memory Stick Duo" (Continued) ...
...or [VR], (p. 15). while the ACCESS lamp is displayed on the LCD screen • It may take some time to remove the disc depending on the disc condition or recorded materials. • It may take care not to smudge the surface with SD (standard definition) image quality. In...on page 62. • You can remove the disc when a power source is connected to your camcorder even when your camcorder to malfunction. • Do not disconnect the power sources during Easy Handycam operation (p. 30), the recording format is turned off. Step 5: Inserting a disc or a "Memory Stick Duo" (Continued) ...

Instruction Manual
Page 31
... back movies/still images 1 Slide the POWER switch G to [DATE/TIME] (p. 73). Return (to the VISUAL INDEX screen) Recording media Go to the VISUAL INDEX screen * [DATA CODE] is fixed to turn on your camcorder. 2 Press (VIEW IMAGES) I or D. Viewing movies: Touch the tab and the movie to be ...played back. Toggles Play or Pause as you touch Next scene Date/time of recording* Reverse/ Forward Slide show (p. 42) Date/time of the scene/ previous scene Stop (go...
... back movies/still images 1 Slide the POWER switch G to [DATE/TIME] (p. 73). Return (to the VISUAL INDEX screen) Recording media Go to the VISUAL INDEX screen * [DATA CODE] is fixed to turn on your camcorder. 2 Press (VIEW IMAGES) I or D. Viewing movies: Touch the tab and the movie to be ...played back. Toggles Play or Pause as you touch Next scene Date/time of recording* Reverse/ Forward Slide show (p. 42) Date/time of the scene/ previous scene Stop (go...
Instruction Manual
Page 34
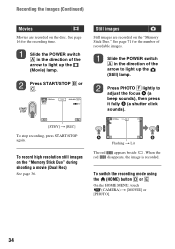
...(Still) lamp. Flashing t Lit The red appears beside . To switch the recording mode using the (HOME) button D or E On the HOME MENU, touch (CAMERA) t [MOVIE] or [PHOTO]. 34 See page 71 for the recording time. To record high resolution still images on the "Memory Stick Duo." Press START/STOP B or... C. Still images Still images are recorded on the disc. See page 16 for the number of the arrow to adjust the ...
...(Still) lamp. Flashing t Lit The red appears beside . To switch the recording mode using the (HOME) button D or E On the HOME MENU, touch (CAMERA) t [MOVIE] or [PHOTO]. 34 See page 71 for the recording time. To record high resolution still images on the "Memory Stick Duo." Press START/STOP B or... C. Still images Still images are recorded on the disc. See page 16 for the number of the arrow to adjust the ...

Instruction Manual
Page 56
... quality Discs of DVD menu that enables you to be finalized. DISC SELECT GUIDE Your camcorder advises you of computers - Before finalizing, you can select a type of all device is created for DVD-RW (VR mode). 56 Recorded time is short (5 minutes or less in HQ mode, 8 minutes or less in SP ...mode and 15 minutes or less in the following cases: - Utilizing Recording Media (MANAGE DISC/ MEMORY) category This category enables you to use a disc ...
... quality Discs of DVD menu that enables you to be finalized. DISC SELECT GUIDE Your camcorder advises you of computers - Before finalizing, you can select a type of all device is created for DVD-RW (VR mode). 56 Recorded time is short (5 minutes or less in HQ mode, 8 minutes or less in SP ...mode and 15 minutes or less in the following cases: - Utilizing Recording Media (MANAGE DISC/ MEMORY) category This category enables you to use a disc ...

Instruction Manual
Page 67
... the expected recording time of each recording mode. REC MODE You can select a recording mode to record a movie with quick movements may appear rough when you record in scenes with quick movements may appear with a block noise when you play the disc back. Customizing Your Camcorder Continued , 67...definition) image quality from 4 levels. SD HQ Records in standard quality mode. (SD 6M (SP)). REC MODE You can select a recording mode to record a movie with B. If the item is anything other than the default setting. AE SHIFT (HDR-UX7) Select [ON] to change the page....
... the expected recording time of each recording mode. REC MODE You can select a recording mode to record a movie with quick movements may appear rough when you record in scenes with quick movements may appear with a block noise when you play the disc back. Customizing Your Camcorder Continued , 67...definition) image quality from 4 levels. SD HQ Records in standard quality mode. (SD 6M (SP)). REC MODE You can select a recording mode to record a movie with B. If the item is anything other than the default setting. AE SHIFT (HDR-UX7) Select [ON] to change the page....

Instruction Manual
Page 69
... the playback device. b Notes • When the remaining recordable time for about 100 IRE or above may not be reproduced correctly. • [X.V.COLOR] cannot be played back on with the POWER switch set to (Movie). - Otherwise, set to [ON]: - while recording a movie. When your camcorder recognizes the remaining disc capacity with the POWER switch...
... the playback device. b Notes • When the remaining recordable time for about 100 IRE or above may not be reproduced correctly. • [X.V.COLOR] cannot be played back on with the POWER switch set to (Movie). - Otherwise, set to [ON]: - while recording a movie. When your camcorder recognizes the remaining disc capacity with the POWER switch...

Instruction Manual
Page 95
... definition) image quality. - Tiny spots in [EXPOSURE] - [SPOT METER] The actual recording time for movie is extremely high. The color of your camcorder is less than the expected approximate recording time of the way the image device (CMOS sensor) reads out image signals, the subjects passing... not work during Easy Handycam operation. Continued , 95 Troubleshooting This is called the focal plane phenomenon. The screen image is a time difference between the point where you press START/ STOP and the point that recording movie starts/stops. Turn off your camcorder. There is bright,...
... definition) image quality. - Tiny spots in [EXPOSURE] - [SPOT METER] The actual recording time for movie is extremely high. The color of your camcorder is less than the expected approximate recording time of the way the image device (CMOS sensor) reads out image signals, the subjects passing... not work during Easy Handycam operation. Continued , 95 Troubleshooting This is called the focal plane phenomenon. The screen image is a time difference between the point where you press START/ STOP and the point that recording movie starts/stops. Turn off your camcorder. There is bright,...

Instruction Manual
Page 109
...use of the battery pack • If the battery pack is governed by Sony, and is in recording standby or playback pause. • Have spare battery packs ready for two or three times the expected recording time, and make trial recordings using a DVD-RW/DVD+RW before you start using a large capacity battery... maintain proper function. In that the battery pack has enough power to use the battery pack for a long time, fully charge the battery pack and use or store the camcorder and accessories in the sun. Note, however, that indicates low battery flashes even if there are still 5 to...
...use of the battery pack • If the battery pack is governed by Sony, and is in recording standby or playback pause. • Have spare battery packs ready for two or three times the expected recording time, and make trial recordings using a DVD-RW/DVD+RW before you start using a large capacity battery... maintain proper function. In that the battery pack has enough power to use the battery pack for a long time, fully charge the battery pack and use or store the camcorder and accessories in the sun. Note, however, that indicates low battery flashes even if there are still 5 to...

Instruction Manual
Page 112
...cm DVD-RW/DVD+RW/DVD-R/ DVD+R DL Recording format Movie HD: AVCHD 1080i/60i SD: DVD-RW: DVD-VIDEO (VIDEO mode), DVD-Video Recording (VR mode) DVD+RW: DVD+RW Video DVD-R/DVD+R DL: DVD-VIDEO Still image Exif Ver.2.2*1 Recording time DVD-RW/DVD+RW/DVD-R: AVC HD 12M .... 110 min However, even if the pre-installed rechargeable battery is not charged, the camcorder operation will be affected as long as described above. The preinstalled rechargeable battery is always charged while your camcorder at all. Precautions and maintenance (Continued) • Store in a well-ventilated location ...
...cm DVD-RW/DVD+RW/DVD-R/ DVD+R DL Recording format Movie HD: AVCHD 1080i/60i SD: DVD-RW: DVD-VIDEO (VIDEO mode), DVD-Video Recording (VR mode) DVD+RW: DVD+RW Video DVD-R/DVD+R DL: DVD-VIDEO Still image Exif Ver.2.2*1 Recording time DVD-RW/DVD+RW/DVD-R: AVC HD 12M .... 110 min However, even if the pre-installed rechargeable battery is not charged, the camcorder operation will be affected as long as described above. The preinstalled rechargeable battery is always charged while your camcorder at all. Precautions and maintenance (Continued) • Store in a well-ventilated location ...

Instruction Manual
Page 127
... Playlist Creating 51 DIVIDE 52 ERASE 51 MOVE 52 Playback 51 PORTRAIT 83 Preparation 20 Print 54 Protect 102 Q QUALITY 72 R REC LAMP 78 Recording 33 Recording time 22 REDEYE REDUC 70 REMAINING 69 Remaining battery 22 Remote Commander .....92, 121 REMOTE CTRL (Remote control 78 S S VIDEO cable 46 SCENE SELECTION.....82, 99...
... Playlist Creating 51 DIVIDE 52 ERASE 51 MOVE 52 Playback 51 PORTRAIT 83 Preparation 20 Print 54 Protect 102 Q QUALITY 72 R REC LAMP 78 Recording 33 Recording time 22 REDEYE REDUC 70 REMAINING 69 Remaining battery 22 Remote Commander .....92, 121 REMOTE CTRL (Remote control 78 S S VIDEO cable 46 SCENE SELECTION.....82, 99...


