
User Guide
Page 2
...Duo" media in this manual. Design and specifications of your camcorder and accessories are subject to its fullest in the Operating Guide and the PMB Guide that actually appear on your camcorder. The HDR-XR520V is the Help of the supplied "PMB (Picture Motion Browser)"... software. Information on using your camcorder connected to the Operating Guide (a separate volume). Read the Handycam Handbook in ...
...Duo" media in this manual. Design and specifications of your camcorder and accessories are subject to its fullest in the Operating Guide and the PMB Guide that actually appear on your camcorder. The HDR-XR520V is the Help of the supplied "PMB (Picture Motion Browser)"... software. Information on using your camcorder connected to the Operating Guide (a separate volume). Read the Handycam Handbook in ...

User Guide
Page 3
... Using the OPTION MENU 12 Menu lists 13 List of the HOME MENU 13 List of the OPTION MENU 14 Read this before operating your camcorder 15 Notes on using the Hard Disk Drive Handycam 16 Getting started Step 1: Charging the battery pack 18 Step 2: Turning the power on /...movies 30 Shooting photos 32 Useful functions for recording movies and photos 34 Zooming 34 Recording sound with more presence (5.1ch surround recording 34 Recording high quality photos during movie recording (Dual Rec 35 Recording in dark places (NightShot/LOW LUX 35 Recording in mirror mode 36 Recording fast action...
... Using the OPTION MENU 12 Menu lists 13 List of the HOME MENU 13 List of the OPTION MENU 14 Read this before operating your camcorder 15 Notes on using the Hard Disk Drive Handycam 16 Getting started Step 1: Charging the battery pack 18 Step 2: Turning the power on /...movies 30 Shooting photos 32 Useful functions for recording movies and photos 34 Zooming 34 Recording sound with more presence (5.1ch surround recording 34 Recording high quality photos during movie recording (Dual Rec 35 Recording in dark places (NightShot/LOW LUX 35 Recording in mirror mode 36 Recording fast action...
User Guide
Page 4
Table of Contents Useful Recording Techniques Acquiring location information (GPS) (HDR-XR500V/XR520V 39 Playback on the camcorder 41 Playing movies 41 Viewing photos 43 Useful functions for playing movies and photos 44 Searching for a desired scene by recording location... a movie 64 Using the Playlist of movies 65 Creating the Playlist 65 Playing the Playlist 66 Creating a disc with a DVD writer, recorder 67 Creating a high definition image quality (HD) disc with a DVD writer, etc. (USB cable connection 67 Creating a standard definition image quality (SD) disc with a recorder,...
Table of Contents Useful Recording Techniques Acquiring location information (GPS) (HDR-XR500V/XR520V 39 Playback on the camcorder 41 Playing movies 41 Viewing photos 43 Useful functions for playing movies and photos 44 Searching for a desired scene by recording location... a movie 64 Using the Playlist of movies 65 Creating the Playlist 65 Playing the Playlist 66 Creating a disc with a DVD writer, recorder 67 Creating a high definition image quality (HD) disc with a DVD writer, etc. (USB cable connection 67 Creating a standard definition image quality (SD) disc with a recorder,...

User Guide
Page 5
... photos 119 Expected time of recording and playback with each battery pack 119 Expected recording time of movies 120 Expected number of your camcorder MOVIE SETTINGS (Items for recording movies 74 PHOTO SETTINGS (Items for recording photos 81 FACE FUNC. Table of Contents Useful Recording Techniques...on the internal hard disk and "Memory Stick PRO Duo" media ...124 Maintenance and precautions 125 About the AVCHD format 125 About GPS (HDR-XR500V/XR520V 126 About "Memory Stick" media 127 About the "InfoLITHIUM" battery pack 129 About x.v.Color 130 About handling of recordable photos...
... photos 119 Expected time of recording and playback with each battery pack 119 Expected recording time of movies 120 Expected number of your camcorder MOVIE SETTINGS (Items for recording movies 74 PHOTO SETTINGS (Items for recording photos 81 FACE FUNC. Table of Contents Useful Recording Techniques...on the internal hard disk and "Memory Stick PRO Duo" media ...124 Maintenance and precautions 125 About the AVCHD format 125 About GPS (HDR-XR500V/XR520V 126 About "Memory Stick" media 127 About the "InfoLITHIUM" battery pack 129 About x.v.Color 130 About handling of recordable photos...

User Guide
Page 7
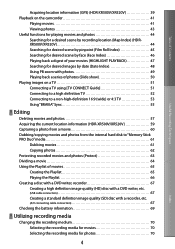
...67) HDMI OUT (mini) jack (51) Remote sensor/Infrared port Point the Wireless Remote Commander (p. 9) towards the remote sensor to operate your camcorder. Lens (G lens) Flash (79, 83) Camera recording lamp (98) The camera recording lamp lights up in red during playback ...in ( ) are recording movies with an external flash (sold separately) connected to the accessory shoe, turn off the power of your camcorder. To remove an accessory, loosen the screw, and then press down and push it to the operating instructions supplied with your accessory ...
...67) HDMI OUT (mini) jack (51) Remote sensor/Infrared port Point the Wireless Remote Commander (p. 9) towards the remote sensor to operate your camcorder. Lens (G lens) Flash (79, 83) Camera recording lamp (98) The camera recording lamp lights up in red during playback ...in ( ) are recording movies with an external flash (sold separately) connected to the accessory shoe, turn off the power of your camcorder. To remove an accessory, loosen the screw, and then press down and push it to the operating instructions supplied with your accessory ...
User Guide
Page 8
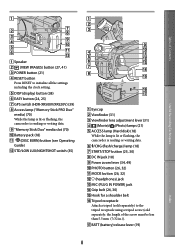
...; DISP (display) button (38) EASY button (24, 25) GPS switch (HDR-XR500V/XR520V) (39) Access lamp ("Memory Stick PRO Duo" media) (70) While the lamp is lit or flashing, the camcorder is reading or writing data. "Memory Stick Duo" media slot (70) Battery ...Viewfinder lens adjustment lever (31) (Movie)/ (Photo) lamps (21) ACCESS lamp (Hard disk) (18) While the lamp is lit or flashing, the camcorder is reading or writing data. /CHG (flash/charge) lamp (18) START/STOP button (25, 30) DC IN jack (18) ...
...; DISP (display) button (38) EASY button (24, 25) GPS switch (HDR-XR500V/XR520V) (39) Access lamp ("Memory Stick PRO Duo" media) (70) While the lamp is lit or flashing, the camcorder is reading or writing data. "Memory Stick Duo" media slot (70) Battery ...Viewfinder lens adjustment lever (31) (Movie)/ (Photo) lamps (21) ACCESS lamp (Hard disk) (18) While the lamp is lit or flashing, the camcorder is reading or writing data. /CHG (flash/charge) lamp (18) START/STOP button (25, 30) DC IN jack (18) ...

User Guide
Page 9
...the remote sensor to pull out the battery case. Place a new battery with a Sony CR2025 lithium battery. When you press any of these buttons, the orange frame appears on the ...To change the battery of the Wireless Remote Commander While pressing on the tab, inset your camcorder (p. 9). When no commands have been sent from the Wireless Remote Commander within a certain...; DATA CODE button (90) Displays the date and time, camera setting data, or coordinates (HDR-XR500V/XR520V) of the recorded images when you press this button during playback. PHOTO button...
...the remote sensor to pull out the battery case. Place a new battery with a Sony CR2025 lithium battery. When you press any of these buttons, the orange frame appears on the ...To change the battery of the Wireless Remote Commander While pressing on the tab, inset your camcorder (p. 9). When no commands have been sent from the Wireless Remote Commander within a certain...; DATA CODE button (90) Displays the date and time, camera setting data, or coordinates (HDR-XR500V/XR520V) of the recorded images when you press this button during playback. PHOTO button...

User Guide
Page 12
... computer. You can change in the context appears. (OPTION) Touch the desired category the menu item to change the settings of your camcorder at the time. 12 The menu items you right-click the mouse on the screen, touch /. To return to the previous screen, touch ...touch . When the item is not on the screen, touch another tab. (There may be changed. Taking advantage of two types of your camcorder, etc. (HOME) (HOME) button Using the HELP function To see the descriptions on the HOME MENU, touch (HELP) on the recording/playback status...
... computer. You can change in the context appears. (OPTION) Touch the desired category the menu item to change the settings of your camcorder at the time. 12 The menu items you right-click the mouse on the screen, touch /. To return to the previous screen, touch ...touch . When the item is not on the screen, touch another tab. (There may be changed. Taking advantage of two types of your camcorder, etc. (HOME) (HOME) button Using the HELP function To see the descriptions on the HOME MENU, touch (HELP) on the recording/playback status...

User Guide
Page 15
... will damage the terminal and may be sure to another device with this before operating your camcorder" (p. 130). Do not do any of the following parts, and also do not hold the camcorder by the following when the (Movie)/ (Photo) mode lamps (p. 21) or the ACCESS... as the GPS switch is set to the camcorder When connecting your camcorder. Disconnect the AC Adaptor from the camcorder, holding both the camcorder and the DC plug. Even if the camcorder is turned off and landing of an airplane (HDR-XR500V/XR520V). Menu items, LCD panel, viewfinder...
... will damage the terminal and may be sure to another device with this before operating your camcorder" (p. 130). Do not do any of the following parts, and also do not hold the camcorder by the following when the (Movie)/ (Photo) mode lamps (p. 21) or the ACCESS... as the GPS switch is set to the camcorder When connecting your camcorder. Disconnect the AC Adaptor from the camcorder, holding both the camcorder and the DC plug. Even if the camcorder is turned off and landing of an airplane (HDR-XR500V/XR520V). Menu items, LCD panel, viewfinder...

User Guide
Page 16
...a disc such as a DVD-R using your image data using a VCR, or a DVD/HDD recorder (p. 67). DVD media containing AVCHD footage should not be copyrighted. Index 16 Therefore, you can save all your camcorder in very loud areas. It is recommended that you need an NTSC system-based TV. &#...is lit. When using a shoulder belt (sold separately), do not apply shock. Notes on other devices Your camcorder is compatible with MPEG4 AVC/H.264 High Profile for the contents of recordings cannot be some tiny black points and/or bright points (white, red, blue, or green in...
...a disc such as a DVD-R using your image data using a VCR, or a DVD/HDD recorder (p. 67). DVD media containing AVCHD footage should not be copyrighted. Index 16 Therefore, you can save all your camcorder in very loud areas. It is recommended that you need an NTSC system-based TV. &#...is lit. When using a shoulder belt (sold separately), do not apply shock. Notes on other devices Your camcorder is compatible with MPEG4 AVC/H.264 High Profile for the contents of recordings cannot be some tiny black points and/or bright points (white, red, blue, or green in...

User Guide
Page 17
... In this function is recommended that you perform [ EMPTY] (p. 72) to format the hard disk or music file storage area of the camcorder using the camcorder at high altitudes Do not turn on disposal/transfer Even if you perform [MEDIA FORMAT] (p. 72) or formatting the hard disk ... images on operating temperatures When the temperature of the camcorder becomes extremely high or extremely low, you may not delete data from shock by the camcorder may not be recorded. Also, when you dispose of the camcorder, it is recommended that you do so, your data. Images...
... In this function is recommended that you perform [ EMPTY] (p. 72) to format the hard disk or music file storage area of the camcorder using the camcorder at high altitudes Do not turn on disposal/transfer Even if you perform [MEDIA FORMAT] (p. 72) or formatting the hard disk ... images on operating temperatures When the temperature of the camcorder becomes extremely high or extremely low, you may not delete data from shock by the camcorder may not be recorded. Also, when you dispose of the camcorder, it is recommended that you do so, your data. Images...

User Guide
Page 18
The /CHG lamp lights up and charging starts. The /CHG lamp turns off your camcorder by sliding it in the direction of your camcorder and the wall outlet (wall socket). Align the mark on the DC plug with that on the DC IN jack. Getting started Step 1: .... 2 Attach the battery pack by closing the LCD screen after attaching it clicks. 3 Connect the AC Adaptor and the power cord (mains lead) to your camcorder. 1 Turn off when the battery pack is fully charged. 4 When the battery is charged, disconnect the AC Adaptor from the DC IN jack of the...
The /CHG lamp lights up and charging starts. The /CHG lamp turns off your camcorder by sliding it in the direction of your camcorder and the wall outlet (wall socket). Align the mark on the DC plug with that on the DC IN jack. Getting started Step 1: .... 2 Attach the battery pack by closing the LCD screen after attaching it clicks. 3 Connect the AC Adaptor and the power cord (mains lead) to your camcorder. 1 Turn off when the battery pack is fully charged. 4 When the battery is charged, disconnect the AC Adaptor from the DC IN jack of the...

User Guide
Page 19
.... Charging the battery pack abroad You can check the approximate amount of Contents See page 119 on recording and playing time. When your camcorder is on, you can charge the battery pack in any operation for about 5 minutes, to 86 F) is not discharged. Notes on the LCD screen...), it is recommended that you use an NP-FH70 or NPFH100 battery pack. We do not recommend using the AC Adaptor supplied with your camcorder within the AC 100 V - 240 V, 50 Hz/60 Hz range. Do not use a wall outlet (wall socket) as a power source Make the same ...
.... Charging the battery pack abroad You can check the approximate amount of Contents See page 119 on recording and playing time. When your camcorder is on, you can charge the battery pack in any operation for about 5 minutes, to 86 F) is not discharged. Notes on the LCD screen...), it is recommended that you use an NP-FH70 or NPFH100 battery pack. We do not recommend using the AC Adaptor supplied with your camcorder within the AC 100 V - 240 V, 50 Hz/60 Hz range. Do not use a wall outlet (wall socket) as a power source Make the same ...

User Guide
Page 20
Table of the AC Adaptor or battery terminal with any metallic objects. This may cause a malfunction. 20 Index Disconnect the AC Adaptor from the wall outlet (wall socket) immediately if any malfunction occurs while using your camcorder. Do not use the AC Adaptor placed in a narrow space, such as between a wall and furniture. Do not short-circuit the DC plug of Contents Useful Recording Techniques Notes on the AC Adaptor Use the nearby wall outlet (wall socket) when using the AC Adaptor.
Table of the AC Adaptor or battery terminal with any metallic objects. This may cause a malfunction. 20 Index Disconnect the AC Adaptor from the wall outlet (wall socket) immediately if any malfunction occurs while using your camcorder. Do not use the AC Adaptor placed in a narrow space, such as between a wall and furniture. Do not short-circuit the DC plug of Contents Useful Recording Techniques Notes on the AC Adaptor Use the nearby wall outlet (wall socket) when using the AC Adaptor.

User Guide
Page 21
...] or [SUMMERTIME], date and time, then touch . Touch the button on , and setting the date and time 1 Open the LCD screen of your camcorder when the LCD screen is not on the recording media, and can turn off the operation beeps by touching (HOME) (SETTINGS) [SOUND/DISP...]. Table of Contents Step 2: Turning the power on the LCD screen. To set [DST SET] or [SUMMERTIME] to [ON], the clock advances 1 hour. Your camcorder is turned on. To turn on your...
...] or [SUMMERTIME], date and time, then touch . Touch the button on , and setting the date and time 1 Open the LCD screen of your camcorder when the LCD screen is not on the recording media, and can turn off the operation beeps by touching (HOME) (SETTINGS) [SOUND/DISP...]. Table of Contents Step 2: Turning the power on the LCD screen. To set [DST SET] or [SUMMERTIME] to [ON], the clock advances 1 hour. Your camcorder is turned on. To turn on your...

User Guide
Page 22
... Off On Notes Even if the LCD screen is closed, if the viewfinder is pulled out, the camcorder is turned on or off depending on -screen displays to [OFF] (HDR-XR500V/XR520V). Changing the language setting You can turn off the power Close the LCD screen. Touch (HOME) (SETTINGS...
... Off On Notes Even if the LCD screen is closed, if the viewfinder is pulled out, the camcorder is turned on or off depending on -screen displays to [OFF] (HDR-XR500V/XR520V). Changing the language setting You can turn off the power Close the LCD screen. Touch (HOME) (SETTINGS...

User Guide
Page 23
...the recording person is essential that may make the viewer feel tired when viewing them. By always carrying spare batteries, you hold the camcorder, keep your upper body upright, and hold your arms close to your body. Excessive zooming will make movies that you turn your ... about battery power shortages. 23 Index Table of Contents Useful Recording Techniques Recording/Playback Five pieces of advice for successful recording Stabilizing your camcorder When you can make a time-lapse recording or record subjects in and out slowly and smoothly. Zooming smoothly Zoom in dim light,...
...the recording person is essential that may make the viewer feel tired when viewing them. By always carrying spare batteries, you hold the camcorder, keep your upper body upright, and hold your arms close to your body. Excessive zooming will make movies that you turn your ... about battery power shortages. 23 Index Table of Contents Useful Recording Techniques Recording/Playback Five pieces of advice for successful recording Stabilizing your camcorder When you can make a time-lapse recording or record subjects in and out slowly and smoothly. Zooming smoothly Zoom in dim light,...

User Guide
Page 24
..., movies are recorded with high definition image quality (HD) on the hard disk (p. 70, 74). Fasten the grip belt. Open the LCD screen of Contents Useful Recording Techniques Recording and playing movies and photos easily ( Easy Handycam Operation) Simply press EASY. appears on your camcorder. Your camcorder is turned on. ...
..., movies are recorded with high definition image quality (HD) on the hard disk (p. 70, 74). Fasten the grip belt. Open the LCD screen of Contents Useful Recording Techniques Recording and playing movies and photos easily ( Easy Handycam Operation) Simply press EASY. appears on your camcorder. Your camcorder is turned on. ...

User Guide
Page 25
Your camcorder is turned on. To turn on the LCD screen. 25 Index appears on your camcorder. Shooting photos Open the LCD screen of Contents Useful Recording Techniques Press START/STOP to [HD SP] or [SD SP] (p. 74). Table of your camcorder when the LCD screen is fixed to start recording. STBY] [REC] To stop recording, press START/STOP again. Tips The [REC MODE] is already open, press POWER (p. 21). Press EASY.
Your camcorder is turned on. To turn on the LCD screen. 25 Index appears on your camcorder. Shooting photos Open the LCD screen of Contents Useful Recording Techniques Press START/STOP to [HD SP] or [SD SP] (p. 74). Table of your camcorder when the LCD screen is fixed to start recording. STBY] [REC] To stop recording, press START/STOP again. Tips The [REC MODE] is already open, press POWER (p. 21). Press EASY.

User Guide
Page 26
Flashes Lights up When disappears, the photo is recorded on your camcorder. Playing movies Open the LCD screen of Contents Useful Recording Techniques Press MODE to adjust the focus, then press it fully. Your camcorder is already open, press POWER (p. 21). 26 Index Table of your camcorder when the LCD screen is turned on. To turn on the (Photo) lamp. Press PHOTO lightly to turn on the internal hard disk.
Flashes Lights up When disappears, the photo is recorded on your camcorder. Playing movies Open the LCD screen of Contents Useful Recording Techniques Press MODE to adjust the focus, then press it fully. Your camcorder is already open, press POWER (p. 21). 26 Index Table of your camcorder when the LCD screen is turned on. To turn on the (Photo) lamp. Press PHOTO lightly to turn on the internal hard disk.


