Operating Instructions
Page 3
... to operate this equipment does cause harmful interference to persons. Connect the equipment into an outlet on , the user is connected. - 6 The use of an accessory attachment not recommended by one or more of the following circumstances: • Residential area • Business district • Light-industry district 3-GB If this equipment...
... to operate this equipment does cause harmful interference to persons. Connect the equipment into an outlet on , the user is connected. - 6 The use of an accessory attachment not recommended by one or more of the following circumstances: • Residential area • Business district • Light-industry district 3-GB If this equipment...
Operating Instructions
Page 5
Features • This unit is exclusively for use with digital still cameras with an advanced accessory shoe or ACC terminal made by SONY. • Using its pre-flash function flash photographs with the correct exposure can be taken.* • With it's AF illuminator function the auto focus works even in dark locations.* * There are some types of digital still cameras with which this flash cannot be used. 5-GB
Features • This unit is exclusively for use with digital still cameras with an advanced accessory shoe or ACC terminal made by SONY. • Using its pre-flash function flash photographs with the correct exposure can be taken.* • With it's AF illuminator function the auto focus works even in dark locations.* * There are some types of digital still cameras with which this flash cannot be used. 5-GB
Operating Instructions
Page 7
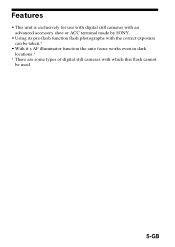
Parts identification 2 1 6 4 3 8 5 7 qh qg qf qd qs 1 Flashing section 2 Wide panel 3 Light exposure meter 4 AF illuminator 5 Advanced accessory shoe 6 Bounce flash angle display 7 Battery cover 8 Rotating knob 9 POWER switch q; qa qk ql qa Light intensity change button qs Modeling light button qd Back light button qf Test flash button qg READY lamp qh AF illuminator change button qj Display panel qk Connection cord terminal ql Cord clamper 7-GB Mode button 9 qj q;
Parts identification 2 1 6 4 3 8 5 7 qh qg qf qd qs 1 Flashing section 2 Wide panel 3 Light exposure meter 4 AF illuminator 5 Advanced accessory shoe 6 Bounce flash angle display 7 Battery cover 8 Rotating knob 9 POWER switch q; qa qk ql qa Light intensity change button qs Modeling light button qd Back light button qf Test flash button qg READY lamp qh AF illuminator change button qj Display panel qk Connection cord terminal ql Cord clamper 7-GB Mode button 9 qj q;
Operating Instructions
Page 11
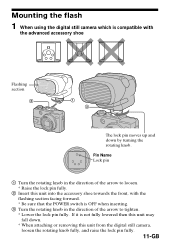
...this unit may fall down. * When attaching or removing this unit into the accessory shoe towards the front, with the flashing section facing forward. * Be sure that the POWER switch is compatible with the advanced accessory shoe Flashing section 2 1 3 The lock pin moves up and down by turning the ...rotating knob. Mounting the flash 1 When using the digital still camera which is OFF when inserting. 3 Turn the rotating knob ...
...this unit may fall down. * When attaching or removing this unit into the accessory shoe towards the front, with the flashing section facing forward. * Be sure that the POWER switch is compatible with the advanced accessory shoe Flashing section 2 1 3 The lock pin moves up and down by turning the ...rotating knob. Mounting the flash 1 When using the digital still camera which is OFF when inserting. 3 Turn the rotating knob ...
Operating Instructions
Page 12
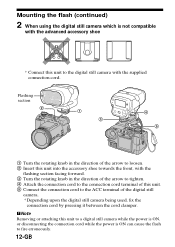
... using the digital still camera which is ON can cause the flash to fire erroneously. 12-GB Flashing section 2 1 3 4 5 1 Turn the rotating knob in the direction of the arrow to loosen. 2 Insert this unit into the accessory shoe towards the front, with the supplied connection cord. PNote ... ON, or disconnecting the connection cord while the power is not compatible with the advanced accessory shoe * Connect this unit. 5 Connect the connection cord to the digital still camera with the flashing section facing forward. 3 Turn the rotating knob in the direction of the arrow to tighten...
... using the digital still camera which is ON can cause the flash to fire erroneously. 12-GB Flashing section 2 1 3 4 5 1 Turn the rotating knob in the direction of the arrow to loosen. 2 Insert this unit into the accessory shoe towards the front, with the supplied connection cord. PNote ... ON, or disconnecting the connection cord while the power is not compatible with the advanced accessory shoe * Connect this unit. 5 Connect the connection cord to the digital still camera with the flashing section facing forward. 3 Turn the rotating knob in the direction of the arrow to tighten...
Operating Instructions
Page 13
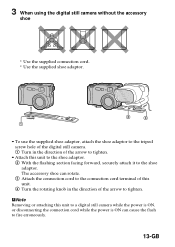
... cord terminal of this unit. 4 Turn the rotating knob in the direction of the arrow to tighten. 3 When using the digital still camera without the accessory shoe * Use the supplied connection cord. * Use the supplied shoe adaptor. 2 3 1 • To use the supplied shoe adaptor, attach the shoe adaptor to the tripod...; Attach this unit to a digital still camera while the power is ON, or disconnecting the connection cord while the power is ON can cause the flash to fire erroneously. 13-GB PNote Removing or attaching this unit to the shoe adaptor. 2 With the...
... cord terminal of this unit. 4 Turn the rotating knob in the direction of the arrow to tighten. 3 When using the digital still camera without the accessory shoe * Use the supplied connection cord. * Use the supplied shoe adaptor. 2 3 1 • To use the supplied shoe adaptor, attach the shoe adaptor to the tripod...; Attach this unit to a digital still camera while the power is ON, or disconnecting the connection cord while the power is ON can cause the flash to fire erroneously. 13-GB PNote Removing or attaching this unit to the shoe adaptor. 2 With the...
Operating Instructions
Page 14
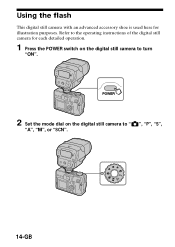
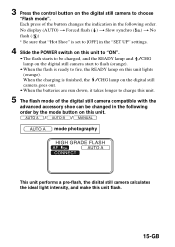
Using the flash This digital still camera with an advanced accessory shoe is used here for each detailed operation. 1 Press the POWER switch on the digital still camera to turn "ON". 2 Set the mode dial on the digital still camera to " ", "P", "S", "A", "M", or "SCN". 14-GB Refer to the operating instructions of the digital still camera for illustration purposes.
Using the flash This digital still camera with an advanced accessory shoe is used here for each detailed operation. 1 Press the POWER switch on the digital still camera to turn "ON". 2 Set the mode dial on the digital still camera to " ", "P", "S", "A", "M", or "SCN". 14-GB Refer to the operating instructions of the digital still camera for illustration purposes.
Operating Instructions
Page 15
...digital still camera compatible with the advanced accessory shoe can be charged, and the READY lamp and /CHG lamp on the digital still camera start to flash (orange). • When the flash is ready to charge this unit lights (orange). No display (AUTO) t Forced flash ( ) t Slow synchro ( ) t No flash ( ) * Be sure that "...is set to [OFF] in the "SET UP" settings. 4 Slide the POWER switch on this unit to "ON". • The flash starts to choose "Flash mode". 3 Press the control button on the digital still camera to be changed in the following order by the mode button on this unit...
...digital still camera compatible with the advanced accessory shoe can be charged, and the READY lamp and /CHG lamp on the digital still camera start to flash (orange). • When the flash is ready to charge this unit lights (orange). No display (AUTO) t Forced flash ( ) t Slow synchro ( ) t No flash ( ) * Be sure that "...is set to [OFF] in the "SET UP" settings. 4 Slide the POWER switch on this unit to "ON". • The flash starts to choose "Flash mode". 3 Press the control button on the digital still camera to be changed in the following order by the mode button on this unit...
Operating Instructions
Page 27
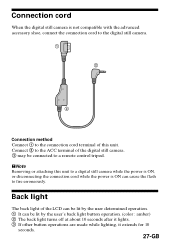
... a remote control tripod. Back light The back light of the LCD can cause the flash to fire erroneously. PNote Removing or attaching this unit. Connection cord When the digital still camera is not compatible with the advanced accessory shoe, connect the connection cord to the digital still camera. 1 2 3 Connection method Connect 1 to...
... a remote control tripod. Back light The back light of the LCD can cause the flash to fire erroneously. PNote Removing or attaching this unit. Connection cord When the digital still camera is not compatible with the advanced accessory shoe, connect the connection cord to the digital still camera. 1 2 3 Connection method Connect 1 to...
Operating Instructions
Page 28
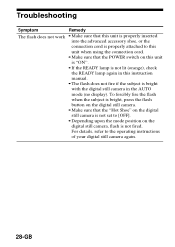
...OFF]. • Depending upon the mode position on this instruction manual. • The flash does not fire if the subject is not fired. To forcibly fire the flash when the subject is bright, press the flash button on the digital still camera. • Make sure that the POWER switch on ...(orange), check the READY lamp again in the AUTO mode (no display). Troubleshooting Symptom Remedy The flash does not work • Make sure that this unit is properly inserted into the advanced accessory shoe, or the connection cord is properly attached to this unit when using the connection cord. &#...
...OFF]. • Depending upon the mode position on this instruction manual. • The flash does not fire if the subject is not fired. To forcibly fire the flash when the subject is bright, press the flash button on the digital still camera. • Make sure that the POWER switch on ...(orange), check the READY lamp again in the AUTO mode (no display). Troubleshooting Symptom Remedy The flash does not work • Make sure that this unit is properly inserted into the advanced accessory shoe, or the connection cord is properly attached to this unit when using the connection cord. &#...
Operating Instructions
Page 29
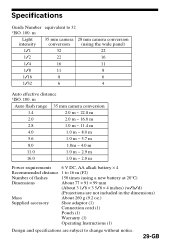
...) (w/h/d) (Projections are not included in the dimensions) Mass About 260 g (9.2 oz.) Supplied accessory Shoe adaptor (1) Connection cord (1) Pouch (1) Warranty (1) Operating Instructions (1) Design and specifications are subject... to change without notice. 29-GB Specifications Guide Number equivalent to 16 m (F2) Number of flashes 150 times (using the wide panel) 1/1 32 22 1/2 22 16 1/4 16 11 1/8 11 8 1/16 8 6 1/32 6 4 Auto effective distance *ISO. 100. m Auto flash range 35 mm camera conversion 1.4 2.0 m ~ 22.8 m 2.0 2.0 m ~ 16.0 m 2.8 1.0 m ~ 11.4 m...
...) (w/h/d) (Projections are not included in the dimensions) Mass About 260 g (9.2 oz.) Supplied accessory Shoe adaptor (1) Connection cord (1) Pouch (1) Warranty (1) Operating Instructions (1) Design and specifications are subject... to change without notice. 29-GB Specifications Guide Number equivalent to 16 m (F2) Number of flashes 150 times (using the wide panel) 1/1 32 22 1/2 22 16 1/4 16 11 1/8 11 8 1/16 8 6 1/32 6 4 Auto effective distance *ISO. 100. m Auto flash range 35 mm camera conversion 1.4 2.0 m ~ 22.8 m 2.0 2.0 m ~ 16.0 m 2.8 1.0 m ~ 11.4 m...