Operating Instructions
Page 11
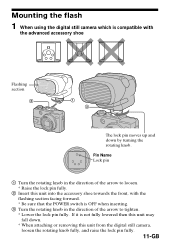
... the arrow to loosen. * Raise the lock pin fully. 2 Insert this unit into the accessory shoe towards the front, with the advanced accessory shoe Flashing section 2 1 3 The lock pin moves up and down . * When attaching or removing this unit may fall down by turning the rotating knob. ...Turn the rotating knob in the direction of the arrow to tighten. * Lower the lock pin fully. Mounting the flash 1 When using the digital still camera which is compatible with the flashing section facing forward. * Be sure that the POWER switch is not fully lowered then this unit from the digital ...
... the arrow to loosen. * Raise the lock pin fully. 2 Insert this unit into the accessory shoe towards the front, with the advanced accessory shoe Flashing section 2 1 3 The lock pin moves up and down . * When attaching or removing this unit may fall down by turning the rotating knob. ...Turn the rotating knob in the direction of the arrow to tighten. * Lower the lock pin fully. Mounting the flash 1 When using the digital still camera which is compatible with the flashing section facing forward. * Be sure that the POWER switch is not fully lowered then this unit from the digital ...
Operating Instructions
Page 12
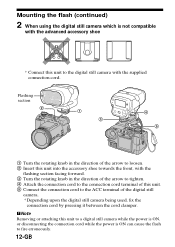
...When using the digital still camera which is not compatible with the advanced accessory shoe * Connect this unit to a digital still camera while the power is ON, or disconnecting the connection cord while the power is ON can cause the flash to fire erroneously. 12-GB PNote Removing or ... terminal of the digital still camera. * Depending upon the digital still camera being used, fix the connection cord by pressing it between the cord clamper. Flashing section 2 1 3 4 5 1 Turn the rotating knob in the direction of the arrow to loosen. 2 Insert this unit into the accessory shoe towards...
...When using the digital still camera which is not compatible with the advanced accessory shoe * Connect this unit to a digital still camera while the power is ON, or disconnecting the connection cord while the power is ON can cause the flash to fire erroneously. 12-GB PNote Removing or ... terminal of the digital still camera. * Depending upon the digital still camera being used, fix the connection cord by pressing it between the cord clamper. Flashing section 2 1 3 4 5 1 Turn the rotating knob in the direction of the arrow to loosen. 2 Insert this unit into the accessory shoe towards...
Operating Instructions
Page 15
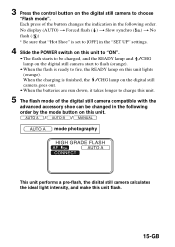
Each press of the digital still camera compatible with the advanced accessory shoe can be changed in the following order. When the charging is ready to fire, the READY lamp on this unit lights (orange). No display (AUTO) t Forced flash ( ) t Slow synchro ( ) t No flash ( ) * Be sure that "Hot Shoe" is set ...camera goes out. • When the batteries are run down, it takes longer to choose "Flash mode". 3 Press the control button on the digital still camera to charge this unit. 5 The flash mode of the button changes the indication in the following order by the mode button on this...
Each press of the digital still camera compatible with the advanced accessory shoe can be changed in the following order. When the charging is ready to fire, the READY lamp on this unit lights (orange). No display (AUTO) t Forced flash ( ) t Slow synchro ( ) t No flash ( ) * Be sure that "Hot Shoe" is set ...camera goes out. • When the batteries are run down, it takes longer to choose "Flash mode". 3 Press the control button on the digital still camera to charge this unit. 5 The flash mode of the button changes the indication in the following order by the mode button on this...
Operating Instructions
Page 17
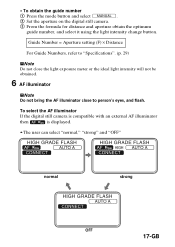
... intensity will not be obtained. 6 AF illuminator PNote Do not bring the AF illuminator close to person's eyes, and flash. To select the AF illuminator If the digital still camera is compatible with an external AF illuminator then is displayed. • The user can select "normal," "strong" and "OFF" normal strong OFF 17...
... intensity will not be obtained. 6 AF illuminator PNote Do not bring the AF illuminator close to person's eyes, and flash. To select the AF illuminator If the digital still camera is compatible with an external AF illuminator then is displayed. • The user can select "normal," "strong" and "OFF" normal strong OFF 17...
Operating Instructions
Page 18
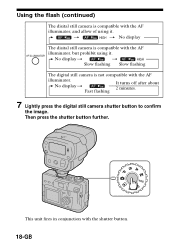
... using it . Then press the shutter button further. t t No display The disital still camera is compatible with the AF illuminator, and allow of using it . No display t Fast flashing It turns off after about 2 minutes. 7 Lightly press the digital still camera shutter button to confirm ...the image. No display t t Slow flashing Slow flashing The digital still camera is not compatible with the shutter button. 18-GB This unit...
... using it . Then press the shutter button further. t t No display The disital still camera is compatible with the AF illuminator, and allow of using it . No display t Fast flashing It turns off after about 2 minutes. 7 Lightly press the digital still camera shutter button to confirm ...the image. No display t t Slow flashing Slow flashing The digital still camera is not compatible with the shutter button. 18-GB This unit...
Operating Instructions
Page 27
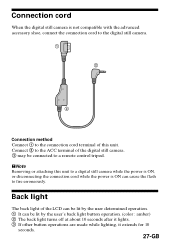
... connected to a remote control tripod. Back light The back light of the LCD can be lit by the user determined operation. 1 It can cause the flash to the connection cord terminal of the digital still camera. 3 may be lit by the user's back light button operation. (color : amber) 2 The back ... the ACC terminal of this unit to a digital still camera while the power is ON, or disconnecting the connection cord while the power is not compatible with the advanced accessory shoe, connect the connection cord to the digital still camera. 1 2 3 Connection method Connect 1 to fire erroneously.
... connected to a remote control tripod. Back light The back light of the LCD can be lit by the user determined operation. 1 It can cause the flash to the connection cord terminal of the digital still camera. 3 may be lit by the user's back light button operation. (color : amber) 2 The back ... the ACC terminal of this unit to a digital still camera while the power is ON, or disconnecting the connection cord while the power is not compatible with the advanced accessory shoe, connect the connection cord to the digital still camera. 1 2 3 Connection method Connect 1 to fire erroneously.


