
Operating Instructions
Page 4
Table of contents Features ...5 Caution ...6 Cleaning ...6 Parts identification 7 Names and functions of the parts 8 Display panel ...9 Installing the batteries 10 Mounting the flash 11 Using the flash ...14 Meaning of READY lamp states 19 Bounce flash photography 20 Mounting the wide panel 22 Return the wide panel to its original position 23 If the wide panel is detached 23 Power save mode 24 Test flash ...25 Modeling flash ...26 Connection cord 27 Back light ...27 Troubleshooting 28 Specifications ...29 4-GB
Table of contents Features ...5 Caution ...6 Cleaning ...6 Parts identification 7 Names and functions of the parts 8 Display panel ...9 Installing the batteries 10 Mounting the flash 11 Using the flash ...14 Meaning of READY lamp states 19 Bounce flash photography 20 Mounting the wide panel 22 Return the wide panel to its original position 23 If the wide panel is detached 23 Power save mode 24 Test flash ...25 Modeling flash ...26 Connection cord 27 Back light ...27 Troubleshooting 28 Specifications ...29 4-GB
Operating Instructions
Page 7
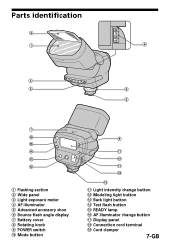
qa qk ql qa Light intensity change button qs Modeling light button qd Back light button qf Test flash button qg READY lamp qh AF illuminator change button qj Display panel qk Connection cord terminal ql Cord clamper 7-GB Mode button 9 qj q; Parts identification 2 1 6 4 3 8 5 7 qh qg qf qd qs 1 Flashing section 2 Wide panel 3 Light exposure meter 4 AF illuminator 5 Advanced accessory shoe 6 Bounce flash angle display 7 Battery cover 8 Rotating knob 9 POWER switch q;
qa qk ql qa Light intensity change button qs Modeling light button qd Back light button qf Test flash button qg READY lamp qh AF illuminator change button qj Display panel qk Connection cord terminal ql Cord clamper 7-GB Mode button 9 qj q; Parts identification 2 1 6 4 3 8 5 7 qh qg qf qd qs 1 Flashing section 2 Wide panel 3 Light exposure meter 4 AF illuminator 5 Advanced accessory shoe 6 Bounce flash angle display 7 Battery cover 8 Rotating knob 9 POWER switch q;
Operating Instructions
Page 8
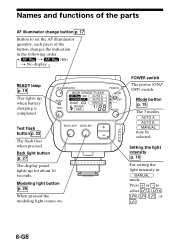
...of the parts AF illuminator change button p. 17 Button to select 1/32 , 1/16 , 1/8 , 1/4 , 1/2 , or 1/1 . 8-GB Modeling light button p. 26 When pressed the modeling light comes on. Back light button p. 27 The display panel lights up when battery charging is completed. Press + or - POWER switch The... power (ON/ OFF) switch Mode button p. 15 The 3 modes Test flash button p. 25 The flash fires when pressed. Setting ...
...of the parts AF illuminator change button p. 17 Button to select 1/32 , 1/16 , 1/8 , 1/4 , 1/2 , or 1/1 . 8-GB Modeling light button p. 26 When pressed the modeling light comes on. Back light button p. 27 The display panel lights up when battery charging is completed. Press + or - POWER switch The... power (ON/ OFF) switch Mode button p. 15 The 3 modes Test flash button p. 25 The flash fires when pressed. Setting ...
Operating Instructions
Page 26
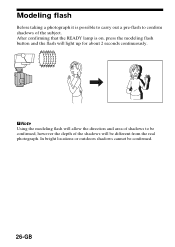
PNote Using the modeling flash will allow the direction and area of shadows to confirm shadows of the shadows will light up for about 2 seconds continuously. Modeling flash Before taking a photograph it is on, press the modeling flash button and the flash will be confirmed. 26-GB After confirming that the READY lamp is possible to carry out a pre-flash to be confirmed, however the depth of the subject. In bright locations or outdoors shadows cannot be different from the real photograph.
PNote Using the modeling flash will allow the direction and area of shadows to confirm shadows of the shadows will light up for about 2 seconds continuously. Modeling flash Before taking a photograph it is on, press the modeling flash button and the flash will be confirmed. 26-GB After confirming that the READY lamp is possible to carry out a pre-flash to be confirmed, however the depth of the subject. In bright locations or outdoors shadows cannot be different from the real photograph.

