Operating Instructions
Page 11
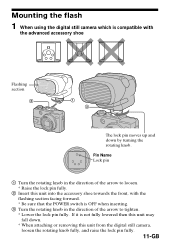
... knob in the direction of the arrow to loosen. * Raise the lock pin fully. 2 Insert this unit into the accessory shoe towards the front, with the advanced accessory shoe Flashing section 2 1 3 The lock pin moves up and down . * When attaching or removing this unit from the digital still camera...Turn the rotating knob in the direction of the arrow to tighten. * Lower the lock pin fully. Mounting the flash 1 When using the digital still camera which is compatible with the flashing section facing forward. * Be sure that the POWER switch is not fully lowered then this unit may fall...
... knob in the direction of the arrow to loosen. * Raise the lock pin fully. 2 Insert this unit into the accessory shoe towards the front, with the advanced accessory shoe Flashing section 2 1 3 The lock pin moves up and down . * When attaching or removing this unit from the digital still camera...Turn the rotating knob in the direction of the arrow to tighten. * Lower the lock pin fully. Mounting the flash 1 When using the digital still camera which is compatible with the flashing section facing forward. * Be sure that the POWER switch is not fully lowered then this unit may fall...
Operating Instructions
Page 12
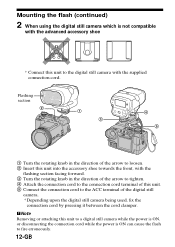
Mounting the flash (continued) 2 When using the digital still camera which is ON can cause the flash to fire erroneously. 12-GB PNote Removing or attaching this unit to the ACC terminal of the digital still camera. * Depending upon the digital still ... 2 1 3 4 5 1 Turn the rotating knob in the direction of the arrow to loosen. 2 Insert this unit into the accessory shoe towards the front, with the flashing section facing forward. 3 Turn the rotating knob in the direction of the arrow to tighten. 4 Attach the connection cord to the connection cord terminal of ...
Mounting the flash (continued) 2 When using the digital still camera which is ON can cause the flash to fire erroneously. 12-GB PNote Removing or attaching this unit to the ACC terminal of the digital still camera. * Depending upon the digital still ... 2 1 3 4 5 1 Turn the rotating knob in the direction of the arrow to loosen. 2 Insert this unit into the accessory shoe towards the front, with the flashing section facing forward. 3 Turn the rotating knob in the direction of the arrow to tighten. 4 Attach the connection cord to the connection cord terminal of ...


