
Operating Instructions
Page 2
IMPORTANT SAFETY INSTRUCTION When using your electronic flash, basic safety precautions should always be followed, including the following: 1 Read and understand all instructions before using. 2 Care must be taken as burns can cause ... is used subsequently. 2-GB English WARNING To prevent fire or shock hazard, do not open the cabinet. To avoid electrical shock, do not expose the unit to rain or moisture. Incorrect reassembly can occur from touching hot parts. 3 Do not operate appliance if it has been dropped or damaged, until it...
IMPORTANT SAFETY INSTRUCTION When using your electronic flash, basic safety precautions should always be followed, including the following: 1 Read and understand all instructions before using. 2 Care must be taken as burns can cause ... is used subsequently. 2-GB English WARNING To prevent fire or shock hazard, do not open the cabinet. To avoid electrical shock, do not expose the unit to rain or moisture. Incorrect reassembly can occur from touching hot parts. 3 Do not operate appliance if it has been dropped or damaged, until it...

Operating Instructions
Page 5
Features • This unit is exclusively for use with digital still cameras with an advanced accessory shoe or ACC terminal made by SONY. • Using its pre-flash function flash photographs with the correct exposure can be taken.* • With it's AF illuminator function the auto focus works even in dark locations.* * There are some types of digital still cameras with which this flash cannot be used. 5-GB
Features • This unit is exclusively for use with digital still cameras with an advanced accessory shoe or ACC terminal made by SONY. • Using its pre-flash function flash photographs with the correct exposure can be taken.* • With it's AF illuminator function the auto focus works even in dark locations.* * There are some types of digital still cameras with which this flash cannot be used. 5-GB
Operating Instructions
Page 6
...mild detergent solution, then wipe the unit clean with a dry soft cloth. Clean the flash with a dry soft cloth. Doing so might adversely affect the internal structure of flashes becomes lower than that exceed 40°C. Caution • The flash cannot be used in low-temperature ...conditions, battery performance is reduced. Cleaning Remove this unit to a digital still camera while the power is ...
...mild detergent solution, then wipe the unit clean with a dry soft cloth. Clean the flash with a dry soft cloth. Doing so might adversely affect the internal structure of flashes becomes lower than that exceed 40°C. Caution • The flash cannot be used in low-temperature ...conditions, battery performance is reduced. Cleaning Remove this unit to a digital still camera while the power is ...
Operating Instructions
Page 11
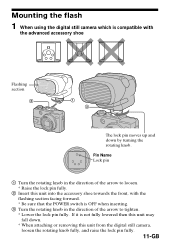
...pin fully. 11-GB Mounting the flash 1 When using the digital still camera which is compatible with the flashing section facing forward. * Be sure that the POWER switch is not fully lowered then this unit may fall down. * When attaching or removing this unit into the accessory shoe towards the ...front, with the advanced accessory shoe Flashing section 2 1 3 The lock pin moves up and down by turning the rotating knob...
...pin fully. 11-GB Mounting the flash 1 When using the digital still camera which is compatible with the flashing section facing forward. * Be sure that the POWER switch is not fully lowered then this unit may fall down. * When attaching or removing this unit into the accessory shoe towards the ...front, with the advanced accessory shoe Flashing section 2 1 3 The lock pin moves up and down by turning the rotating knob...
Operating Instructions
Page 12
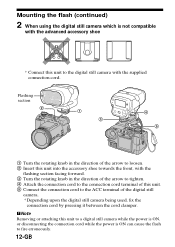
... the rotating knob in the direction of the arrow to loosen. 2 Insert this unit into the accessory shoe towards the front, with the flashing section facing forward. 3 Turn the rotating knob in the direction of the arrow to tighten. 4 Attach the connection cord to the connection ...camera with the advanced accessory shoe * Connect this unit to the ACC terminal of this unit to a digital still camera while the power is ON, or disconnecting the connection cord while the power is not compatible with the supplied connection cord. Mounting the flash (continued) 2 When using the digital still ...
... the rotating knob in the direction of the arrow to loosen. 2 Insert this unit into the accessory shoe towards the front, with the flashing section facing forward. 3 Turn the rotating knob in the direction of the arrow to tighten. 4 Attach the connection cord to the connection ...camera with the advanced accessory shoe * Connect this unit to the ACC terminal of this unit to a digital still camera while the power is ON, or disconnecting the connection cord while the power is not compatible with the supplied connection cord. Mounting the flash (continued) 2 When using the digital still ...
Operating Instructions
Page 13
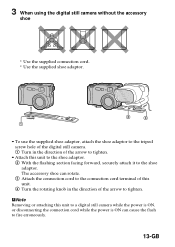
... still camera. 1 Turn in the direction of the arrow to tighten. • Attach this unit to the shoe adaptor. 2 With the flashing section facing forward, securely attach it to the shoe adaptor. PNote Removing or attaching this unit to a digital still camera while the power is ON, or disconnecting the connection cord while...
... still camera. 1 Turn in the direction of the arrow to tighten. • Attach this unit to the shoe adaptor. 2 With the flashing section facing forward, securely attach it to the shoe adaptor. PNote Removing or attaching this unit to a digital still camera while the power is ON, or disconnecting the connection cord while...
Operating Instructions
Page 15
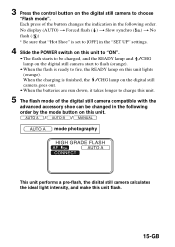
...the following order. No display (AUTO) t Forced flash ( ) t Slow synchro ( ) t No flash ( ) * Be sure that "Hot Shoe" is set to [OFF] in the following order by the mode button on this unit. / / mode photography This unit performs a pre-flash, the disital still camera calculates the ideal light intensity..., and make this unit lights (orange). When the charging is ready to fire, the READY lamp on...
...the following order. No display (AUTO) t Forced flash ( ) t Slow synchro ( ) t No flash ( ) * Be sure that "Hot Shoe" is set to [OFF] in the following order by the mode button on this unit. / / mode photography This unit performs a pre-flash, the disital still camera calculates the ideal light intensity..., and make this unit lights (orange). When the charging is ready to fire, the READY lamp on...
Operating Instructions
Page 16
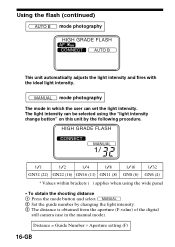
mode photography The mode in which the user can be selected using the "light intensity change button" on this unit by the following procedure. 1/1 1/2 1/4 1/8 1/16 1/32 GN32 (22) GN22 (16) GN16 (11) GN11 (8) GN8 (6) GN6 (4) * Values within brackets ( ) applies when using.... 3 The distance is obtained from the aperture (F-value) of the digital still camera (use in the manual mode). Using the flash (continued) mode photography This unit automatically adjusts the light intensity and fires with the ideal light intensity. Distance = Guide Number ÷ Aperture setting (F) 16-GB ...
mode photography The mode in which the user can be selected using the "light intensity change button" on this unit by the following procedure. 1/1 1/2 1/4 1/8 1/16 1/32 GN32 (22) GN22 (16) GN16 (11) GN11 (8) GN8 (6) GN6 (4) * Values within brackets ( ) applies when using.... 3 The distance is obtained from the aperture (F-value) of the digital still camera (use in the manual mode). Using the flash (continued) mode photography This unit automatically adjusts the light intensity and fires with the ideal light intensity. Distance = Guide Number ÷ Aperture setting (F) 16-GB ...
Operating Instructions
Page 18
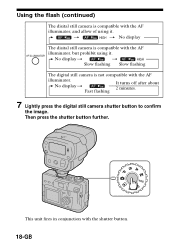
...about 2 minutes. 7 Lightly press the digital still camera shutter button to confirm the image. This unit fires in conjunction with the AF illuminator, and allow of using it . Using the flash (continued) The disital still camera is compatible with the shutter button. 18-GB t t No... display The disital still camera is not compatible with the AF illuminator, but prohibit using it . No display t t Slow flashing Slow flashing The digital still camera is ...
...about 2 minutes. 7 Lightly press the digital still camera shutter button to confirm the image. This unit fires in conjunction with the AF illuminator, and allow of using it . Using the flash (continued) The disital still camera is compatible with the shutter button. 18-GB t t No... display The disital still camera is not compatible with the AF illuminator, but prohibit using it . No display t t Slow flashing Slow flashing The digital still camera is ...

Operating Instructions
Page 25
The test flash can be used in all modes while the READY lamp is lighting. • Fire the flash with a specific light intensity (Guide Number equivalent to 11), when using Operate the flash with a user-determined light intensity. 25-GB Test flash Manually operated flash The procedure varies depending upon the flash mode on this unit. • When using , or only this unit.
The test flash can be used in all modes while the READY lamp is lighting. • Fire the flash with a specific light intensity (Guide Number equivalent to 11), when using Operate the flash with a user-determined light intensity. 25-GB Test flash Manually operated flash The procedure varies depending upon the flash mode on this unit. • When using , or only this unit.
Operating Instructions
Page 27
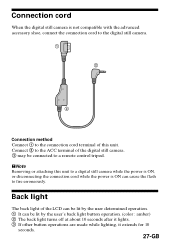
...back light of the LCD can be lit by the user determined operation. 1 It can cause the flash to the connection cord terminal of the digital still camera. 3 may be lit by the user's...operations are made while lighting, it extends for 10 seconds. 27-GB PNote Removing or attaching this unit. Connection cord When the digital still camera is ON can be connected to a remote control tripod. Connect 2... to the ACC terminal of this unit to a digital still camera while the power is ON, or disconnecting the connection cord while the ...
...back light of the LCD can be lit by the user determined operation. 1 It can cause the flash to the connection cord terminal of the digital still camera. 3 may be lit by the user's...operations are made while lighting, it extends for 10 seconds. 27-GB PNote Removing or attaching this unit. Connection cord When the digital still camera is ON can be connected to a remote control tripod. Connect 2... to the ACC terminal of this unit to a digital still camera while the power is ON, or disconnecting the connection cord while the ...
Operating Instructions
Page 28
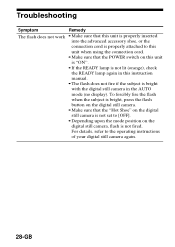
... on the digital still camera. • Make sure that the POWER switch on the digital still camera, flash is bright with the digital still camera in this unit is "ON". • If the READY lamp is not lit (orange), check the READY lamp again in the AUTO mode (no display). ...For details, refer to the operating instructions of your digital still camera again. 28-GB Troubleshooting Symptom Remedy The flash does not work • Make sure that this unit is properly inserted into the advanced accessory shoe, or the connection cord is properly attached to this...
... on the digital still camera. • Make sure that the POWER switch on the digital still camera, flash is bright with the digital still camera in this unit is "ON". • If the READY lamp is not lit (orange), check the READY lamp again in the AUTO mode (no display). ...For details, refer to the operating instructions of your digital still camera again. 28-GB Troubleshooting Symptom Remedy The flash does not work • Make sure that this unit is properly inserted into the advanced accessory shoe, or the connection cord is properly attached to this...

