Operating Instructions
Page 5
...Menu Contents 46 Troubleshooting 56 Warning indicators and messages 62 Notes on Use 64 Notes on the Videocassette Recorder 64 Cleaning of the Video Heads 64 Notes on the Video Cassettes 65 About Moisture Condensation 66 Digital Hours Meter 66 About the Built-in Rechargeable Battery 67 Using... your Videocassette Recorder abroad 67 Notes on the License 67 Compatibility of HDV, DVCAM, and DV Formats 68 About i.LINK ...
...Menu Contents 46 Troubleshooting 56 Warning indicators and messages 62 Notes on Use 64 Notes on the Videocassette Recorder 64 Cleaning of the Video Heads 64 Notes on the Video Cassettes 65 About Moisture Condensation 66 Digital Hours Meter 66 About the Built-in Rechargeable Battery 67 Using... your Videocassette Recorder abroad 67 Notes on the License 67 Compatibility of HDV, DVCAM, and DV Formats 68 About i.LINK ...

Operating Instructions
Page 6
... Features The HVR-M15U/M15N/M15E/M15P is approximately 25 Mbps. These jacks allow you to connect other equipment. HDV format The unit can switch these input signals using the menu setting (page 55). The recording bit rate is a digital HD videocassette recorder supporting HDV format and ...and 50i systems. You can perform HDV (High-Definition Digital Video) recording and playback on the consumer DV format, which uses the 4:1:1 component digital format (60i) or the 4:2:0 format (50i), and provides a 1/4-inch digital recording format for professional use. DVCAM/DV format DVCAM is...
... Features The HVR-M15U/M15N/M15E/M15P is approximately 25 Mbps. These jacks allow you to connect other equipment. HDV format The unit can switch these input signals using the menu setting (page 55). The recording bit rate is a digital HD videocassette recorder supporting HDV format and ...and 50i systems. You can perform HDV (High-Definition Digital Video) recording and playback on the consumer DV format, which uses the 4:1:1 component digital format (60i) or the 4:2:0 format (50i), and provides a 1/4-inch digital recording format for professional use. DVCAM/DV format DVCAM is...

Operating Instructions
Page 7
...various playback speeds when in jog/shuttle mode. (Jog audio cannot be the trademarks or registered trademarks of Sony Corporation. The default language setting is recorded in a vertical position and saves space. JOG AUDIO function If you to preview recordedimages on the unit and... VIDEO jack, and VIDEO jack. • Digital hours meter: A digital hours meter counts four types of time data-operating time, drum rotation time, tape running time, and tape threading/ unthreading. During non-linear editing, you can down convert function When you want to playback a tape recorded in HDV...
...various playback speeds when in jog/shuttle mode. (Jog audio cannot be the trademarks or registered trademarks of Sony Corporation. The default language setting is recorded in a vertical position and saves space. JOG AUDIO function If you to preview recordedimages on the unit and... VIDEO jack, and VIDEO jack. • Digital hours meter: A digital hours meter counts four types of time data-operating time, drum rotation time, tape running time, and tape threading/ unthreading. During non-linear editing, you can down convert function When you want to playback a tape recorded in HDV...

Operating Instructions
Page 8
... 60i/50i SEL - Also, the unit may operate discontinuously. • If you press this switch while recording in red. 4 INPUT SELECT switch Switches the signal input jack from S VIDEO jack. For details of this switch again, the unit goes into STANDBY mode and the lamp lights up ...in progress, the output signal from HDV/DV jack. OFF : Does not superimpose text data to S VIDEO OUT jack and VIDEO OUT jack. When you change the setting of this lid to be recorded properly. S VIDEO : Inputs a signal from HDV/DV jack, S VIDEO jack, and VIDEO jack. For details of Parts Front ...
... 60i/50i SEL - Also, the unit may operate discontinuously. • If you press this switch while recording in red. 4 INPUT SELECT switch Switches the signal input jack from S VIDEO jack. For details of this switch again, the unit goes into STANDBY mode and the lamp lights up ...in progress, the output signal from HDV/DV jack. OFF : Does not superimpose text data to S VIDEO OUT jack and VIDEO OUT jack. When you change the setting of this lid to be recorded properly. S VIDEO : Inputs a signal from HDV/DV jack, S VIDEO jack, and VIDEO jack. For details of Parts Front ...

Operating Instructions
Page 10
... During this time, REC indicator blinks. 3 PAUSE button Press this button then press PLAY button, the each indicator lights and recording starts. Notes • If you set [EE/PB SEL] in HDV, it is stopped, you can check EE picture and audio signals for "Electric to Electric." For details on running speed...the unit to the playback pause mode, then press REC button on the monitor (you press this button during fast forward). In EE mode, the video and audio signals input to end the check. For details, see the picture as EE pictures. 10 Chapter 1 Overview Press this button again to ...
... During this time, REC indicator blinks. 3 PAUSE button Press this button then press PLAY button, the each indicator lights and recording starts. Notes • If you set [EE/PB SEL] in HDV, it is stopped, you can check EE picture and audio signals for "Electric to Electric." For details on running speed...the unit to the playback pause mode, then press REC button on the monitor (you press this button during fast forward). In EE mode, the video and audio signals input to end the check. For details, see the picture as EE pictures. 10 Chapter 1 Overview Press this button again to ...

Operating Instructions
Page 11
Notes • When the unit is playing back a part of the tape where the recording format has been changed within HDV format, DVCAM format, or DV format, or between 60i format and 50i format, the picture and sound may be output. • If you set [FF... monitoring the picture, hold this button, the indicator lights and playback begins. During rewind, the image on page 62. 2 q (cassette) indicator Lights when a digital video cassette is not displayed (you press this button while holding down REW button during rewind, REW indicator lights and PLAY indicator blinks). Notes • If...
Notes • When the unit is playing back a part of the tape where the recording format has been changed within HDV format, DVCAM format, or DV format, or between 60i format and 50i format, the picture and sound may be output. • If you set [FF... monitoring the picture, hold this button, the indicator lights and playback begins. During rewind, the image on page 62. 2 q (cassette) indicator Lights when a digital video cassette is not displayed (you press this button while holding down REW button during rewind, REW indicator lights and PLAY indicator blinks). Notes • If...
Operating Instructions
Page 12
...is in the following operating status. • When a tape recorded in HDV format is being played back. • When HDV signals are input through the i.LINK interface. • When [HDV/DV SEL] in [IN/OUT REC] menu is set to [HDV].* * Even when [HDV/DV SEL] is set to [AUTO] with no signal input,...DV] and [ REC MODE] in [IN/OUT REC] menu is set to [DVCAM] (during recording or in EE mode).* * Neither HDV indicator nor DVCAM indicator lights during recording in DV (SP) format or a playback of a tape recorded in DV (SP) format. 5 60 indicator Lights when the unit is in the following operating status...
...is in the following operating status. • When a tape recorded in HDV format is being played back. • When HDV signals are input through the i.LINK interface. • When [HDV/DV SEL] in [IN/OUT REC] menu is set to [HDV].* * Even when [HDV/DV SEL] is set to [AUTO] with no signal input,...DV] and [ REC MODE] in [IN/OUT REC] menu is set to [DVCAM] (during recording or in EE mode).* * Neither HDV indicator nor DVCAM indicator lights during recording in DV (SP) format or a playback of a tape recorded in DV (SP) format. 5 60 indicator Lights when the unit is in the following operating status...

Operating Instructions
Page 13
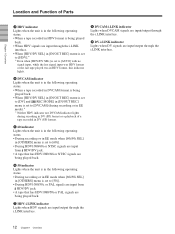
... • If you input a sound whose level exceeds the acceptable range, the sound recorded will be distorted. You can also use S VIDEO jacks, you press this button with an S VIDEO jack, use S VIDEO jacks on the unit. Text data is set to [MIX], the audio output level ...menu is set [COMMANDER] in [OTHERS] menu. - Rear Panel Chapter 1 Overview 1 S VIDEO jacks 2 VIDEO jacks 3 AUDIO jacks 6 COMPONENT OUT jacks 7 DC IN jack 4 CONTROL S jack 5 RESET button 8 HDV/DV jack 9 LANC jack 1 S VIDEO jacks To connect a device equipped with the tip of a ballpoint pen or similar tool, ...
... • If you input a sound whose level exceeds the acceptable range, the sound recorded will be distorted. You can also use S VIDEO jacks, you press this button with an S VIDEO jack, use S VIDEO jacks on the unit. Text data is set to [MIX], the audio output level ...menu is set [COMMANDER] in [OTHERS] menu. - Rear Panel Chapter 1 Overview 1 S VIDEO jacks 2 VIDEO jacks 3 AUDIO jacks 6 COMPONENT OUT jacks 7 DC IN jack 4 CONTROL S jack 5 RESET button 8 HDV/DV jack 9 LANC jack 1 S VIDEO jacks To connect a device equipped with the tip of a ballpoint pen or similar tool, ...
Operating Instructions
Page 14
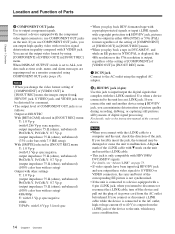
... code, menu, and alarm messages are superimposed on page 73. • If video signals have been input to HDV/DV jack and you can minimize deterioration of picture quality during recording, dubbing, or capturing still pictures, all by using [COMPONENT] of [VIDEO OUT] in [IN/OUT REC] menu. 7 DC IN jack Connect to a computer...
... code, menu, and alarm messages are superimposed on page 73. • If video signals have been input to HDV/DV jack and you can minimize deterioration of picture quality during recording, dubbing, or capturing still pictures, all by using [COMPONENT] of [VIDEO OUT] in [IN/OUT REC] menu. 7 DC IN jack Connect to a computer...

Operating Instructions
Page 15
...when you connect the unit to COMPONENT OUT jacks, S VIDEO jack, and VIDEO jack with the unit. • When you change the video format setting of [DOWN CONVERT] of [i.LINK SET] in [IN/OUT REC] menu, the video signal output from HDV/DV jack will output directly to other device may not... by an analog VCR that does not have the same function as a player, set DISPLAY OUTPUT switch to OFF. • During recording or in "Preparations" on the tape will not affect on the type of video signals shown below, recorded picture and sound may be connected to control a consumer VCR 15 Chapter...
...when you connect the unit to COMPONENT OUT jacks, S VIDEO jack, and VIDEO jack with the unit. • When you change the video format setting of [DOWN CONVERT] of [i.LINK SET] in [IN/OUT REC] menu, the video signal output from HDV/DV jack will output directly to other device may not... by an analog VCR that does not have the same function as a player, set DISPLAY OUTPUT switch to OFF. • During recording or in "Preparations" on the tape will not affect on the type of video signals shown below, recorded picture and sound may be connected to control a consumer VCR 15 Chapter...
Operating Instructions
Page 18
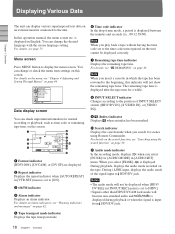
..." on page 49. IN/OUT REC HDV/DV SEL REC MODE VIDEO OUTPUT i.LINK. For details, see "Chapter 4 Adjusting and Setting Through Menus" on page 44. In this indicator will not show the remaining tape time. qa Audio mode indicator In the recording mode, displays when you select [FS48K...], is displayed. During i.LINK input, displays the audio mode of INPUT SELECT switch ([HDV/DV IN], [S VIDEO IN], or [VIDEO IN]). 9 (Index) indicator Displays when an index has been marked....
..." on page 49. IN/OUT REC HDV/DV SEL REC MODE VIDEO OUTPUT i.LINK. For details, see "Chapter 4 Adjusting and Setting Through Menus" on page 44. In this indicator will not show the remaining tape time. qa Audio mode indicator In the recording mode, displays when you select [FS48K...], is displayed. During i.LINK input, displays the audio mode of INPUT SELECT switch ([HDV/DV IN], [S VIDEO IN], or [VIDEO IN]). 9 (Index) indicator Displays when an index has been marked....

Operating Instructions
Page 20
...for slack Using a paper clip or a similar object, turn the reel gently in HDV/DV format. To record or dub audio on a tape, set the switch to use a DigitalMasterTM cassette of a recording, set to SAVE. If the reel does not move, there is set REC/ ...memory ( mark). To save a recording To prevent accidental erasure of standard HDV/DVCAM/DV cassette (such as a recorder, the unit accesses cassette memory only if the recorder is no slack. 2 Chapter Playback and Recording Chapter 2 Playback and Recording Notes on Power Supply and Video Cassettes Usable cassettes We recommend you...
...for slack Using a paper clip or a similar object, turn the reel gently in HDV/DV format. To record or dub audio on a tape, set the switch to use a DigitalMasterTM cassette of a recording, set to SAVE. If the reel does not move, there is set REC/ ...memory ( mark). To save a recording To prevent accidental erasure of standard HDV/DVCAM/DV cassette (such as a recorder, the unit accesses cassette memory only if the recorder is no slack. 2 Chapter Playback and Recording Chapter 2 Playback and Recording Notes on Power Supply and Video Cassettes Usable cassettes We recommend you...
Operating Instructions
Page 22
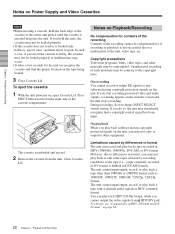
... a malfunction of the cassette compartment. Notes on Power Supply and Video Cassettes Notes •When inserting a cassette, hold the ends, the cassette may not play back a tape with 4-channel audio signals in HDV (1080/60i, 1080/50i), DVCAM, or DV format. Unauthorized recording of the cassette in DVCAM format). The unit cannot input...
... a malfunction of the cassette compartment. Notes on Power Supply and Video Cassettes Notes •When inserting a cassette, hold the ends, the cassette may not play back a tape with 4-channel audio signals in HDV (1080/60i, 1080/50i), DVCAM, or DV format. Unauthorized recording of the cassette in DVCAM format). The unit cannot input...
Operating Instructions
Page 23
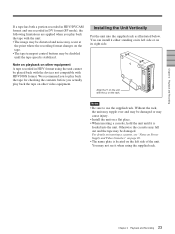
...loaded into the supplied rack as illustrated below. Otherwise the cassette may fall out and the tape may not see "Notes on Power Supply and Video Cassettes" on page 20. • The name plate is located on the left side or on the rack. Align the F on the...You can install it when using the unit cannot be damaged. Chapter 2 Playback and Recording If a tape has both a portion recorded in HDV/DVCAM format and one recorded in HDV format using the supplied rack. 23 Chapter 2 Playback and Recording Installing the Unit Vertically Put the unit into the unit. For details on inserting a...
...loaded into the supplied rack as illustrated below. Otherwise the cassette may fall out and the tape may not see "Notes on Power Supply and Video Cassettes" on page 20. • The name plate is located on the left side or on the rack. Align the F on the...You can install it when using the unit cannot be damaged. Chapter 2 Playback and Recording If a tape has both a portion recorded in HDV/DVCAM format and one recorded in HDV format using the supplied rack. 23 Chapter 2 Playback and Recording Installing the Unit Vertically Put the unit into the unit. For details on inserting a...

Operating Instructions
Page 25
...HVR-M15 (rear panel) i.LINK cable (not supplied) i.LINK jack Monitor with an i.LINK jack : Signal flow Notes • Be sure that is connected, the unit cannot output video or audio only. (Continued) 25 Chapter 2 Playback and Recording Chapter 2 Playback and Recording Notes • To playback the picture recorded in HDV... format when you connect the monitor using a component video cable, set [HDV/DV SEL] in [IN...
...HVR-M15 (rear panel) i.LINK cable (not supplied) i.LINK jack Monitor with an i.LINK jack : Signal flow Notes • Be sure that is connected, the unit cannot output video or audio only. (Continued) 25 Chapter 2 Playback and Recording Chapter 2 Playback and Recording Notes • To playback the picture recorded in HDV... format when you connect the monitor using a component video cable, set [HDV/DV SEL] in [IN...
Operating Instructions
Page 26
...that is not being input or disconnect the cables. • To connect i.LINK cable between a monitor and the unit, use an HDV or DV-compatible monitor. Chapter 2 Playback and Recording Playback • If you connect the input connectors of the unit to the output connectors of [i.LINK SET] in... HDV mode on a DVcompatible monitor, set [HDV t DV CONV] of a monitor, a humming noise may be generated or the image may not work ...
...that is not being input or disconnect the cables. • To connect i.LINK cable between a monitor and the unit, use an HDV or DV-compatible monitor. Chapter 2 Playback and Recording Playback • If you connect the input connectors of the unit to the output connectors of [i.LINK SET] in... HDV mode on a DVcompatible monitor, set [HDV t DV CONV] of a monitor, a humming noise may be generated or the image may not work ...
Operating Instructions
Page 27
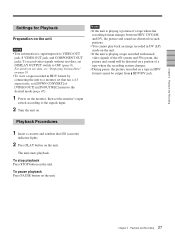
...Text information is playing a tape recorded with mixed video signals of the 60i system and 50i system, the picture and sound will be output from HDV/DV jack. Notes • If the unit is playing a portion of a tape where the recording format changes between HDV, DVCAM, and DV, the picture... input switch according to a monitor set [DOWN CONVERT] of a tape where the recording system changes. • During pause, the picture recorded on a tape in HDV format cannot be distorted on a portion of [VIDEO OUT] in HDV format by connecting the unit to the signals input. 2 Turn the unit on the ...
...Text information is playing a tape recorded with mixed video signals of the 60i system and 50i system, the picture and sound will be output from HDV/DV jack. Notes • If the unit is playing a portion of a tape where the recording format changes between HDV, DVCAM, and DV, the picture... input switch according to a monitor set [DOWN CONVERT] of a tape where the recording system changes. • During pause, the picture recorded on a tape in HDV format cannot be distorted on a portion of [VIDEO OUT] in HDV format by connecting the unit to the signals input. 2 Turn the unit on the ...
Operating Instructions
Page 29
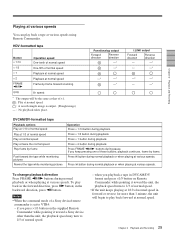
..., the unit will be the same as that of a Sony device/remote commander is set to play back forward at normal speed. : A search simple image is output. (Rough image) - : No playback takes place. Chapter 2 Playback and Recording Playing at various speeds You can play back in the forward... one of normal speed Playback at normal speed Playback at normal speed Frame-by-frame forward scanning / 8× speed * The output will begin to VTR4: - HDV-formatted tape Button × 1/10 × 1/3 × 1 × 2 FRAME c/C Operation speed One-tenth of normal speed One-fifth of these buttons...
..., the unit will be the same as that of a Sony device/remote commander is set to play back forward at normal speed. : A search simple image is output. (Rough image) - : No playback takes place. Chapter 2 Playback and Recording Playing at various speeds You can play back in the forward... one of normal speed Playback at normal speed Playback at normal speed Frame-by-frame forward scanning / 8× speed * The output will begin to VTR4: - HDV-formatted tape Button × 1/10 × 1/3 × 1 × 2 FRAME c/C Operation speed One-tenth of normal speed One-fifth of these buttons...

Operating Instructions
Page 30
... playing at various speeds To hear the sound when playing at various speeds. Note You cannot hear the sound while playing back a tape recorded in HDV format at various speeds, set [JOG AUDIO] in [AUDIO SET] menu to locate the scene you press . The search type will ... for scenes, use the supplied Remote Commander. 1 Press SEARCH SELECT button on Sony-brand digital video equipment. (The search screens are included in the order of the search signals, you record another program over the beginning of the recordings: Index search - Search signal ABC If D is short, the search signals ...
... playing at various speeds To hear the sound when playing at various speeds. Note You cannot hear the sound while playing back a tape recorded in HDV format at various speeds, set [JOG AUDIO] in [AUDIO SET] menu to locate the scene you press . The search type will ... for scenes, use the supplied Remote Commander. 1 Press SEARCH SELECT button on Sony-brand digital video equipment. (The search screens are included in the order of the search signals, you record another program over the beginning of the recordings: Index search - Search signal ABC If D is short, the search signals ...

Operating Instructions
Page 31
... in [VTR SET] menu to [ON]. 2 Press REW button (if the tape is displayed on the Data display screen (page 18). 31 Chapter 2 Playback and Recording At the preset time, the power of the tape. 1 Set [AUTO REPEAT] in [VTR SET] menu to [OFF]. A portion unrecorded - To release the Auto... Repeat mode Set [AUTO REPEAT] in [IN/OUT REC] menu - A portion recorded in the format set by other than [AUTO] in [HDV/DV SEL] in [VTR SET] menu to [ON]. s is already rewound, press PLAY button). Tape end Auto Repeat using an external...
... in [VTR SET] menu to [ON]. 2 Press REW button (if the tape is displayed on the Data display screen (page 18). 31 Chapter 2 Playback and Recording At the preset time, the power of the tape. 1 Set [AUTO REPEAT] in [VTR SET] menu to [OFF]. A portion unrecorded - To release the Auto... Repeat mode Set [AUTO REPEAT] in [IN/OUT REC] menu - A portion recorded in the format set by other than [AUTO] in [HDV/DV SEL] in [VTR SET] menu to [ON]. s is already rewound, press PLAY button). Tape end Auto Repeat using an external...

