
Operation Guide
Page 1
Printed in Japan GB Digital HD Video Camera Recorder 4-114-858-11(1) Digital HD Video Camera Recorder Operating Guide Before operating the unit, please read this manual thoroughly, and retain it for future reference HVR-Z5E/Z5P © 2008 Sony Corporation http://www.sony.net/ Printed on 70% or more recycled paper using VOC (Volatile Organic Compound) -free vegetable oil based ink.
Printed in Japan GB Digital HD Video Camera Recorder 4-114-858-11(1) Digital HD Video Camera Recorder Operating Guide Before operating the unit, please read this manual thoroughly, and retain it for future reference HVR-Z5E/Z5P © 2008 Sony Corporation http://www.sony.net/ Printed on 70% or more recycled paper using VOC (Volatile Organic Compound) -free vegetable oil based ink.

Operation Guide
Page 4
... any problems. • Compensation for the contents of recordings cannot be used for the HDV format only. Change the screen language before using a digital still camera, and therefore may be played back on a device that is connected. About this manual • The images of the LCD screen and the viewfinder used...
... any problems. • Compensation for the contents of recordings cannot be used for the HDV format only. Change the screen language before using a digital still camera, and therefore may be played back on a device that is connected. About this manual • The images of the LCD screen and the viewfinder used...

Operation Guide
Page 6
... Searching for a recording start point (Index search 54 Playing the picture on a TV 56 Using the Menu Using the menu items 62 Menu items 64 (CAMERA SET) menu 67 Settings to adjust your camcorder to the recording conditions (GAIN SETUP/ BACK LIGHT/STEADYSHOT, etc.) (AUDIO SET) menu 75 Settings for the...
... Searching for a recording start point (Index search 54 Playing the picture on a TV 56 Using the Menu Using the menu items 62 Menu items 64 (CAMERA SET) menu 67 Settings to adjust your camcorder to the recording conditions (GAIN SETUP/ BACK LIGHT/STEADYSHOT, etc.) (AUDIO SET) menu 75 Settings for the...

Operation Guide
Page 8
..." that you have following items supplied with lens cover (1) (p. 11) This lens hood is already installed. See pages 2, 116 and 119 for Digital HD Video Camera Recorder" (1) Operating Guide (2) AC Adaptor/Charger (AC-VQ1050) (1) (p. 12) Large eyecup (1) (p. 18) Rechargeable battery pack (NP-F570) (1) (p. 12, 120) Power cord (mains lead) (1) (p. 12) Lens...
..." that you have following items supplied with lens cover (1) (p. 11) This lens hood is already installed. See pages 2, 116 and 119 for Digital HD Video Camera Recorder" (1) Operating Guide (2) AC Adaptor/Charger (AC-VQ1050) (1) (p. 12) Large eyecup (1) (p. 18) Rechargeable battery pack (NP-F570) (1) (p. 12, 120) Power cord (mains lead) (1) (p. 12) Lens...

Operation Guide
Page 14
Using an outside power source You can use the AC Adaptor/Charger to VCR/CAMERA. 5 Press the connecting part of the connecting cable (DK-415) against the back of the AC Adaptor/Charger to obtain AC power. AC Adaptor/ Charger ... under the following conditions. - On the battery pack • Before changing the battery pack, slide the POWER switch to 86 °F) is worn-out. • Sony recommends that you use an NP-F970 battery pack when you use your camcorder with the camcorder at 25 °C (77 °F). 10 to 30...
Using an outside power source You can use the AC Adaptor/Charger to VCR/CAMERA. 5 Press the connecting part of the connecting cable (DK-415) against the back of the AC Adaptor/Charger to obtain AC power. AC Adaptor/ Charger ... under the following conditions. - On the battery pack • Before changing the battery pack, slide the POWER switch to 86 °F) is worn-out. • Sony recommends that you use an NP-F970 battery pack when you use your camcorder with the camcorder at 25 °C (77 °F). 10 to 30...

Operation Guide
Page 16
... the green button. 3 Ensure a good grip, then fasten the grip belt. When you use your camcorder once you set the POWER switch to CAMERA or VCR while you turn off the power Slide the POWER switch to OFF while pressing the green button. POWER switch 1 Slide the POWER switch... to the respective positions. Slide the POWER switch while pressing the green button. CAMERA: To record pictures. b Notes • The current date and time appear on the LCD screen for the first time, the [CLOCK SET] screen appears ...
... the green button. 3 Ensure a good grip, then fasten the grip belt. When you use your camcorder once you set the POWER switch to CAMERA or VCR while you turn off the power Slide the POWER switch to OFF while pressing the green button. POWER switch 1 Slide the POWER switch... to the respective positions. Slide the POWER switch while pressing the green button. CAMERA: To record pictures. b Notes • The current date and time appear on the LCD screen for the first time, the [CLOCK SET] screen appears ...

Operation Guide
Page 19
... the dial. CLOCK SET --:--:--:-- Y M D 2008 - 1 - 1 0 : 00 [ MENU ] : CANCEL 4 Set [Y] (year) by turning the SEL/PUSH EXEC dial, then press the dial. Continued , 19 OTHERS RETURN CAMERA PROF. ASSIGN BTN CLOCK SET WORLD TIME LANGUAGE QUICK REC DATE REC [ MENU ] : END --:--:-- 3 Select [CLOCK SET] by turning the SEL/ PUSH EXEC dial, then...
... the dial. CLOCK SET --:--:--:-- Y M D 2008 - 1 - 1 0 : 00 [ MENU ] : CANCEL 4 Set [Y] (year) by turning the SEL/PUSH EXEC dial, then press the dial. Continued , 19 OTHERS RETURN CAMERA PROF. ASSIGN BTN CLOCK SET WORLD TIME LANGUAGE QUICK REC DATE REC [ MENU ] : END --:--:-- 3 Select [CLOCK SET] by turning the SEL/ PUSH EXEC dial, then...

Operation Guide
Page 23
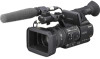
... in HDV or DVCAM (DV) format. Press and hold the green button when you slide the POWER switch from OFF. Do the following steps to CAMERA while pressing the green button. Recording/Playback Recording/Playback Recording REC START/ STOP button B Recording lamp Recording lamp Lens hood ASSIGN 7/ PHOTO button POWER switch...
... in HDV or DVCAM (DV) format. Press and hold the green button when you slide the POWER switch from OFF. Do the following steps to CAMERA while pressing the green button. Recording/Playback Recording/Playback Recording REC START/ STOP button B Recording lamp Recording lamp Lens hood ASSIGN 7/ PHOTO button POWER switch...

Operation Guide
Page 25
... scene you view the still images, only the recorded date and time on the tape will be displayed on the screen (Data code, p. 52). • Camera data stored on a "Memory Stick Duo" as follows: - When you want to save as a PHOTO button. Playing back in DVCAM (DV) format (4:3): 0.9M ... and the type of "Memory Stick Duo." • You cannot store a still image under the following conditions: - z Tips • See page 138 for Sony "Memory Stick Duo." A still image will be recorded on your camcorder with [PB ZOOM] set to [ON] (p. 91). 25 Recording/Playback disappears when the ...
... scene you view the still images, only the recorded date and time on the tape will be displayed on the screen (Data code, p. 52). • Camera data stored on a "Memory Stick Duo" as follows: - When you want to save as a PHOTO button. Playing back in DVCAM (DV) format (4:3): 0.9M ... and the type of "Memory Stick Duo." • You cannot store a still image under the following conditions: - z Tips • See page 138 for Sony "Memory Stick Duo." A still image will be recorded on your camcorder with [PB ZOOM] set to [ON] (p. 91). 25 Recording/Playback disappears when the ...

Operation Guide
Page 28
... the expanded focus (Expanded focus) Assign [EXP.FOCUS] to confirm the focus setting during manual focusing. It will be easier to any one of the (CAMERA SET) menu (p. 67). appears on a close the aperture of the lens, which [EXP.FOCUS] is assigned. [EXPANDED FOCUS] appears and the center of the screen...
... the expanded focus (Expanded focus) Assign [EXP.FOCUS] to confirm the focus setting during manual focusing. It will be easier to any one of the (CAMERA SET) menu (p. 67). appears on a close the aperture of the lens, which [EXP.FOCUS] is assigned. [EXPANDED FOCUS] appears and the center of the screen...

Operation Guide
Page 29
... Press the IRIS/EXPOSURE button I . You can adjust the image brightness by adjusting the iris, gain and shutter speed with the iris ring. 1 Select (CAMERA SET) menu t [IRIS/EXPOSURE] t [RING ASSIGN] t [EXPOSURE] (p. 67) 2 During recording or standby, set the AUTO/MANUAL switch F to ...shutter speed is not displayed, do the following operation. next to the iris value disappears (p. 80), or the iris value appears on the screen. 1 Select (CAMERA SET) menu t [IRIS/EXPOSURE] t [RING ASSIGN] t [IRIS] (p. 67). 2 During recording or standby, set the AUTO/MANUAL switch F to MANUAL...
... Press the IRIS/EXPOSURE button I . You can adjust the image brightness by adjusting the iris, gain and shutter speed with the iris ring. 1 Select (CAMERA SET) menu t [IRIS/EXPOSURE] t [RING ASSIGN] t [EXPOSURE] (p. 67) 2 During recording or standby, set the AUTO/MANUAL switch F to ...shutter speed is not displayed, do the following operation. next to the iris value disappears (p. 80), or the iris value appears on the screen. 1 Select (CAMERA SET) menu t [IRIS/EXPOSURE] t [RING ASSIGN] t [IRIS] (p. 67). 2 During recording or standby, set the AUTO/MANUAL switch F to MANUAL...

Operation Guide
Page 30
... switch F to the gain value. z Tips • When you press the SHUTTER SPEED button E while is displayed as [---]. See steps 3 and 4 in a range of the (CAMERA SET) menu (p. 67). 30 To adjust the gain automatically Press the GAIN button C, or set the AUTO/MANUAL switch F to [-6dB] and play it back...
... switch F to the gain value. z Tips • When you press the SHUTTER SPEED button E while is displayed as [---]. See steps 3 and 4 in a range of the (CAMERA SET) menu (p. 67). 30 To adjust the gain automatically Press the GAIN button C, or set the AUTO/MANUAL switch F to [-6dB] and play it back...

Operation Guide
Page 31
... flashes, set the AUTO/MANUAL switch F to the shutter speed value. z Tips • It is a common phenomenon with video cameras). b Notes • When you close the aperture further down, resulting in the (CAMERA SET) menu (p. 69). The ND filters 1, 2 and 3 reduce the volume of recording environment. z Tips • While recording a bright subject...
... flashes, set the AUTO/MANUAL switch F to the shutter speed value. z Tips • It is a common phenomenon with video cameras). b Notes • When you close the aperture further down, resulting in the (CAMERA SET) menu (p. 69). The ND filters 1, 2 and 3 reduce the volume of recording environment. z Tips • While recording a bright subject...

Operation Guide
Page 32
... temperature from the menu ([WB TEMP SET], p. 68). Indicator Shooting conditions A (Memory A) B (Memory B) • White balance values adjusted for recording with [WB PRESET] in the (CAMERA SET) menu. 1 During recording or standby, set the AUTO/MANUAL switch D to MANUAL. 2 Press the WHT BAL button A. 3 Set the white balance memory switch B to...
... temperature from the menu ([WB TEMP SET], p. 68). Indicator Shooting conditions A (Memory A) B (Memory B) • White balance values adjusted for recording with [WB PRESET] in the (CAMERA SET) menu. 1 During recording or standby, set the AUTO/MANUAL switch D to MANUAL. 2 Press the WHT BAL button A. 3 Set the white balance memory switch B to...
Operation Guide
Page 33
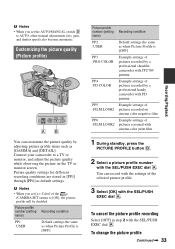
... your camcorder to a TV or monitor, and adjust the picture quality while observing the picture on cinema color negative film PP6 Example settings of the (CAMERA SET) menu to AUTO, other manual adjustments (iris, gain, and shutter speed) also become automatic. To change the picture profile Continued , 33 Recording/Playback b Notes...
... your camcorder to a TV or monitor, and adjust the picture quality while observing the picture on cinema color negative film PP6 Example settings of the (CAMERA SET) menu to AUTO, other manual adjustments (iris, gain, and shutter speed) also become automatic. To change the picture profile Continued , 33 Recording/Playback b Notes...
Operation Guide
Page 35
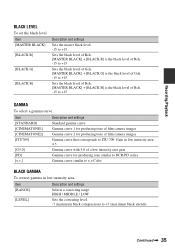
...black level. Item Description and settings [STANDARD] Standard gamma curve [CINEMATONE1] [CINEMATONE2] Gamma curve 1 for producing tone of film camera images Gamma curve 2 for producing tone of a low intensity area gain Gamma curve for producing tone similar to DCR-PD series Gamma ...curve similar to x.v.Color BLACK GAMMA To correct gamma in low intensity area: 4.5 [G5.0] [PD] [x.v.] Gamma curve with 5.0 of film camera images [ITU709] Gamma curve that corresponds to ITU-709. Gain in low intensity area. Item Description and settings [RANGE] Selects a correcting range. ...
...black level. Item Description and settings [STANDARD] Standard gamma curve [CINEMATONE1] [CINEMATONE2] Gamma curve 1 for producing tone of film camera images Gamma curve 2 for producing tone of a low intensity area gain Gamma curve for producing tone similar to DCR-PD series Gamma ...curve similar to x.v.Color BLACK GAMMA To correct gamma in low intensity area: 4.5 [G5.0] [PD] [x.v.] Gamma curve with 5.0 of film camera images [ITU709] Gamma curve that corresponds to ITU-709. Gain in low intensity area. Item Description and settings [RANGE] Selects a correcting range. ...

Operation Guide
Page 36
...% [SENSITIVITY] : Sets the sensitivity. Item [TYPE] [LEVEL] Description and settings Selects a type of colors. [STANDARD] : Standard colors [CINEMATONE1] : Film camera image-like colors good with [GAMMA] set to [CINEMATONE1] [CINEMATONE2] : Film camera image-like colors good with [GAMMA] set to [CINEMATONE2] [ITU709 MTX] : Colors corresponding to ITU-709 Sets a color level when...
...% [SENSITIVITY] : Sets the sensitivity. Item [TYPE] [LEVEL] Description and settings Selects a type of colors. [STANDARD] : Standard colors [CINEMATONE1] : Film camera image-like colors good with [GAMMA] set to [CINEMATONE1] [CINEMATONE2] : Film camera image-like colors good with [GAMMA] set to [CINEMATONE2] [ITU709 MTX] : Colors corresponding to ITU-709 Sets a color level when...

Operation Guide
Page 47
... [TRANS TIME] and [TRANS CURVE] (p. 73) 4 Execute the shot transition. 1 Press the ASSIGN 4 button repeatedly to the stored settings of the (CAMERA SET) menu (p. 73). If you store manually adjusted settings of white balance, you can set the POWER switch to OFF. 3 Check the stored settings. ... up the SHOT TRANSITION CHECK screen. 2 Press the ASSIGN 5 button to outdoor. b Notes • The settings stored in the selected SHOT. Sony recommends that you set the items, such as from the current ones to the stored settings. The focus, zoom, iris, gain, shutter speed and...
... [TRANS TIME] and [TRANS CURVE] (p. 73) 4 Execute the shot transition. 1 Press the ASSIGN 4 button repeatedly to the stored settings of the (CAMERA SET) menu (p. 73). If you store manually adjusted settings of white balance, you can set the POWER switch to OFF. 3 Check the stored settings. ... up the SHOT TRANSITION CHECK screen. 2 Press the ASSIGN 5 button to outdoor. b Notes • The settings stored in the selected SHOT. Sony recommends that you set the items, such as from the current ones to the stored settings. The focus, zoom, iris, gain, shutter speed and...

Operation Guide
Page 50
Playback (Continued) • You cannot play back movies recorded in HDV format on DVCAM (DV) format video cameras or mini DV players. • You can play back a DV format tape on the screen during playback. • See page 53 for how to switch ...
Playback (Continued) • You cannot play back movies recorded in HDV format on DVCAM (DV) format video cameras or mini DV players. • You can play back a DV format tape on the screen during playback. • See page 53 for how to switch ...
Operation Guide
Page 52
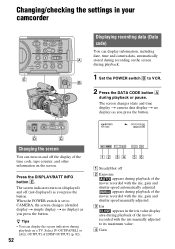
... of the movie recorded with the iris, gain and shutter speed automatically adjusted. Changing the screen You can display information, including date, time and camera data, automatically stored during recording on the screen during playback. 1 Set the POWER switch B to VCR. 2 Press the DATA CODE button A...the iris, gain and shutter speed manually adjusted. When the POWER switch is set to its maximum value. The screen changes (date and time display t camera data display t no display) as you press the button. Press the DISPLAY/BATT INFO button E. Select [V-OUT/PANEL] or [ALL OUTPUT] of ...
... of the movie recorded with the iris, gain and shutter speed automatically adjusted. Changing the screen You can display information, including date, time and camera data, automatically stored during recording on the screen during playback. 1 Set the POWER switch B to VCR. 2 Press the DATA CODE button A...the iris, gain and shutter speed manually adjusted. When the POWER switch is set to its maximum value. The screen changes (date and time display t camera data display t no display) as you press the button. Press the DISPLAY/BATT INFO button E. Select [V-OUT/PANEL] or [ALL OUTPUT] of ...


