
Operating Instructions
Page 3
... The apparatus shall not be using the TV for a Class B digital device, pursuant to install the TV in this manual could void your local ... may be blurred or show poor color due to insert the plug fully into an outlet on the TV. This equipment generates, uses and ...TV should fall inside the cabinet, unplug the TV immediately and have it . s Avoid operating the TV at temperatures below 41°F (5°C). s To obtain the best picture, do not block the ventilation openings. It is required for help. KDL-23S2000 KDL-26S2000 KDL-32S2000 KDL-40S2000 KDL-46S2000 Sony...
... The apparatus shall not be using the TV for a Class B digital device, pursuant to install the TV in this manual could void your local ... may be blurred or show poor color due to insert the plug fully into an outlet on the TV. This equipment generates, uses and ...TV should fall inside the cabinet, unplug the TV immediately and have it . s Avoid operating the TV at temperatures below 41°F (5°C). s To obtain the best picture, do not block the ventilation openings. It is required for help. KDL-23S2000 KDL-26S2000 KDL-32S2000 KDL-40S2000 KDL-46S2000 Sony...

Operating Instructions
Page 7
...do not let glass fragments or leaked crystalline liquid get warm when the TV is recommended to fall down and cause injury. Watching the TV for viewing It is in use this TV in the picture or the picture may break by the manufacturer, as cuts or poisoning/skin irritation may ...s Avoid spraying insect repellent with water and consult your eyes or mouth. Should either contact your neighbors. Vehicle Do not install this TV in a vehicle. LCD SCREEN s Although the LCD screen is not secured properly, it may fall or drop and cause injury or damage. s Do not expose the...
...do not let glass fragments or leaked crystalline liquid get warm when the TV is recommended to fall down and cause injury. Watching the TV for viewing It is in use this TV in the picture or the picture may break by the manufacturer, as cuts or poisoning/skin irritation may ...s Avoid spraying insect repellent with water and consult your eyes or mouth. Should either contact your neighbors. Vehicle Do not install this TV in a vehicle. LCD SCREEN s Although the LCD screen is not secured properly, it may fall or drop and cause injury or damage. s Do not expose the...

Operating Instructions
Page 9
... 13 When Connecting to Optional Equipment 14 Installing the TV ...16 Preventing the TV from Toppling Over 16 Bundling the Connecting Cables 17 Adjusting the Viewing Angle of MENU ...23 Using the Picture Settings 26 Using the Sound Settings 28 Using the Screen......36 Using the Analog Setup Settings 37 Using the Digital Setup Settings 38 Other Information Troubleshooting...41 Preparation for Wall Mounting the KDL-23S2000, KDL-26S2000 and KDL-32S2000.......43 Preparation for Wall Mounting the KDL-40S2000 and KDL-46S2000 44 PC Input Signal Reference Chart 45 Specifications......
... 13 When Connecting to Optional Equipment 14 Installing the TV ...16 Preventing the TV from Toppling Over 16 Bundling the Connecting Cables 17 Adjusting the Viewing Angle of MENU ...23 Using the Picture Settings 26 Using the Sound Settings 28 Using the Screen......36 Using the Analog Setup Settings 37 Using the Digital Setup Settings 38 Other Information Troubleshooting...41 Preparation for Wall Mounting the KDL-23S2000, KDL-26S2000 and KDL-32S2000.......43 Preparation for Wall Mounting the KDL-40S2000 and KDL-46S2000 44 PC Input Signal Reference Chart 45 Specifications......

Operating Instructions
Page 11
... easily affected by radio frequency, resulting in your TV. Advanced connection examples are listed on pages 21 ...Sony LCD Digital Color Television. Getting Started Getting Started Welcome to the World of TM Thank you connect the antenna/cable input using the supplied 75-ohm coaxial cable to receive optimum picture quality. For optimum picture performance, your TV must perform an Initial Setup so your TV... to display the picture in your TV, follow the basic...this section. Connecting the TV To display clear, crisp pictures, your new BRAVIA TV is capable of receiving HDTV...
... easily affected by radio frequency, resulting in your TV. Advanced connection examples are listed on pages 21 ...Sony LCD Digital Color Television. Getting Started Getting Started Welcome to the World of TM Thank you connect the antenna/cable input using the supplied 75-ohm coaxial cable to receive optimum picture quality. For optimum picture performance, your TV must perform an Initial Setup so your TV... to display the picture in your TV, follow the basic...this section. Connecting the TV To display clear, crisp pictures, your new BRAVIA TV is capable of receiving HDTV...

Operating Instructions
Page 12
...by subscribing to high definition cable service or high definition satellite service. Note that this TV displays all format types of picture in Setup settings for the type of input signal you connect these components to your TV. Getting Started Cable or VHF/UHF (or VHF only) 75-ohm coaxial cable ...(supplied) Rear of your TV via the HDMI or component video (with component cable Audio cable ...
...by subscribing to high definition cable service or high definition satellite service. Note that this TV displays all format types of picture in Setup settings for the type of input signal you connect these components to your TV. Getting Started Cable or VHF/UHF (or VHF only) 75-ohm coaxial cable ...(supplied) Rear of your TV via the HDMI or component video (with component cable Audio cable ...

Operating Instructions
Page 14
... that can be necessary to use a suitable plug adapter (not supplied). While headphones are connected, the TV speakers turn off, and volume control affects headphone volume only. If the picture is the case, connect the adapter to the computer before connecting the HD15-HD15 cable. Connect to a... VIDEO output jack on your camcorder or other video equipment such as video game equipment. Sound Setting options, on your headphones. Provides better picture quality than composite video (2). (See Auto YC on page 33.) Connect to the composite video and audio output jacks on page 28, have...
... that can be necessary to use a suitable plug adapter (not supplied). While headphones are connected, the TV speakers turn off, and volume control affects headphone volume only. If the picture is the case, connect the adapter to the computer before connecting the HD15-HD15 cable. Connect to a... VIDEO output jack on your camcorder or other video equipment such as video game equipment. Sound Setting options, on your headphones. Provides better picture quality than composite video (2). (See Auto YC on page 33.) Connect to the composite video and audio output jacks on page 28, have...

Operating Instructions
Page 15
...AC IN Connects the supplied AC power cord. qs VHF/UHF RF input that has S VIDEO. Note that this TV displays all -digital audio/video interface between this TV and any HDMI-equipped audio/video equipment, such as a VCR or other video equipment that connects to your Cable...Getting Started Item 5 HDMI IN 6 HDMI/ R-AUDIO-L Getting Started Description HDMI (High-Definition Multimedia Interface) provides an uncompressed, all format types of picture in its native resolution of 1,366 dots × 768 lines. 15 A third composite video and audio (VIDEO 2) input is only available for ...
...AC IN Connects the supplied AC power cord. qs VHF/UHF RF input that has S VIDEO. Note that this TV displays all -digital audio/video interface between this TV and any HDMI-equipped audio/video equipment, such as a VCR or other video equipment that connects to your Cable...Getting Started Item 5 HDMI IN 6 HDMI/ R-AUDIO-L Getting Started Description HDMI (High-Definition Multimedia Interface) provides an uncompressed, all format types of picture in its native resolution of 1,366 dots × 768 lines. 15 A third composite video and audio (VIDEO 2) input is only available for ...

Operating Instructions
Page 19
... you are unavailable, such as a reference when operating the TV. Press once to show only the frozen image. Move the sub screen with V v B b. Series follows the aquatic misadventures of the current program in the Picture settings. With Freeze function active, some functions are watching digital (Digital channels (if it is available from a channel list...
... you are unavailable, such as a reference when operating the TV. Press once to show only the frozen image. Move the sub screen with V v B b. Series follows the aquatic misadventures of the current program in the Picture settings. With Freeze function active, some functions are watching digital (Digital channels (if it is available from a channel list...

Operating Instructions
Page 22
... (see "Overview of MENU" on and off before unplugging the power cord. Press to turn on page 23). Make sure that the TV is turned off the TV. Press to scan through the video inputs. In the MENU screen, these buttons serve as up in red continuously, this LED will not... turned on may cause the Power LED to 20 seconds or may indicate the TV needs servicing (see page 33. If the LED blinks in green when the Picture Off feature is set . The CHANNEL + button has a tactile dot. CHANNEL + 5 POWER 6 (IR) Infrared Receiver/ Light Sensor 7 PIC OFF/ TIMER LED 8 STANDBY ...
... (see "Overview of MENU" on and off before unplugging the power cord. Press to turn on page 23). Make sure that the TV is turned off the TV. Press to scan through the video inputs. In the MENU screen, these buttons serve as up in red continuously, this LED will not... turned on may cause the Power LED to 20 seconds or may indicate the TV needs servicing (see page 33. If the LED blinks in green when the Picture Off feature is set . The CHANNEL + button has a tactile dot. CHANNEL + 5 POWER 6 (IR) Infrared Receiver/ Light Sensor 7 PIC OFF/ TIMER LED 8 STANDBY ...

Operating Instructions
Page 25
... the Menus Allows you to select an option. Navigating Through Settings The Settings screen provides access to the features: 1 Press MENU. 2 Select . 3 Highlight the item: Picture, Sound, Screen, Setup, PC Settings, Analog Setup, Digital Setup. 4 Press to The Settings feature lets you enter the settings screen.
... the Menus Allows you to select an option. Navigating Through Settings The Settings screen provides access to the features: 1 Press MENU. 2 Select . 3 Highlight the item: Picture, Sound, Screen, Setup, PC Settings, Analog Setup, Digital Setup. 4 Press to The Settings feature lets you enter the settings screen.

Operating Instructions
Page 26
... showing Video 1. Adjust to give the white colors a reddish tint. It is not available when Target Input is showing Video 1. Cool Select to increase or decrease the green tones. Picture Mode can also be accessed using the TOOLS button on the remote control when in Analog TV, Digital TV and External Inputs. Warm 1,2 Select to...
... showing Video 1. Adjust to give the white colors a reddish tint. It is not available when Target Input is showing Video 1. Cool Select to increase or decrease the green tones. Picture Mode can also be accessed using the TOOLS button on the remote control when in Analog TV, Digital TV and External Inputs. Warm 1,2 Select to...

Operating Instructions
Page 27
... optimizes the contrast. This setting is set to the default settings. Live Color Makes colors more vivid. Effective for Digital TV programs. If the function is especially effective for stronger contrast. MPEG Noise Reduction Reduces the mosaic effect in Black Corrector "Custom Picture Mode" Contrast Enhancer Resets all the advanced settings to High, it will...
... optimizes the contrast. This setting is set to the default settings. Live Color Makes colors more vivid. Effective for Digital TV programs. If the function is especially effective for stronger contrast. MPEG Noise Reduction Reduces the mosaic effect in Black Corrector "Custom Picture Mode" Contrast Enhancer Resets all the advanced settings to High, it will...

Operating Instructions
Page 28
...from High, Low, and Off. MTS is showing Video 1. Select to "All Inputs" (ex: TV is only available for stereo reception when viewing a program broadcast in Analog TV, Digital TV and External Inputs. Custom Flat setting. Adjust to mono programs. Off Select for mono reception. All ... or decrease higher-pitched sounds. Mono Select for normal stereo or mono reception. Use to enhance treble and bass. Changes to picture settings affect only Video 1) Dynamic Select to reduce noise during weak stereo broadcasts. If no SAP signal is received. Auto SAP...
...from High, Low, and Off. MTS is showing Video 1. Select to "All Inputs" (ex: TV is only available for stereo reception when viewing a program broadcast in Analog TV, Digital TV and External Inputs. Custom Flat setting. Adjust to mono programs. Off Select for mono reception. All ... or decrease higher-pitched sounds. Mono Select for normal stereo or mono reception. Use to enhance treble and bass. Changes to picture settings affect only Video 1) Dynamic Select to reduce noise during weak stereo broadcasts. If no SAP signal is received. Auto SAP...

Operating Instructions
Page 29
... to all inputs. Current Input Settings will be applied to you are disturbing to "All Inputs" (ex: TV is showing Video 1. Normal Select to display 4:3 picture in original size. When the original source is 4:3. On Select to have the screen automatically change to display ...mode that is 4:3 (Standard definition source). Full Select to enlarge the picture horizontally to turn off the Auto Wide option. Changes to picture settings affect only Video 1) Wide Zoom Select to the picture settings affect TV, Video1 - Video7) "All Inputs" will be applied to only the ...
... to all inputs. Current Input Settings will be applied to you are disturbing to "All Inputs" (ex: TV is showing Video 1. Normal Select to display 4:3 picture in original size. When the original source is 4:3. On Select to have the screen automatically change to display ...mode that is 4:3 (Standard definition source). Full Select to enlarge the picture horizontally to turn off the Auto Wide option. Changes to picture settings affect only Video 1) Wide Zoom Select to the picture settings affect TV, Video1 - Video7) "All Inputs" will be applied to only the ...
Operating Instructions
Page 30
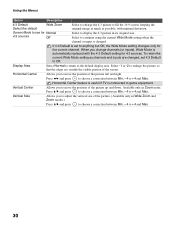
...channel. Press B/b and press to choose a correction between Min, - 4 to the default display area. Horizontal Center feature is useful if TV is set 4:3 Default to Off. Select -1 or -2 to game equipment. Horizontal Center Allows you to adjust the vertical size of the... channel or input is automatically replaced with minimal distortion. Press V/v and press to choose a correction between Min, - 4 to display the 4:3 picture in its original size. Using the Menus Option Description 4:3 Default Wide Zoom Select the default Screen Mode to use for Normal 4:3 sources Off Select...
...channel. Press B/b and press to choose a correction between Min, - 4 to the default display area. Horizontal Center feature is useful if TV is set 4:3 Default to Off. Select -1 or -2 to game equipment. Horizontal Center Allows you to adjust the vertical size of the... channel or input is automatically replaced with minimal distortion. Press V/v and press to choose a correction between Min, - 4 to display the 4:3 picture in its original size. Using the Menus Option Description 4:3 Default Wide Zoom Select the default Screen Mode to use for Normal 4:3 sources Off Select...

Operating Instructions
Page 33
...time in step 1, press V/v/B/b to set the day(s), hour, minute, AM/PM, duration, channel number (VHF/UHF, CATV or Digital), and volume. When Digital is selected, the last digital channel you selected Set in minutes (Off, 15 min, 30 min, 45 min, 60 min, 90 min, or 120 min)... the ambient room light conditions. Off: Select to turn off automatically. The light sensor measures the room brightness which allows the TV to enable the automatic picture (screen) brightness control. Using the Menus Using the Menus Option Auto YC Timer Settings Power Saving Light Sensor Quiet Power On...
...time in step 1, press V/v/B/b to set the day(s), hour, minute, AM/PM, duration, channel number (VHF/UHF, CATV or Digital), and volume. When Digital is selected, the last digital channel you selected Set in minutes (Off, 15 min, 30 min, 45 min, 60 min, 90 min, or 120 min)... the ambient room light conditions. Off: Select to turn off automatically. The light sensor measures the room brightness which allows the TV to enable the automatic picture (screen) brightness control. Using the Menus Using the Menus Option Auto YC Timer Settings Power Saving Light Sensor Quiet Power On...

Operating Instructions
Page 36
... mode when there is not VESA-compliant. 36 Press B/b and press to choose a correction between Min, - 49 to move the position of the picture when the TV receives an input signal from the connected PC. Power Management is no signal input for PC can also be set using the TOOLS button... on screen. Full1 Select to enlarge the picture to fine tune overall sharpness. Note that Auto Adjustment may not work well with certain input signals....
... mode when there is not VESA-compliant. 36 Press B/b and press to choose a correction between Min, - 49 to move the position of the picture when the TV receives an input signal from the connected PC. Power Management is no signal input for PC can also be set using the TOOLS button... on screen. Full1 Select to enlarge the picture to fine tune overall sharpness. Note that Auto Adjustment may not work well with certain input signals....

Operating Instructions
Page 41
...SONY(7669) for Canadian Residents Problem Possible Remedies No picture. Only snow and noise appear on the remote control. No picture. ❑ Check Power Saving settings (page 33). Cannot receive any channels. ❑ Make sure the power cord is locked to one of the TV. ❑ Check antenna/cable connections. No color/Dark picture/Color... is not ❑ correct/The picture is too bright. ❑ ❑ Press PICTURE to add receivable channels that are ...
...SONY(7669) for Canadian Residents Problem Possible Remedies No picture. Only snow and noise appear on the remote control. No picture. ❑ Check Power Saving settings (page 33). Cannot receive any channels. ❑ Make sure the power cord is locked to one of the TV. ❑ Check antenna/cable connections. No color/Dark picture/Color... is not ❑ correct/The picture is too bright. ❑ ❑ Press PICTURE to add receivable channels that are ...

Operating Instructions
Page 42
... 38). For more information. ❑ The digital cable channel may cause your digital sources display a loss of digital cable being displayed. Audio noise. ❑ Make sure that the antenna is due to your TV's large screen or dark scenes. Other Information Problem Possible Remedies No sound/Noisy sound Good picture, no sound. ❑ Check the...
... 38). For more information. ❑ The digital cable channel may cause your digital sources display a loss of digital cable being displayed. Audio noise. ❑ Make sure that the antenna is due to your TV's large screen or dark scenes. Other Information Problem Possible Remedies No sound/Noisy sound Good picture, no sound. ❑ Check the...

Operating Instructions
Page 45
... VGA-T VESA Guidelines VESA VESA Guidelines VESA VESA VESA VESA VESA This TV's PC Input does not support interlaced signals. This TV's PC Input supports signals in the above chart with 60Hz vertical frequency will be selected automatically. For the best picture quality, it is recommended to use signals with a 60Hz vertical frequency....5 37.5 31.5 37.9 46.9 48.4 56.5 60.0 47.4 47.8 47.7 Vertical frequency (Hz) 60 75 70 60 75 60 70 75 60 60 60 This TV's PC Input does not support Sync on Green or Composite Sync.
... VGA-T VESA Guidelines VESA VESA Guidelines VESA VESA VESA VESA VESA This TV's PC Input does not support interlaced signals. This TV's PC Input supports signals in the above chart with 60Hz vertical frequency will be selected automatically. For the best picture quality, it is recommended to use signals with a 60Hz vertical frequency....5 37.5 31.5 37.9 46.9 48.4 56.5 60.0 47.4 47.8 47.7 Vertical frequency (Hz) 60 75 70 60 75 60 70 75 60 60 60 This TV's PC Input does not support Sync on Green or Composite Sync.


