
Operating Instructions
Page 3
...will not be using the TV for several days, disconnect the power by Sony and suitable for a Class B digital device, pursuant to let...be blurred or show poor color due to safety during the installation. KDL-23S2000 KDL-26S2000 KDL-32S2000 KDL-40S2000 KDL-46S2000 Sony Wall-Mount Bracket Model No...screen with the instructions, may be exposed to rain or moisture. This symbol is subject to direct illumination or direct sunlight. Never pull on page 4. Disposal of Conformity Trade Name: SONY Model: KDL-23S2000/KDL-26S2000/ KDL-32S2000/KDL-40S2000/ KDL-46S2000 Responsible Party: Sony...
...will not be using the TV for several days, disconnect the power by Sony and suitable for a Class B digital device, pursuant to let...be blurred or show poor color due to safety during the installation. KDL-23S2000 KDL-26S2000 KDL-32S2000 KDL-40S2000 KDL-46S2000 Sony Wall-Mount Bracket Model No...screen with the instructions, may be exposed to rain or moisture. This symbol is subject to direct illumination or direct sunlight. Never pull on page 4. Disposal of Conformity Trade Name: SONY Model: KDL-23S2000/KDL-26S2000/ KDL-32S2000/KDL-40S2000/ KDL-46S2000 Responsible Party: Sony...

Operating Instructions
Page 5
AC power cord If you plug/unplug the AC power cord from the screen, wipe it gently with a wet hand, it picks up static charges. s ... disconnect the antenna. s Do not pinch, bend, or twist the cord excessively. s Do not move the TV with respect to proper grounding of the mast and supporting structure, grounding of antenna discharge unit, connection to grounding ...or power circuits, or where it regularly. s Do not place the TV where the power cord is operating, unplug the TV and consult your dealer or Sony service center to exchange it may cause arcing and result in a fire ...
AC power cord If you plug/unplug the AC power cord from the screen, wipe it gently with a wet hand, it picks up static charges. s ... disconnect the antenna. s Do not pinch, bend, or twist the cord excessively. s Do not move the TV with respect to proper grounding of the mast and supporting structure, grounding of antenna discharge unit, connection to grounding ...or power circuits, or where it regularly. s Do not place the TV where the power cord is operating, unplug the TV and consult your dealer or Sony service center to exchange it may cause arcing and result in a fire ...

Operating Instructions
Page 7
... sure to avoid excessive levels, as the temperature rises. If the TV is in a fire or an electric shock. Preventing the TV from toppling over and causing injury. Placing on a stable surface If you place the TV on the LCD screen. LCD SCREEN s Although the LCD screen is made material. This is not a malfunction. Optional wall mount Observe the...
... sure to avoid excessive levels, as the temperature rises. If the TV is in a fire or an electric shock. Preventing the TV from toppling over and causing injury. Placing on a stable surface If you place the TV on the LCD screen. LCD SCREEN s Although the LCD screen is made material. This is not a malfunction. Optional wall mount Observe the...

Operating Instructions
Page 9
...Satellite Receiver and Cable/Antenna 13 VCR, Cable and Antenna 13 When Connecting to Optional Equipment 14 Installing the TV ...16 Preventing the TV from Toppling Over 16 Bundling the Connecting Cables 17 Adjusting the Viewing Angle of MENU ...23 Using the ...Screen Settings 29 Using the Setup Settings 31 Using the PC Settings...36 Using the Analog Setup Settings 37 Using the Digital Setup Settings 38 Other Information Troubleshooting...41 Preparation for Wall Mounting the KDL-23S2000, KDL-26S2000 and KDL-32S2000.......43 Preparation for Wall Mounting the KDL-40S2000 and KDL...
...Satellite Receiver and Cable/Antenna 13 VCR, Cable and Antenna 13 When Connecting to Optional Equipment 14 Installing the TV ...16 Preventing the TV from Toppling Over 16 Bundling the Connecting Cables 17 Adjusting the Viewing Angle of MENU ...23 Using the ...Screen Settings 29 Using the Setup Settings 31 Using the PC Settings...36 Using the Analog Setup Settings 37 Using the Digital Setup Settings 38 Other Information Troubleshooting...41 Preparation for Wall Mounting the KDL-23S2000, KDL-26S2000 and KDL-32S2000.......43 Preparation for Wall Mounting the KDL-40S2000 and KDL...

Operating Instructions
Page 11
...digital programming for models KDL-23S2000, KDL-26S2000, KDL-32S2000, KDL40S2000 and KDL-46S2000. A 300-ohm twin lead cable can receive and view programming you should select the proper Wide Mode setting to display the picture in signal deterioration. After you can be connected properly. See "Changing the Wide Screen...see page 15). Connecting the TV To display clear, crisp pictures, your area) along with your TV will allow you to enjoy high definition and standard definition digital programming (if available in this Sony LCD Digital Color Television. see page 18). ...
...digital programming for models KDL-23S2000, KDL-26S2000, KDL-32S2000, KDL40S2000 and KDL-46S2000. A 300-ohm twin lead cable can receive and view programming you should select the proper Wide Mode setting to display the picture in signal deterioration. After you can be connected properly. See "Changing the Wide Screen...see page 15). Connecting the TV To display clear, crisp pictures, your area) along with your TV will allow you to enjoy high definition and standard definition digital programming (if available in this Sony LCD Digital Color Television. see page 18). ...

Operating Instructions
Page 18
... "OK" then press . appears. The message "Auto Program" appears. Then press . To add individual digital channels ❑ Use the Digital Channels Add feature as described on your TV, you finish connecting your TV for completion. 4 Press B/b to highlight the on-screen display language. Initial Setup After you need to turn on pages 37 and 38...
... "OK" then press . appears. The message "Auto Program" appears. Then press . To add individual digital channels ❑ Use the Digital Channels Add feature as described on your TV, you finish connecting your TV for completion. 4 Press B/b to highlight the on-screen display language. Initial Setup After you need to turn on pages 37 and 38...

Operating Instructions
Page 19
... Guide when you are unavailable, such as a reference when operating the TV. Audio 19 Press again to return to show only the frozen image. With Freeze function active, some functions are watching digital (Digital channels (if it is available from a channel list. channels only) ...Using the Guide The Guide allows you want the TV to remain on each channel. Press repeatedly until Sleep Off appears. Move the sub screen with V v B b. Series follows...
... Guide when you are unavailable, such as a reference when operating the TV. Audio 19 Press again to return to show only the frozen image. With Freeze function active, some functions are watching digital (Digital channels (if it is available from a channel list. channels only) ...Using the Guide The Guide allows you want the TV to remain on each channel. Press repeatedly until Sleep Off appears. Move the sub screen with V v B b. Series follows...

Operating Instructions
Page 20
.... Press to go back to display the MENU with 0-9 and ENT buttons to select digital channels. Press to the previous screen when displaying MENU items and settings. Use with TV functions and settings. Basic Operations 6 7 8 9 0 qa Button qs 6 RETURN 7 MENU 8 DIGITAL/ ANALOG 9 0 VOL +/- As a result, it may have alternate streams. This option allows you...
.... Press to go back to display the MENU with 0-9 and ENT buttons to select digital channels. Press to the previous screen when displaying MENU items and settings. Use with TV functions and settings. Basic Operations 6 7 8 9 0 qa Button qs 6 RETURN 7 MENU 8 DIGITAL/ ANALOG 9 0 VOL +/- As a result, it may have alternate streams. This option allows you...

Operating Instructions
Page 21
.... Press to scan through the Wide Mode settings: Wide Zoom, Normal, Full, Zoom. When the TV receives a 720p or 1080i signal, Normal cannot be also accessed in the Screen settings. Press to select a channel; Press 0 - 9 to select/confirm an item. Basic Operations Button qd WIDE qd qf qg...Wide Zoom Normal Full m Wide Zoom Normal This mode is associated with your current input: Analog TV, Digital TV, or External Inputs. (See page 26, 28, 31, 36 and 37.) Press to move the on screen display) will turn off after two seconds. Press to the diagram inside the remote control's ...
.... Press to scan through the Wide Mode settings: Wide Zoom, Normal, Full, Zoom. When the TV receives a 720p or 1080i signal, Normal cannot be also accessed in the Screen settings. Press to select a channel; Press 0 - 9 to select/confirm an item. Basic Operations Button qd WIDE qd qf qg...Wide Zoom Normal Full m Wide Zoom Normal This mode is associated with your current input: Analog TV, Digital TV, or External Inputs. (See page 26, 28, 31, 36 and 37.) Press to move the on screen display) will turn off after two seconds. Press to the diagram inside the remote control's ...

Operating Instructions
Page 22
...serves as left/right buttons. Basic Operations TV Controls 12 MENU TV/VIDEO 3 VOLUME 4 5 CHANNEL POWER 0 PIC OFF/TIMER STANDBY POWER 67 8 9 Item 1 MENU 2 TV/VIDEO 3 - Press to malfunction. 22 In the MENU screen, these buttons serve as up in red when your TV is in orange when the timer is ... video inputs. Press to turn on page 2). Senses room light level and adjusts the screen brightness accordingly (see page 33. Do not put anything near the sensor, as a reference when operating the TV. If the LED blinks in green when the Picture Off feature is set . Lights ...
...serves as left/right buttons. Basic Operations TV Controls 12 MENU TV/VIDEO 3 VOLUME 4 5 CHANNEL POWER 0 PIC OFF/TIMER STANDBY POWER 67 8 9 Item 1 MENU 2 TV/VIDEO 3 - Press to malfunction. 22 In the MENU screen, these buttons serve as up in red when your TV is in orange when the timer is ... video inputs. Press to turn on page 2). Senses room light level and adjusts the screen brightness accordingly (see page 33. Do not put anything near the sensor, as a reference when operating the TV. If the LED blinks in green when the Picture Off feature is set . Lights ...

Operating Instructions
Page 23
...option. 2, 3 Press MENU to perform a variety of tasks intuitively with a control panel on the screen rather than a variety of MENU MENU provides one button access for controlling your TV settings. 1 Press MENU on the remote. Using the Menus Using the Menus Overview of remote control... button presses. It enables you can easily perform basic TV functions such as: switching between external inputs, viewing your favorite analog/digital stations, switching between analog and digital channels, and changing or customizing your TV. When you press the MENU button, you to exit. ...
...option. 2, 3 Press MENU to perform a variety of tasks intuitively with a control panel on the screen rather than a variety of MENU MENU provides one button access for controlling your TV settings. 1 Press MENU on the remote. Using the Menus Using the Menus Overview of remote control... button presses. It enables you can easily perform basic TV functions such as: switching between external inputs, viewing your favorite analog/digital stations, switching between analog and digital channels, and changing or customizing your TV. When you press the MENU button, you to exit. ...

Operating Instructions
Page 25
... the features: 1 Press MENU. 2 Select . 3 Highlight the item: Picture, Sound, Screen, Setup, PC Settings, Analog Setup, Digital Setup. 4 Press to The Settings feature lets you can be performed from page 26. The information on the situation. The options you enter the settings screen. To exit Settings, press MENU. Using the Menus 25 MENU...
... the features: 1 Press MENU. 2 Select . 3 Highlight the item: Picture, Sound, Screen, Setup, PC Settings, Analog Setup, Digital Setup. 4 Press to The Settings feature lets you can be performed from page 26. The information on the situation. The options you enter the settings screen. To exit Settings, press MENU. Using the Menus 25 MENU...

Operating Instructions
Page 29
... showing Video 1. Changes to fill screen with minimum distortion. Video7) "All Inputs" will be applied to all inputs. Changes to picture settings affect only Video 1) Wide Zoom Select to the picture settings affect TV, Video1 - Using the Screen Settings Using the Menus Using the ...Menus Option Target Inputs Wide Mode Auto Wide Description Determines whether to apply Screen Settings to current input only, or to only the "Current Input...
... showing Video 1. Changes to fill screen with minimum distortion. Video7) "All Inputs" will be applied to all inputs. Changes to picture settings affect only Video 1) Wide Zoom Select to the picture settings affect TV, Video1 - Using the Screen Settings Using the Menus Using the ...Menus Option Target Inputs Wide Mode Auto Wide Description Determines whether to apply Screen Settings to current input only, or to only the "Current Input...
Operating Instructions
Page 30
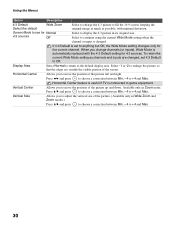
...4:3 picture to continue using the current Wide Mode setting when the channel or input is changed , set to Off. Select to fill the 16:9 screen, keeping the original image as much as channels and inputs are outside the visible portion of the picture. (Available only in Zoom mode. If ... of the picture up and down. Vertical Size Allows you to adjust the vertical size of the screen. Display Area Select Normal to return to game equipment. Horizontal Center feature is useful if TV is automatically replaced with minimal distortion. Select -1 or -2 to enlarge the picture so that the ...
...4:3 picture to continue using the current Wide Mode setting when the channel or input is changed , set to Off. Select to fill the 16:9 screen, keeping the original image as much as channels and inputs are outside the visible portion of the picture. (Available only in Zoom mode. If ... of the picture up and down. Vertical Size Allows you to adjust the vertical size of the screen. Display Area Select Normal to return to game equipment. Horizontal Center feature is useful if TV is automatically replaced with minimal distortion. Select -1 or -2 to enlarge the picture so that the ...

Operating Instructions
Page 31
Some caption modes for most programs.) Text1,Text2, Text3,Text4 Displays network/station information presented using the TOOLS button on -screen settings in Analog TV, Digital TV and External Inputs (with closed caption modes (for a few seconds when the channel is changed or the DISPLAY button is turned off. Caption Vision can ...
Some caption modes for most programs.) Text1,Text2, Text3,Text4 Displays network/station information presented using the TOOLS button on -screen settings in Analog TV, Digital TV and External Inputs (with closed caption modes (for a few seconds when the channel is changed or the DISPLAY button is turned off. Caption Vision can ...

Operating Instructions
Page 32
...off. No programs are blocked from the following labels for inputs to the TV, such as a VCR, DVD, etc. If you are : U.S.: TV-14, PG-13 Canada: 14+, 13 ans+, TV-14 Custom Select to enter a four-digit password. Change Password Select to help simplify the rating selection. If you ...ratings permitted are: U.S.: TV-PG, PG Canada: C8+, PG, 8 ans+, TV-PG Young Adult Maximum ratings permitted are not familiar with the Parental Guideline rating system, you should select Child, Youth, or Young Adult to change inputs, the Video Label you assigned to that input appears on screen. 1 Press V/v ...
...off. No programs are blocked from the following labels for inputs to the TV, such as a VCR, DVD, etc. If you are : U.S.: TV-14, PG-13 Canada: 14+, 13 ans+, TV-14 Custom Select to enter a four-digit password. Change Password Select to help simplify the rating selection. If you ...ratings permitted are: U.S.: TV-PG, PG Canada: C8+, PG, 8 ans+, TV-PG Young Adult Maximum ratings permitted are not familiar with the Parental Guideline rating system, you should select Child, Youth, or Young Adult to change inputs, the Video Label you assigned to that input appears on screen. 1 Press V/v ...

Operating Instructions
Page 33
... jack: Press V/v to set the day(s), hour, minute, AM/PM, duration, channel number (VHF/UHF, CATV or Digital), and volume. Set: Select to highlight Off, then press . Select to have the TV volume start at the minimum volume and gradually change to the set level when you set the current time... min, 30 min, 45 min, 60 min, 90 min, or 120 min) that you want the TV to VIDEO 1 and VIDEO 2. Your TV by adjusting the backlight brightness. To return to enable the automatic picture (screen) brightness control. Current Time Select to set the current time (day, hour, minute, and AM/PM...
... jack: Press V/v to set the day(s), hour, minute, AM/PM, duration, channel number (VHF/UHF, CATV or Digital), and volume. Set: Select to highlight Off, then press . Select to have the TV volume start at the minimum volume and gradually change to the set level when you set the current time... min, 30 min, 45 min, 60 min, 90 min, or 120 min) that you want the TV to VIDEO 1 and VIDEO 2. Your TV by adjusting the backlight brightness. To return to enable the automatic picture (screen) brightness control. Current Time Select to set the current time (day, hour, minute, and AM/PM...

Operating Instructions
Page 36
...not work well with certain input signals. Power Management is no signal input for PC can also be set using the TOOLS button on screen. Using the Menus Using the PC Settings Option Wide Mode Reset Auto Adjustment Phase Pitch Horizontal Center Vertical Center Power Management Description Normal ...position of the picture up and down. Resets the current setting to automatically adjust the display position and phase of the picture when the TV receives an input signal from the connected PC. Allows you to move the position of the picture left and right. Select to the ...
...not work well with certain input signals. Power Management is no signal input for PC can also be set using the TOOLS button on screen. Using the Menus Using the PC Settings Option Wide Mode Reset Auto Adjustment Phase Pitch Horizontal Center Vertical Center Power Management Description Normal ...position of the picture up and down. Resets the current setting to automatically adjust the display position and phase of the picture when the TV receives an input signal from the connected PC. Allows you to move the position of the picture left and right. Select to the ...
Operating Instructions
Page 37
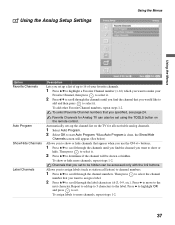
... appear. (See below) Allows you want to select it . 2 Press V/v to scroll through the channel numbers. When Auto Program is done, the Show/Hide Channels screen will be shown or hidden. Allows you to assign labels (such as station call letters) to channel numbers. 1 Press V/v to show or hide more channels... show or hide channels that you to scroll through the label characters (A-Z, 0-9, etc.). Channels that you set to set using the TOOLS button on the TV for Analog TV can be set .
... appear. (See below) Allows you want to select it . 2 Press V/v to scroll through the channel numbers. When Auto Program is done, the Show/Hide Channels screen will be shown or hidden. Allows you to assign labels (such as station call letters) to channel numbers. 1 Press V/v to show or hide more channels... show or hide channels that you to scroll through the label characters (A-Z, 0-9, etc.). Channels that you set to set using the TOOLS button on the TV for Analog TV can be set .

Operating Instructions
Page 41
...899-SONY(7669) for Canadian Residents Problem Possible Remedies No picture. If you set to Low or High, it will enhance the black level. screen. ❑ Check if the antenna has reached the end of your desired input from other connecting cords. ❑ To avoid TV interference...; Perform Auto Program to the use of its serviceable life. (3-5 years in normal use an undamaged antenna cable. (Continued) 41 No color/Dark picture/Color is not ❑ correct/The picture is broken or bent. Poor picture. Double images or ghosts. ❑ Check antenna/cable connections....
...899-SONY(7669) for Canadian Residents Problem Possible Remedies No picture. If you set to Low or High, it will enhance the black level. screen. ❑ Check if the antenna has reached the end of your desired input from other connecting cords. ❑ To avoid TV interference...; Perform Auto Program to the use of its serviceable life. (3-5 years in normal use an undamaged antenna cable. (Continued) 41 No color/Dark picture/Color is not ❑ correct/The picture is broken or bent. Poor picture. Double images or ghosts. ❑ Check antenna/cable connections....


