
Operating Instructions
Page 2
... the receiving antenna. KDL40XBR6 46XBR6 52XBR6 Sony Wall-Mount Bracket Model No. Use with Canadian ICES-003. and/or one or more of the following WALL-MOUNT BRACKET or TV-stand. In the United States, TV Guide and other data in the TV Guide On Screen system and cannot guarantee service availability in your cable service provider. For Customers in the United States Lamp in any damages in a residential installation. Owner's Record The model and serial numbers...
... the receiving antenna. KDL40XBR6 46XBR6 52XBR6 Sony Wall-Mount Bracket Model No. Use with Canadian ICES-003. and/or one or more of the following WALL-MOUNT BRACKET or TV-stand. In the United States, TV Guide and other data in the TV Guide On Screen system and cannot guarantee service availability in your cable service provider. For Customers in the United States Lamp in any damages in a residential installation. Owner's Record The model and serial numbers...

Operating Instructions
Page 3
... TV 6 Carrying the TV 6 Preparation for Table-Top Stand 6 Preparation for HDMI ....36 Using DIGITAL MEDIA PORT Adapter 36 Using P&P and PIP Features 37 To Enter P&P and PIP 37 To Change Inputs or Channels 37 To Exit from Favorites 28 Quick Setup Guide (separate volume) Provides a variety of BRAVIA® The Four Steps to Use TV Guide On Screen 34 Using BRAVIA Sync with Control for Wall-Mount Bracket 7 When Installing the TV Against a Wall or Enclosed Area 7 Bundling the Connecting Cables 8 Securing the TV 9 2. Setting Up the Channel List...
... TV 6 Carrying the TV 6 Preparation for Table-Top Stand 6 Preparation for HDMI ....36 Using DIGITAL MEDIA PORT Adapter 36 Using P&P and PIP Features 37 To Enter P&P and PIP 37 To Change Inputs or Channels 37 To Exit from Favorites 28 Quick Setup Guide (separate volume) Provides a variety of BRAVIA® The Four Steps to Use TV Guide On Screen 34 Using BRAVIA Sync with Control for Wall-Mount Bracket 7 When Installing the TV Against a Wall or Enclosed Area 7 Bundling the Connecting Cables 8 Securing the TV 9 2. Setting Up the Channel List...

Operating Instructions
Page 5
...: view photo files via USB or compatible DLNA Certified™ equipment (see page 30). • Music: listen to music files via USB or add music to access the TV settings for the 40, 46 and 52 inch BRAVIA KDL-XBR6 series models with screen size measured diagonally. 5 DISPLAY LIGHT POWER TV POWER DVD AMP STB TV FUNCTION PREV REPLAY ADVANCE NEXT PLAY SYNC MENU PAUSE STOP THEATER SOUND PICTURE WIDE CC FREEZE Product Support Clock/Timers Settings Sound Screen Channel Media Category Bar TV...
...: view photo files via USB or compatible DLNA Certified™ equipment (see page 30). • Music: listen to music files via USB or add music to access the TV settings for the 40, 46 and 52 inch BRAVIA KDL-XBR6 series models with screen size measured diagonally. 5 DISPLAY LIGHT POWER TV POWER DVD AMP STB TV FUNCTION PREV REPLAY ADVANCE NEXT PLAY SYNC MENU PAUSE STOP THEATER SOUND PICTURE WIDE CC FREEZE Product Support Clock/Timers Settings Sound Screen Channel Media Category Bar TV...

Operating Instructions
Page 6
... stress on a TV stand (except model, KDL-52XBR6). 1 Remove the Table-Top Stand and screws from the carton. Getting Started 1. Table-Top Stand Screws TV Unit 2 Place the Table-Top Stand on a level and stable surface. • Lift the TV by placing your hands or the AC power cord when you use the screws provided with the TV. For product protection and safety reasons, Sony strongly recommends that you install the TV unit to...
... stress on a TV stand (except model, KDL-52XBR6). 1 Remove the Table-Top Stand and screws from the carton. Getting Started 1. Table-Top Stand Screws TV Unit 2 Place the Table-Top Stand on a level and stable surface. • Lift the TV by placing your hands or the AC power cord when you use the screws provided with the TV. For product protection and safety reasons, Sony strongly recommends that you install the TV unit to...

Operating Instructions
Page 9
... support the weight of the angle brace to the wall stud. • attach the other M6 anchor bolt) Anchor bolts Wall-mount holes Rope or chain Wallanchor Secure the TV to the Stand Use the optional hardware listed below (not supplied): • Two M6 × 10-12 mm anchor bolts (screw into the TV's Table-Top Stand) • A screw or similar (attach it to the TV stand) ~ • Securing the TV...
... support the weight of the angle brace to the wall stud. • attach the other M6 anchor bolt) Anchor bolts Wall-mount holes Rope or chain Wallanchor Secure the TV to the Stand Use the optional hardware listed below (not supplied): • Two M6 × 10-12 mm anchor bolts (screw into the TV's Table-Top Stand) • A screw or similar (attach it to the TV stand) ~ • Securing the TV...

Operating Instructions
Page 11
... Audio cable between this connection to connect to a network, receive software updates and enjoy photos from Dolby Laboratories. Connect the supplied power cord to your TV's audio through your cable or VHF/UHF antenna. HDMI IN 4 R-AUDIO-L If the equipment has a DVI jack and not an HDMI jack, connect the DVI jack to the HDMI IN 4 (with the TV's remote control (see page 30). This USB port is PCM/Dolby* OUT (OPTICAL) Digital compatible. 8 AUDIO OUT (VAR/FIX) Connects to a Local Area Network using...
... Audio cable between this connection to connect to a network, receive software updates and enjoy photos from Dolby Laboratories. Connect the supplied power cord to your TV's audio through your cable or VHF/UHF antenna. HDMI IN 4 R-AUDIO-L If the equipment has a DVI jack and not an HDMI jack, connect the DVI jack to the HDMI IN 4 (with the TV's remote control (see page 30). This USB port is PCM/Dolby* OUT (OPTICAL) Digital compatible. 8 AUDIO OUT (VAR/FIX) Connects to a Local Area Network using...

Operating Instructions
Page 14
... or HDMI output. (Refer to the separate Quick Setup Guide.) Rear of the above PC input signals to display on Green or Composite Sync. • This TV's PC VGA input does not support interlaced signals. • Your PC must support one of TV HD15-HD15 cable (analog RGB) VIDEO IN 1 3 S VIDEO VIDEO L (MONO) AUDIO R COMPONENT IN PC IN 1 2 Y RGB PB PR L AUDIO R AUDIO (1080p/1080i/720p/480p/480i) IN DIGITAL 1 AUDIO OUT (OPTICAL) 3 4 AUDIO OUT R AUDIO L L AUDIO R (VAR/FIX) Audio cable (stereo mini plugs) ~ • Connect...
... or HDMI output. (Refer to the separate Quick Setup Guide.) Rear of the above PC input signals to display on Green or Composite Sync. • This TV's PC VGA input does not support interlaced signals. • Your PC must support one of TV HD15-HD15 cable (analog RGB) VIDEO IN 1 3 S VIDEO VIDEO L (MONO) AUDIO R COMPONENT IN PC IN 1 2 Y RGB PB PR L AUDIO R AUDIO (1080p/1080i/720p/480p/480i) IN DIGITAL 1 AUDIO OUT (OPTICAL) 3 4 AUDIO OUT R AUDIO L L AUDIO R (VAR/FIX) Audio cable (stereo mini plugs) ~ • Connect...
Operating Instructions
Page 16
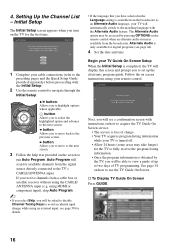
... remote control when an alternate audio stream is free of TV programming. Initial Setup Step 6 of 6 Please select a language. s To Display TV Guide On Screen Press GUIDE. 16 Language settings will be able to the TV's CABLE/ANTENNA input. Follow the on how to acquire the TV Guide On Screen service. • The service is available from the broadcaster as default audio for details. • If the language that you receive channels from the signal source directly connected to view a guide...
... remote control when an alternate audio stream is free of TV programming. Initial Setup Step 6 of 6 Please select a language. s To Display TV Guide On Screen Press GUIDE. 16 Language settings will be able to the TV's CABLE/ANTENNA input. Follow the on how to acquire the TV Guide On Screen service. • The service is available from the broadcaster as default audio for details. • If the language that you receive channels from the signal source directly connected to view a guide...

Operating Instructions
Page 19
... Sound settings. x STOP: Press to play a program in fast rewind mode. Remote Control Button Description Operating the TV 1 2 3 4 DISPLAY LIGHT POWER TV POWER DVD AMP STB TV FUNCTION PREV REPLAY ADVANCE NEXT PLAY SYNC MENU PAUSE STOP 5 6 THEATER SOUND PICTURE WIDE CC FREEZE VOL MUTING CH JUMP REC RECPAUSE RECSTOP BD/DVD TOP MENU MENU F1 F2 ~ • The 5, PLAY and CH+ buttons have a tactile dot. The sound modes can operate video equipment programmed to the DVD, AMP, or STB FUNCTION buttons of time...
... Sound settings. x STOP: Press to play a program in fast rewind mode. Remote Control Button Description Operating the TV 1 2 3 4 DISPLAY LIGHT POWER TV POWER DVD AMP STB TV FUNCTION PREV REPLAY ADVANCE NEXT PLAY SYNC MENU PAUSE STOP 5 6 THEATER SOUND PICTURE WIDE CC FREEZE VOL MUTING CH JUMP REC RECPAUSE RECSTOP BD/DVD TOP MENU MENU F1 F2 ~ • The 5, PLAY and CH+ buttons have a tactile dot. The sound modes can operate video equipment programmed to the DVD, AMP, or STB FUNCTION buttons of time...

Operating Instructions
Page 22
..., Photo-Original, Photo-Custom, Video, Text. (Available options depend on the screen. ~ • With the Freeze feature active, some features are available in the currently tuned digital program. Press to display a list of External Inputs and TV mode. Press to select/ confirm an item. Menu Item Picture Adjustments Sound Adjustments P&P or PIP Exit P&P or Exit PIP Speakers Audio Swap Screen Add to cycle through the available settings for DMPORT Photo Music...
..., Photo-Original, Photo-Custom, Video, Text. (Available options depend on the screen. ~ • With the Freeze feature active, some features are available in the currently tuned digital program. Press to display a list of External Inputs and TV mode. Press to select/ confirm an item. Menu Item Picture Adjustments Sound Adjustments P&P or PIP Exit P&P or Exit PIP Speakers Audio Swap Screen Add to cycle through the available settings for DMPORT Photo Music...

Operating Instructions
Page 28
To remove from Favorites (see pages 16 and 46). • Initial Setup will return your recently viewed channels and inputs list, highlight the list in Favorites and press OPTIONS, then select Clear Recently Viewed. Adding to move between them. 3 To view an item, highlight its icon and press . ~ • To clear your Favorites to factory default settings (see page 52). 28 Locate the item you...
To remove from Favorites (see pages 16 and 46). • Initial Setup will return your recently viewed channels and inputs list, highlight the list in Favorites and press OPTIONS, then select Clear Recently Viewed. Adding to move between them. 3 To view an item, highlight its icon and press . ~ • To clear your Favorites to factory default settings (see page 52). 28 Locate the item you...

Operating Instructions
Page 36
... controlling it via the TV's remote control. In this case, the system outputs a composite video signal. • Check compatibility between portable player and the DIGITAL MEDIA PORT adapter. • The output volume level between the DMPORT input and TV or other Sony equipment supporting the Control for HDMI function. Using BRAVIA Sync with Control for HDMI The BRAVIA Sync function on this TV communicates with other equipment input may be significantly different; See pages 12 to its operating instructions. To connect Sony...
... controlling it via the TV's remote control. In this case, the system outputs a composite video signal. • Check compatibility between portable player and the DIGITAL MEDIA PORT adapter. • The output volume level between the DMPORT input and TV or other Sony equipment supporting the Control for HDMI function. Using BRAVIA Sync with Control for HDMI The BRAVIA Sync function on this TV communicates with other equipment input may be significantly different; See pages 12 to its operating instructions. To connect Sony...

Operating Instructions
Page 40
... have digital TV programming (not available with the use of a cable box). • The broadcast download is performed while the TV is off. • The software update is performed while the TV is powered on the Timer will allow setting the following: Day of the Week, Time, Duration, Input, Channel, and TV On Volume. Press V/v to choose the new version (if available) and press to begin the software update. ~ • The Cable/Antenna cable needs...
... have digital TV programming (not available with the use of a cable box). • The broadcast download is performed while the TV is off. • The software update is performed while the TV is powered on the Timer will allow setting the following: Day of the Week, Time, Duration, Input, Channel, and TV On Volume. Press V/v to choose the new version (if available) and press to begin the software update. ~ • The Cable/Antenna cable needs...
Operating Instructions
Page 45
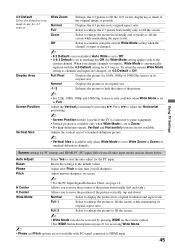
... channel or input is automatically replaced with PC signal connected to Off. Normal Displays the picture in its original aspect ratio. Full Pixel Displays the picture for 1080i, 1080p or 1080/24p sources in its original resolution and aspect ratio. Pitch Adjust uneven sharpness on page 21 for accessing Wide Mode. ~ • Phase and Pitch options are not available with the 4:3 Default setting for PC timings and HDMI...
... channel or input is automatically replaced with PC signal connected to Off. Normal Displays the picture in its original aspect ratio. Full Pixel Displays the picture for 1080i, 1080p or 1080/24p sources in its original resolution and aspect ratio. Pitch Adjust uneven sharpness on page 21 for accessing Wide Mode. ~ • Phase and Pitch options are not available with the 4:3 Default setting for PC timings and HDMI...

Operating Instructions
Page 47
... the Parental Lock setting with Video and Component (480i) inputs. Analog CC For the basic analog (EIA-608) closed caption options. To View Blocked Programs Press ENT when tuned to view Closed Captions (CC). Using TV Settings CC Closed Captions (CC) Settings CC Display This option allows you to a blocked program, then enter the password. To reactivate the Parental Lock settings, turn off and on page 49. (Continued) 47 Off Disables CC Display. Parental Lock Settings The Parental Lock feature allows you to block programs according...
... the Parental Lock setting with Video and Component (480i) inputs. Analog CC For the basic analog (EIA-608) closed caption options. To View Blocked Programs Press ENT when tuned to view Closed Captions (CC). Using TV Settings CC Closed Captions (CC) Settings CC Display This option allows you to a blocked program, then enter the password. To reactivate the Parental Lock settings, turn off and on page 49. (Continued) 47 Off Disables CC Display. Parental Lock Settings The Parental Lock feature allows you to block programs according...
Operating Instructions
Page 50
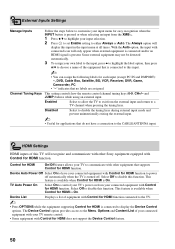
... connected equipment with Control for HDMI function. TV Auto Power On Select On to communicate with Control for HDMI does not support the Device Control feature. 50 Enabled Select to allow the TV to exit from the external input and return to display the Device Control options. Device List Displays a list of this input in the input menu at all times. Device Auto Power Off Select On to have a connection to the CABLE/ANTENNA input. This setting controls how the remote control channel...
... connected equipment with Control for HDMI function. TV Auto Power On Select On to communicate with Control for HDMI does not support the Device Control feature. 50 Enabled Select to allow the TV to exit from the external input and return to display the Device Control options. Device List Displays a list of this input in the input menu at all times. Device Auto Power Off Select On to have a connection to the CABLE/ANTENNA input. This setting controls how the remote control channel...

Operating Instructions
Page 52
Mode 2 Select to scroll quickly with V/v buttons. Power Saving Reduces the power consumption by this Initial Setup. Follow the instructions on the picture settings and the ambient room light conditions. ~ • Be sure not to put anything around the sensor, as Picture Adjustments, Sound Adjustments, and Parental Lock will not be affected by adjusting the backlight brightness. Home Menu Scrolling Adjust the navigation speed through menu items. Standard Select to scroll individually...
Mode 2 Select to scroll quickly with V/v buttons. Power Saving Reduces the power consumption by this Initial Setup. Follow the instructions on the picture settings and the ambient room light conditions. ~ • Be sure not to put anything around the sensor, as Picture Adjustments, Sound Adjustments, and Parental Lock will not be affected by adjusting the backlight brightness. Home Menu Scrolling Adjust the navigation speed through menu items. Standard Select to scroll individually...
Operating Instructions
Page 54
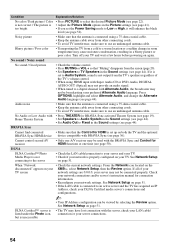
... of the TV's volume control. • When using a 75-ohm coaxial cable. • Keep the antenna cable away from the TV's speakers regardless of your network settings are 0.0.0.0, your preferred Alternate Audio language. See Network Setup on the XMBTM, select Network Setup, then the Review option. See Network Setup on both the TV and the optional BRAVIA Sync HDMI device device compatible with • Press THEATER for HDMI is not output from other connecting cords. • To...
... of the TV's volume control. • When using a 75-ohm coaxial cable. • Keep the antenna cable away from the TV's speakers regardless of your network settings are 0.0.0.0, your preferred Alternate Audio language. See Network Setup on the XMBTM, select Network Setup, then the Review option. See Network Setup on both the TV and the optional BRAVIA Sync HDMI device device compatible with • Press THEATER for HDMI is not output from other connecting cords. • To...

Operating Instructions
Page 57
...Television system Channel coverage Panel system Speaker output Input/Output jacks CABLE/ANTENNA VIDEO IN 1/2/3 COMPONENT IN 1/2 HDMI IN 1/2/3/4 AUDIO OUT DIGITAL AUDIO OUT (OPTICAL) PC IN PC AUDIO INPUT LAN (10/100) DMPORT USB Power and others Power requirement Power consumption in use in standby Screen size (inches measured diagonally) Display resolution Speaker/Front (2) (mm) (inches) Tweater (2) (mm) ø (inches) ø Assist Woofer (mm) (inches) Dimensions (W x H x D) with stand (mm) (inches) without stand (mm) (inches) wall-mount hole pattern (mm) wall-mount screw size Mass with stand...
...Television system Channel coverage Panel system Speaker output Input/Output jacks CABLE/ANTENNA VIDEO IN 1/2/3 COMPONENT IN 1/2 HDMI IN 1/2/3/4 AUDIO OUT DIGITAL AUDIO OUT (OPTICAL) PC IN PC AUDIO INPUT LAN (10/100) DMPORT USB Power and others Power requirement Power consumption in use in standby Screen size (inches measured diagonally) Display resolution Speaker/Front (2) (mm) (inches) Tweater (2) (mm) ø (inches) ø Assist Woofer (mm) (inches) Dimensions (W x H x D) with stand (mm) (inches) without stand (mm) (inches) wall-mount hole pattern (mm) wall-mount screw size Mass with stand...

Operating Instructions
Page 58
... RETURN button 20 S S VIDEO jack 11 Screen Position 45 Server Diagnostics 51 Settings Channel 46 Clock/Timers 40 Closed Captions (CC) 47 External Inputs 50 General Setup 51 HDMI Settings 50 Initial Setup 52 Network 51 Parental Lock 47 Picture 41 Product Support 40 Screen 44 Sound 43 Sharpness 41 Show/Hide Channels 46 Show/Hide Servers 51 Signal Diagnostics 40 Signal Type 46 Sleep Timer 40 Software Update 40 Sound Adjustments 32, 43 Sound Booster 43 SOUND button 19 Sound Mode 43 Speaker 24 Speakers 32, 44 STANDBY LED 24...
... RETURN button 20 S S VIDEO jack 11 Screen Position 45 Server Diagnostics 51 Settings Channel 46 Clock/Timers 40 Closed Captions (CC) 47 External Inputs 50 General Setup 51 HDMI Settings 50 Initial Setup 52 Network 51 Parental Lock 47 Picture 41 Product Support 40 Screen 44 Sound 43 Sharpness 41 Show/Hide Channels 46 Show/Hide Servers 51 Signal Diagnostics 40 Signal Type 46 Sleep Timer 40 Software Update 40 Sound Adjustments 32, 43 Sound Booster 43 SOUND button 19 Sound Mode 43 Speaker 24 Speakers 32, 44 STANDBY LED 24...


