
Operating Instructions
Page 1
LCD TV Operating Instructions 4-411-984-13(1) KDL-55HX75x / 46HX75x / 46EX65x / 40HX75x / 40EX65x / 32HX75x / 32EX65x / 26EX55x KDL-22EX55x
LCD TV Operating Instructions 4-411-984-13(1) KDL-55HX75x / 46HX75x / 46EX65x / 40HX75x / 40EX65x / 32HX75x / 32EX65x / 26EX55x KDL-22EX55x

Operating Instructions
Page 2
...with or ) must be registered in order to play purchased DivX Video-on European Union legislation shall be addressed to the authorized representative, Sony Deutschland GmbH, Hedelfinger Strasse 61, 70327 Stuttgart, Germany. For any service or guarantee matters, please refer to the addresses provided in ... with this equipment has a detachable fuse cover, be used. DLNA®, the DLNA Logo and DLNA CERTIFIED® are trademarks of Sony Corporation. NOTICE FOR CUSTOMERS IN THE UNITED KINGDOM A moulded plug complying with BS1363 is fitted to this equipment for TV model series HX753...
...with or ) must be registered in order to play purchased DivX Video-on European Union legislation shall be addressed to the authorized representative, Sony Deutschland GmbH, Hedelfinger Strasse 61, 70327 Stuttgart, Germany. For any service or guarantee matters, please refer to the addresses provided in ... with this equipment has a detachable fuse cover, be used. DLNA®, the DLNA Logo and DLNA CERTIFIED® are trademarks of Sony Corporation. NOTICE FOR CUSTOMERS IN THE UNITED KINGDOM A moulded plug complying with BS1363 is fitted to this equipment for TV model series HX753...

Operating Instructions
Page 3
... Directive 1999/5/EC. Gracenote is governed: - Gracenote Software, copyright © 2000-present Gracenote. Copyright 1995-2012 Opera Software ASA. Hereby, Sony Corporation declares that the WLAN (WiFi) feature of this unit is not allowed in the geographical area within a radius of 20 km from... from Opera Software ASA. Wi-Fi Direct is permitted; "Blu-ray Disc", "Blu-ray" and "Blu-ray Disc" logo are trademarks of Sony Corporation. One or more information, please visit www.gracenote.com. For details, please access the following countries: Austria, Belgium, Bulgaria, Cyprus, Czech...
... Directive 1999/5/EC. Gracenote is governed: - Gracenote Software, copyright © 2000-present Gracenote. Copyright 1995-2012 Opera Software ASA. Hereby, Sony Corporation declares that the WLAN (WiFi) feature of this unit is not allowed in the geographical area within a radius of 20 km from... from Opera Software ASA. Wi-Fi Direct is permitted; "Blu-ray Disc", "Blu-ray" and "Blu-ray Disc" logo are trademarks of Sony Corporation. One or more information, please visit www.gracenote.com. For details, please access the following countries: Austria, Belgium, Bulgaria, Cyprus, Czech...
Operating Instructions
Page 4
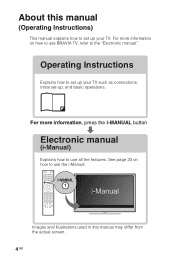
For more information, press the i-MANUAL button Electronic manual (i-Manual) Explains how to use the i-Manual. See page 23 on how to use BRAVIA TV, refer to use all the features. About this manual may differ from the actual screen. 4 GB Operating Instructions Explains how to set -up your TV. Images and illustrations used in this manual (Operating Instructions) This manual explains how to set up your TV such as connections, initial set up , and basic operations. For more information on how to the "Electronic manual".
For more information, press the i-MANUAL button Electronic manual (i-Manual) Explains how to use the i-Manual. See page 23 on how to use BRAVIA TV, refer to use all the features. About this manual may differ from the actual screen. 4 GB Operating Instructions Explains how to set -up your TV. Images and illustrations used in this manual (Operating Instructions) This manual explains how to set up your TV such as connections, initial set up , and basic operations. For more information on how to the "Electronic manual".
Operating Instructions
Page 5
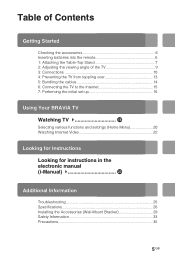
Table of Contents Getting Started GB Checking the accessories 6 Inserting batteries into the remote 6 1: Attaching the Table-Top Stand 7 2: Adjusting the viewing angle of the TV 9 3: Connections 10 4: Preventing the TV from toppling over 13 5: Bundling the cables 14 6: Connecting the TV to the Internet 15 7: Performing the initial set-up 16 Using Your BRAVIA TV Watching TV B qk Selecting various functions and settings (Home Menu 20 Watching Internet Video 22 Looking for Instructions Looking for instructions in the electronic manual (i-Manual) B wd Additional Information ...
Table of Contents Getting Started GB Checking the accessories 6 Inserting batteries into the remote 6 1: Attaching the Table-Top Stand 7 2: Adjusting the viewing angle of the TV 9 3: Connections 10 4: Preventing the TV from toppling over 13 5: Bundling the cables 14 6: Connecting the TV to the Internet 15 7: Performing the initial set-up 16 Using Your BRAVIA TV Watching TV B qk Selecting various functions and settings (Home Menu 20 Watching Internet Video 22 Looking for Instructions Looking for instructions in the electronic manual (i-Manual) B wd Additional Information ...
Operating Instructions
Page 6
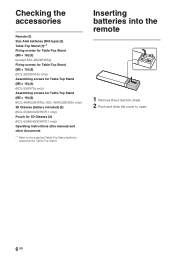
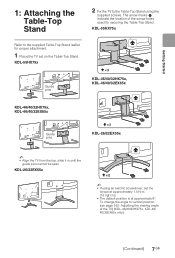
Inserting batteries into the remote 1 Remove the protection sheet. 2 Push and slide the cover to assemble the Table-Top Stand. Getting Started Checking the accessories Remote (1) Size AAA batteries (R03 type) (2) Table-Top Stand (1)*1 Fixing screws for Table-Top Stand (M5 × 16) (3) (except KDL-26/22EX55x) Fixing screws for Table-Top Stand (M5 × 16) (2) (KDL-26/22EX55x only) Assembling screws for Table-Top Stand (M5 × 16) (4) (KDL-55HX75x only) Assembling screws for Table-Top Stand (M5 × 16) (2) (KDL-46/40/32HX75x, KDL-46/40/32EX65x only) 3D Glasses (battery included) (2) (...
Inserting batteries into the remote 1 Remove the protection sheet. 2 Push and slide the cover to assemble the Table-Top Stand. Getting Started Checking the accessories Remote (1) Size AAA batteries (R03 type) (2) Table-Top Stand (1)*1 Fixing screws for Table-Top Stand (M5 × 16) (3) (except KDL-26/22EX55x) Fixing screws for Table-Top Stand (M5 × 16) (2) (KDL-26/22EX55x only) Assembling screws for Table-Top Stand (M5 × 16) (4) (KDL-55HX75x only) Assembling screws for Table-Top Stand (M5 × 16) (2) (KDL-46/40/32HX75x, KDL-46/40/32EX65x only) 3D Glasses (battery included) (2) (...
Operating Instructions
Page 7
The arrow marks indicate the location of the TV) (KDL-46/40/32HX75x, KDL-46/ 40/32EX65x only). (Continued) 7 GB KDL-55HX75x Guide pins KDL-46/40/32HX75x, KDL-46/40/32EX65x KDL-46/40/32HX75x, KDL-46/40/32EX65x Guide pins KDL-26/22EX55x ~ • Align the TV from the top, slide it in until the guide pins cannot be seen. To change the angle to vertical position, see page 9 (2: Adjusting the viewing angle of the screw holes used for proper attachment. 1 Place the TV set the torque at approximately 1.5 N·m {15 kgf·cm}. • The default position is at approximate 6°...
The arrow marks indicate the location of the TV) (KDL-46/40/32HX75x, KDL-46/ 40/32EX65x only). (Continued) 7 GB KDL-55HX75x Guide pins KDL-46/40/32HX75x, KDL-46/40/32EX65x KDL-46/40/32HX75x, KDL-46/40/32EX65x Guide pins KDL-26/22EX55x ~ • Align the TV from the top, slide it in until the guide pins cannot be seen. To change the angle to vertical position, see page 9 (2: Adjusting the viewing angle of the screw holes used for proper attachment. 1 Place the TV set the torque at approximately 1.5 N·m {15 kgf·cm}. • The default position is at approximate 6°...
Operating Instructions
Page 8
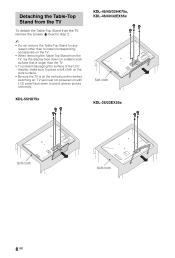
KDL-55HX75x KDL-46/40/32HX75x, KDL-46/40/32EX65x Soft cloth KDL-26/22EX55x Soft cloth Soft cloth 8 GB Detaching the Table-Top Stand from the TV To detach the Table-Top Stand from the TV, remove the screws fixed in step 2. ~ • Do not remove the Table-Top Stand for any reason other than the TV. • To prevent damaging the surface of the LCD display, make sure to avoid uneven picture uniformity. TV set must not powered on with LCD panel face down on a stable work surface. • Be sure the TV is larger than to install corresponding accessories on the TV. • When ...
KDL-55HX75x KDL-46/40/32HX75x, KDL-46/40/32EX65x Soft cloth KDL-26/22EX55x Soft cloth Soft cloth 8 GB Detaching the Table-Top Stand from the TV To detach the Table-Top Stand from the TV, remove the screws fixed in step 2. ~ • Do not remove the Table-Top Stand for any reason other than the TV. • To prevent damaging the surface of the LCD display, make sure to avoid uneven picture uniformity. TV set must not powered on with LCD panel face down on a stable work surface. • Be sure the TV is larger than to install corresponding accessories on the TV. • When ...

Operating Instructions
Page 9
IR Sensor 3D Sync Transmitter (KDL-55/46/40/ 32HX75x only) KDL-46/40/32HX75x, KDL-46/40/32EX65x *6° 1 2 9 GB Getting Started 2: Adjusting the KDL-26/22EX55x viewing angle *6° of the TV. x Angle adjustment (Swivel) (Except KDL-26/22EX55x) ~ • When adjusting the angle, hold the stand with one hand to avoid having the stand slip or TV tip over. *15° *15° *15° *15° x Angle adjustment (Tilt) (Except KDL-55HX75x) * The angle is approximate value. ~ • Ensure that there are no objects in front of the TV This TV can be adjusted within the ...
IR Sensor 3D Sync Transmitter (KDL-55/46/40/ 32HX75x only) KDL-46/40/32HX75x, KDL-46/40/32EX65x *6° 1 2 9 GB Getting Started 2: Adjusting the KDL-26/22EX55x viewing angle *6° of the TV. x Angle adjustment (Swivel) (Except KDL-26/22EX55x) ~ • When adjusting the angle, hold the stand with one hand to avoid having the stand slip or TV tip over. *15° *15° *15° *15° x Angle adjustment (Tilt) (Except KDL-55HX75x) * The angle is approximate value. ~ • Ensure that there are no objects in front of the TV This TV can be adjusted within the ...
Operating Instructions
Page 10
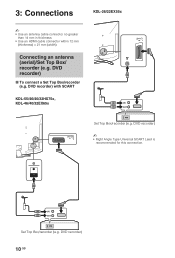
Connecting an antenna (aerial)/Set Top Box/ recorder (e.g. DVD recorder) x To connect a Set Top Box/recorder (e.g. Set Top Box/recorder (e.g. DVD recorder) with SCART KDL-55/46/40/32HX75x, KDL-46/40/32EX65x Set Top Box/recorder (e.g. DVD recorder) ~ • Right Angle Type Universal SCART Lead is recommended for this connection. DVD recorder) 10 GB 3: Connections KDL-26/22EX55x ~ • Use an antenna cable connector no greater than 14 mm in thickness. • Use an HDMI cable connector within 12 mm AV 1 (thickness) × 21 mm (width).
Connecting an antenna (aerial)/Set Top Box/ recorder (e.g. DVD recorder) x To connect a Set Top Box/recorder (e.g. Set Top Box/recorder (e.g. DVD recorder) with SCART KDL-55/46/40/32HX75x, KDL-46/40/32EX65x Set Top Box/recorder (e.g. DVD recorder) ~ • Right Angle Type Universal SCART Lead is recommended for this connection. DVD recorder) 10 GB 3: Connections KDL-26/22EX55x ~ • Use an antenna cable connector no greater than 14 mm in thickness. • Use an HDMI cable connector within 12 mm AV 1 (thickness) × 21 mm (width).

Operating Instructions
Page 11
DVD recorder) (Continued) 11 GB DVD recorder) with HDMI KDL-55/46/40/32HX75x, KDL-46/40/32EX65x KDL-26/22EX55x ARC 1 2 ARC 1 4 Set Top Box/recorder (e.g. Getting Started x To connect a Set Top Box/recorder (e.g. DVD recorder) Set Top Box/recorder (e.g.
DVD recorder) (Continued) 11 GB DVD recorder) with HDMI KDL-55/46/40/32HX75x, KDL-46/40/32EX65x KDL-26/22EX55x ARC 1 2 ARC 1 4 Set Top Box/recorder (e.g. Getting Started x To connect a Set Top Box/recorder (e.g. DVD recorder) Set Top Box/recorder (e.g.

Operating Instructions
Page 13
The length of the TV and tie with a strong cord (not supplied). ~ • Before install the machine screw, lay the display face down on the cord diameter. Then, tie the strong cord to place a soft cloth on the work surface. 1 Install a machine screw (M4, not supplied) into the screw hole of the M4 machine screw differs depending on a stable work surface that is larger than the TV. • To prevent damaging the surface of the LCD display, make sure to the wood screw. Please see below illustration. 6-8 mm Screw M4 Cord TV's Table-Top Stand 13 GB 4: Preventing the TV from ...
The length of the TV and tie with a strong cord (not supplied). ~ • Before install the machine screw, lay the display face down on the cord diameter. Then, tie the strong cord to place a soft cloth on the work surface. 1 Install a machine screw (M4, not supplied) into the screw hole of the M4 machine screw differs depending on a stable work surface that is larger than the TV. • To prevent damaging the surface of the LCD display, make sure to the wood screw. Please see below illustration. 6-8 mm Screw M4 Cord TV's Table-Top Stand 13 GB 4: Preventing the TV from ...
Operating Instructions
Page 14
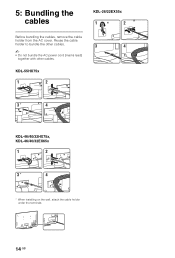
KDL-55HX75x 1 2 3* 4 KDL-46/40/32HX75x, KDL-46/40/32EX65x 1 2 3* 4 * When installing on the wall, attach the cable holder under the terminals. 14 GB Reuse the cable holder to bundle the other cables. 3 4 ~ • Do not bundle the AC power cord (mains lead) together with other cables. 5: Bundling the cables KDL-26/22EX55x 1 2 Before bundling the cables, remove the cable holder from the AC cover.
KDL-55HX75x 1 2 3* 4 KDL-46/40/32HX75x, KDL-46/40/32EX65x 1 2 3* 4 * When installing on the wall, attach the cable holder under the terminals. 14 GB Reuse the cable holder to bundle the other cables. 3 4 ~ • Do not bundle the AC power cord (mains lead) together with other cables. 5: Bundling the cables KDL-26/22EX55x 1 2 Before bundling the cables, remove the cable holder from the AC cover.
Operating Instructions
Page 15
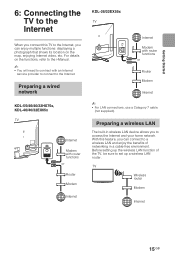
With this TV to the Internet, you can connect to a wireless LAN and enjoy the benefits of the TV, be sure to set up a wireless LAN router. Preparing a wireless LAN The built-in a cable-free environment. For details on the map, enjoying Internet video, etc. Preparing a wired network KDL-55/46/40/32HX75x, KDL-46/40/32EX65x TV Internet Modem with router functions or Router Modem Internet KDL-26/22EX55x TV Internet LAN Modem with an Internet service provider to connect to the Internet. Getting Started 6: Connecting the TV to the Internet When you connect this feature, you to ...
With this TV to the Internet, you can connect to a wireless LAN and enjoy the benefits of the TV, be sure to set up a wireless LAN router. Preparing a wireless LAN The built-in a cable-free environment. For details on the map, enjoying Internet video, etc. Preparing a wired network KDL-55/46/40/32HX75x, KDL-46/40/32EX65x TV Internet Modem with router functions or Router Modem Internet KDL-26/22EX55x TV Internet LAN Modem with an Internet service provider to connect to the Internet. Getting Started 6: Connecting the TV to the Internet When you connect this feature, you to ...
Operating Instructions
Page 16
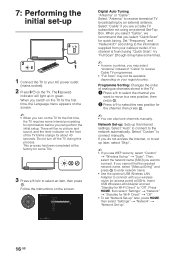
There will light up in the TV. 1 Press F/f to select the channel you can also tune channels manually. Network Set-up: Sets up the Internet settings. Select "Custom" to receive terrestrial TV broadcasting by an external antenna. If you do not access the Internet, or to set up later, select "Skip". ~ • If you are a Cable TV subscriber not using "Quick Scan", try "Full Scan" (though it may select "Antenna" instead of analogue channels stored in green. Press HOME, then select "Settings" t "Network" t "Standby for about 40 seconds. Digital Auto Tuning: "Antenna" or "Cable": ...
There will light up in the TV. 1 Press F/f to select the channel you can also tune channels manually. Network Set-up: Sets up the Internet settings. Select "Custom" to receive terrestrial TV broadcasting by an external antenna. If you do not access the Internet, or to set up later, select "Skip". ~ • If you are a Cable TV subscriber not using "Quick Scan", try "Full Scan" (though it may select "Antenna" instead of analogue channels stored in green. Press HOME, then select "Settings" t "Network" t "Standby for about 40 seconds. Digital Auto Tuning: "Antenna" or "Cable": ...
Operating Instructions
Page 18
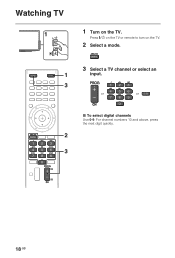
For channel numbers 10 and above, press the next digit quickly. 2 3 18 GB Press "/1 on the TV or remote to turn on the TV. Using Your BRAVIA TV Watching TV 1 1 Turn on the TV. 2 Select a mode. 3 Select a TV channel or select an 1 input. 3 or or x To select digital channels Use 0-9.
For channel numbers 10 and above, press the next digit quickly. 2 3 18 GB Press "/1 on the TV or remote to turn on the TV. Using Your BRAVIA TV Watching TV 1 1 Turn on the TV. 2 Select a mode. 3 Select a TV channel or select an 1 input. 3 or or x To select digital channels Use 0-9.
Operating Instructions
Page 19
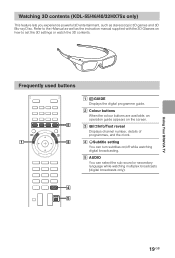
Watching 3D contents (KDL-55/46/40/32HX75x only) This feature lets you experience powerful 3D entertainment, such as the instruction manual supplied with the 3D Glasses on /off while watching digital broadcasting. 5 AUDIO You can turn subtitles on how to set the 3D settings or watch the 3D contents. Using Your BRAVIA TV Frequently used buttons 1 GUIDE Displays the digital programme guide. 2 Colour buttons When the colour buttons are available, an operation guide appears on the screen. 2 3 / Info/Text reveal Displays channel number, details of programmes, and the clock. 1 3 4 ...
Watching 3D contents (KDL-55/46/40/32HX75x only) This feature lets you experience powerful 3D entertainment, such as the instruction manual supplied with the 3D Glasses on /off while watching digital broadcasting. 5 AUDIO You can turn subtitles on how to set the 3D settings or watch the 3D contents. Using Your BRAVIA TV Frequently used buttons 1 GUIDE Displays the digital programme guide. 2 Colour buttons When the colour buttons are available, an operation guide appears on the screen. 2 3 / Info/Text reveal Displays channel number, details of programmes, and the clock. 1 3 4 ...
Operating Instructions
Page 20
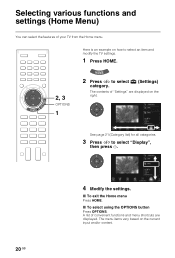
Here is an example on how to select an item and modify the TV settings. 1 Press HOME. 2, 3 OPTIONS 1 2 Press G/g to select "Display", then press . 20 GB 4 Modify the settings. x To exit the Home menu Press HOME. Selecting various functions and settings (Home Menu) You can select the features of convenient functions and menu shortcuts are displayed on the current input and/or content. x To select using the OPTIONS button Press OPTIONS. The menu items vary based on the right. A list of your TV from the Home menu. See page 21 (Category list) for all categories. 3 Press F/f to ...
Here is an example on how to select an item and modify the TV settings. 1 Press HOME. 2, 3 OPTIONS 1 2 Press G/g to select "Display", then press . 20 GB 4 Modify the settings. x To exit the Home menu Press HOME. Selecting various functions and settings (Home Menu) You can select the features of convenient functions and menu shortcuts are displayed on the current input and/or content. x To select using the OPTIONS button Press OPTIONS. The menu items vary based on the right. A list of your TV from the Home menu. See page 21 (Category list) for all categories. 3 Press F/f to ...
Operating Instructions
Page 21
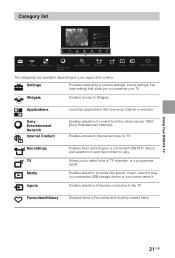
Widgets Enables access to Internet services for TV. Enables access to Widgets. Category list Settings Widgets Applications Sony Internet Content Recordings TV Entertainment Network Media Inputs Favourites/History The categories are available depending on your TV. ...Enables selection of media files (photo, music, video) to select a list of content from the online service "SEN" (Sony Entertainment Network). Allows you to customise your region and country. Sony Entertainment Network Internet Content Enables selection of TV channels, or a programme guide.
Widgets Enables access to Internet services for TV. Enables access to Widgets. Category list Settings Widgets Applications Sony Internet Content Recordings TV Entertainment Network Media Inputs Favourites/History The categories are available depending on your TV. ...Enables selection of media files (photo, music, video) to select a list of content from the online service "SEN" (Sony Entertainment Network). Allows you to customise your region and country. Sony Entertainment Network Internet Content Enables selection of TV channels, or a programme guide.
Operating Instructions
Page 22
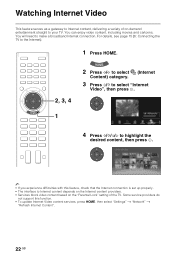
For details, see page 15 (6: Connecting the TV to the Internet). 1 Press HOME. 2, 3, 4 2 Press G/g to select (Internet Content) category. 3 Press F/f to select "Internet Video", then press . 1 4 Press F/f/G/g to highlight the desired content, then press . ~ • If you experience difficulties with this function. • To update Internet Video content services, press HOME, then select "Settings" t "Network" t "Refresh Internet Content". 22 GB Watching Internet Video This feature serves as a gateway to Internet content, delivering a variety of the TV. You will need to your TV. ...
For details, see page 15 (6: Connecting the TV to the Internet). 1 Press HOME. 2, 3, 4 2 Press G/g to select (Internet Content) category. 3 Press F/f to select "Internet Video", then press . 1 4 Press F/f/G/g to highlight the desired content, then press . ~ • If you experience difficulties with this function. • To update Internet Video content services, press HOME, then select "Settings" t "Network" t "Refresh Internet Content". 22 GB Watching Internet Video This feature serves as a gateway to Internet content, delivering a variety of the TV. You will need to your TV. ...