
Operating Instructions
Page 2
... safely support the television. • Ensuring the television is not overhanging the edge of the Digital Living Network Alliance. Re-test. Notice for example, cupboards or bookcases) without damaging the screw head. 3 TEST: Grip the converter plug, and pull the VDE cord set/transformer to reach the television or its controls. and Power Supply rating (in accordance with applicable safety regulation) are trademarks, service...
... safely support the television. • Ensuring the television is not overhanging the edge of the Digital Living Network Alliance. Re-test. Notice for example, cupboards or bookcases) without damaging the screw head. 3 TEST: Grip the converter plug, and pull the VDE cord set/transformer to reach the television or its controls. and Power Supply rating (in accordance with applicable safety regulation) are trademarks, service...

Operating Instructions
Page 3
... "To use 3D Glasses ...10 Additional Information Troubleshooting...12 Specifications ...13 Installing the Accessories (Wall-Mount Bracket 15 Safety Information ...20 Precautions...21 • Operating instructions are built into the remote 1 Remove the protection sheet. 2 Push and slide the cover upward. 3 GB Table of Contents Checking the accessories...3 Inserting batteries into the remote 3 Setting Up Attaching the Table-Top Stand (KDL-52LX900 only 4 Connecting an antenna (aerial)/cable/VCR 5 Preventing...
... "To use 3D Glasses ...10 Additional Information Troubleshooting...12 Specifications ...13 Installing the Accessories (Wall-Mount Bracket 15 Safety Information ...20 Precautions...21 • Operating instructions are built into the remote 1 Remove the protection sheet. 2 Push and slide the cover upward. 3 GB Table of Contents Checking the accessories...3 Inserting batteries into the remote 3 Setting Up Attaching the Table-Top Stand (KDL-52LX900 only 4 Connecting an antenna (aerial)/cable/VCR 5 Preventing...

Operating Instructions
Page 4
... arrow marks that guide the screw holes using an electric screwdriver, set on the Table-Top Stand. Remove screw as shown. Lift up and tilt. Slide in. ~ • To return to 0°, reverse the above procedure. 4 GB Adjusting the viewing angle of the Table-Top Stand. ~ 2 3 • If using the 1 4 supplied screws. Setting Up Attaching the Table-Top Stand (KDL-52LX900 only) 1 Refer to the supplied Table-Top Stand leaflet for proper...
... arrow marks that guide the screw holes using an electric screwdriver, set on the Table-Top Stand. Remove screw as shown. Lift up and tilt. Slide in. ~ • To return to 0°, reverse the above procedure. 4 GB Adjusting the viewing angle of the Table-Top Stand. ~ 2 3 • If using the 1 4 supplied screws. Setting Up Attaching the Table-Top Stand (KDL-52LX900 only) 1 Refer to the supplied Table-Top Stand leaflet for proper...

Operating Instructions
Page 5
... antenna (aerial)/cable Antenna (aerial) cable (not supplied) Antenna (aerial) cable (not supplied) VCR ~ • When connecting an antenna (aerial) cable (not supplied), an adaptor (not supplied) may be used. If you notice moisture condensation between the glass panel and the LCD, turn off the TV and leave the TV off until the moisture evaporates, and then the TV can be required (Australian model and New Zealand model only). Setting...
... antenna (aerial)/cable Antenna (aerial) cable (not supplied) Antenna (aerial) cable (not supplied) VCR ~ • When connecting an antenna (aerial) cable (not supplied), an adaptor (not supplied) may be used. If you notice moisture condensation between the glass panel and the LCD, turn off the TV and leave the TV off until the moisture evaporates, and then the TV can be required (Australian model and New Zealand model only). Setting...

Operating Instructions
Page 6
... cables ~ • A cable holder is used to secure the TV. z • An optional Sony support belt kit is available for reference. ~ • Do not bundle the AC power cord (mains lead) together with a strong cord (not supplied). Contact your TV model name ready for KDL-52LX900. To bundle the cables, follow steps 3 to 5. 1 Install a wood screw (4 mm in diameter, not supplied) in the TV stand. 2 Install a machine screw...
... cables ~ • A cable holder is used to secure the TV. z • An optional Sony support belt kit is available for reference. ~ • Do not bundle the AC power cord (mains lead) together with a strong cord (not supplied). Contact your TV model name ready for KDL-52LX900. To bundle the cables, follow steps 3 to 5. 1 Install a wood screw (4 mm in diameter, not supplied) in the TV stand. 2 Install a machine screw...
Operating Instructions
Page 7
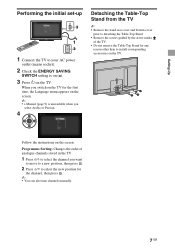
... Persian. 4 Detaching the Table-Top Stand from the TV ~ • Remove the stand rear cover and bottom cover prior to detaching the Table-Top Stand. • Remove the screws guided by the arrow marks of analogue channels stored in the TV. 1 Press F/f to select the channel you switch on the TV for the first time, the Language menu appears on the screen. ~ • i-Manual (page 9) is on...
... Persian. 4 Detaching the Table-Top Stand from the TV ~ • Remove the stand rear cover and bottom cover prior to detaching the Table-Top Stand. • Remove the screws guided by the arrow marks of analogue channels stored in the TV. 1 Press F/f to select the channel you switch on the TV for the first time, the Language menu appears on the screen. ~ • i-Manual (page 9) is on...

Operating Instructions
Page 8
... supported countries/regions) Press GUIDE in digital mode to turn on the TV. 2 Select a mode (if both digital and analogue signals are available). 3 Select a TV channel. 3 z • The number 5, N, PROG + and AUDIO buttons on the TV to display the programme guide. GUIDE OPTIONS HOME 2 1 Switch ENERGY SAVING SWITCH on (z). 2 Press 1 on the remote have a tactile dot. To utilise the TV's features HOME button Press to display various operation and setting screens. 8 GB Settings System Settings...
... supported countries/regions) Press GUIDE in digital mode to turn on the TV. 2 Select a mode (if both digital and analogue signals are available). 3 Select a TV channel. 3 z • The number 5, N, PROG + and AUDIO buttons on the TV to display the programme guide. GUIDE OPTIONS HOME 2 1 Switch ENERGY SAVING SWITCH on (z). 2 Press 1 on the remote have a tactile dot. To utilise the TV's features HOME button Press to display various operation and setting screens. 8 GB Settings System Settings...
Operating Instructions
Page 9
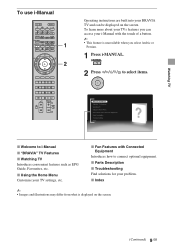
... displayed on the screen. x Using the Home Menu Customise your problem. x Index ~ • Images and illustrations may differ from what is unavailable when you select Arabic or Persian. 1 Press i-MANUAL. 2 Press G/g/F/f/ to select items. Watching TV x Welcome to connect optional equipment. x Parts Description x Troubleshooting Find solutions for your TV settings, etc. To use i-Manual 1 2 Operating instructions are built into your BRAVIA TV and can access your i-Manual...
... displayed on the screen. x Using the Home Menu Customise your problem. x Index ~ • Images and illustrations may differ from what is unavailable when you select Arabic or Persian. 1 Press i-MANUAL. 2 Press G/g/F/f/ to select items. Watching TV x Welcome to connect optional equipment. x Parts Description x Troubleshooting Find solutions for your TV settings, etc. To use i-Manual 1 2 Operating instructions are built into your BRAVIA TV and can access your i-Manual...

Operating Instructions
Page 10
...; Please keep this face clean. 5 Power button Power on: Press once Power off: Hold power button down for a comfortable fit. IR's entry angle differs according to set the switch. Set both the switches on Flashes three times every 3 seconds: Low battery. Parts and components Pouch (2) 3D Glasses (2) 1 Slide switch Set the switch for 2 seconds * Auto power off 4 IR sensor Receive signals from the 3D Sync Transmitter. This part receives IR (infrared rays) from the...
...; Please keep this face clean. 5 Power button Power on: Press once Power off: Hold power button down for a comfortable fit. IR's entry angle differs according to set the switch. Set both the switches on Flashes three times every 3 seconds: Low battery. Parts and components Pouch (2) 3D Glasses (2) 1 Slide switch Set the switch for 2 seconds * Auto power off 4 IR sensor Receive signals from the 3D Sync Transmitter. This part receives IR (infrared rays) from the...

Operating Instructions
Page 11
... • Not for use by receiving infrared rays from your mouth or eyes. • Keep children away when replacing the battery or opening or closing the battery cover, make sure the coin, etc., is properly inserted in the groove of the batteries used in 3D Glasses in ...8226; Do not dispose of the battery cover. Watching TV Replacing the battery If the LED indicates low battery power, replace the battery. orientation. • Use only the specified battery for this product for watching 3D video images on a compatible Sony television. • Do not drop or modify these 3D Glasses. ...
... • Not for use by receiving infrared rays from your mouth or eyes. • Keep children away when replacing the battery or opening or closing the battery cover, make sure the coin, etc., is properly inserted in the groove of the batteries used in 3D Glasses in ...8226; Do not dispose of the battery cover. Watching TV Replacing the battery If the LED indicates low battery power, replace the battery. orientation. • Use only the specified battery for this product for watching 3D video images on a compatible Sony television. • Do not drop or modify these 3D Glasses. ...

Operating Instructions
Page 12
...) on . The TV turns off for three seconds, then flash again three times. 2 Press 1 on the TV to "Troubleshooting" in the i-Manual.) 2 If the problem persists, have your dealer or Sony service centre of how the indicator flashes (number of flashes). When the 1 (standby) indicator is flashing The self-diagnosis function is no sound. • Connect the TV to control the TV. Tiny black points and/or...
...) on . The TV turns off for three seconds, then flash again three times. 2 Press 1 on the TV to "Troubleshooting" in the i-Manual.) 2 If the problem persists, have your dealer or Sony service centre of how the indicator flashes (number of flashes). When the 1 (standby) indicator is flashing The self-diagnosis function is no sound. • Connect the TV to control the TV. Tiny black points and/or...

Operating Instructions
Page 13
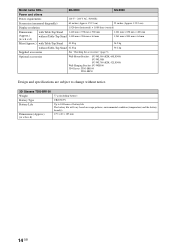
Additional Information Specifications System Panel system TV system Colour/video system Channel coverage Sound output Input/Output jacks Antenna (aerial)/cable 1 1, 2 /2 HDMI IN1, 2, 3, 4 DIGITAL AUDIO OUT (OPTICAL) (VAR/FIX) / PC IN i LAN LCD (Liquid Crystal Display) Panel Analogue: B/G, I, D/K, M Digital: DVB-T Analogue: PAL, PAL60 (only video input), SECAM, NTSC3.58, NTSC4.43 (only video input) Digital: MPEG-2 MP@ML/HL (Australian model), MPEG-2 MP@ML/HL, H.264/MPEG-4 AVC MP/HP@L4 (New Zealand and Singaporean model) Analogue...
Additional Information Specifications System Panel system TV system Colour/video system Channel coverage Sound output Input/Output jacks Antenna (aerial)/cable 1 1, 2 /2 HDMI IN1, 2, 3, 4 DIGITAL AUDIO OUT (OPTICAL) (VAR/FIX) / PC IN i LAN LCD (Liquid Crystal Display) Panel Analogue: B/G, I, D/K, M Digital: DVB-T Analogue: PAL, PAL60 (only video input), SECAM, NTSC3.58, NTSC4.43 (only video input) Digital: MPEG-2 MP@ML/HL (Australian model), MPEG-2 MP@ML/HL, H.264/MPEG-4 AVC MP/HP@L4 (New Zealand and Singaporean model) Analogue...
Operating Instructions
Page 14
... (KDL-52LX900) Wall-Hanging Bracket: SU-WH500 3D Glasses: TDG-BR100 TDG-BR50 Design and specifications are subject to change without Table-Top Stand 42.8 kg 30.2 kg Supplied accessories See "Checking the accessories" (page 3). Model name KDL- 60LX900 52LX900 Power and others Power requirements 110 V - 240 V AC, 50/60 Hz Screen size (measured diagonally) 60 inches (Approx. 152.5 cm) 52 inches (Approx. 132.2 cm) Display resolution 1,920...
... (KDL-52LX900) Wall-Hanging Bracket: SU-WH500 3D Glasses: TDG-BR100 TDG-BR50 Design and specifications are subject to change without Table-Top Stand 42.8 kg 30.2 kg Supplied accessories See "Checking the accessories" (page 3). Model name KDL- 60LX900 52LX900 Power and others Power requirements 110 V - 240 V AC, 50/60 Hz Screen size (measured diagonally) 60 inches (Approx. 152.5 cm) 52 inches (Approx. 132.2 cm) Display resolution 1,920...

Operating Instructions
Page 15
... Table-Top Stand from children. • Attach the Mounting Hook using the supplied four spacers and four M6 × 20 screws (KDL-60LX900). • Attach the Mounting Hook using the SU-WL500 (KDL-60LX900 only), SU-WL50B, or SU-WL700 (KDL-52LX900 only) Wall-Mount Bracket (sold separately). • Refer to the Instructions supplied with SU- Additional Information Installing the Accessories (Wall-Mount Bracket) To Customers: For product protection and safety reasons, Sony...
... Table-Top Stand from children. • Attach the Mounting Hook using the supplied four spacers and four M6 × 20 screws (KDL-60LX900). • Attach the Mounting Hook using the SU-WL500 (KDL-60LX900 only), SU-WL50B, or SU-WL700 (KDL-52LX900 only) Wall-Mount Bracket (sold separately). • Refer to the Instructions supplied with SU- Additional Information Installing the Accessories (Wall-Mount Bracket) To Customers: For product protection and safety reasons, Sony...

Operating Instructions
Page 16
... Screen centre point Model Name KDL- 60LX900 52LX900 Display dimensions A B 1,440 906 1,261 804 Unit: mm Screen centre dimension Length for its weight. 16 GB Refer to "Specifications" (page 14) for each mounting angle Angle (0°) Angle (20°) C D E F G H SU- SU- SU- SU- Figures in the above table may differ slightly depending on should be capable of supporting a weight of at least four times...
... Screen centre point Model Name KDL- 60LX900 52LX900 Display dimensions A B 1,440 906 1,261 804 Unit: mm Screen centre dimension Length for its weight. 16 GB Refer to "Specifications" (page 14) for each mounting angle Angle (0°) Angle (20°) C D E F G H SU- SU- SU- SU- Figures in the above table may differ slightly depending on should be capable of supporting a weight of at least four times...

Operating Instructions
Page 17
... the Base Bracket. b SU-WL500 Screw location When installing the Mounting Hook on the TV. a b* c* Additional Information * Hook location "b" and "c" cannot be used for the models. (Continued) 17 GB Hook location When installing the TV onto the Base Bracket. SU-WL50B Screw location When installing the Mounting Hook on the TV. Screw and Hook locations diagram/table Model Name KDL-60LX900 KDL-52LX900 Screw location SU-WL500 SU-WL50B e, j - a b* c* a b c Mounting Hook c b a Base Bracket * Hook location "b" and "c" cannot be used for the models. e, j Hook location...
... the Base Bracket. b SU-WL500 Screw location When installing the Mounting Hook on the TV. a b* c* Additional Information * Hook location "b" and "c" cannot be used for the models. (Continued) 17 GB Hook location When installing the TV onto the Base Bracket. SU-WL50B Screw location When installing the Mounting Hook on the TV. Screw and Hook locations diagram/table Model Name KDL-60LX900 KDL-52LX900 Screw location SU-WL500 SU-WL50B e, j - a b* c* a b c Mounting Hook c b a Base Bracket * Hook location "b" and "c" cannot be used for the models. e, j Hook location...

Operating Instructions
Page 18
... the manual provided with the Wall- Tape the template to the following "TV installation dimensions table". SU-WL700 (KDL-52LX900 only) Installing on a wall Precautions Be sure to install the Wall-Mount Bracket securely to complete the installation. (5-3 through 6) 18 GB Mount Bracket (1). Allow for details. 5 Connect the supplied AC power cord (mains lead). (5-1) ~ • Do not attach the bottom cover and terminal cover. 6 Place the Spacers. 1 Remove the four screws...
... the manual provided with the Wall- Tape the template to the following "TV installation dimensions table". SU-WL700 (KDL-52LX900 only) Installing on a wall Precautions Be sure to install the Wall-Mount Bracket securely to complete the installation. (5-3 through 6) 18 GB Mount Bracket (1). Allow for details. 5 Connect the supplied AC power cord (mains lead). (5-1) ~ • Do not attach the bottom cover and terminal cover. 6 Place the Spacers. 1 Remove the four screws...

Operating Instructions
Page 19
Additional Information 19 GB Refer to "Specifications" (page 14) for each mounting angle Angle (0°) D E Angle (20°) F G H 434 75 390 753 495 Figures in the above table may differ slightly depending on should be capable of supporting a weight of the TV. TV installation dimensions table Screen centre point Model Name KDL- 52LX900 Display dimensions A B 1,261 804 Screen centre dimension C 13 Unit: mm Length for its weight. WARNING The wall that of at least four times that the TV will be installed on the installation.
Additional Information 19 GB Refer to "Specifications" (page 14) for each mounting angle Angle (0°) D E Angle (20°) F G H 434 75 390 753 495 Figures in the above table may differ slightly depending on should be capable of supporting a weight of the TV. TV installation dimensions table Screen centre point Model Name KDL- 52LX900 Display dimensions A B 1,261 804 Screen centre dimension C 13 Unit: mm Length for its weight. WARNING The wall that of at least four times that the TV will be installed on the installation.

Operating Instructions
Page 20
... fitting AC power outlet. Use only Sony supplied AC power cords, not those of TV set Transporting • Before transporting the TV set with the Wall-mount bracket) Mounting Hook Hook attachment on the Wall-mount bracket model. Unplug the AC power plug and clean it might be exposed to the TV. • Only qualified service personnel should be installed near water, rain, moisture or smoke. where it regularly. Use of screws other brands...
... fitting AC power outlet. Use only Sony supplied AC power cords, not those of TV set Transporting • Before transporting the TV set with the Wall-mount bracket) Mounting Hook Hook attachment on the Wall-mount bracket model. Unplug the AC power plug and clean it might be exposed to the TV. • Only qualified service personnel should be installed near water, rain, moisture or smoke. where it regularly. Use of screws other brands...

Operating Instructions
Page 21
... the LCD screen and is on the TV set from the screen surface/ cabinet, wipe gently with a diluted mild detergent solution. • Do not spray water or detergent directly on the remote control. 21 GB Additional Information This is a structural property of this TV set Be sure to unplug the AC power cord connected to watch 3D video images or play 3D video games...
... the LCD screen and is on the TV set from the screen surface/ cabinet, wipe gently with a diluted mild detergent solution. • Do not spray water or detergent directly on the remote control. 21 GB Additional Information This is a structural property of this TV set Be sure to unplug the AC power cord connected to watch 3D video images or play 3D video games...


