
Operating Instructions
Page 4
...Install in the United States This product contains mercury. As an ENERGY STAR® Partner, Sony Corporation has determined that produce heat. 9) Do not defeat the safety purpose of Sony Corporation. WOW technology is damaged, liquid has been spilled or objects have fallen into your... to read and follow the instructions supplied with those optional products. For Customers in accordance with the manufacturer's instructions. 8) Do not install near water. 6) Clean only with dry cloth. 7) Do not block any heat sources such as power-supply cord or plug is incorporated under ...
...Install in the United States This product contains mercury. As an ENERGY STAR® Partner, Sony Corporation has determined that produce heat. 9) Do not defeat the safety purpose of Sony Corporation. WOW technology is damaged, liquid has been spilled or objects have fallen into your... to read and follow the instructions supplied with those optional products. For Customers in accordance with the manufacturer's instructions. 8) Do not install near water. 6) Clean only with dry cloth. 7) Do not block any heat sources such as power-supply cord or plug is incorporated under ...

Operating Instructions
Page 5
.... If you are unable to your local laws or regulations. Cleaning s Clean the AC power plug regularly. s Clean the cabinet of electrical power supplied to your home, consult your dealer or local power company. 120V AC Grounding or Polarization This unit is operating, unplug the unit and consult your...the unit is not being turned on the AC power cord. Stubborn stains may result in a fire. Batteries Do not dispose of power source indicated on the unit. Important Safeguards Before using it and ask your dealer or Sony service center to exchange it. WARNING To guard ...
.... If you are unable to your local laws or regulations. Cleaning s Clean the AC power plug regularly. s Clean the cabinet of electrical power supplied to your home, consult your dealer or local power company. 120V AC Grounding or Polarization This unit is operating, unplug the unit and consult your...the unit is not being turned on the AC power cord. Stubborn stains may result in a fire. Batteries Do not dispose of power source indicated on the unit. Important Safeguards Before using it and ask your dealer or Sony service center to exchange it. WARNING To guard ...
Operating Instructions
Page 13
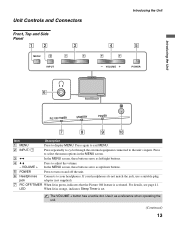
...the unit. (Continued) 13 LED When lit in the MENU screen. 3 Bb In the MENU screen, these buttons serve as up/down buttons. 5 POWER Press to turn on and off the unit. 6 Headphones jack Connects to display MENU. The VOLUME + button has a tactile dot. Press to select ...Connectors Front, Top and Side Panel MENU INPUT Introducing the Unit VOLUME POWER Introducing the Unit PIC OFF/TIMER STANDBY POWER Item Description 1 MENU Press to your headphones do not match the jack, use a suitable plug adaptor (not supplied). 7 PIC OFF/TIMER When lit in green, indicates that the ...
...the unit. (Continued) 13 LED When lit in the MENU screen. 3 Bb In the MENU screen, these buttons serve as up/down buttons. 5 POWER Press to turn on and off the unit. 6 Headphones jack Connects to display MENU. The VOLUME + button has a tactile dot. Press to select ...Connectors Front, Top and Side Panel MENU INPUT Introducing the Unit VOLUME POWER Introducing the Unit PIC OFF/TIMER STANDBY POWER Item Description 1 MENU Press to your headphones do not match the jack, use a suitable plug adaptor (not supplied). 7 PIC OFF/TIMER When lit in green, indicates that the ...

Operating Instructions
Page 16
... IN IN 4 AUDIO IN RL PC IN 5 AUDIO RGB Jack 1 AC IN 2 HDMI IN 4 HDMI/ R-AUDIO IN-L 3 PC IN 5 RGB/AUDIO Description Connects the supplied AC power cord. HDMI (High-Definition Multimedia Interface) provides an uncompressed, all-digital audio/video interface between this unit and any HDMI-equipped audio/video component, such...
... IN IN 4 AUDIO IN RL PC IN 5 AUDIO RGB Jack 1 AC IN 2 HDMI IN 4 HDMI/ R-AUDIO IN-L 3 PC IN 5 RGB/AUDIO Description Connects the supplied AC power cord. HDMI (High-Definition Multimedia Interface) provides an uncompressed, all-digital audio/video interface between this unit and any HDMI-equipped audio/video component, such...
Operating Instructions
Page 26
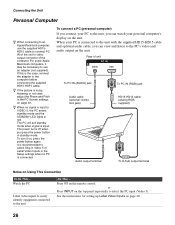
... 5 AUDIO RGB To PC IN (AUDIO) jack Audio cable (optional: stereo mini jack) To PC IN (RGB) jack HD15-HD15 cable (analog RGB, supplied) Audio output terminal To D-Sub output terminal Notes on the remote control. or Press INPUT on the unit. Watch the PC Label video inputs to...this is input. See the instructions for setting up Label Video Inputs on , press the power button again. Connecting the Unit Personal Computer z When connecting to an Apple Macintosh computer, use an adapter (not supplied). The PC will exit standby mode when signal is the case, connect the adapter to ...
... 5 AUDIO RGB To PC IN (AUDIO) jack Audio cable (optional: stereo mini jack) To PC IN (RGB) jack HD15-HD15 cable (analog RGB, supplied) Audio output terminal To D-Sub output terminal Notes on the remote control. or Press INPUT on the unit. Watch the PC Label video inputs to...this is input. See the instructions for setting up Label Video Inputs on , press the power button again. Connecting the Unit Personal Computer z When connecting to an Apple Macintosh computer, use an adapter (not supplied). The PC will exit standby mode when signal is the case, connect the adapter to ...
Operating Instructions
Page 28
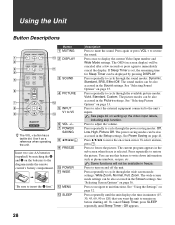
... Unit Button Descriptions MUTING DISPLAY POWER MODE SOUND PICTURE WIDE Button 1 MUTING 2 DISPLAY INPUT V1 V2 V3 V4 V5 3 SOUND VOL POWER SAVING MENU FREEZE SLEEP 4 PICTURE...32. Press to unit functions. See Power Saving on page 33. Press repeatedly to immediately cancel the display. The power saving modes can be canceled after a ... seconds or press again to cycle through the power saving modes: Off, Low, High, Picture ...remote control's battery compartment. 6 VOL +/- 7 POWER SAVING 8 V/v/B/b/ 9 FREEZE 0 POWER qa WIDE "Be sure to cycle through the available picture modes: Vivid,...
... Unit Button Descriptions MUTING DISPLAY POWER MODE SOUND PICTURE WIDE Button 1 MUTING 2 DISPLAY INPUT V1 V2 V3 V4 V5 3 SOUND VOL POWER SAVING MENU FREEZE SLEEP 4 PICTURE...32. Press to unit functions. See Power Saving on page 33. Press repeatedly to immediately cancel the display. The power saving modes can be canceled after a ... seconds or press again to cycle through the power saving modes: Off, Low, High, Picture ...remote control's battery compartment. 6 VOL +/- 7 POWER SAVING 8 V/v/B/b/ 9 FREEZE 0 POWER qa WIDE "Be sure to cycle through the available picture modes: Vivid,...

Operating Instructions
Page 44
.... 2 oz.) Supplied accessories: Remote control RM-YA004 (1) Size AA batteries (2) AC power cord (1) HD15-HD15 cable (1) Support belt (1), securing screw (1) and wood screw (1) Operating Instructions (1) Quick Setup Guide (1) Leaflet (Installing the Wall-Mount Bracket, KLV-32U100M only) (1) Warranty... 29 kg (63 lb. 15 oz.) (without notice. 44 Other Information Specifications Screen size (measured diagonally): KLV-32U100M: 32 inches KLV-40U100M: 40 inches Panel System: LCD (Liquid Crystal Display) Panel Display resolution (horizontal × vertical): 1,366 dots × 768 lines VIDEO IN...
.... 2 oz.) Supplied accessories: Remote control RM-YA004 (1) Size AA batteries (2) AC power cord (1) HD15-HD15 cable (1) Support belt (1), securing screw (1) and wood screw (1) Operating Instructions (1) Quick Setup Guide (1) Leaflet (Installing the Wall-Mount Bracket, KLV-32U100M only) (1) Warranty... 29 kg (63 lb. 15 oz.) (without notice. 44 Other Information Specifications Screen size (measured diagonally): KLV-32U100M: 32 inches KLV-40U100M: 40 inches Panel System: LCD (Liquid Crystal Display) Panel Display resolution (horizontal × vertical): 1,366 dots × 768 lines VIDEO IN...

Instructions (SU-WL31 Wall-Mount Bracket)
Page 6
...Bracket. After proper installation of the wall. 2 Unpack the carton and check to see that all the following items are not supplied. Do not allow the AC power cord or the connecting cable to be sure to refer to hurt your hands or fingers when installing the Wall-Mount Bracket ... screwdriver. Select screws suitable for the material of the TV, secure the cables properly. If the AC power cord or the connecting cable is pinched between the unit and the wall or is supplied with a leaflet explaining how to install Wall-Mount Bracket ("Installing the Wall-Mount Bracket"), be pinched. ...
...Bracket. After proper installation of the wall. 2 Unpack the carton and check to see that all the following items are not supplied. Do not allow the AC power cord or the connecting cable to be sure to refer to hurt your hands or fingers when installing the Wall-Mount Bracket ... screwdriver. Select screws suitable for the material of the TV, secure the cables properly. If the AC power cord or the connecting cable is pinched between the unit and the wall or is supplied with a leaflet explaining how to install Wall-Mount Bracket ("Installing the Wall-Mount Bracket"), be pinched. ...

Instructions (SU-WL31 Wall-Mount Bracket)
Page 12
... the cable in the wall, feed them through the hole you allow the AC power cord to be pinched under or between pieces of equipment, this may hurt yourself. 1 Connect the AC power cord and the connecting cable(s) supplied with the TV to the TV. B Screw (+PSW5 × L16) Step 6: Installing the TV... on the rear side of the TV. Connect the AC power cord and the connecting cable(s) to stumble over the AC...
... the cable in the wall, feed them through the hole you allow the AC power cord to be pinched under or between pieces of equipment, this may hurt yourself. 1 Connect the AC power cord and the connecting cable(s) supplied with the TV to the TV. B Screw (+PSW5 × L16) Step 6: Installing the TV... on the rear side of the TV. Connect the AC power cord and the connecting cable(s) to stumble over the AC...

Quick Setup Guide
Page 1
... the Supplied Accessories • Remote control (RM-YA004) (1) and size AA batteries (2) • AC power cord (1) • HD15-HD15 cable (1) • Support belt (1), securing screw (1) and wood screw (1) • Operating Instructions (1) • Quick Setup Guide (1) • Leaflet (Installing the Wall-Mount Bracket, KLV-32U100M only... our Customer Information Service Center Toll Free: Website Support: Sony.Com/TVsupport US Residents: 1-800-222-SONY (7669) Canadian Residents: 1-877-899-SONY (7669) DO NOT RETURN TO THE STORE Sony Corporation © 2006 Printed in the table on the ...
... the Supplied Accessories • Remote control (RM-YA004) (1) and size AA batteries (2) • AC power cord (1) • HD15-HD15 cable (1) • Support belt (1), securing screw (1) and wood screw (1) • Operating Instructions (1) • Quick Setup Guide (1) • Leaflet (Installing the Wall-Mount Bracket, KLV-32U100M only... our Customer Information Service Center Toll Free: Website Support: Sony.Com/TVsupport US Residents: 1-800-222-SONY (7669) Canadian Residents: 1-877-899-SONY (7669) DO NOT RETURN TO THE STORE Sony Corporation © 2006 Printed in the table on the ...

Marketing Specifications
Page 2
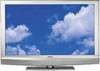
....sony.com BRAVIA™ HDTV LCD Monitor1 Please visit the Dealer Network for supported resolutions ©2006 Sony Electronics Inc. SRS and the SRS symbol, TruSurround are property of SRS Labs, Inc. Limited to change without notice. This TV incorporates High-Definition Multimedia Interface (HDMI™ ) technology. All other tuner box sold or rented separately. 2. KLV-32U100M...
....sony.com BRAVIA™ HDTV LCD Monitor1 Please visit the Dealer Network for supported resolutions ©2006 Sony Electronics Inc. SRS and the SRS symbol, TruSurround are property of SRS Labs, Inc. Limited to change without notice. This TV incorporates High-Definition Multimedia Interface (HDMI™ ) technology. All other tuner box sold or rented separately. 2. KLV-32U100M...


