
Limited Warranty (U.S. Only)
Page 1
...cover cosmetic damage or damage due to acts of God, accident, misuse, abuse, negligence, commercial use, or modification of one (1) year (color picture tube - REPAIR OR REPLACEMENT AS PROVIDED UNDER THIS WARRANTY IS THE EXCLUSIVE REMEDY OF THE CONSUMER. LABOR: For a period of , or to ... are for one (1) year period for all labor charges. 2. 4-557-168-03 ® LIMITED WARRANTY HDTV Color TV XBR Projection TV Sony Electronics Inc. ("Sony") warrants this Product is determined to be presented to state. This warranty gives you specific legal rights, and you must pay for...
...cover cosmetic damage or damage due to acts of God, accident, misuse, abuse, negligence, commercial use, or modification of one (1) year (color picture tube - REPAIR OR REPLACEMENT AS PROVIDED UNDER THIS WARRANTY IS THE EXCLUSIVE REMEDY OF THE CONSUMER. LABOR: For a period of , or to ... are for one (1) year period for all labor charges. 2. 4-557-168-03 ® LIMITED WARRANTY HDTV Color TV XBR Projection TV Sony Electronics Inc. ("Sony") warrants this Product is determined to be presented to state. This warranty gives you specific legal rights, and you must pay for...

Operating Instructions
Page 3
... by BBE Sound, Inc. MODELS: KP-51HW40, KP-57HW40 Please keep this case, please wait a few hours to a warm location, or if the room temperature changes suddenly, the picture may be using the projection TV for safety purposes, to install the projection TV in a room where the floor... Laboratories. registered mark. Patent No. 4,638,258 and 4,482,866. It is incorporated under U.S. TruSurround technology is recommended to your Sony dealer regarding this product meets the ENERGY STAR® guidelines for instructions on page 4. Dolby and the double-D symbol are not of SRS...
... by BBE Sound, Inc. MODELS: KP-51HW40, KP-57HW40 Please keep this case, please wait a few hours to a warm location, or if the room temperature changes suddenly, the picture may be using the projection TV for safety purposes, to install the projection TV in a room where the floor... Laboratories. registered mark. Patent No. 4,638,258 and 4,482,866. It is incorporated under U.S. TruSurround technology is recommended to your Sony dealer regarding this product meets the ENERGY STAR® guidelines for instructions on page 4. Dolby and the double-D symbol are not of SRS...

Operating Instructions
Page 4
... a three-wire grounding type plug (a plug having a third pin for a long period of time, it in. Cleaning Clean the cabinet of the projection TV with all warnings, cautions and instructions placed on the set off . To remove dust from battery power, refer to make occasional snapping or popping... any kind into the power outlet only one blade wider than the other), or with solution of the grounding plug. If the picture becomes dark after using the projection TV for grounding). Always turn the set . Carefully observe and comply with a dry soft cloth. Never use strong solvents such ...
... a three-wire grounding type plug (a plug having a third pin for a long period of time, it in. Cleaning Clean the cabinet of the projection TV with all warnings, cautions and instructions placed on the set off . To remove dust from battery power, refer to make occasional snapping or popping... any kind into the power outlet only one blade wider than the other), or with solution of the grounding plug. If the picture becomes dark after using the projection TV for grounding). Always turn the set . Carefully observe and comply with a dry soft cloth. Never use strong solvents such ...

Operating Instructions
Page 6
... shock or other than the specified manner and without the specified number of persons, it may drop and a serious injury may expose you place the projection TV in a picture tube implosion. Ask a qualified service technician to dispose of persons. (see page 10) ❑ Do not carry the... substitutions may result in damage and will prevent damage to the receiver due to lightning and power-line surges. Lightning For added protection for this television receiver during a lightning storm, or when it is damaged or frayed. ❑ If liquid has been spilled into the set. ❑ If the set ...
... shock or other than the specified manner and without the specified number of persons, it may drop and a serious injury may expose you place the projection TV in a picture tube implosion. Ask a qualified service technician to dispose of persons. (see page 10) ❑ Do not carry the... substitutions may result in damage and will prevent damage to the receiver due to lightning and power-line surges. Lightning For added protection for this television receiver during a lightning storm, or when it is damaged or frayed. ❑ If liquid has been spilled into the set. ❑ If the set ...

Operating Instructions
Page 8
Introducing the Sony Projection TV Presenting the Sony Projection TV Thank you for illustration purposes. Model KP-51HW40 is used for purchasing the Sony Projection TV. Features Some of the features that you to the program in the selected window. This manual is consistent...eight favorite channels without leaving the current channel. ❑ Scrolling Channel Index: Allows you can connect a DTV (digital television) receiver to view and choose channels from scrolling pictures without leaving the current channel. 8 By using the VIDEO 5/6 IN jacks, you to view DTV programs. ❑...
Introducing the Sony Projection TV Presenting the Sony Projection TV Thank you for illustration purposes. Model KP-51HW40 is used for purchasing the Sony Projection TV. Features Some of the features that you to the program in the selected window. This manual is consistent...eight favorite channels without leaving the current channel. ❑ Scrolling Channel Index: Allows you can connect a DTV (digital television) receiver to view and choose channels from scrolling pictures without leaving the current channel. 8 By using the VIDEO 5/6 IN jacks, you to view DTV programs. ❑...

Operating Instructions
Page 12
... for enhanced picture quality Align guides and push into connection. Yellow Audio (Left) - Screw-on Type Screw into connection. Coaxial cable Standard TV cable and antenna cable Plug Type Push into connection. Green PB (CB, Cb or B-Y) - Installing and Connecting the Projection TV Connector Types You may find it necessary to Sony products...
... for enhanced picture quality Align guides and push into connection. Yellow Audio (Left) - Screw-on Type Screw into connection. Coaxial cable Standard TV cable and antenna cable Plug Type Push into connection. Green PB (CB, Cb or B-Y) - Installing and Connecting the Projection TV Connector Types You may find it necessary to Sony products...

Operating Instructions
Page 15
... the CONTROL S IN jack of the equipment to the CONTROL S IN jack on the front panel of the projection TV. Use this jack instead of your projection TV to get better picture quality when switching between local and cable channels easily by pressing ANT on the remote control. Connects to the S... Digital Set-top box's component video (Y, PB, PR) and audio (L/R) jacks. For detailed information about connection, refer to an AV receiver for another Sony product, connect the CONTROL S OUT jack of all audio and video equipment (see page 30). Connects to the AUX input cannot be viewed in Twin...
... the CONTROL S IN jack of the equipment to the CONTROL S IN jack on the front panel of the projection TV. Use this jack instead of your projection TV to get better picture quality when switching between local and cable channels easily by pressing ANT on the remote control. Connects to the S... Digital Set-top box's component video (Y, PB, PR) and audio (L/R) jacks. For detailed information about connection, refer to an AV receiver for another Sony product, connect the CONTROL S OUT jack of all audio and video equipment (see page 30). Connects to the AUX input cannot be viewed in Twin...

Operating Instructions
Page 22
...may need to change the video input on your VCR. Using an S VIDEO cable, connect the playback VCR's S VIDEO OUT jack to the projection TV's AUDIO and VIDEO IN jacks. Disconnect all power sources before making any connections. 1 Using AUDIO and VIDEO cables, connect the playback VCR...S VIDEO IN jack. Consult your VCR's operating manual for instructions. ✍ If your VCRs have an S VIDEO jack: For best picture quality, use an S VIDEO connection instead of projection TV VCR (playback) VCR (recording) AUDIO-R (red) AUDIO-L (white) VIDEO (yellow) VMC-810S/820S (not supplied) ✍ ...
...may need to change the video input on your VCR. Using an S VIDEO cable, connect the playback VCR's S VIDEO OUT jack to the projection TV's AUDIO and VIDEO IN jacks. Disconnect all power sources before making any connections. 1 Using AUDIO and VIDEO cables, connect the playback VCR...S VIDEO IN jack. Consult your VCR's operating manual for instructions. ✍ If your VCRs have an S VIDEO jack: For best picture quality, use an S VIDEO connection instead of projection TV VCR (playback) VCR (recording) AUDIO-R (red) AUDIO-L (white) VIDEO (yellow) VMC-810S/820S (not supplied) ✍ ...

Operating Instructions
Page 27
Disconnect all power sources before making any connections. 1 Using audio cables, connect the DVD player's Audio OUT jacks to the projection TV's AUDIO IN jacks. 2 Using an S VIDEO cable, connect the DVD player's S VIDEO jack to switch between the VCR, DVD player and cable TV ... Your DVD player does not have component (Y, PB, PR) jacks. ✍ If your DVD player has video component output connectors: for best picture quality use a VIDEO cable (yellow) instead of projection TV YC-15V/30V (not supplied) DVD player S VIDEO AUDIO-R (red) AUDIO-L (white) RK-74A (not supplied) ✍ Use TV...
Disconnect all power sources before making any connections. 1 Using audio cables, connect the DVD player's Audio OUT jacks to the projection TV's AUDIO IN jacks. 2 Using an S VIDEO cable, connect the DVD player's S VIDEO jack to switch between the VCR, DVD player and cable TV ... Your DVD player does not have component (Y, PB, PR) jacks. ✍ If your DVD player has video component output connectors: for best picture quality use a VIDEO cable (yellow) instead of projection TV YC-15V/30V (not supplied) DVD player S VIDEO AUDIO-R (red) AUDIO-L (white) RK-74A (not supplied) ✍ Use TV...

Operating Instructions
Page 28
... box's Audio OUT jacks to read the Set-top box manual. Digital TV Set-top box VMC-10HG (not supplied) PR PB Y Rear of projection TV 28 AUDIO-R (red) AUDIO-L (white) RK-74A (not supplied) ✍ You cannot record the signal from any connections. 1 Using three... or Composite Video connections, however, component video (Y, PB, PR) will provide the best picture quality for all power sources before making any equipment connected into the Y, PB and PR connectors. ✍ This projection TV is necessary to provide sound. ✍ Component video connection is not compatible with digital...
... box's Audio OUT jacks to read the Set-top box manual. Digital TV Set-top box VMC-10HG (not supplied) PR PB Y Rear of projection TV 28 AUDIO-R (red) AUDIO-L (white) RK-74A (not supplied) ✍ You cannot record the signal from any connections. 1 Using three... or Composite Video connections, however, component video (Y, PB, PR) will provide the best picture quality for all power sources before making any equipment connected into the Y, PB and PR connectors. ✍ This projection TV is necessary to provide sound. ✍ Component video connection is not compatible with digital...

Operating Instructions
Page 33
... adjust the convergence automatically. ✍ It is first turned on the screen in progress, FLASH FOCUS operation is poor and the picture blurs. Projection TV front panel 1 Receive a TV or cable TV program. 2 Press FLASH FOCUS. The cross pattern shown below appears and ...be sure to perform FLASH FOCUS about 30 minutes after the projection TV is recommended to adjust the convergence. The projection tube image appears on . Installing and Connecting the Projection TV Installing and Connecting the Projection TV Adjusting the Convergence Automatically - The adjustment is completed when...
... adjust the convergence automatically. ✍ It is first turned on the screen in progress, FLASH FOCUS operation is poor and the picture blurs. Projection TV front panel 1 Receive a TV or cable TV program. 2 Press FLASH FOCUS. The cross pattern shown below appears and ...be sure to perform FLASH FOCUS about 30 minutes after the projection TV is recommended to adjust the convergence. The projection tube image appears on . Installing and Connecting the Projection TV Installing and Connecting the Projection TV Adjusting the Convergence Automatically - The adjustment is completed when...

Operating Instructions
Page 34
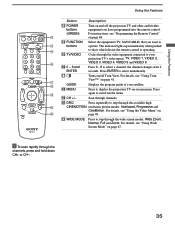
... the picture. See page 57 for details on -screen cursor. Press again to mute the sound. The joystick allows for more advanced functions. Using the Features Using the Remote Control The following table describes the buttons on the remote control that was selected. The projection TV ... on the center of the on setting the time. Also available in a menu to reset the settings to step through the available video picture modes: Vivid, Standard, Movie and Pro. Press to restore the sound. Changes between two channels. Displays the Favorite Channels list. Press ...
... the picture. See page 57 for details on -screen cursor. Press again to mute the sound. The joystick allows for more advanced functions. Using the Features Using the Remote Control The following table describes the buttons on the remote control that was selected. The projection TV ... on the center of the on setting the time. Also available in a menu to reset the settings to step through the available video picture modes: Vivid, Standard, Movie and Pro. Press to restore the sound. Changes between two channels. Displays the Favorite Channels list. Press ...
Operating Instructions
Page 35
... equipment (TV, SAT/CABLE) that you have programmed into the remote control. qh 0 - 9 and ENTER Press 0 - 9 to display the projection TV on-screen menu. qk MENU Press to select a channel, the channel changes after 2 seconds. For details, see "Using the Video Menu" ...(GREEN) Turn on and off Twin View. qg TV/VIDEO Cycles through channels. ql CH +/- CINEMOTION resolution picture modes: Interlaced, Progressive and CineMotion. GUIDE Displays the program guide of your projection TV's video inputs: TV, VIDEO 1, VIDEO 2, VIDEO 3, VIDEO 4, VIDEO 5 and VIDEO 6. w; Scan...
... equipment (TV, SAT/CABLE) that you have programmed into the remote control. qh 0 - 9 and ENTER Press 0 - 9 to display the projection TV on-screen menu. qk MENU Press to select a channel, the channel changes after 2 seconds. For details, see "Using the Video Menu" ...(GREEN) Turn on and off Twin View. qg TV/VIDEO Cycles through channels. ql CH +/- CINEMOTION resolution picture modes: Interlaced, Progressive and CineMotion. GUIDE Displays the program guide of your projection TV's video inputs: TV, VIDEO 1, VIDEO 2, VIDEO 3, VIDEO 4, VIDEO 5 and VIDEO 6. w; Scan...

Operating Instructions
Page 38
... "Video Label" on page 59). Vivid: Select for enhanced picture contrast and sharpness. Pro (Professional): Select to display a standard picture for normal viewing environments. Using the Features qa DISPLAY Press to display a finely detailed picture for low light environments. When you select each mode, you are...number, current time and channel label (if set). qs TV/VIDEO Press repeatedly to suit your projection TV will skip the video input you selected (see "Mode" on page 51). If you select Skip as Brightness, Color, etc.) to scroll through the Multi-channel TV Sound...
... "Video Label" on page 59). Vivid: Select for enhanced picture contrast and sharpness. Pro (Professional): Select to display a standard picture for normal viewing environments. Using the Features qa DISPLAY Press to display a finely detailed picture for low light environments. When you select each mode, you are...number, current time and channel label (if set). qs TV/VIDEO Press repeatedly to suit your projection TV will skip the video input you selected (see "Mode" on page 51). If you select Skip as Brightness, Color, etc.) to scroll through the Multi-channel TV Sound...

Operating Instructions
Page 41
...input sources from VHF/UHF to switch the video input. Although two pictures appear on the screen at the same time. Activating Twin Pictures To display twin pictures 1 Make sure your projection TV is active. Change the picture size by pressing ANT or TV/VIDEO to cable by using the joystick.... To activate the right picture ❑ Move the joystick to AUX by pressing ANT. ❑ Change the picture size by ...
...input sources from VHF/UHF to switch the video input. Although two pictures appear on the screen at the same time. Activating Twin Pictures To display twin pictures 1 Make sure your projection TV is active. Change the picture size by pressing ANT or TV/VIDEO to cable by using the joystick.... To activate the right picture ❑ Move the joystick to AUX by pressing ANT. ❑ Change the picture size by ...
Operating Instructions
Page 42
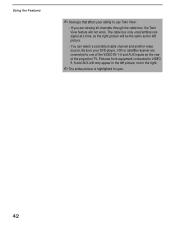
... your DVD player, VCR or satellite receiver are viewing all channels through the cable box, the Twin View feature will only appear in the left picture. - Be sure your ability to VIDEO 5, 6 and AUX will not work. If you are connected to one signal at a time, so the right... picture will be the same as the left picture, not in the right. ✍ The active picture is highlighted in cyan. 42 The cable box only unscrambles one of the VIDEO IN 1-6 and AUX inputs on the rear of the projection TV. Pictures from equipment connected to use Twin...
... your DVD player, VCR or satellite receiver are viewing all channels through the cable box, the Twin View feature will only appear in the left picture. - Be sure your ability to VIDEO 5, 6 and AUX will not work. If you are connected to one signal at a time, so the right... picture will be the same as the left picture, not in the right. ✍ The active picture is highlighted in cyan. 42 The cable box only unscrambles one of the VIDEO IN 1-6 and AUX inputs on the rear of the projection TV. Pictures from equipment connected to use Twin...
Operating Instructions
Page 43
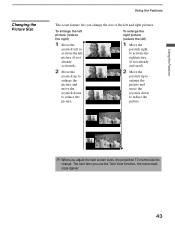
... function, the memorized sizes appear. 43 V ✍ When you adjust the twin screen sizes, the projection TV memorizes the change the size of the left and right pictures. To enlarge the right picture (reduce the left picture (if not already activated). 2 Move the joystick up to enlarge the... picture and move the joystick down to reduce the picture. To enlarge the left picture (reduce the right) v 1 Move the ...
... function, the memorized sizes appear. 43 V ✍ When you adjust the twin screen sizes, the projection TV memorizes the change the size of the left and right pictures. To enlarge the right picture (reduce the left picture (if not already activated). 2 Move the joystick up to enlarge the... picture and move the joystick down to reduce the picture. To enlarge the left picture (reduce the right) v 1 Move the ...
Operating Instructions
Page 44
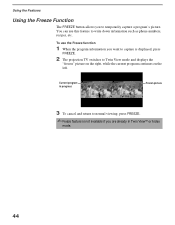
...is not available if you to temporarily capture a program's picture. Current program in progress Frozen picture Call 555-1234 3 To cancel and return to normal viewing, press FREEZE. ✍ Freeze feature is displayed, press FREEZE. 2 The projection TV switches to write down information such as phone numbers,... recipes, etc. To use this feature to Twin View mode and displays the "frozen" picture on the right, while the current program continues on the left...
...is not available if you to temporarily capture a program's picture. Current program in progress Frozen picture Call 555-1234 3 To cancel and return to normal viewing, press FREEZE. ✍ Freeze feature is displayed, press FREEZE. 2 The projection TV switches to write down information such as phone numbers,... recipes, etc. To use this feature to Twin View mode and displays the "frozen" picture on the right, while the current program continues on the left...
Operating Instructions
Page 45
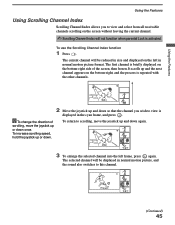
...channel. ✍ Scrolling Channel Index will be reduced in the cyan frame, and press . The current channel will be displayed in normal motion picture format. To increase scrolling speed, hold the joystick up and down so that the channel you to view and select from all receivable channels ... bottom-right side of scrolling, move the joystick up and down again. 10 3 To enlarge the selected channel into the left in normal motion picture, and the sound also switches to scrolling, move the joystick up or down once. To use the Scrolling Channel Index function 1 Press . The...
...channel. ✍ Scrolling Channel Index will be reduced in the cyan frame, and press . The current channel will be displayed in normal motion picture format. To increase scrolling speed, hold the joystick up and down so that the channel you to view and select from all receivable channels ... bottom-right side of scrolling, move the joystick up and down again. 10 3 To enlarge the selected channel into the left in normal motion picture, and the sound also switches to scrolling, move the joystick up or down once. To use the Scrolling Channel Index function 1 Press . The...
Operating Instructions
Page 46
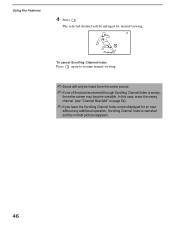
... again to resume normal viewing. ✍ Sound will only be heard from the center picrure. ✍ If one of the pictures received through Scrolling Channel Index is canceled and the normal picture reappears. 46 The selected channel will be enlarged for an hour without any additional operation, Scrolling Channel Index is snowy...
... again to resume normal viewing. ✍ Sound will only be heard from the center picrure. ✍ If one of the pictures received through Scrolling Channel Index is canceled and the normal picture reappears. 46 The selected channel will be enlarged for an hour without any additional operation, Scrolling Channel Index is snowy...


