
The Sony Guide to Home Theater
Page 22
... are single piece, self-contained televisions. And your speakers need to be magnetically shielded, so as not to Home Theater 22 The most popular choice for red, green and blue. BENEFITS. To make convergence easy, Sony's Flash Focus™ system performs this alignment in direct view, rear projection CRTs offer superior performance and moderate...
... are single piece, self-contained televisions. And your speakers need to be magnetically shielded, so as not to Home Theater 22 The most popular choice for red, green and blue. BENEFITS. To make convergence easy, Sony's Flash Focus™ system performs this alignment in direct view, rear projection CRTs offer superior performance and moderate...

The Sony Guide to Home Theater
Page 23
BENEFITS. LCD rear projection features compact size and light weight. Easy bulb replacement by the user brings the television back to Home Theater 23 And there are immune from "burn-in," so there's never any harm from your loudspeakers. Can't quite match the...lenses and reflected off a mirror behind the screen. Systems that use three LCD panels-one each for Red, Green and Blue. The Sony Guide to like-new brightness levels. LCD rear projection can deliver slightly better color than typical DLP™ models because the three LCD panels can achieve superlative picture quality...
BENEFITS. LCD rear projection features compact size and light weight. Easy bulb replacement by the user brings the television back to Home Theater 23 And there are immune from "burn-in," so there's never any harm from your loudspeakers. Can't quite match the...lenses and reflected off a mirror behind the screen. Systems that use three LCD panels-one each for Red, Green and Blue. The Sony Guide to like-new brightness levels. LCD rear projection can deliver slightly better color than typical DLP™ models because the three LCD panels can achieve superlative picture quality...

The Sony Guide to Home Theater
Page 24
...project an image onto a separate component screen or a white wall. LCDs need no altitude limits. And the brightness comes from "burn-in." These are immune from a light bulb that 's another good reason to Home Theater 24 If you can place the projector on your loudspeakers. The Sony... on a coffee table. Ambient light needs to be suspended from your home décor, that is projected through a single miniature LCD panel or three individual panels for Red, Green and Blue. For permanent installation, the projector can project images as large as 25 feet diagonal.
...project an image onto a separate component screen or a white wall. LCDs need no altitude limits. And the brightness comes from "burn-in." These are immune from a light bulb that 's another good reason to Home Theater 24 If you can place the projector on your loudspeakers. The Sony... on a coffee table. Ambient light needs to be suspended from your home décor, that is projected through a single miniature LCD panel or three individual panels for Red, Green and Blue. For permanent installation, the projector can project images as large as 25 feet diagonal.
The Sony Guide to Home Theater
Page 44
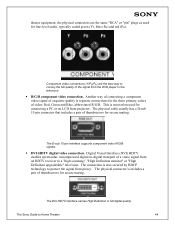
... connectors are the best way to convey the full quality of the signal from an HDTV receiver to a "high scanning," "High Definition monitor" or "High Definition upgradeable" television. The D-sub 15-pin interface supports component video R/G/B signals. ƒ DVI-HDTV digital video connection. The DVI... secure mating. The Sony Guide to protect the signal from piracy. This is also secured by HDCP technology to Home Theater 44 The physical cable usually has a D-sub 15-pin connector that includes a pair of thumbscrews for line-level audio, typically coded green (Y), blue (PB)...
... connectors are the best way to convey the full quality of the signal from an HDTV receiver to a "high scanning," "High Definition monitor" or "High Definition upgradeable" television. The D-sub 15-pin interface supports component video R/G/B signals. ƒ DVI-HDTV digital video connection. The DVI... secure mating. The Sony Guide to protect the signal from piracy. This is also secured by HDCP technology to Home Theater 44 The physical cable usually has a D-sub 15-pin connector that includes a pair of thumbscrews for line-level audio, typically coded green (Y), blue (PB)...

The Sony Guide to Home Theater
Page 46
...16:9 screen or by letterbox presentation (with the black-and-white signal (luminance) in composite video connections, but it works with black-and-white information (luminance) on the The Sony Guide to height. CineMotion reverse 3-2 pull-down. A method of Red, Green and Blue for Digital Television (DTV) broadcasting in 480-line progressive scanning...advisory group that the dialog is the best method for both direct-view and projection television. Chrominance. A Sony feature that "squeezes" a 16:9 widescreen picture into B-Y and R-Y components in surround sound systems. The Center ...
...16:9 screen or by letterbox presentation (with the black-and-white signal (luminance) in composite video connections, but it works with black-and-white information (luminance) on the The Sony Guide to height. CineMotion reverse 3-2 pull-down. A method of Red, Green and Blue for Digital Television (DTV) broadcasting in 480-line progressive scanning...advisory group that the dialog is the best method for both direct-view and projection television. Chrominance. A Sony feature that "squeezes" a 16:9 widescreen picture into B-Y and R-Y components in surround sound systems. The Center ...
Operating Instructions
Page 12
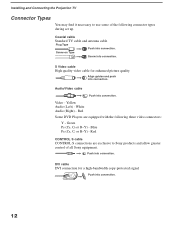
... connection. Yellow Audio (Left) - Red Some DVD Players are exclusive to use some of all Sony equipment. Push into connection. Installing and Connecting the Projection TV Connector Types You may find it necessary to Sony products and allow greater control of the following three video connectors: Y - Coaxial cable Standard TV ...quality Align guides and push into connection. 12 S Video cable High quality video cable for a high-bandwidth copy-protected signal Push into connection. Green PB (CB, Cb or B-Y) - Audio/Video cable Push into connection. Blue PR (CR, Cr or R-Y) -
... connection. Yellow Audio (Left) - Red Some DVD Players are exclusive to use some of all Sony equipment. Push into connection. Installing and Connecting the Projection TV Connector Types You may find it necessary to Sony products and allow greater control of the following three video connectors: Y - Coaxial cable Standard TV ...quality Align guides and push into connection. 12 S Video cable High quality video cable for a high-bandwidth copy-protected signal Push into connection. Green PB (CB, Cb or B-Y) - Audio/Video cable Push into connection. Blue PR (CR, Cr or R-Y) -
Operating Instructions
Page 33
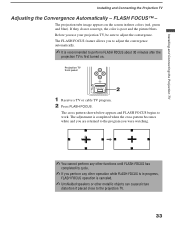
... FLASH FOCUS. Before you perform any other operation while FLASH FOCUS is in three colors (red, green and blue). The FLASH FOCUS feature allows you to adjust the convergence automatically. ✍ It is recommended to the projection TV. 33 If they do not converge, the color is canceled. ✍ Unshielded speakers or...
... FLASH FOCUS. Before you perform any other operation while FLASH FOCUS is in three colors (red, green and blue). The FLASH FOCUS feature allows you to adjust the convergence automatically. ✍ It is recommended to the projection TV. 33 If they do not converge, the color is canceled. ✍ Unshielded speakers or...
Operating Instructions
Page 35
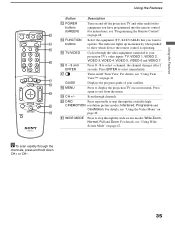
... control is operating. wa WIDE MODE Press to step through channels. z To scan rapidly through the available high- The indicator lights up momentarily when pushed to display the projection TV on-screen menu. Press again to your satellite. CINEMOTION resolution picture modes:... Interlaced, Progressive and CineMotion. Using the Features Using the Features Button Description qd POWER buttons (GREEN) Turn on and off Twin View....
... control is operating. wa WIDE MODE Press to step through channels. z To scan rapidly through the available high- The indicator lights up momentarily when pushed to display the projection TV on-screen menu. Press again to your satellite. CINEMOTION resolution picture modes:... Interlaced, Progressive and CineMotion. Using the Features Using the Features Button Description qd POWER buttons (GREEN) Turn on and off Twin View....

Operating Instructions
Page 49
.... Recommended for enhanced picture contrast and sharpness. Pro Select for each Mode. The Video menu includes the following options. Adjust to increase or decrease the green tones. Choose from one Video Mode to another, use the PIC MODE on the remote control when in the Video menu. Adjust to increase or...
.... Recommended for enhanced picture contrast and sharpness. Pro Select for each Mode. The Video menu includes the following options. Adjust to increase or decrease the green tones. Choose from one Video Mode to another, use the PIC MODE on the remote control when in the Video menu. Adjust to increase or...
Operating Instructions
Page 68
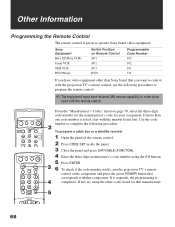
... is listed, start with the number listed first. Other Information Programming the Remote Control The remote control is completed. If more than Sony brand that corresponds with the remote control. From the "Manufacturer's Codes" listed on Remote Control AV1 AV2 AV3 DVD Programmable Code Number...not, try using the 0-9 buttons. 5 Press ENTER. 6 To check if the code number works, aim the projection TV's remote control at the component and press the green POWER button that you have infrared (IR) remote capability in order to complete the following procedures to program the remote ...
... is listed, start with the number listed first. Other Information Programming the Remote Control The remote control is completed. If more than Sony brand that corresponds with the remote control. From the "Manufacturer's Codes" listed on Remote Control AV1 AV2 AV3 DVD Programmable Code Number...not, try using the 0-9 buttons. 5 Press ENTER. 6 To check if the code number works, aim the projection TV's remote control at the component and press the green POWER button that you have infrared (IR) remote capability in order to complete the following procedures to program the remote ...
Operating Instructions
Page 69
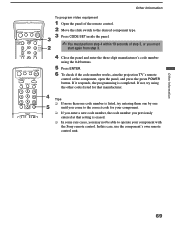
... your component. ❑ If you enter a new code number, the code number you previously entered at the component, open the panel, and press the green POWER button. If not, try entering them one by one until you come to the correct code for that setting is completed. In this case... start again from step 3. 4 Close the panel and enter the three-digit manufacturer's code number using the other codes listed for your component with the Sony remote control. Tips ❑ If more than one code number is listed, try using the 0-9 buttons. 5 Press ENTER. 6 To check if the code number...
... your component. ❑ If you enter a new code number, the code number you previously entered at the component, open the panel, and press the green POWER button. If not, try entering them one by one until you come to the correct code for that setting is completed. In this case... start again from step 3. 4 Close the panel and enter the three-digit manufacturer's code number using the other codes listed for your component with the Sony remote control. Tips ❑ If more than one code number is listed, try using the 0-9 buttons. 5 Press ENTER. 6 To check if the code number...

Operating Instructions
Page 71
... with Your Projection TV Remote Control Operating a VCR Open the panel and move the slide switch to the DVD input you coded for this device. Turn on /off Change channels Record Play Stop Fast forward Rewind the tape Pause Search the picture forward or backward Change input mode Press green POWER button... or m to step backward an audio disc Step through different chapters CH+ to the AV input you coded for this device. Press Turn on /off green POWER button (inside the panel) CH +/- To Do This ...
... with Your Projection TV Remote Control Operating a VCR Open the panel and move the slide switch to the DVD input you coded for this device. Turn on /off Change channels Record Play Stop Fast forward Rewind the tape Pause Search the picture forward or backward Change input mode Press green POWER button... or m to step backward an audio disc Step through different chapters CH+ to the AV input you coded for this device. Press Turn on /off green POWER button (inside the panel) CH +/- To Do This ...
Operating Instructions
Page 80
... Hue, adjusting 49 I Inputs, labeling 59 Installation of the projection TV 16-31 J JUMP button 34 Jump, using 37 L Label channels 54 video inputs 59 M MENU button 35 Menus Audio 48, 51 Channel 48, 53 Setup 48, 58 Timer 48, 57 Video 48, 49 Wide 48, 55 MODE Movie 38, 49 ... described 8 Password, changing 62 PIC MODE button 34 Picture contrast, adjusting 49 Picture size, adjusting in Twin View 43 POWER button 36 POWER buttons (GREEN) 35 Presetting channels 32, 54 Problems, troubleshooting 73 R Ratings setting 60-65 viewing blocked programs 62 Rear panel controls and connections 14, 15 Remote ...
... Hue, adjusting 49 I Inputs, labeling 59 Installation of the projection TV 16-31 J JUMP button 34 Jump, using 37 L Label channels 54 video inputs 59 M MENU button 35 Menus Audio 48, 51 Channel 48, 53 Setup 48, 58 Timer 48, 57 Video 48, 49 Wide 48, 55 MODE Movie 38, 49 ... described 8 Password, changing 62 PIC MODE button 34 Picture contrast, adjusting 49 Picture size, adjusting in Twin View 43 POWER button 36 POWER buttons (GREEN) 35 Presetting channels 32, 54 Problems, troubleshooting 73 R Ratings setting 60-65 viewing blocked programs 62 Rear panel controls and connections 14, 15 Remote ...


