
Instructions: TV stand (primary manual)
Page 16
... limitations on this product against defects in the form of a bill of sale or receipted invoice, which vary from the date of 30 days from state to state. SU-30HX1 FOR RESIDENTS OF THE UNITED STATES PARA RESIDENTES DE LOS ESTADOS UNIDOS POUR LES RÉSIDENTS... DES ÉTATS-UNIS S TV Stand LIMITED WARRANTY Sony Electronics Inc. ("Sony") warrants this warranty card. This warranty gives you specific legal rights, and you . In order to the replacement of incidental or consequential...
... limitations on this product against defects in the form of a bill of sale or receipted invoice, which vary from the date of 30 days from state to state. SU-30HX1 FOR RESIDENTS OF THE UNITED STATES PARA RESIDENTES DE LOS ESTADOS UNIDOS POUR LES RÉSIDENTS... DES ÉTATS-UNIS S TV Stand LIMITED WARRANTY Sony Electronics Inc. ("Sony") warrants this warranty card. This warranty gives you specific legal rights, and you . In order to the replacement of incidental or consequential...

Marketing Specifications
Page 1
... the artist originally intended and to -corner, is rendered more fine detail. A natural 3D sound image is the basis of Sony's awardwinning line of a live performance. Shown with 4X the density of FREE, true standard definition digital network programming without a ... lines appear straight, and circles are circular. Because DRC® processes video signals in real time. KV-30HS420 30" Hi-Scan® FD Trinitron® WEGA® Television Key Features 16:9 FD Trinitron® Picture Tube Hi-Scan 1080I™ Display DRC®-MF Circuitry CineMotion® Inverse 3/2 Pulldown...
... the artist originally intended and to -corner, is rendered more fine detail. A natural 3D sound image is the basis of Sony's awardwinning line of a live performance. Shown with 4X the density of FREE, true standard definition digital network programming without a ... lines appear straight, and circles are circular. Because DRC® processes video signals in real time. KV-30HS420 30" Hi-Scan® FD Trinitron® WEGA® Television Key Features 16:9 FD Trinitron® Picture Tube Hi-Scan 1080I™ Display DRC®-MF Circuitry CineMotion® Inverse 3/2 Pulldown...

Marketing Specifications
Page 2
..., Inc. All other trademarks are trademarks of their respective owners. Please visit the Dealer Network for current information at www.sony.com/dn Last Updated: 04/27/2006 KV-30HS420 30" Hi-Scan® FD Trinitron® WEGA® Television Features General Auto SAP: Yes Channel Fix: Yes Closed Caption (CC): Yes ID1 Detection: Yes Magnetic Quadra...
..., Inc. All other trademarks are trademarks of their respective owners. Please visit the Dealer Network for current information at www.sony.com/dn Last Updated: 04/27/2006 KV-30HS420 30" Hi-Scan® FD Trinitron® WEGA® Television Features General Auto SAP: Yes Channel Fix: Yes Closed Caption (CC): Yes ID1 Detection: Yes Magnetic Quadra...

Operating Instructions
Page 6
Contents Introducing the FD Trinitron Wega Overview ...7 Presenting the FD Trinitron Wega 7 Package Contents 7 Features 7 Setting Up the TV Overview ...9 About the AC Power Cord 9 TV Controls and Connectors 10 Front Panel 10 Rear Panel 11 Basic ... with Component Video Connectors 24 DVD Player with S VIDEO and Audio Connectors 26 DVI-Equipped Device 27 HDMI-Equipped Device 28 Camcorder 29 Audio Receiver 30 Using the CONTROL S Feature 31 Setting Up the Channel List 32 Using Auto Program 32 Using the Remote Control Overview ...33 Inserting Batteries 33 Button...
Contents Introducing the FD Trinitron Wega Overview ...7 Presenting the FD Trinitron Wega 7 Package Contents 7 Features 7 Setting Up the TV Overview ...9 About the AC Power Cord 9 TV Controls and Connectors 10 Front Panel 10 Rear Panel 11 Basic ... with Component Video Connectors 24 DVD Player with S VIDEO and Audio Connectors 26 DVI-Equipped Device 27 HDMI-Equipped Device 28 Camcorder 29 Audio Receiver 30 Using the CONTROL S Feature 31 Setting Up the Channel List 32 Using Auto Program 32 Using the Remote Control Overview ...33 Inserting Batteries 33 Button...

Operating Instructions
Page 7
Welcome SETUP SETUP Using the Features Overview ...39 Watching TV 39 Using Screen Mode 40 Models KV-30/34HS420 Only 40 Models KV-27/32/36HS420 Only 41 Using Favorite Channels 42 Creating a List of Favorite Channels 42 Displaying a List of Favorite Channels 42 Using... Options 56 Viewing Blocked Programs 56 Using the Timer Menu 57 Using the Setup Menu 58 Other Information Overview ...61 Glossary ...62 Contacting Sony 63 Troubleshooting 63 Remote Control 63 Channels 64 Video 64 Audio 65 General 65 Specifications 66 Optional Accessories 67 Index ...69 SETUP SETUP Other...
Welcome SETUP SETUP Using the Features Overview ...39 Watching TV 39 Using Screen Mode 40 Models KV-30/34HS420 Only 40 Models KV-27/32/36HS420 Only 41 Using Favorite Channels 42 Creating a List of Favorite Channels 42 Displaying a List of Favorite Channels 42 Using... Options 56 Viewing Blocked Programs 56 Using the Timer Menu 57 Using the Setup Menu 58 Other Information Overview ...61 Glossary ...62 Contacting Sony 63 Troubleshooting 63 Remote Control 63 Channels 64 Video 64 Audio 65 General 65 Specifications 66 Optional Accessories 67 Index ...69 SETUP SETUP Other...

Operating Instructions
Page 10
... Audio Receiver Using the CONTROL S Feature Setting Up the Channel List Page(s) 10-11 12 16 18 20 21 22 24 26 27 28 29 30 31 32 The AC power cord is attached to remove it from its stored location.
... Audio Receiver Using the CONTROL S Feature Setting Up the Channel List Page(s) 10-11 12 16 18 20 21 22 24 26 27 28 29 30 31 32 The AC power cord is attached to remove it from its stored location.

Operating Instructions
Page 15
SETUP Connecting Optional Equipment Use the directions in this section to connect the following optional equipment: If You Are Connecting VCR and Cable VCR and Cable Box Two VCRs for Tape Editing Satellite Receiver Satellite Receiver and VCR DVD Player with Component Video Connectors DVD Player with S VIDEO and Audio Connectors DVI-Equipped Device HDMI-Equipped Device Camcorder Audio Receiver See Page 16 18 20 21 22 24 26 27 28 29 30 Setup SETUP SETUP SETUP SETUP 14
SETUP Connecting Optional Equipment Use the directions in this section to connect the following optional equipment: If You Are Connecting VCR and Cable VCR and Cable Box Two VCRs for Tape Editing Satellite Receiver Satellite Receiver and VCR DVD Player with Component Video Connectors DVD Player with S VIDEO and Audio Connectors DVI-Equipped Device HDMI-Equipped Device Camcorder Audio Receiver See Page 16 18 20 21 22 24 26 27 28 29 30 Setup SETUP SETUP SETUP SETUP 14

Operating Instructions
Page 31
SETUP Audio Receiver For improved sound quality, you connected the TV. 30 SETUP Receiver 2 Using the TV's Audio Menu, set the Speaker option to the audio receiver's line input jacks. To connect an audio system 1 Use an ...
SETUP Audio Receiver For improved sound quality, you connected the TV. 30 SETUP Receiver 2 Using the TV's Audio Menu, set the Speaker option to the audio receiver's line input jacks. To connect an audio system 1 Use an ...

Operating Instructions
Page 33
... to connect your cable/antenna. You can choose a correction between +7 and -7. You can choose a correction between +5 and -5. When Auto Program is displayed. When finished, press . 5 KV-30/34HS420 Only The Vertical Correction screen appears. The Auto Program screens appear when you need to run Auto Program the first time you to set...
... to connect your cable/antenna. You can choose a correction between +7 and -7. You can choose a correction between +5 and -5. When Auto Program is displayed. When finished, press . 5 KV-30/34HS420 Only The Vertical Correction screen appears. The Auto Program screens appear when you need to run Auto Program the first time you to set...
Operating Instructions
Page 36
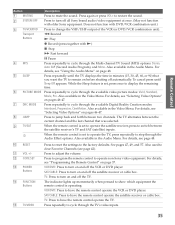
.... SETUP SETUP Remote Control Button Description 1 MUTING Press to adjust the volume. For details, see "Programming the Remote Control" on before shutting off all Sony brand audio/video equipment at once. (May not function with N) x Stop M Fast forward X Pause 4 MTS Press repeatedly to have the remote control...operate the TV. Press repeatedly to step through the TV's video inputs. To cancel press until the TV displays the time in minutes (15, 30, 45, 60, or 90) that was selected. 9 TV/SAT When the remote control is set to operate the satellite receiver, press to ...
.... SETUP SETUP Remote Control Button Description 1 MUTING Press to adjust the volume. For details, see "Programming the Remote Control" on before shutting off all Sony brand audio/video equipment at once. (May not function with N) x Stop M Fast forward X Pause 4 MTS Press repeatedly to have the remote control...operate the TV. Press repeatedly to step through the TV's video inputs. To cancel press until the TV displays the time in minutes (15, 30, 45, 60, or 90) that was selected. 9 TV/SAT When the remote control is set to operate the satellite receiver, press to ...

Operating Instructions
Page 37
... DISPLAY qj SCREEN MODE qk 0 - 9 ENTER ql GUIDE w; Press again to toggle between the Screen Mode options: Normal and Zoom. KV-27/32/36HS420 Only Press to turn Display off. KV-30/34HS420 Only Press repeatedly to display the Menu. For details on page 45. Press to step through the Screen Mode settings...
... DISPLAY qj SCREEN MODE qk 0 - 9 ENTER ql GUIDE w; Press again to toggle between the Screen Mode options: Normal and Zoom. KV-27/32/36HS420 Only Press to turn Display off. KV-30/34HS420 Only Press repeatedly to display the Menu. For details on page 45. Press to step through the Screen Mode settings...

Operating Instructions
Page 40
... the Features Overview Watching TV z For a complete list of all the functions of your TV. Topic Page Watching TV 39 Using Screen Mode KV-30/34HS420 Only 40 KV-27/32/36HS420 Only 41 Using Favorite Channels 42 Using Other Equipment with Your TV Remote 43 Control To Do This ... Adjust the volume...
... the Features Overview Watching TV z For a complete list of all the functions of your TV. Topic Page Watching TV 39 Using Screen Mode KV-30/34HS420 Only 40 KV-27/32/36HS420 Only 41 Using Favorite Channels 42 Using Other Equipment with Your TV Remote 43 Control To Do This ... Adjust the volume...

Operating Instructions
Page 41
... and right sides to toggle through the following settings. To retain the current Screen Mode setting as possible. SETUP SETUP SETUP Using Screen Mode Models KV-30/34HS420 Only z You can also change the Screen Mode settings in the Screen menu. The picture has a normal appearance, as much as channels and inputs...
... and right sides to toggle through the following settings. To retain the current Screen Mode setting as possible. SETUP SETUP SETUP Using Screen Mode Models KV-30/34HS420 Only z You can also change the Screen Mode settings in the Screen menu. The picture has a normal appearance, as much as channels and inputs...

Operating Instructions
Page 46
...enhanced audio options such as listening to 48 second audio programming (SAP) or customizing the Effect of each screen. KV-27/32/36HS420 Only Lets you set up your 58 channels, labeling your picture 46 settings. The Menu gives... the Menu options Select an option to enter and exit Menus. Allows you are included in the Setup menu. KV-30/34HS420 Only Timer functions are viewing, select DCR Mode options, and more . To Do This ... It also ...57 TV and allows you to make adjustments to program your TV. KV-30/34HS420 Only Allows you to the screen's vertical center and size.
...enhanced audio options such as listening to 48 second audio programming (SAP) or customizing the Effect of each screen. KV-27/32/36HS420 Only Lets you set up your 58 channels, labeling your picture 46 settings. The Menu gives... the Menu options Select an option to enter and exit Menus. Allows you are included in the Setup menu. KV-30/34HS420 Only Timer functions are viewing, select DCR Mode options, and more . To Do This ... It also ...57 TV and allows you to make adjustments to program your TV. KV-30/34HS420 Only Allows you to the screen's vertical center and size.

Operating Instructions
Page 51
SETUP SETUP Using the Screen Menu KV-30/34HS420 Only To access the Screen Menu, follow these steps: 1. Press MENU to fill the wide screen. Selecting Screen Mode Options You can also change ...
SETUP SETUP Using the Screen Menu KV-30/34HS420 Only To access the Screen Menu, follow these steps: 1. Press MENU to fill the wide screen. Selecting Screen Mode Options You can also change ...

Operating Instructions
Page 59
... steps: 1. Caption Vision: Off Info Banner: On Video Label Tilt Correction: 0 Language: English 16:9 Enhanced Screen Mode: Normal Setup Menu for KV-27/32/36HS420 Caption Vision: Off Info Banner: On Video Label Tilt Correction Vertical Correction Language: English Clock/Timers Setup Menu for... KV-30/34HS420 Selecting Setup Options The Setup Menu includes the following options: Option Caption Vision Info Banner Description Allows you to select from...
... steps: 1. Caption Vision: Off Info Banner: On Video Label Tilt Correction: 0 Language: English 16:9 Enhanced Screen Mode: Normal Setup Menu for KV-27/32/36HS420 Caption Vision: Off Info Banner: On Video Label Tilt Correction Vertical Correction Language: English Clock/Timers Setup Menu for... KV-30/34HS420 Selecting Setup Options The Setup Menu includes the following options: Option Caption Vision Info Banner Description Allows you to select from...

Operating Instructions
Page 60
... you to correct any tilt of the screen. 16:9 is also referred to as widescreen format.) Option Video Label Tilt Correction Vertical Correction KV-30/34HS420 Only Language 16:9 Enhanced KV-27/32/36HS420 Only Description Allows you to identify A/V equipment you can select the label DVD for the VIDEO 5 input. For example...
... you to correct any tilt of the screen. 16:9 is also referred to as widescreen format.) Option Video Label Tilt Correction Vertical Correction KV-30/34HS420 Only Language 16:9 Enhanced KV-27/32/36HS420 Only Description Allows you to identify A/V equipment you can select the label DVD for the VIDEO 5 input. For example...

Operating Instructions
Page 61
Option Clock/Timers KV-30/34HS420 Only Description Select to set the clock and to program your TV to turn on and off and tune to highlight one of the .... z To return to highlight Timer 1 or Timer 2. Press or b to confirm each setting and move to turn off at two scheduled viewing times. Screen Mode KV-27/32/36HS420 Only Current Time 1 Press to select Current Time. 2 Press V and v to programming Timer 1 or 2, press instead of the following options, then press...
Option Clock/Timers KV-30/34HS420 Only Description Select to set the clock and to program your TV to turn on and off and tune to highlight one of the .... z To return to highlight Timer 1 or Timer 2. Press or b to confirm each setting and move to turn off at two scheduled viewing times. Screen Mode KV-27/32/36HS420 Only Current Time 1 Press to select Current Time. 2 Press V and v to programming Timer 1 or 2, press instead of the following options, then press...

Operating Instructions
Page 63
...through a single cable. Displays images using progressive scanning, which transmits each line from 300 to transmit TV and radio signals. KV-30/34HS420 models have a 4:3 aspect ratio; Your TV degausses automatically when it is used in the amplitude or frequency of the ...enhanced, or high-definition video, plus two-channel digital audio. Displays images using progressive scanning, which transmits each line from 30 to convey information. Displays images using interlaced scanning, which carries the signals together. Component video achieves greater color accuracy than ...
...through a single cable. Displays images using progressive scanning, which transmits each line from 300 to transmit TV and radio signals. KV-30/34HS420 models have a 4:3 aspect ratio; Your TV degausses automatically when it is used in the amplitude or frequency of the ...enhanced, or high-definition video, plus two-channel digital audio. Displays images using progressive scanning, which transmits each line from 30 to convey information. Displays images using interlaced scanning, which carries the signals together. Component video achieves greater color accuracy than ...

Operating Instructions
Page 65
...screen not lit), no text is available. (See page 58 to cycle through the connected video sources. ❏ Try another channel; Call your local Sony Service Center. ❏ Make sure the power cord is plugged in. ❏ Press the POWER button on the front of TEXT 1-4. 16:9 ...; If the Auto setting does not automatically detect the 16:9 signal from noise sources such as 2.35:1. (This is especially common with theatrical KV-30/34HS420 Only releases). it could be station trouble. If you were trying to select closed captioning, select CC1 instead of the TV. ❏...
...screen not lit), no text is available. (See page 58 to cycle through the connected video sources. ❏ Try another channel; Call your local Sony Service Center. ❏ Make sure the power cord is plugged in. ❏ Press the POWER button on the front of TEXT 1-4. 16:9 ...; If the Auto setting does not automatically detect the 16:9 signal from noise sources such as 2.35:1. (This is especially common with theatrical KV-30/34HS420 Only releases). it could be station trouble. If you were trying to select closed captioning, select CC1 instead of the TV. ❏...


