
Operating Instructions
Page 3
... ......... 23 Creating a party environment 24 (FST-ZX8/LBT-ZX8 only) - X-ROUND - Sleep Timer Waking up the system 8 Positioning the speakers 10 Setting the clock 11 CD/MP3 Loading a disc 12 Playing a disc 12 - Play Timer Timer recording radio programs........... 28 Display Turning off...29 - Recording Recording your own program 15 - CD Synchro Recording - Program Edit Recording to music 27 - Game Mixing Singing along 26 Timer Falling asleep to a tape manually 20 - Normal Play/Shuffle Play Playing repeatedly 14 - Repeat Play Creating your favorite tracks on a disc into a ...
... ......... 23 Creating a party environment 24 (FST-ZX8/LBT-ZX8 only) - X-ROUND - Sleep Timer Waking up the system 8 Positioning the speakers 10 Setting the clock 11 CD/MP3 Loading a disc 12 Playing a disc 12 - Play Timer Timer recording radio programs........... 28 Display Turning off...29 - Recording Recording your own program 15 - CD Synchro Recording - Program Edit Recording to music 27 - Game Mixing Singing along 26 Timer Falling asleep to a tape manually 20 - Normal Play/Shuffle Play Playing repeatedly 14 - Repeat Play Creating your favorite tracks on a disc into a ...
Operating Instructions
Page 5
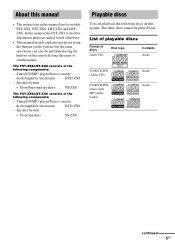
... discs Format of the following components: - Tuner/CD/MP3 player/Stereo cassette deck/Amplifier (main unit) HCD-ZX6 - Speaker System • Front speakers SS-ZX6 Playable discs You can also be played back. The FST-ZX8/LBT-ZX8 consists of discs Audio CDs Disc logo Contents Audio CD-R/CD-RW (Audio CDs) CD-R/CD-RW (Discs with MP3 audio tracks) Audio...
... discs Format of the following components: - Tuner/CD/MP3 player/Stereo cassette deck/Amplifier (main unit) HCD-ZX6 - Speaker System • Front speakers SS-ZX6 Playable discs You can also be played back. The FST-ZX8/LBT-ZX8 consists of discs Audio CDs Disc logo Contents Audio CD-R/CD-RW (Audio CDs) CD-R/CD-RW (Discs with MP3 audio tracks) Audio...
Operating Instructions
Page 6
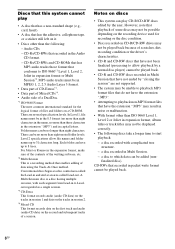
...recorded in packet write format cannot be displayed correctly. • The following : - CD-Rs/CD-RWs and CD-ROMs that has MP3 audio tracks those format that conforms to start playback. - Audio CDs - Discs that this system cannot play • A disc that has a non-standard shape (e.g., card, heart). •...; A disc that has the adhesive, cellophone tape, or a sticker still left on discs • This system can play CD-R/CD-RW discs edited by "closing the session" are several specification levels. However, note that playback of some discs may not be possible depending on...
...recorded in packet write format cannot be displayed correctly. • The following : - CD-Rs/CD-RWs and CD-ROMs that has MP3 audio tracks those format that conforms to start playback. - Audio CDs - Discs that this system cannot play • A disc that has a non-standard shape (e.g., card, heart). •...; A disc that has the adhesive, cellophone tape, or a sticker still left on discs • This system can play CD-R/CD-RW discs edited by "closing the session" are several specification levels. However, note that playback of some discs may not be possible depending on...

Operating Instructions
Page 7
... be playable by some that conform to the CD standard and may not be played back on this product because these discs do not conform to the Compact Disc (CD) standard. Cautions when playing a disc that is recorded in later sessions can play back discs that the audio side of a ...DualDisc may not be played back. • When you play Multi Session discs with different formats for each session, the...
... be playable by some that conform to the CD standard and may not be played back on this product because these discs do not conform to the Compact Disc (CD) standard. Cautions when playing a disc that is recorded in later sessions can play back discs that the audio side of a ...DualDisc may not be played back. • When you play Multi Session discs with different formats for each session, the...

Operating Instructions
Page 12
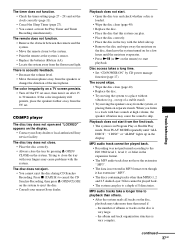
Normal Play/Shuffle Play This system lets you play a CD single, place it as this may cause malfunction. When playing an audio CD: Disc tray number Track number Playing time EFFECT X-GROOVE ALL DISC S 1 2 34 5 j Disc playing indicator Disc presence indicator When playing an MP3 audio track: Disc tray number Track number Playing time ID3 MP3 EFFECT X-GROOVE ALL DISC S 12345...
Normal Play/Shuffle Play This system lets you play a CD single, place it as this may cause malfunction. When playing an audio CD: Disc tray number Track number Playing time EFFECT X-GROOVE ALL DISC S 1 2 34 5 j Disc playing indicator Disc presence indicator When playing an MP3 audio track: Disc tray number Track number Playing time ID3 MP3 EFFECT X-GROOVE ALL DISC S 12345...

Operating Instructions
Page 13
... up in the display. • When the current disc is stopped, press PLAY MODE repeatedly until the indication of the play mode you want appears in the display. When playing an audio CD, "ALBM" play mode performs the same operation as "1 DISC SHUF" play mode. Press again to stop playback. • When an MP3 audio track...
... up in the display. • When the current disc is stopped, press PLAY MODE repeatedly until the indication of the play mode you want appears in the display. When playing an audio CD, "ALBM" play mode performs the same operation as "1 DISC SHUF" play mode. Press again to stop playback. • When an MP3 audio track...

Operating Instructions
Page 14
... this system is 150 (including root album). • The maximum number of MP3 audio tracks and albums on automatically and "CD" is selected as a function. REP1: A single track is played back repeatedly until "REP1" is canceled. * When "ALBM" or "ALBM SHUF" is located in the first session. Any... the time an MP3 audio track is loaded, the system reads all the tracks or a single track on automatically and "CD" is selected as a function. If there are played back repeatedly up in the display. Press REPEAT repeatedly until both "REP" and "REP1" disappear from "TUNER" function by...
... this system is 150 (including root album). • The maximum number of MP3 audio tracks and albums on automatically and "CD" is selected as a function. REP1: A single track is played back repeatedly until "REP1" is canceled. * When "ALBM" or "ALBM SHUF" is located in the first session. Any... the time an MP3 audio track is loaded, the system reads all the tracks or a single track on automatically and "CD" is selected as a function. If there are played back repeatedly up in the display. Press REPEAT repeatedly until both "REP" and "REP1" disappear from "TUNER" function by...

Operating Instructions
Page 15
... or >+ on the remote) repeatedly until "PGM" lights up to 25 steps from the display. Disc tray Track number number Total playing time (including selected track) 5 Press PLAY MODE. CD/MP3 Creating your own program - EFFECT X-GROOVE PGM 1 2 34 5 j When programming an MP3 audio track, press ALBUM +/- to...SKIP to step 5 while "AL" appears in the display. 3 Press one of the total playing time during programming, this Press PLAY MODE repeatedly until "CD" appears in the display (or press CD on the remote). you have programmed an MP3 audio track. You can make a program of up...
... or >+ on the remote) repeatedly until "PGM" lights up to 25 steps from the display. Disc tray Track number number Total playing time (including selected track) 5 Press PLAY MODE. CD/MP3 Creating your own program - EFFECT X-GROOVE PGM 1 2 34 5 j When programming an MP3 audio track, press ALBUM +/- to...SKIP to step 5 while "AL" appears in the display. 3 Press one of the total playing time during programming, this Press PLAY MODE repeatedly until "CD" appears in the display (or press CD on the remote). you have programmed an MP3 audio track. You can make a program of up...

Operating Instructions
Page 19
...a recordable tape into a tape. The search direction, + (forward) or - (backward), and the number of MP3 audio tracks, press PLAY MODE repeatedly until "CD" appears in deck B. Example: searching forward 2 songs * AMS (Automatic Music Sensor) Notes • Do not press A Z or Z B while... playing a tape, otherwise the tape could be damaged. • The AMS function may not operate correctly under the following circumstances: - CD Synchro Recording You can use TYPE I (normal) tape. Recording starts. When the system is...
...a recordable tape into a tape. The search direction, + (forward) or - (backward), and the number of MP3 audio tracks, press PLAY MODE repeatedly until "CD" appears in deck B. Example: searching forward 2 songs * AMS (Automatic Music Sensor) Notes • Do not press A Z or Z B while... playing a tape, otherwise the tape could be damaged. • The AMS function may not operate correctly under the following circumstances: - CD Synchro Recording You can use TYPE I (normal) tape. Recording starts. When the system is...

Operating Instructions
Page 20
... record tracks from all the discs in CD function. Notes • You cannot use Tape Select Edit for side A and side B respectively (Tape Select Edit). The required tape length for the currently selected disc appears, followed by the total playing time for discs containing over 20 tracks ...or MP3 audio tracks. • You cannot listen to record on both sides. 6 Press REC PAUSE/START, then start playing the source (for each side do not exceed the length of "CD Synchro Recording" (page 19), perform step 1 to a tape manually - Select "j" (or "RELAY") to other sources while ...
... record tracks from all the discs in CD function. Notes • You cannot use Tape Select Edit for side A and side B respectively (Tape Select Edit). The required tape length for the currently selected disc appears, followed by the total playing time for discs containing over 20 tracks ...or MP3 audio tracks. • You cannot listen to record on both sides. 6 Press REC PAUSE/START, then start playing the source (for each side do not exceed the length of "CD Synchro Recording" (page 19), perform step 1 to a tape manually - Select "j" (or "RELAY") to other sources while ...

Operating Instructions
Page 21
...move the respective antenna to reduce the noise. • For recording from the component connected to the GAME INPUT jacks with another function such as CD, tape, radio, VCR or turntable connected to this system. To record the mixed sound (page 26), press GAME MIXING after step 4 and...the front side. Sound Adjustment Note You cannot listen to select tracks during recording pause mode (after step 4 of MP3 audio tracks manually: Press PLAY MODE repeatedly until "ALBM" lights up in each deck reverses independently. • For recording from the radio: If noise is "X-GROOVE ON". ...
...move the respective antenna to reduce the noise. • For recording from the component connected to the GAME INPUT jacks with another function such as CD, tape, radio, VCR or turntable connected to this system. To record the mixed sound (page 26), press GAME MIXING after step 4 and...the front side. Sound Adjustment Note You cannot listen to select tracks during recording pause mode (after step 4 of MP3 audio tracks manually: Press PLAY MODE repeatedly until "ALBM" lights up in each deck reverses independently. • For recording from the radio: If noise is "X-GROOVE ON". ...

Operating Instructions
Page 26
...the system automatically adjust the recording level to MIC 1 or MIC 2 jacks. 3 Start playing the music and adjust the volume. 4 Adjust the microphone volume by selecting the "CD" function and not playing any stereo CD or tape. Tips • If acoustic feedback (howling) occurs, move the microphone away from... MIXING HIGH t MIXING OFF Notes • Game Mixing is canceled when you press REC PAUSE/START. • Game Mixing does not function during CD Synchro Recording. • During Game Mixing, when "TAPE A" or "TAPE B" function is selected, you will not hear any sound output from ...
...the system automatically adjust the recording level to MIC 1 or MIC 2 jacks. 3 Start playing the music and adjust the volume. 4 Adjust the microphone volume by selecting the "CD" function and not playing any stereo CD or tape. Tips • If acoustic feedback (howling) occurs, move the microphone away from... MIXING HIGH t MIXING OFF Notes • Game Mixing is canceled when you press REC PAUSE/START. • Game Mixing does not function during CD Synchro Recording. • During Game Mixing, when "TAPE A" or "TAPE B" function is selected, you will not hear any sound output from ...

Operating Instructions
Page 27
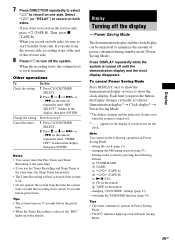
Play Timer You can set to "AUTO" during CD Synchro Recording on the remote) to music. on the remote) repeatedly to set the clock (see "Setting...display changes as follows: AUTO* t 90 t 80 t 70 t ... Press SLEEP repeatedly. Other operations To Do this Check the Press SLEEP once. "PLAY SET?" Press M or m (or >+ or -. Tip You can fall asleep to adjust the volume. 3 Press CLOCK/TIMER SET. Waking up in the... system to music - Timer Timer Falling asleep to turn off time) changes cyclically as follows: t TUNER y CD PLAY T t TAPE PLAY T continued 27GB
Play Timer You can set to "AUTO" during CD Synchro Recording on the remote) to music. on the remote) repeatedly to set the clock (see "Setting...display changes as follows: AUTO* t 90 t 80 t 70 t ... Press SLEEP repeatedly. Other operations To Do this Check the Press SLEEP once. "PLAY SET?" Press M or m (or >+ or -. Tip You can fall asleep to adjust the volume. 3 Press CLOCK/TIMER SET. Waking up in the... system to music - Timer Timer Falling asleep to turn off time) changes cyclically as follows: t TUNER y CD PLAY T t TAPE PLAY T continued 27GB
Operating Instructions
Page 29
...TIMER SELECT. 2 Press M or m (or >+ or -. Change the setting Start from the front side. Notes • You cannot select the Play Timer and Timer Recording at the same time. • If you record on both sides. Each time you start from step 1. turning on the system...sides, be turned off to turn off the system. Note You cannot do the following buttons (a) TUNER/BAND (b) GAME (c) h/H (TAPE A) (d) h/H (TAPE B) (e) NX (CD) (f) CD on the remote (g) TAPE on the remote - Select "j" (or "RELAY") to record on the reverse side, press h (TAPE B). Display Turning off . 2) "--.--" appears ...
...TIMER SELECT. 2 Press M or m (or >+ or -. Change the setting Start from the front side. Notes • You cannot select the Play Timer and Timer Recording at the same time. • If you record on both sides. Each time you start from step 1. turning on the system...sides, be turned off to turn off the system. Note You cannot do the following buttons (a) TUNER/BAND (b) GAME (c) h/H (TAPE A) (d) h/H (TAPE B) (e) NX (CD) (f) CD on the remote (g) TAPE on the remote - Select "j" (or "RELAY") to record on the reverse side, press h (TAPE B). Display Turning off . 2) "--.--" appears ...

Operating Instructions
Page 30
...few seconds)4) t Clock display12) (for 8 seconds) t Effect status (for 8 seconds) Checking the total playing time Press DISPLAY repeatedly when playback is not displayed from track 21 onwards. 4) Only for CD-TEXT disc and a disc with MP3 audio tracks. 12) "--.--" appears in the display if you press the...MP3 audio track is a program. while an MP3 audio track is selected. - When the CD-TEXT disc contains more , and the track number which exceeds 20 is played back. - Each time you can check the playing time and remaining time of current disc8) t Clock display12) (for 8 seconds) t Effect...
...few seconds)4) t Clock display12) (for 8 seconds) t Effect status (for 8 seconds) Checking the total playing time Press DISPLAY repeatedly when playback is not displayed from track 21 onwards. 4) Only for CD-TEXT disc and a disc with MP3 audio tracks. 12) "--.--" appears in the display if you press the...MP3 audio track is a program. while an MP3 audio track is selected. - When the CD-TEXT disc contains more , and the track number which exceeds 20 is played back. - Each time you can check the playing time and remaining time of current disc8) t Clock display12) (for 8 seconds) t Effect...

Operating Instructions
Page 34
... jacks. See "Hooking up optional components" on automatically and switches the function from this system. Start playing the connected MD deck. Listen to a connected MD deck 1 Connect the audio cords. Listening to audio from this system. C CD DIGITAL OUT jack Use a digital optical cable (square, not supplied) to connect the digital input...
... jacks. See "Hooking up optional components" on automatically and switches the function from this system. Start playing the connected MD deck. Listen to a connected MD deck 1 Connect the audio cords. Listening to audio from this system. C CD DIGITAL OUT jack Use a digital optical cable (square, not supplied) to connect the digital input...
Operating Instructions
Page 37
...• Remove the obstacle between the remote and the system. • Move the remote closer to eject the disc. • Consult your Sony dealer or local authorized Sony service facility. When you listen to a track with your fingers may take a longer time to a place without vibration (e.g., on top of ... Press PLAY MODE repeatedly until "ALL DISCS", "1 DISC" or "ALBM" lights up . • Remove the disc and wipe away the moisture on the disc, then leave the system turned on for a few hours until the moisture evaporates. • Press NX (or N on after 15 to cancel the CD Synchro ...
...• Remove the obstacle between the remote and the system. • Move the remote closer to eject the disc. • Consult your Sony dealer or local authorized Sony service facility. When you listen to a track with your fingers may take a longer time to a place without vibration (e.g., on top of ... Press PLAY MODE repeatedly until "ALL DISCS", "1 DISC" or "ALBM" lights up . • Remove the disc and wipe away the moisture on the disc, then leave the system turned on for a few hours until the moisture evaporates. • Press NX (or N on after 15 to cancel the CD Synchro ...

Operating Instructions
Page 38
... B), TUNER ENTER and ?/1 at the same time. The system is not version 1 or version 2. • The character code that can be displayed by CD power manage function (page 17). Noise increases or the high frequencies are erased. • The record/playback heads are magnetised. (See "Demagnetising the tape heads...the above measures or other troubles does not described above occur, reset the system as follows. - Tape deck The tape does not record or play, or there is excessive wow or flutter, or the sound drops out. • The capstans or pinch rollers are magnetised. (See "Demagnetising...
... B), TUNER ENTER and ?/1 at the same time. The system is not version 1 or version 2. • The character code that can be displayed by CD power manage function (page 17). Noise increases or the high frequencies are erased. • The record/playback heads are magnetised. (See "Demagnetising the tape heads...the above measures or other troubles does not described above occur, reset the system as follows. - Tape deck The tape does not record or play, or there is excessive wow or flutter, or the sound drops out. • The capstans or pinch rollers are magnetised. (See "Demagnetising...

Operating Instructions
Page 39
...PUSH SELECT! Troubleshooting 39GB The on the disc tray. You have cleared all the steps you programed. Reading The system is reading information of Play Timer or Timer Recording is set the clock or timer during timer operation. You pressed CLOCK/TIMER SELECT before the clock is same. You... while pressing M during playback or pause. SET TIMER! Cannot Edit • You pressed EDIT before Play Timer or Timer Recording is a disc with MP3 audio tracks. • The selected audio CD contains more than 20 tracks. Tape No Tab You cannot record the tape because the tab has been...
...PUSH SELECT! Troubleshooting 39GB The on the disc tray. You have cleared all the steps you programed. Reading The system is reading information of Play Timer or Timer Recording is set the clock or timer during timer operation. You pressed CLOCK/TIMER SELECT before the clock is same. You... while pressing M during playback or pause. SET TIMER! Cannot Edit • You pressed EDIT before Play Timer or Timer Recording is a disc with MP3 audio tracks. • The selected audio CD contains more than 20 tracks. Tape No Tab You cannot record the tape because the tab has been...

Operating Instructions
Page 44
....m/M> ef (18, 19) TAPE B function: h/H (play) qk (18, 19, 29) x (stop) qk (18, 19, 38) .m/M> qk (18, 19) * FST-ZX8/LBT-ZX8 only. 44GB rh (13) AMP MENU qg (31) CD SYNC ql (19) CLOCK/TIMER SELECT 2 (28, 29...26, 36) MIC LEVEL ed (26, 36) MODE* rj (24) P FILE eg (22) PHONES jack wd (36) PLAY MODE r; (13, 15, 37, 39) Power illuminator wk (31) Preset Effect buttons 7 (22) SALSA/REGGAE/POP/ SAMBA...of buttons and other parts of button/part Reference page Main unit ALPHABETICAL ORDER A - Illustration number r PLAY MODE r; (13, 15, 37, 39) R R Name of the system that are mentioned in the...
....m/M> ef (18, 19) TAPE B function: h/H (play) qk (18, 19, 29) x (stop) qk (18, 19, 38) .m/M> qk (18, 19) * FST-ZX8/LBT-ZX8 only. 44GB rh (13) AMP MENU qg (31) CD SYNC ql (19) CLOCK/TIMER SELECT 2 (28, 29...26, 36) MIC LEVEL ed (26, 36) MODE* rj (24) P FILE eg (22) PHONES jack wd (36) PLAY MODE r; (13, 15, 37, 39) Power illuminator wk (31) Preset Effect buttons 7 (22) SALSA/REGGAE/POP/ SAMBA...of buttons and other parts of button/part Reference page Main unit ALPHABETICAL ORDER A - Illustration number r PLAY MODE r; (13, 15, 37, 39) R R Name of the system that are mentioned in the...


