
Operating Instructions
Page 2
... abnormality in the unit, disconnect the main plug from earphones and headphones can cause hearing loss. Model No. This symbol is used to disconnect the unit from the AC power source (mains) as long as vases, on the apparatus. The following FCC statement...apparatus to the presence of important operating and maintenance (servicing) instructions in the literature accompanying the appliance. Should you call upon your Sony dealer regarding this product. Serial No. Excessive sound pressure from the AC outlet immediately. For customer in cabinet. Do not expose...
... abnormality in the unit, disconnect the main plug from earphones and headphones can cause hearing loss. Model No. This symbol is used to disconnect the unit from the AC power source (mains) as long as vases, on the apparatus. The following FCC statement...apparatus to the presence of important operating and maintenance (servicing) instructions in the literature accompanying the appliance. Should you call upon your Sony dealer regarding this product. Serial No. Excessive sound pressure from the AC outlet immediately. For customer in cabinet. Do not expose...

Operating Instructions
Page 3
... 15 of the FCC Rules. CAUTION You are cautioned that to which can radiate radio frequency energy and, if not installed and used , use caution when moving the cart/apparatus combination to avoid injury from that any way, such as radiators, heat registers, stoves, or ...the third prong are designed to provide reasonable protection against harmful interference in this apparatus near any ventilation openings. When a cart is used in any changes or modification not expressly approved in a residential installation. Install in a particular installation. If the provided plug does ...
... 15 of the FCC Rules. CAUTION You are cautioned that to which can radiate radio frequency energy and, if not installed and used , use caution when moving the cart/apparatus combination to avoid injury from that any way, such as radiators, heat registers, stoves, or ...the third prong are designed to provide reasonable protection against harmful interference in this apparatus near any ventilation openings. When a cart is used in any changes or modification not expressly approved in a residential installation. Install in a particular installation. If the provided plug does ...

Operating Instructions
Page 4
...conform to the Compact Disc (CD) standard. In this manual are for illustration purposes unless stated otherwise. About this manual The instructions in this manual, the LBT-ZX99i is used for models LBT-ZX99i and LBT-ZX66i. iPod is not guaranteed. Speaker System • Front speakers SS-...ZX66i 4US and other side. Unit HCD-ZX99i - MPEG Layer-3 audio coding technology and patents licensed from...
...conform to the Compact Disc (CD) standard. In this manual are for illustration purposes unless stated otherwise. About this manual The instructions in this manual, the LBT-ZX99i is used for models LBT-ZX99i and LBT-ZX66i. iPod is not guaranteed. Speaker System • Front speakers SS-...ZX66i 4US and other side. Unit HCD-ZX99i - MPEG Layer-3 audio coding technology and patents licensed from...

Operating Instructions
Page 5
... ..........6 Getting Started Hooking up the system 11 Positioning the speakers 15 Setting the clock 16 Basic Operations Playing a CD/MP3 disc 17 Listening to the radio 19 Playing the iPod 20 Using optional components........22 Adjusting the sound 22 Creating a party atmosphere ......23 (LBT-ZX99i only) Selecting the speaker setting ......25 (LBT-ZX99i only) Enhancing the video...
... ..........6 Getting Started Hooking up the system 11 Positioning the speakers 15 Setting the clock 16 Basic Operations Playing a CD/MP3 disc 17 Listening to the radio 19 Playing the iPod 20 Using optional components........22 Adjusting the sound 22 Creating a party atmosphere ......23 (LBT-ZX99i only) Selecting the speaker setting ......25 (LBT-ZX99i only) Enhancing the video...
Operating Instructions
Page 6
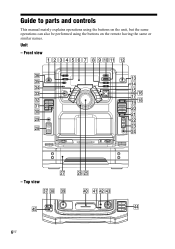
wa wl ws wd wk wf wj - Front view 1234567 89q;qa qs eh qd eg qf ef qg ed qh qj es qk ql ea w; Unit - Guide to parts and controls This manual mainly explains operations using the buttons on the unit, but the same operations can also be performed using the buttons on the remote having the same or similar names. e; ra rsrd rg PLAY MODE HS s rf 6US Top view ej ek el wh wg r;
wa wl ws wd wk wf wj - Front view 1234567 89q;qa qs eh qd eg qf ef qg ed qh qj es qk ql ea w; Unit - Guide to parts and controls This manual mainly explains operations using the buttons on the unit, but the same operations can also be performed using the buttons on the remote having the same or similar names. e; ra rsrd rg PLAY MODE HS s rf 6US Top view ej ek el wh wg r;

Operating Instructions
Page 9
... reception. Press to pause playback. rs (LBT-ZX99i only) X-ROUND ON/OFF (pages 23, 25) Press to select X-ROUND setting. rd (LBT-ZX99i only) JOG (page 24) Turn to activate or deactivate X-ROUND mode. Use the tactile dots as references when operating the system. ra (LBT-ZX99i only) MODE (page 23) When X-ROUND... REPEAT/FM MODE (pages 17, 37) Press to select a preset sound effect. rh EQ (pages 22, 31) Press to change the Repeat Play setting of CD function. rj CLEAR (page 30) Press to stop playback. t; x (stop) (pages 17, 19) Press to select the play mode of MP3 files. ...
... reception. Press to pause playback. rs (LBT-ZX99i only) X-ROUND ON/OFF (pages 23, 25) Press to select X-ROUND setting. rd (LBT-ZX99i only) JOG (page 24) Turn to activate or deactivate X-ROUND mode. Use the tactile dots as references when operating the system. ra (LBT-ZX99i only) MODE (page 23) When X-ROUND... REPEAT/FM MODE (pages 17, 37) Press to select a preset sound effect. rh EQ (pages 22, 31) Press to change the Repeat Play setting of CD function. rj CLEAR (page 30) Press to stop playback. t; x (stop) (pages 17, 19) Press to select the play mode of MP3 files. ...

Operating Instructions
Page 12
...Use an audio cord (not supplied) to connect the audio output of TV to these jacks. You can then output audio through this system... FM lead antenna horizontally Note Keep the antennas away from this system. 12US D VIDEO OUT jack Use a video cable (not supplied) to connect the video input...SUEPREARAKOKEURENBRD) L Grey L R (SPFERAOKNERT A) Notes • Be sure to use only the supplied speakers. • Be sure to the terminals on the... correctly. Black (#) Black (#) Red (3) Red (3) Surround speakers (LBT-ZX99i only) Connect the speaker cords to the SPEAKER SURROUND (SPEAKER B) ...
...Use an audio cord (not supplied) to connect the audio output of TV to these jacks. You can then output audio through this system... FM lead antenna horizontally Note Keep the antennas away from this system. 12US D VIDEO OUT jack Use a video cable (not supplied) to connect the video input...SUEPREARAKOKEURENBRD) L Grey L R (SPFERAOKNERT A) Notes • Be sure to use only the supplied speakers. • Be sure to the terminals on the... correctly. Black (#) Black (#) Red (3) Red (3) Surround speakers (LBT-ZX99i only) Connect the speaker cords to the SPEAKER SURROUND (SPEAKER B) ...

Operating Instructions
Page 13
... last for a long period of the optional video game player to these jacks. You can then output video through this system. When you do not use . Note The video game player image may appear on and the demonstration automatically ends. The demonstration appears in the display.... You can then output audio through this system. Getting Started F PC IN L/R jacks Use an audio cord (not supplied) to connect the audio output of the computer to a wall outlet. H Power Connect the...
... last for a long period of the optional video game player to these jacks. You can then output video through this system. When you do not use . Note The video game player image may appear on and the demonstration automatically ends. The demonstration appears in the display.... You can then output audio through this system. Getting Started F PC IN L/R jacks Use an audio cord (not supplied) to connect the audio output of the computer to a wall outlet. H Power Connect the...

Operating Instructions
Page 14
...CLOSE again to close the disc tray. Sub panel 14US Use the buttons on the unit for the operation. 1 Press "/1 to turn on the bottom of the speakers to stabilize the speakers and to prevent them from slipping. (LBT-ZX99i only) (LBT-ZX66i only) When carrying the unit Do the following ...sure to disconnect the iPod. (LBT-ZX99i only) When carrying the front and surround speakers Do not carry the front and surround speakers by their sub panel. Attaching the speaker pads Attach the supplied speaker pads at each corner on the system. 2 Press FUNCTION repeatedly to select "CD". 3 Press Z OPEN/CLOSE...
...CLOSE again to close the disc tray. Sub panel 14US Use the buttons on the unit for the operation. 1 Press "/1 to turn on the bottom of the speakers to stabilize the speakers and to prevent them from slipping. (LBT-ZX99i only) (LBT-ZX66i only) When carrying the unit Do the following ...sure to disconnect the iPod. (LBT-ZX99i only) When carrying the front and surround speakers Do not carry the front and surround speakers by their sub panel. Attaching the speaker pads Attach the supplied speaker pads at each corner on the system. 2 Press FUNCTION repeatedly to select "CD". 3 Press Z OPEN/CLOSE...

Operating Instructions
Page 17
... M during playback until "REP 1" lights up on the remote) to resume playback. The disc tray slides out. Use button on Press +/- on the remote) repeatedly to CD Press one of the when playback is selected for this may not be displayed correctly depending on the remote repeatedly during... playback and release it at the point you want to close it as a CD single, place it on the inner circle of the function from DISC 1 ~ 5 buttons another source and (Automatic Source start playback. 6 Turn ...
... M during playback until "REP 1" lights up on the remote) to resume playback. The disc tray slides out. Use button on Press +/- on the remote) repeatedly to CD Press one of the when playback is selected for this may not be displayed correctly depending on the remote repeatedly during... playback and release it at the point you want to close it as a CD single, place it on the inner circle of the function from DISC 1 ~ 5 buttons another source and (Automatic Source start playback. 6 Turn ...

Operating Instructions
Page 18
...300 MP3 files. • Depending on the encoding/writing software, recording device, or the recording media used to five times. Each time you have the extension ".mp3" may take a longer time for ...tracks or files on page 29). * Suffle Play mode will change the play mode. For AUDIO CDs, this play mode performs the same operation as can only play back MP3 files with a complicated... MPEG 1 Audio Layer 3, MPEG 2 Audio Layer 3 and MPEG 2.5 Audio Layer 3. • This system can be played back (see "Creating your own program" on all discs in Multi Session. - The tracks...
...300 MP3 files. • Depending on the encoding/writing software, recording device, or the recording media used to five times. Each time you have the extension ".mp3" may take a longer time for ...tracks or files on page 29). * Suffle Play mode will change the play mode. For AUDIO CDs, this play mode performs the same operation as can only play back MP3 files with a complicated... MPEG 1 Audio Layer 3, MPEG 2 Audio Layer 3 and MPEG 2.5 Audio Layer 3. • This system can be played back (see "Creating your own program" on all discs in Multi Session. - The tracks...

Operating Instructions
Page 19
...remote) repeatedly to the radio 1 Press TUNER/BAND (or FUNCTION +/- In this case, set the CD power manage function to "CD POWER OFF". on the remote) to turn off , the system turns on automatically and "CD" function is tuned in, "ST" lights up in the display. To stop , see "To... improve tuner reception" below. 4 Turn VOLUME +/- (or press VOLUME +/- Use buttons on the unit for the operation. 1 Press FUNCTION repeatedly to select "CD". 2 Press ?/1 to ...
...remote) repeatedly to the radio 1 Press TUNER/BAND (or FUNCTION +/- In this case, set the CD power manage function to "CD POWER OFF". on the remote) to turn off , the system turns on automatically and "CD" function is tuned in, "ST" lights up in the display. To stop , see "To... improve tuner reception" below. 4 Turn VOLUME +/- (or press VOLUME +/- Use buttons on the unit for the operation. 1 Press FUNCTION repeatedly to select "CD". 2 Press ?/1 to ...

Operating Instructions
Page 20
... appears, hold down . Notes • When you connect an iPod to the unit, the iPod is automatically turned on if the system is designed for iPod only. To change the CD power manage setting in the same angle as that of the iPod connector on the unit and do not twist or... may cause a malfunction. • When placing or removing the iPod, brace the unit with an iPod set CD power on the remote) to adjust the volume. on automatically. Doing so may not able to use VOLUME +/-. "AM 9K STEP" or "AM 10K STEP" appears in the display. The volume level does not...
... appears, hold down . Notes • When you connect an iPod to the unit, the iPod is automatically turned on if the system is designed for iPod only. To change the CD power manage setting in the same angle as that of the iPod connector on the unit and do not twist or... may cause a malfunction. • When placing or removing the iPod, brace the unit with an iPod set CD power on the remote) to adjust the volume. on automatically. Doing so may not able to use VOLUME +/-. "AM 9K STEP" or "AM 10K STEP" appears in the display. The volume level does not...

Operating Instructions
Page 21
...Tips • If you press NX while the system is turned off, the system turns on automatically and "iPod" function is on the iPod connector. Note You can use the system as a battery charger for the iPod when the system is selected. To use the system as a battery charger You can confirm menu and... the iPod may not be playback. • The following buttons on Center button. • To use an iPod, refer to the operating instructions of your iPod. • Sony cannot accept responsibility in the iPod screen and when the system is an iPod connected to the iPod dock (One Touch Play).
...Tips • If you press NX while the system is turned off, the system turns on automatically and "iPod" function is on the iPod connector. Note You can use the system as a battery charger for the iPod when the system is selected. To use the system as a battery charger You can confirm menu and... the iPod may not be playback. • The following buttons on Center button. • To use an iPod, refer to the operating instructions of your iPod. • Sony cannot accept responsibility in the iPod screen and when the system is an iPod connected to the iPod dock (One Touch Play).
Operating Instructions
Page 22
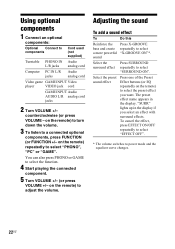
.... 22US To cancel the effect, press EFFECT ON/OFF repeatedly to select "EFFECT OFF". * The volume switches to select "SURROUND ON". Using optional components 1 Connect an optional components: Optional Connect to select "X-GROOVE ON"*. The preset effect name appears in the display if you want... sound To add a sound effect To Do this Reinforce the bass and create a more powerful sound Press X-GROOVE repeatedly to components Cord used (not supplied) Turntable PHONO IN Audio L/R jacks analog cord Computer PC IN L/R Audio jacks analog cord Video game GAME INPUT Video player...
.... 22US To cancel the effect, press EFFECT ON/OFF repeatedly to select "EFFECT OFF". * The volume switches to select "SURROUND ON". Using optional components 1 Connect an optional components: Optional Connect to select "X-GROOVE ON"*. The preset effect name appears in the display if you want... sound To add a sound effect To Do this Reinforce the bass and create a more powerful sound Press X-GROOVE repeatedly to components Cord used (not supplied) Turntable PHONO IN Audio L/R jacks analog cord Computer PC IN L/R Audio jacks analog cord Video game GAME INPUT Video player...

Operating Instructions
Page 23
... X-ROUND ON/OFF repeatedly until the X-ROUND ON/ OFF button lights up. Creating a party atmosphere (LBT-ZX99i only) You can create a party environment by using X-ROUND for "moving" sound effect or/and SOUND FLASH for LBT-ZX99i only" on the system. Notes • You can only listen to MP3 Booster effect during playback. 1 Press AMP MENU...
... X-ROUND ON/OFF repeatedly until the X-ROUND ON/ OFF button lights up. Creating a party atmosphere (LBT-ZX99i only) You can create a party environment by using X-ROUND for "moving" sound effect or/and SOUND FLASH for LBT-ZX99i only" on the system. Notes • You can only listen to MP3 Booster effect during playback. 1 Press AMP MENU...

Operating Instructions
Page 32
... jack. If acoustic feedback (howling) occurs, reduce the volume, move the microphone away from the MIC 1 and/or MIC 2 jack. Using the timer The system offers two timer functions. The minute display (turn off after the current disc finishes playing. "ON" appears and the hour indication flashes in ...the remote). Make sure you have finished, turn the MIC LEVEL to turn -off in the display. 32US t SLEEP 10min t SLEEP OFF * The system automatically turns off time) changes cyclically as follows: SLEEP AUTO* t SLEEP 90min t SLEEP 80min t ... However, you can not check the remaining ...
... jack. If acoustic feedback (howling) occurs, reduce the volume, move the microphone away from the MIC 1 and/or MIC 2 jack. Using the timer The system offers two timer functions. The minute display (turn off after the current disc finishes playing. "ON" appears and the hour indication flashes in ...the remote). Make sure you have finished, turn the MIC LEVEL to turn -off in the display. 32US t SLEEP 10min t SLEEP OFF * The system automatically turns off time) changes cyclically as follows: SLEEP AUTO* t SLEEP 90min t SLEEP 80min t ... However, you can not check the remaining ...

Operating Instructions
Page 33
... setting remains as long as step 4. 6 Select the sound source. The display will show the timer settings. 7 Press ?/1 to stop playback using the Play Timer. • The system turns on 30 seconds before the preset time. Other operations To Do this Check the setting 1 Press TIMER MENU. flashes in the display..., the Play Timer will not be activated depending on the status of the connected iPod or iPod touch. 33US Other Operations If the system is not playing when using the same procedure as the setting is not canceled manually. • Be sure that the iPod is on at the same time,...
... setting remains as long as step 4. 6 Select the sound source. The display will show the timer settings. 7 Press ?/1 to stop playback using the Play Timer. • The system turns on 30 seconds before the preset time. Other operations To Do this Check the setting 1 Press TIMER MENU. flashes in the display..., the Play Timer will not be activated depending on the status of the connected iPod or iPod touch. 33US Other Operations If the system is not playing when using the same procedure as the setting is not canceled manually. • Be sure that the iPod is on at the same time,...

Operating Instructions
Page 34
... some parts during repair, these parts may be found even after doing all the above items, consult your nearest Sony dealer. After checking the above , consult your nearest Sony dealer. Set the clock (page 16) and timer settings (page 32) again. If the problem persists after ...Set the clock (page 16). • A power failure has occurred. circuited? • Are you using the supplied speakers? • Is anything blocking the ventilation holes on the remote) or turn on the system. • The demonstration mode started. The clock or timer setting is canceled. • The power...
... some parts during repair, these parts may be found even after doing all the above items, consult your nearest Sony dealer. After checking the above , consult your nearest Sony dealer. Set the clock (page 16) and timer settings (page 32) again. If the problem persists after ...Set the clock (page 16). • A power failure has occurred. circuited? • Are you using the supplied speakers? • Is anything blocking the ventilation holes on the remote) or turn on the system. • The demonstration mode started. The clock or timer setting is canceled. • The power...

Operating Instructions
Page 36
... may take time to start from the speaker cords as possible. • Try turning off the surrounding electrical equipment. • Set "CD POWER OFF" by this system" (page 42) for the supported device types. The sound is connected securely. the number of the iPod to ISO9660 Level 1/ Level ..." lights up the antenna again. Symbols Other characters may not be displayed by CD power manage function (page 19). The folder name, track name, file name, ID3 tag and CD-TEXT characters do not appear properly. • Use a disc that can not be played back. • The MP3 file is...
... may take time to start from the speaker cords as possible. • Try turning off the surrounding electrical equipment. • Set "CD POWER OFF" by this system" (page 42) for the supported device types. The sound is connected securely. the number of the iPod to ISO9660 Level 1/ Level ..." lights up the antenna again. Symbols Other characters may not be displayed by CD power manage function (page 19). The folder name, track name, file name, ID3 tag and CD-TEXT characters do not appear properly. • Use a disc that can not be played back. • The MP3 file is...


