Limited Warranty (US Only)
Page 1
... days of the date of one (1) year. 4-557-172-02 General Stereo/Hifi Components/Tape Decks ® CD Players/Mini Disc Players/Audio Systems Hifi Audio LIMITED WARRANTY Sony Electronics Inc. ("Sony") warrants this Product is determined to be presented to service the Product. This warranty is valid only in material or workmanship as fuses or batteries). Proof of purchase in either its option, at no...
... days of the date of one (1) year. 4-557-172-02 General Stereo/Hifi Components/Tape Decks ® CD Players/Mini Disc Players/Audio Systems Hifi Audio LIMITED WARRANTY Sony Electronics Inc. ("Sony") warrants this Product is determined to be presented to service the Product. This warranty is valid only in material or workmanship as fuses or batteries). Proof of purchase in either its option, at no...
Operating Instructions
Page 2
... the deck. This equipment generates, uses, and can be determined by turning the equipment off and on the rear exterior. Reorient or relocate the receiving antenna. - ENERGY STAR® is located inside the apparatus. This appliance is located on , the user is encouraged to try to which can radiate radio frequency energy and, if not installed and used in a particular installation. This...
... the deck. This equipment generates, uses, and can be determined by turning the equipment off and on the rear exterior. Reorient or relocate the receiving antenna. - ENERGY STAR® is located inside the apparatus. This appliance is located on , the user is encouraged to try to which can radiate radio frequency energy and, if not installed and used in a particular installation. This...
Operating Instructions
Page 3
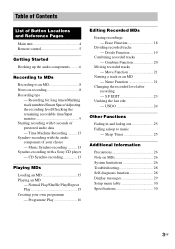
... a track or an MD - Time Machine Recording .......... 13 Synchro-recording with a Sony CD player - UNDO 24 Other Functions Fading in and fading out 25 Falling asleep to an MD 8 Notes on MDs 26 System limitations 26 Troubleshooting 28 Self-diagnosis function 28 Display messages 29 Setup menu table 30 Specifications 30 3GB Name Function 21 Changing the recorded level after recording - Erase Function 18 Dividing recorded tracks...
... a track or an MD - Time Machine Recording .......... 13 Synchro-recording with a Sony CD player - UNDO 24 Other Functions Fading in and fading out 25 Falling asleep to an MD 8 Notes on MDs 26 System limitations 26 Troubleshooting 28 Self-diagnosis function 28 Display messages 29 Setup menu table 30 Specifications 30 3GB Name Function 21 Changing the recorded level after recording - Erase Function 18 Dividing recorded tracks...
Operating Instructions
Page 6
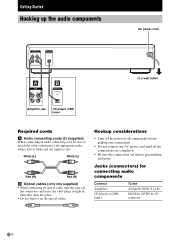
... place. • Do not bend or tie the optical cables. Hookup considerations • Turn off the connectors and insert the cable plugs straight in until all the connections are completed. • Be sure the connections are firm to red. Jacks (connectors) for connecting audio components Connect Amplifiers CD players or DBS tuners To the ANALOG IN/OUT jacks DIGITAL OPTICAL IN connector 6GB Getting Started Hooking up the audio components AC power cord A B to a wall outlet...
... place. • Do not bend or tie the optical cables. Hookup considerations • Turn off the connectors and insert the cable plugs straight in until all the connections are completed. • Be sure the connections are firm to red. Jacks (connectors) for connecting audio components Connect Amplifiers CD players or DBS tuners To the ANALOG IN/OUT jacks DIGITAL OPTICAL IN connector 6GB Getting Started Hooking up the audio components AC power cord A B to a wall outlet...
Operating Instructions
Page 8
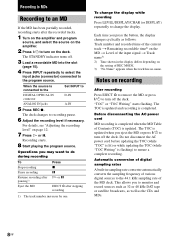
... digital sources to the program source. Operations you to ensure a complete recording. "TOC" or "TOC Writing" starts flashing. The TOC is updated when you press the button, the display changes cyclically as the CDs and MDs. 8GB Recording starts. 8 Start playing the program source. Each time you eject the MD or press ?/1 to turn off . 3 Load a recordable MD into the slot (page 15). 4 Press INPUT repeatedly to select the input jacks (connector) connected...
... digital sources to the program source. Operations you to ensure a complete recording. "TOC" or "TOC Writing" starts flashing. The TOC is updated when you press the button, the display changes cyclically as the CDs and MDs. 8GB Recording starts. 8 Start playing the program source. Each time you eject the MD or press ?/1 to turn off . 3 Load a recordable MD into the slot (page 15). 4 Press INPUT repeatedly to select the input jacks (connector) connected...

Operating Instructions
Page 9
... recordable time for long times This deck has two long time recording modes: LP2 and LP4 (MDLP recording). When recording in LP2 Stereo mode, you press REC MODE repeatedly to select MONO, the monitor signal during recording does not become monaural. • You cannot use S.F Edit and some MD edit functions for systems that support MDLP mode. • When set to an MD is completed, so be played back...
... recordable time for long times This deck has two long time recording modes: LP2 and LP4 (MDLP recording). When recording in LP2 Stereo mode, you press REC MODE repeatedly to select MONO, the monitor signal during recording does not become monaural. • You cannot use S.F Edit and some MD edit functions for systems that support MDLP mode. • When set to an MD is completed, so be played back...
Operating Instructions
Page 10
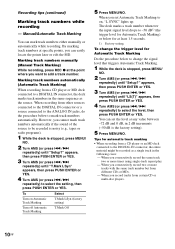
... a source connected to the ANALOG IN jacks, do the procedure below for Automatic Track Marking) or below to on Automatic Track Marking Turn off Automatic Track Marking T.Mark LSyn (factory setting) T.Mark Off 5 Press MENU/NO. Marking track numbers automatically (Automatic Track Marking) When recording from certain CD or multi-disc players. 10GB When you record tracks from a CD player or MD deck connected to a DIGITAL IN...
... a source connected to the ANALOG IN jacks, do the procedure below for Automatic Track Marking) or below to on Automatic Track Marking Turn off Automatic Track Marking T.Mark LSyn (factory setting) T.Mark Off 5 Press MENU/NO. Marking track numbers automatically (Automatic Track Marking) When recording from certain CD or multi-disc players. 10GB When you record tracks from a CD player or MD deck connected to a DIGITAL IN...
Operating Instructions
Page 11
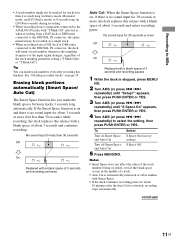
... (in LP4 Stereo mode) during recording. • When recording from a component connected to the ANALOG IN jacks with "T.Mark Off" selected or when recording from a DAT deck or DBS tuner connected to select the setting, then press PUSH ENTER or YES. No sound input for about 3 seconds and enters recording pause. To Turn on page 19. No sound input for less than 30 seconds Off On Replaced with...
... (in LP4 Stereo mode) during recording. • When recording from a component connected to the ANALOG IN jacks with "T.Mark Off" selected or when recording from a DAT deck or DBS tuner connected to select the setting, then press PUSH ENTER or YES. No sound input for about 3 seconds and enters recording pause. To Turn on page 19. No sound input for less than 30 seconds Off On Replaced with...
Operating Instructions
Page 12
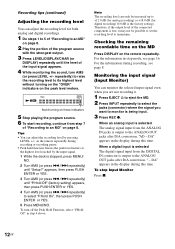
... highest level without turning on the "OVER" indicators on these indicators 5 Stop playing the program source. 6 To start recording, continue from step 7 of the connected component is low, it . 1 Press EJECT A to eject the MD. 2 Press INPUT repeatedly to select the jacks (connector) where the signal you want to monitor is output to the ANALOG OUT jacks after D/A conversion. When a digital input is selected The digital signal input from the ANALOG IN jacks is being input...
... highest level without turning on the "OVER" indicators on these indicators 5 Stop playing the program source. 6 To start recording, continue from step 7 of the connected component is low, it . 1 Press EJECT A to eject the MD. 2 Press INPUT repeatedly to select the jacks (connector) where the signal you want to monitor is output to the ANALOG OUT jacks after D/A conversion. When a digital input is selected The digital signal input from the ANALOG IN jacks is being input...
Operating Instructions
Page 13
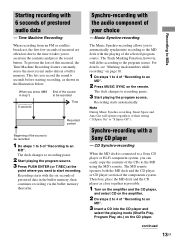
... the sound 6 seconds before starting recording, as possible. 1 Turn on the amplifier and the CD player, and select CD on the amplifier. 2 Do steps 2 to 4 of "Recording to recording pause. 3 Start playing the program source. CD Synchro-recording When the MD deck is connected to a Sony CD player or Hi-Fi component system, you want to the MD using the MD's remote. Recording starts with the playing of the selected program source. Synchro...
... the sound 6 seconds before starting recording, as possible. 1 Turn on the amplifier and the CD player, and select CD on the amplifier. 2 Do steps 2 to 4 of "Recording to recording pause. 3 Start playing the program source. CD Synchro-recording When the MD deck is connected to a Sony CD player or Hi-Fi component system, you want to the MD using the MD's remote. Recording starts with the playing of the selected program source. Synchro...
Operating Instructions
Page 15
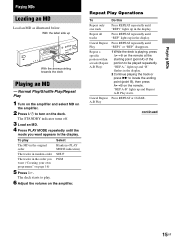
... REPEAT repeatedly until the mode you want appears in the display. Repeat a specific portion within a track (Repeat A-B Play) 1 While the deck is playing, press AyB on the remote at the starting point (point A) of the portion to locate the ending point (point B), then press AyB on the amplifier. Cancel Repeat Press REPEAT or CLEAR. To play . 6 Adjust the volume on the...
... REPEAT repeatedly until the mode you want appears in the display. Repeat a specific portion within a track (Repeat A-B Play) 1 While the deck is playing, press AyB on the remote at the starting point (point A) of the portion to locate the ending point (point B), then press AyB on the amplifier. Cancel Repeat Press REPEAT or CLEAR. To play . 6 Adjust the volume on the...
Operating Instructions
Page 16
... the number button(s) on the remote. "-" equal to the number of digits for the number of the current track during play . 16GB 1) Automatic Music Sensor 2) When you locate a point while monitoring the sound. 3) When you locate by total playing time of the track you reach the desired point. Resume play after stopping play Turn AMS counterclockwise (or press . during play Press x. The display changes cyclically as follows: During playing Track number...
... the number button(s) on the remote. "-" equal to the number of digits for the number of the current track during play . 16GB 1) Automatic Music Sensor 2) When you locate a point while monitoring the sound. 3) When you locate by total playing time of the track you reach the desired point. Resume play after stopping play Turn AMS counterclockwise (or press . during play Press x. The display changes cyclically as follows: During playing Track number...

Operating Instructions
Page 17
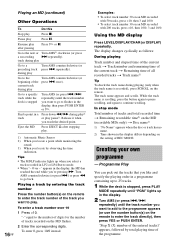
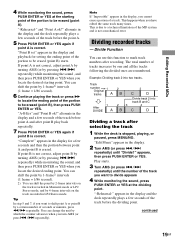
... recorded tracks" (page 21) and "Naming a track or an MD" (page 21) using the Net MD function, etc.) other tracks. 4 Press N. Before disconnecting the AC power cord MD editing is completed when the MD Table of programme tracks While the deck is normal play mode is stopped and the "PGM" lights up, press LEVEL/DISPLAY/CHAR repeatedly. See this page for details. 3 Repeat step...
... recorded tracks" (page 21) and "Naming a track or an MD" (page 21) using the Net MD function, etc.) other tracks. 4 Press N. Before disconnecting the AC power cord MD editing is completed when the MD Table of programme tracks While the deck is normal play mode is stopped and the "PGM" lights up, press LEVEL/DISPLAY/CHAR repeatedly. See this page for details. 3 Repeat step...
Operating Instructions
Page 19
... LP4 Stereo mode. Play starts. 3 Turn AMS (or press ./> repeatedly) until "Divide?" continued 19GB "-Rehearsal-" and "Point A ok?" "Point B set" appears in the display and the deck repeatedly plays a few seconds and then the portion between point A and point B is correct. "A-B Ers" and "Point B ok?" This happens when you locate the desired ending point. Editing Recorded MDs 4 While monitoring the sound...
... LP4 Stereo mode. Play starts. 3 Turn AMS (or press ./> repeatedly) until "Divide?" continued 19GB "-Rehearsal-" and "Point A ok?" "Point B set" appears in the display and the deck repeatedly plays a few seconds and then the portion between point A and point B is correct. "A-B Ers" and "Point B ok?" This happens when you locate the desired ending point. Editing Recorded MDs 4 While monitoring the sound...
Operating Instructions
Page 25
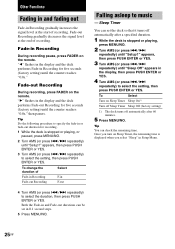
... playing, press MENU/NO. 2 Turn AMS (or press ./> repeatedly) until "Setup?" Once you select "Sleep" in Recording for five seconds (factory setting) until "Setup?" Fade-out Recording gradually decreases the signal level at the start of recording. "B" flashes in the display and the deck performs Fade-out Recording for recording. 1 While the deck is displayed when you turn on Sleep Timer, the remaining time is stopped or playing...
... playing, press MENU/NO. 2 Turn AMS (or press ./> repeatedly) until "Setup?" Once you select "Sleep" in Recording for five seconds (factory setting) until "Setup?" Fade-out Recording gradually decreases the signal level at the start of recording. "B" flashes in the display and the deck performs Fade-out Recording for recording. 1 While the deck is displayed when you turn on Sleep Timer, the remaining time is stopped or playing...
Operating Instructions
Page 26
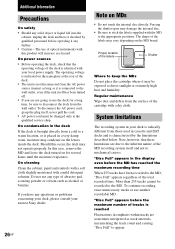
... for a long time, be changed only at the rear of the cartridge with a dry cloth. "Disc Full" appears before the maximum number of the MD recording system itself has been turned off. • If you have any questions or problems concerning your deck, please consult your local power supply. The shape of the labels Shutter Where to direct sunlight or extremely...
... for a long time, be changed only at the rear of the cartridge with a dry cloth. "Disc Full" appears before the maximum number of the MD recording system itself has been turned off. • If you have any questions or problems concerning your deck, please consult your local power supply. The shape of the labels Shutter Where to direct sunlight or extremely...
Operating Instructions
Page 28
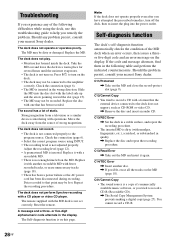
... power outlet. The sound has a lot of strong magnetism. Strong magnetism from the source of static. Repeat the recording procedure. The Self-diagnosis function is not enough time left on this troubleshooting guide to the program source. The deck does not operate or operates poorly. Replace it again. Troubleshooting If you experience any problem persist, consult your nearest Sony dealer. The remote supplied with a CD player or video CD player...
... power outlet. The sound has a lot of strong magnetism. Strong magnetism from the source of static. Repeat the recording procedure. The Self-diagnosis function is not enough time left on this troubleshooting guide to the program source. The deck does not operate or operates poorly. Replace it again. Troubleshooting If you experience any problem persist, consult your nearest Sony dealer. The remote supplied with a CD player or video CD player...

Operating Instructions
Page 29
... display. Initialize (flashing) The Setup Menu settings have disappeared over time. (The message flashes for about 1,700 characters). The program contains the maximum number of this message is an error in the internal data that appear in order to erase a protected track. Tr Protected You attempt to operate. , Consult your nearest Sony dealer. Consult your nearest Sony dealer. Premastered An attempt was unplugged or the digital component turned...
... display. Initialize (flashing) The Setup Menu settings have disappeared over time. (The message flashes for about 1,700 characters). The program contains the maximum number of this message is an error in the internal data that appear in order to erase a protected track. Tr Protected You attempt to operate. , Consult your nearest Sony dealer. Consult your nearest Sony dealer. Premastered An attempt was unplugged or the digital component turned...

Operating Instructions
Page 30
... ATRAC (Adaptive TRansform Acoustic Coding)/ATRAC 3 EFM (Eight-to-Fourteen Modulation) 2 stereo channels 5 to change without notice. projecting parts and controls Mass (approx.) 3.0 kg Supplied accessories Audio connecting cords (2) Optical cable (1) Remote commander (remote) (1) R6 (size-AA) batteries (2) US and foreign patents licensed from the objective lens surface on the MD. Finish the changes and leave S.F Edit mode before turning off the deck while in standby mode) Dimensions (approx.) 430...
... ATRAC (Adaptive TRansform Acoustic Coding)/ATRAC 3 EFM (Eight-to-Fourteen Modulation) 2 stereo channels 5 to change without notice. projecting parts and controls Mass (approx.) 3.0 kg Supplied accessories Audio connecting cords (2) Optical cable (1) Remote commander (remote) (1) R6 (size-AA) batteries (2) US and foreign patents licensed from the objective lens surface on the MD. Finish the changes and leave S.F Edit mode before turning off the deck while in standby mode) Dimensions (approx.) 430...

Marketing Specifications
Page 1
...) L/R • Line Output Jacks (RCA Type) L/R Convenience Features • Timer Standby Recording • MDLP for High Recording Time - Sony, ATRAC, Jog Dial and Remote Commander are property of Sony. All rights reserved. MDS-JE480 MiniDisc Player/Recorder Key Features • MD Player/Recorder • ATRAC® DSP Type S/MDLP/MP3 • Hybrid Pulse DAC 24 Bit • Remote Commander® Remote Control • MD Long Play (MDLP) Modes - Dimensions...
...) L/R • Line Output Jacks (RCA Type) L/R Convenience Features • Timer Standby Recording • MDLP for High Recording Time - Sony, ATRAC, Jog Dial and Remote Commander are property of Sony. All rights reserved. MDS-JE480 MiniDisc Player/Recorder Key Features • MD Player/Recorder • ATRAC® DSP Type S/MDLP/MP3 • Hybrid Pulse DAC 24 Bit • Remote Commander® Remote Control • MD Long Play (MDLP) Modes - Dimensions...


