Operating Instructions
Page 2
... equipment has been tested and found to comply with the Dolby Pro Logic Surround decoder*. * Manufactured under Canadian patent 1,037,877. "Dolby", the double-D symbol ; and "PRO LOGIC" are designed to Part 15 of important operating and maintenance (servicing) instructions in the literature accompanying the appliance. These limits are trademarks of the following measures: - Reorient or relocate the receiving antenna. - Connect the equipment...
... equipment has been tested and found to comply with the Dolby Pro Logic Surround decoder*. * Manufactured under Canadian patent 1,037,877. "Dolby", the double-D symbol ; and "PRO LOGIC" are designed to Part 15 of important operating and maintenance (servicing) instructions in the literature accompanying the appliance. These limits are trademarks of the following measures: - Reorient or relocate the receiving antenna. - Connect the equipment...
Operating Instructions
Page 3
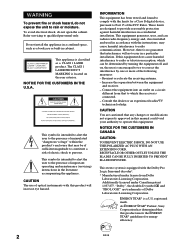
... 27 Sound Adjustment Adjusting the sound 29 Selecting the audio emphasis 29 Changing the spectrum analyzer display 30 Selecting surround effects 30 Enjoying Dolby Pro Logic Surround sound 31 Other Features Using the Radio Data System (RDS)* 32 Falling asleep to music 34 Waking up to music 35 Timer-recording radio programs ....... 36 Optional components Connecting audio components .......... 37 Connecting a VCR 39 Connecting a DVD player 39 Connecting external antennas 40 Additional Information Precautions 42 Troubleshooting 43 Specifications 46 Index Back cover * European model...
... 27 Sound Adjustment Adjusting the sound 29 Selecting the audio emphasis 29 Changing the spectrum analyzer display 30 Selecting surround effects 30 Enjoying Dolby Pro Logic Surround sound 31 Other Features Using the Radio Data System (RDS)* 32 Falling asleep to music 34 Waking up to music 35 Timer-recording radio programs ....... 36 Optional components Connecting audio components .......... 37 Connecting a VCR 39 Connecting a DVD player 39 Connecting external antennas 40 Additional Information Precautions 42 Troubleshooting 43 Specifications 46 Index Back cover * European model...

Operating Instructions
Page 4
... procedure to hook up your system using the supplied cords and accessories. Rear surround speaker (Right) AM loop antenna Rear surround speaker (Left) FM antenna Center surround speaker 2 2 3 1 4 2 5 6 Front speaker (Right) 1 Connect the front speakers. R L + Red/ Solid (3) + - Insert only the stripped portion. Connect the speaker cords to the model you purchased (see "Specifications" on page 46). Getting Started Step 1: Hooking up the system Follow steps 1 through 6 of speakers supplied vary according to the FRONT SPEAKER jacks as...
... procedure to hook up your system using the supplied cords and accessories. Rear surround speaker (Right) AM loop antenna Rear surround speaker (Left) FM antenna Center surround speaker 2 2 3 1 4 2 5 6 Front speaker (Right) 1 Connect the front speakers. R L + Red/ Solid (3) + - Insert only the stripped portion. Connect the speaker cords to the model you purchased (see "Specifications" on page 46). Getting Started Step 1: Hooking up the system Follow steps 1 through 6 of speakers supplied vary according to the FRONT SPEAKER jacks as...

Operating Instructions
Page 5
... prevent noise. • Do not place the rear surround speakers on top of your local power line voltage. Otherwise, the sound will not be heard. 3 Connect the center surround speaker. Jack type B Extend the FM lead AM loop antenna antenna horizontally. Note Black/ Stripe (#) Keep the speaker cords away from the antennas to position of a TV. Connect the speaker cords to the REAR SPEAKER jacks. R L + Red/ Solid (3) - VOLTAGE SELECTOR 110-120V 220...
... prevent noise. • Do not place the rear surround speakers on top of your local power line voltage. Otherwise, the sound will not be heard. 3 Connect the center surround speaker. Jack type B Extend the FM lead AM loop antenna antenna horizontally. Note Black/ Stripe (#) Keep the speaker cords away from the antennas to position of a TV. Connect the speaker cords to the REAR SPEAKER jacks. R L + Red/ Solid (3) - VOLTAGE SELECTOR 110-120V 220...
Operating Instructions
Page 6
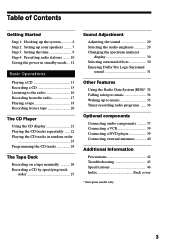
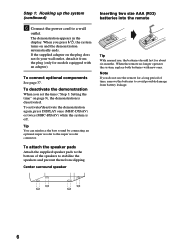
... 1: Hooking up the system (continued) 6 Connect the power cord to the super woofer connector. Note If you do not use , the batteries should last for models equipped with new ones. To deactivate the demonstration When you press ?/1, the system turns on and the demonstration automatically ends. Center surround speaker Inserting two size AAA (R03) batteries into the remote Tip With normal use the remote...
... 1: Hooking up the system (continued) 6 Connect the power cord to the super woofer connector. Note If you do not use , the batteries should last for models equipped with new ones. To deactivate the demonstration When you press ?/1, the system turns on and the demonstration automatically ends. Center surround speaker Inserting two size AAA (R03) batteries into the remote Tip With normal use the remote...
Operating Instructions
Page 7
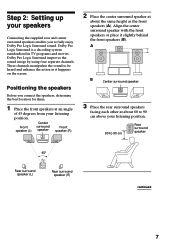
.... These channels manipulate the sound to be heard and enhance the action as the front speakers (A). Align the center surround speaker with the front speakers or place it happens on the screen. Dolby Pro Logic Surround improves the sound image by using four separate channels. Dolby Pro Logic Surround is a decoding system standardized in TV programs and movies. Positioning the speakers Before you to 90 cm Rear surround speaker 45° Rear surround speaker (L) Rear surround speaker (R) continued...
.... These channels manipulate the sound to be heard and enhance the action as the front speakers (A). Align the center surround speaker with the front speakers or place it happens on the screen. Dolby Pro Logic Surround improves the sound image by using four separate channels. Dolby Pro Logic Surround is a decoding system standardized in TV programs and movies. Positioning the speakers Before you to 90 cm Rear surround speaker 45° Rear surround speaker (L) Rear surround speaker (R) continued...
Operating Instructions
Page 8
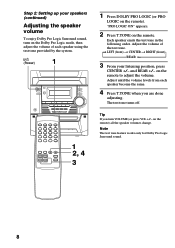
..., press CENTER +/- and REAR +/- Adjust the volume of each speaker become the same. 4 Press T.TONE when you turn on the Dolby Pro Logic mode, then adjust the volume of the test tone. Adjust until the volume levels from each speaker using the test tone provided by the system. ?/1 (Power) 1 1 2, 4 3 1 Press DOLBY PRO LOGIC (or PRO LOGIC on the remote) all the speaker volumes change. on the remote). Each speaker emits the test tone in the following order. Note The test tone feature works only for Dolby Pro Logic Surround sound. 8
..., press CENTER +/- and REAR +/- Adjust the volume of each speaker become the same. 4 Press T.TONE when you turn on the Dolby Pro Logic mode, then adjust the volume of the test tone. Adjust until the volume levels from each speaker using the test tone provided by the system. ?/1 (Power) 1 1 2, 4 3 1 Press DOLBY PRO LOGIC (or PRO LOGIC on the remote) all the speaker volumes change. on the remote). Each speaker emits the test tone in the following order. Note The test tone feature works only for Dolby Pro Logic Surround sound. 8
Operating Instructions
Page 11
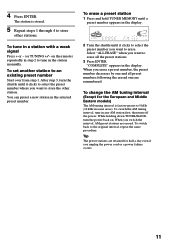
... factory-preset to store the other stations. After step 3, turn the shuttle until it clicks to select the preset number you want to store other station. ALL DISCS VOLUME ß 2 Turn the shuttle until a preset number appears in the display. While holding down TUNER/BAND, turn off the power. To tune in the selected preset number. You can preset a new station in a station with a weak signal Press + or - (or TUNING +/- "COMPLETE" appears in the station manually. Tip The preset stations...
... factory-preset to store the other stations. After step 3, turn the shuttle until it clicks to select the preset number you want to store other station. ALL DISCS VOLUME ß 2 Turn the shuttle until a preset number appears in the display. While holding down TUNER/BAND, turn off the power. To tune in the selected preset number. You can preset a new station in a station with a weak signal Press + or - (or TUNING +/- "COMPLETE" appears in the station manually. Tip The preset stations...

Operating Instructions
Page 17
For manual tuning, press + or - (or TUNING +/- Tips • You can switch from the radio You can use a TYPE I (normal) tape. ?/1 (Power) +/- 53 Basic Operations x 26 4 1 hH 1 Press A and insert a recordable tape into deck B. To listen to restore the stereo effect. • To improve broadcast reception, adjust the supplied antennas. Press the button again to non-preset radio stations Use manual or automatic tuning in the display. Recording from another source to select the band...
For manual tuning, press + or - (or TUNING +/- Tips • You can switch from the radio You can use a TYPE I (normal) tape. ?/1 (Power) +/- 53 Basic Operations x 26 4 1 hH 1 Press A and insert a recordable tape into deck B. To listen to restore the stereo effect. • To improve broadcast reception, adjust the supplied antennas. Press the button again to non-preset radio stations Use manual or automatic tuning in the display. Recording from another source to select the band...
Operating Instructions
Page 18
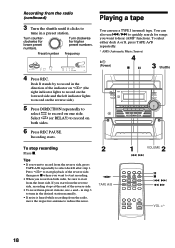
... quickly search for songs you record on both sides. 6 Press REC PAUSE. Recording from the radio (continued) 3 Turn the shuttle until it clicks to hear (AMS* function). You can use a TYPE I (normal) tape. Playing a tape You can also use + and - Turn counterclockwise for higher preset numbers. m Preset number Frequency ALL DISCS VOLUME kHz MHz ß 4 Press REC. Tips • If you start from the reverse side...
... quickly search for songs you record on both sides. 6 Press REC PAUSE. Recording from the radio (continued) 3 Turn the shuttle until it clicks to hear (AMS* function). You can use a TYPE I (normal) tape. Playing a tape You can also use + and - Turn counterclockwise for higher preset numbers. m Preset number Frequency ALL DISCS VOLUME kHz MHz ß 4 Press REC. Tips • If you start from the reverse side...
Operating Instructions
Page 29
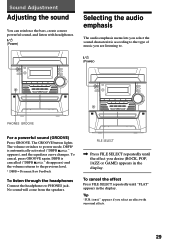
... headphones. ?/1 (Power) Selecting the audio emphasis The audio emphasis menu lets you select the sound characteristic according to PHONES jack. The GROOVE button lights. To cancel, press GROOVE again. DBFB is automatically activated ("DBFB " appears), and the equalizer curve changes. The volume switches to power mode, DBFB* is cancelled ("DBFB " disappears) and the volume returns to the previous level. * DBFB = Dynamic Bass Feedback To listen through the headphones Connect the...
... headphones. ?/1 (Power) Selecting the audio emphasis The audio emphasis menu lets you select the sound characteristic according to PHONES jack. The GROOVE button lights. To cancel, press GROOVE again. DBFB is automatically activated ("DBFB " appears), and the equalizer curve changes. The volume switches to power mode, DBFB* is cancelled ("DBFB " disappears) and the volume returns to the previous level. * DBFB = Dynamic Bass Feedback To listen through the headphones Connect the...

Operating Instructions
Page 31
... setup and adjustments first (see page 7). ?/1 (Power) DOLBY PRO LOGIC To cancel the Dolby Pro Logic Surround sound Press DOLBY PRO LOGIC (or PRO LOGIC on the front panel's DOLBY PRO LOGIC button. Enjoying Dolby Pro Logic Surround sound You can enjoy the Dolby Pro Logic Surround sound of videos that are Dolby Surround encoded ( ). The indicator on the remote) while playing a program source. PRO LOGIC , Press DOLBY PRO LOGIC (or PRO LOGIC on the front panel's DOLBY PRO LOGIC button lights up. 31 Notes • You cannot use both Dolby Pro Logic Surround sound...
... setup and adjustments first (see page 7). ?/1 (Power) DOLBY PRO LOGIC To cancel the Dolby Pro Logic Surround sound Press DOLBY PRO LOGIC (or PRO LOGIC on the front panel's DOLBY PRO LOGIC button. Enjoying Dolby Pro Logic Surround sound You can enjoy the Dolby Pro Logic Surround sound of videos that are Dolby Surround encoded ( ). The indicator on the remote) while playing a program source. PRO LOGIC , Press DOLBY PRO LOGIC (or PRO LOGIC on the front panel's DOLBY PRO LOGIC button lights up. 31 Notes • You cannot use both Dolby Pro Logic Surround sound...
Operating Instructions
Page 32
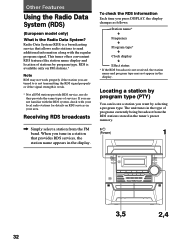
... tunes in the tuner's preset memory. ?/1 (Power) 1 3,5 2,4 32 Receiving RDS broadcasts , Simply select a station from the RDS stations stored in the type of stations by program type (PTY) You can locate a station you are tuned to send additional information along with your local radio stations for details on FM stations.* Note RDS may not work properly if the station you press DISPLAY, the display changes as follows: t Station name* x Frequency x Program type* x Clock display...
... tunes in the tuner's preset memory. ?/1 (Power) 1 3,5 2,4 32 Receiving RDS broadcasts , Simply select a station from the RDS stations stored in the type of stations by program type (PTY) You can locate a station you are tuned to send additional information along with your local radio stations for details on FM stations.* Note RDS may not work properly if the station you press DISPLAY, the display changes as follows: t Station name* x Frequency x Program type* x Clock display...
Operating Instructions
Page 37
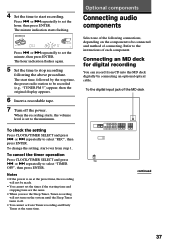
The minute indication starts flashing. 1 2 REC SLEEP ALL DISCS VOLUME ß Press . Optional components Connecting audio components Select one of connecting. or > repeatedly to select "REC", then press ENTER. To the digital input jack of each component. Notes • If the power is set the timer if the starting time and stopping time are the same. • When you use the Sleep Timer, Timer-recording will not turn on the system...
The minute indication starts flashing. 1 2 REC SLEEP ALL DISCS VOLUME ß Press . Optional components Connecting audio components Select one of connecting. or > repeatedly to select "REC", then press ENTER. To the digital input jack of each component. Notes • If the power is set the timer if the starting time and stopping time are the same. • When you use the Sleep Timer, Timer-recording will not turn on the system...

Operating Instructions
Page 38
... deck Connecting a super woofer speaker You can connect an optional super woofer speaker. To super woofer Note If you cannot select "MD" when you cannot switch from "MD" to "VIDEO" or from "VIDEO" to "MD" when the system is turned off. However, you press MD (VIDEO), press ?/1 while pressing MD (VIDEO) when the power is in the Power Saving Mode (see page 12). 38 To the audio output of the plugs...
... deck Connecting a super woofer speaker You can connect an optional super woofer speaker. To super woofer Note If you cannot select "MD" when you cannot switch from "MD" to "VIDEO" or from "VIDEO" to "MD" when the system is turned off. However, you press MD (VIDEO), press ?/1 while pressing MD (VIDEO) when the power is in the Power Saving Mode (see page 12). 38 To the audio output of the plugs...

Operating Instructions
Page 43
... the power cord even though you run into the SPEAKER jack. "Step 4: Presetting radio stations" on page 9 - When using this stereo system, use with a separately sold dry-type or wet-type cleaning cassette. the tape does not erase completely - The demonstration mode appears automatically the first time you plug in sound level - Redo the following check list. For details, refer to the instructions of the speaker cord into any problem...
... the power cord even though you run into the SPEAKER jack. "Step 4: Presetting radio stations" on page 9 - When using this stereo system, use with a separately sold dry-type or wet-type cleaning cassette. the tape does not erase completely - The demonstration mode appears automatically the first time you plug in sound level - Redo the following check list. For details, refer to the instructions of the speaker cord into any problem...
Operating Instructions
Page 44
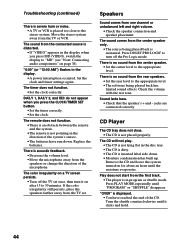
... "PROGRAM" or "SHUFFLE" disappear. Turn the shuttle counterclockwise until it on page 38). Press DOLBY PRO LOGIC to the appropriate level. •The software being played back is inserted label side down . Sound lacks bass. •Check that the speaker's + and - Move the stereo system away from one channel or unbalanced left and right volume. •Check the speaker connection and speaker placement. The sound comes...
... "PROGRAM" or "SHUFFLE" disappear. Turn the shuttle counterclockwise until it on page 38). Press DOLBY PRO LOGIC to the appropriate level. •The software being played back is inserted label side down . Sound lacks bass. •Check that the speaker's + and - Move the stereo system away from one channel or unbalanced left and right volume. •Check the speaker connection and speaker placement. The sound comes...
Operating Instructions
Page 45
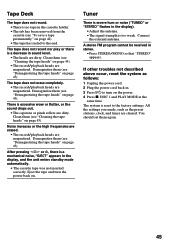
.... Eject the tape and turn on the power. 4 Press x, DISC 1 and PLAY MODE at the same time. Tape Deck The tape does not record. • There is reset to the factory settings. Clean them (see "Cleaning the tape heads" on . Demagnetize them (see "Demagnetizing the tape heads" on page 43). The system is no tape in stereo. •Press STEREO/MONO so that "STEREO" appears. All the settings you made...
.... Eject the tape and turn on the power. 4 Press x, DISC 1 and PLAY MODE at the same time. Tape Deck The tape does not record. • There is reset to the factory settings. Clean them (see "Cleaning the tape heads" on . Demagnetize them (see "Demagnetizing the tape heads" on page 43). The system is no tape in stereo. •Press STEREO/MONO so that "STEREO" appears. All the settings you made...

Operating Instructions
Page 47
... CD OPTICAL DIGITAL OUT (Square optical connector jack, rear panel) Wavelength 660 nm Output Level -18 dBm Tape player section Recording system Frequency response Wow and flutter 4-track 2-channel stereo 40 - 13,000 Hz (±3 dB), using Sony TYPE I cassette ±0.15% W.Peak (IEC) 0.1% W.RMS (NAB) ±0.2% W.Peak (DIN) Tuner section FM stereo, FM/AM superheterodyne tuner FM tuner section Tuning range Antenna Antenna terminals Intermediate frequency 87.5 - 108.0 MHz FM lead antenna 75 ohm unbalanced...
... CD OPTICAL DIGITAL OUT (Square optical connector jack, rear panel) Wavelength 660 nm Output Level -18 dBm Tape player section Recording system Frequency response Wow and flutter 4-track 2-channel stereo 40 - 13,000 Hz (±3 dB), using Sony TYPE I cassette ±0.15% W.Peak (IEC) 0.1% W.RMS (NAB) ±0.2% W.Peak (DIN) Tuner section FM stereo, FM/AM superheterodyne tuner FM tuner section Tuning range Antenna Antenna terminals Intermediate frequency 87.5 - 108.0 MHz FM lead antenna 75 ohm unbalanced...
Operating Instructions
Page 52
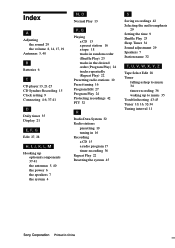
... 15 a radio program 17 timer-recording 36 Repeat Play 22 Resetting the system 45 S Saving recordings 42 Selecting the audio emphasis 29 Setting the time 9 Shuffle Play 23 Sleep Timer 34 Sound adjustment 29 Speakers 7 Station name 32 T, U, V, W, X, Y, Z Tape Select Edit 28 Timer falling asleep to music 34 timer-recording 36 waking up to music 35 Troubleshooting 43-45 Tuner 10, 16, 32-34 Tuning interval 11 52 Sony Corporation Printed...
... 15 a radio program 17 timer-recording 36 Repeat Play 22 Resetting the system 45 S Saving recordings 42 Selecting the audio emphasis 29 Setting the time 9 Shuffle Play 23 Sleep Timer 34 Sound adjustment 29 Speakers 7 Station name 32 T, U, V, W, X, Y, Z Tape Select Edit 28 Timer falling asleep to music 34 timer-recording 36 waking up to music 35 Troubleshooting 43-45 Tuner 10, 16, 32-34 Tuning interval 11 52 Sony Corporation Printed...


