Operating Instructions
Page 6
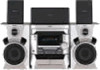
...supplied speaker pads to the bottom of time, remove the batteries to stabilize the speakers and prevent them from slipping. When the remote no longer operates the system, replace both batteries with an adapter). To connect optional components See page 37. Center surround speaker Inserting... (R03) batteries into the remote Tip With normal use the remote for a long period of the speakers to avoid possible damage from the plug (only for about six months. To activate/deactivate the demonstration again, press DISPLAY once (MHC-DX6AV) or twice (MHC-BX6AV) while the system is deactivated...
...supplied speaker pads to the bottom of time, remove the batteries to stabilize the speakers and prevent them from slipping. When the remote no longer operates the system, replace both batteries with an adapter). To connect optional components See page 37. Center surround speaker Inserting... (R03) batteries into the remote Tip With normal use the remote for a long period of the speakers to avoid possible damage from the plug (only for about six months. To activate/deactivate the demonstration again, press DISPLAY once (MHC-DX6AV) or twice (MHC-BX6AV) while the system is deactivated...
Operating Instructions
Page 8
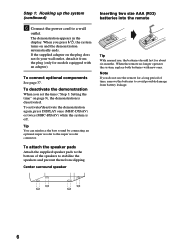
... speaker emits the test tone in the following order. Adjust the volume of each speaker become the same. 4 Press T.TONE when you turn on the remote. Adjust until the volume levels from each speaker using the test tone provided by the system. ?/1 (Power) 1 1 2, 4 3 1 Press DOLBY... PRO LOGIC (or PRO LOGIC on the remote). Note The test tone feature works only for Dolby Pro Logic Surround sound. 8 and REAR +/- t LEFT (front) t CENTER t RIGHT (front) REAR T 3 From...
... speaker emits the test tone in the following order. Adjust the volume of each speaker become the same. 4 Press T.TONE when you turn on the remote. Adjust until the volume levels from each speaker using the test tone provided by the system. ?/1 (Power) 1 1 2, 4 3 1 Press DOLBY... PRO LOGIC (or PRO LOGIC on the remote). Note The test tone feature works only for Dolby Pro Logic Surround sound. 8 and REAR +/- t LEFT (front) t CENTER t RIGHT (front) REAR T 3 From...
Operating Instructions
Page 10
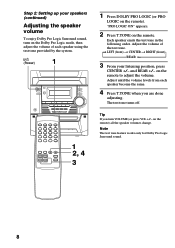
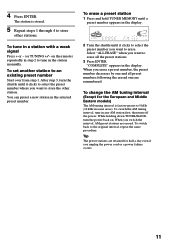
... VOLUME kHz MHz ß 3 Press TUNER MEMORY. The stations are stored from preset number 1. 41 Shuttle ALL DISCS VOLUME ß Preset number 10 on the remote) until the frequency indication starts to select FM or AM. 2 Press and hold + or - (or TUNING +/- "TUNED" and "STEREO" (for AM). ?/1 (Power) 2 3 1 Press TUNER/BAND...
... VOLUME kHz MHz ß 3 Press TUNER MEMORY. The stations are stored from preset number 1. 41 Shuttle ALL DISCS VOLUME ß Preset number 10 on the remote) until the frequency indication starts to select FM or AM. 2 Press and hold + or - (or TUNING +/- "TUNED" and "STEREO" (for AM). ?/1 (Power) 2 3 1 Press TUNER/BAND...
Operating Instructions
Page 11
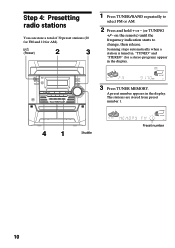
While holding down TUNER/BAND, turn the power back on the remote) repeatedly in step 2 to tune in any AM station first, then turn the shuttle until it clicks to select the preset number where you want ...
While holding down TUNER/BAND, turn the power back on the remote) repeatedly in step 2 to tune in any AM station first, then turn the shuttle until it clicks to select the preset number where you want ...
Operating Instructions
Page 14
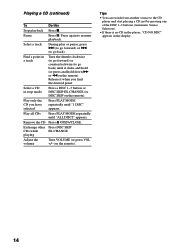
... a CD in stop mode Press a DISC 1~3 button or DISC SKIP EX-CHANGE (or DISC SKIP on the remote). Exchange other Press DISC SKIP CDs while EX-CHANGE. Tips • You can switch from another source to resume playback. playing Adjust the volume Turn ...
... a CD in stop mode Press a DISC 1~3 button or DISC SKIP EX-CHANGE (or DISC SKIP on the remote). Exchange other Press DISC SKIP CDs while EX-CHANGE. Tips • You can switch from another source to resume playback. playing Adjust the volume Turn ...
Operating Instructions
Page 16
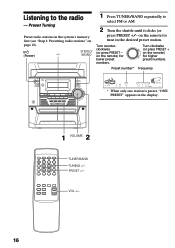
...in the desired preset station. PRESET +/- MONO 1 Press TUNER/BAND repeatedly to the radio -- Turn clockwise M (or press PRESET + on the remote) for higher m preset numbers. Turn counterclockwise (or press PRESET - on page 10). ?/1 (Power) STEREO/ +/- Preset Tuning Preset radio stations in... the system's memory first (see "Step 4: Presetting radio stations" on the remote) to tune in the display. 1 2 VOLUME TUNER/BAND TUNING +/- Listening to select FM or AM. 2 Turn the shuttle until it clicks ...
...in the desired preset station. PRESET +/- MONO 1 Press TUNER/BAND repeatedly to the radio -- Turn clockwise M (or press PRESET + on the remote) for higher m preset numbers. Turn counterclockwise (or press PRESET - on page 10). ?/1 (Power) STEREO/ +/- Preset Tuning Preset radio stations in... the system's memory first (see "Step 4: Presetting radio stations" on the remote) to tune in the display. 1 2 VOLUME TUNER/BAND TUNING +/- Listening to select FM or AM. 2 Turn the shuttle until it clicks ...

Operating Instructions
Page 17
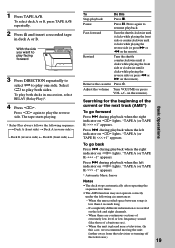
.... There will be no stereo effect, but the reception will improve. You can switch from the radio You can record the radio program on the remote). Tips • You can use a TYPE I (normal) tape. ?/1 (Power) +/- 53 Basic Operations x 26 4 1 hH 1 Press A and insert a recordable tape into deck B....record facing forward 2 Press TUNER/BAND to restore the stereo effect. • To improve broadcast reception, adjust the supplied antennas. on the remote). To Turn off the radio Adjust the volume Do this Press ?/1. To listen to the radio just by calling up a preset station. on...
.... There will be no stereo effect, but the reception will improve. You can switch from the radio You can record the radio program on the remote). Tips • You can use a TYPE I (normal) tape. ?/1 (Power) +/- 53 Basic Operations x 26 4 1 hH 1 Press A and insert a recordable tape into deck B....record facing forward 2 Press TUNER/BAND to restore the stereo effect. • To improve broadcast reception, adjust the supplied antennas. on the remote). To Turn off the radio Adjust the volume Do this Press ?/1. To listen to the radio just by calling up a preset station. on...
Operating Instructions
Page 19
... counterclockwise until it clicks while playing the front side or clockwise until it clicks while playing the reverse side (or press m or M on the remote). "TAPE A (or TAPE B) >>> +1" appears. during playback when the right indicator on hH lights. When the unrecorded space between songs is ... the reverse side. To play both decks in deck A or B. on the left indicator on hH lights. If completely different information is recorded on the remote). 1 Press TAPE A/B. Pause Press X. When the unit is less than 4 seconds long. - To select deck A or B, press TAPE A/B repeatedly. 2 ...
... counterclockwise until it clicks while playing the front side or clockwise until it clicks while playing the reverse side (or press m or M on the remote). "TAPE A (or TAPE B) >>> +1" appears. during playback when the right indicator on hH lights. When the unrecorded space between songs is ... the reverse side. To play both decks in deck A or B. on the left indicator on hH lights. If completely different information is recorded on the remote). 1 Press TAPE A/B. Pause Press X. When the unit is less than 4 seconds long. - To select deck A or B, press TAPE A/B repeatedly. 2 ...

Operating Instructions
Page 25
...stop mode or twice during programming, this means: - Tips • The program you have programmed a track number which exceeds 20. - CHECK on the remote repeatedly until "PROGRAM" or "SHUFFLE" disappears from the end Clear a specific track Add a track to the program Clear the entire program Press CHECK on the... remote in stop mode. Press CD, then press hH to play the same program again. • If "--.--" appears instead of the track to be ...
...stop mode or twice during programming, this means: - Tips • The program you have programmed a track number which exceeds 20. - CHECK on the remote repeatedly until "PROGRAM" or "SHUFFLE" disappears from the end Clear a specific track Add a track to the program Clear the entire program Press CHECK on the... remote in stop mode. Press CD, then press hH to play the same program again. • If "--.--" appears instead of the track to be ...

Operating Instructions
Page 28
... once, so that you must first cancel the program by specifying track order (continued) 8 Press CD SYNC. Recording starts. In order to record on the remote repeatedly. Note You cannot use Tape Select Edit for recording a CD. Note that "EDIT" flashes. To stop recording Press x. The required tape length for the...
... once, so that you must first cancel the program by specifying track order (continued) 8 Press CD SYNC. Recording starts. In order to record on the remote repeatedly. Note You cannot use Tape Select Edit for recording a CD. Note that "EDIT" flashes. To stop recording Press x. The required tape length for the...

Operating Instructions
Page 31
... time. • When recording the sound, be sure to turn off the indicator on the front panel's DOLBY PRO LOGIC button. The indicator on the remote) while playing a program source. Enjoying Dolby Pro Logic Surround sound You can enjoy the Dolby Pro Logic Surround sound of videos that are Dolby Surround... adjustments first (see page 7). ?/1 (Power) DOLBY PRO LOGIC To cancel the Dolby Pro Logic Surround sound Press DOLBY PRO LOGIC (or PRO LOGIC on the remote) again to turn off Dolby Pro Logic Surround sound.
... time. • When recording the sound, be sure to turn off the indicator on the front panel's DOLBY PRO LOGIC button. The indicator on the remote) while playing a program source. Enjoying Dolby Pro Logic Surround sound You can enjoy the Dolby Pro Logic Surround sound of videos that are Dolby Surround... adjustments first (see page 7). ?/1 (Power) DOLBY PRO LOGIC To cancel the Dolby Pro Logic Surround sound Press DOLBY PRO LOGIC (or PRO LOGIC on the remote) again to turn off Dolby Pro Logic Surround sound.
Operating Instructions
Page 44
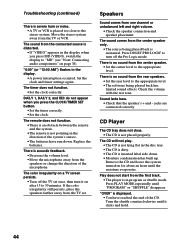
... not function. •There is an obstacle between the remote and the system. •The remote is acoustic feedback. •Decrease the volume level. •Move the microphone away from the first track. •The player is not placed properly. There ...
... not function. •There is an obstacle between the remote and the system. •The remote is acoustic feedback. •Decrease the volume level. •Move the microphone away from the first track. •The player is not placed properly. There ...
Operating Instructions
Page 48
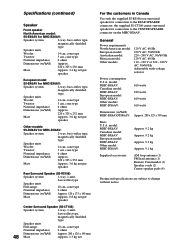
.... model: MHC-BX6AV: Canadian model: MHC-BX6AV: European model: MHC-BX6AV: Other models: MHC-DX6AV: 160 watts 180 watts 160 watts 160 watts Dimensions (w/h/d) MHC-BX6AV/DX6AV: Approx. 280 x 325 x 390 mm Mass U.S.A. model: MHC-BX6AV: Canadian model: MHC-BX6AV: European model: MHC-BX6AV: Other model: MHC-DX6AV: Approx. 9.2 kg Approx. 9.2 kg Approx. 9.2 kg Approx. 9.1 kg Supplied accessories: AM loop antenna (1) FM lead antenna (1) Remote Commander (1) Speaker...
.... model: MHC-BX6AV: Canadian model: MHC-BX6AV: European model: MHC-BX6AV: Other models: MHC-DX6AV: 160 watts 180 watts 160 watts 160 watts Dimensions (w/h/d) MHC-BX6AV/DX6AV: Approx. 280 x 325 x 390 mm Mass U.S.A. model: MHC-BX6AV: Canadian model: MHC-BX6AV: European model: MHC-BX6AV: Other model: MHC-DX6AV: Approx. 9.2 kg Approx. 9.2 kg Approx. 9.2 kg Approx. 9.1 kg Supplied accessories: AM loop antenna (1) FM lead antenna (1) Remote Commander (1) Speaker...


