Operating Instructions
Page 3
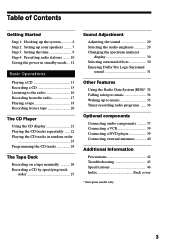
...random order 23 Programming the CD tracks 24 The Tape Deck Recording on a tape manually 26 Recording a CD by specifying track order 27 Sound Adjustment Adjusting the sound 29 Selecting the audio emphasis 29 Changing the spectrum analyzer display 30 Selecting surround effects 30 Enjoying Dolby Pro Logic Surround... sound 31 Other Features Using the Radio Data System (RDS)* 32 Falling asleep to music 34 Waking up to music 35 Timer-recording radio ...
...random order 23 Programming the CD tracks 24 The Tape Deck Recording on a tape manually 26 Recording a CD by specifying track order 27 Sound Adjustment Adjusting the sound 29 Selecting the audio emphasis 29 Changing the spectrum analyzer display 30 Selecting surround effects 30 Enjoying Dolby Pro Logic Surround... sound 31 Other Features Using the Radio Data System (RDS)* 32 Falling asleep to music 34 Waking up to music 35 Timer-recording radio ...

Operating Instructions
Page 5
... a voltage selector, set VOLTAGE SELECTOR to the CENTER SPEAKER jacks. 4 Connect the FM/AM antennas. Connect the speaker cords to position of a TV. Otherwise, the sound will not be heard. 3 Connect the center surround speaker.
... a voltage selector, set VOLTAGE SELECTOR to the CENTER SPEAKER jacks. 4 Connect the FM/AM antennas. Connect the speaker cords to position of a TV. Otherwise, the sound will not be heard. 3 Connect the center surround speaker.
Operating Instructions
Page 6
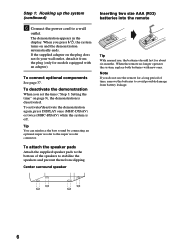
... possible damage from slipping. To connect optional components See page 37. To activate/deactivate the demonstration again, press DISPLAY once (MHC-DX6AV) or twice (MHC-BX6AV) while the system is deactivated. When you set the time ("Step 3: Setting the time" on and the demonstration automatically ...ends. Tip You can reinforce the bass sound by connecting an optional super woofer to a wall outlet. When the remote no longer ...
... possible damage from slipping. To connect optional components See page 37. To activate/deactivate the demonstration again, press DISPLAY once (MHC-DX6AV) or twice (MHC-BX6AV) while the system is deactivated. When you set the time ("Step 3: Setting the time" on and the demonstration automatically ...ends. Tip You can reinforce the bass sound by connecting an optional super woofer to a wall outlet. When the remote no longer ...
Operating Instructions
Page 7
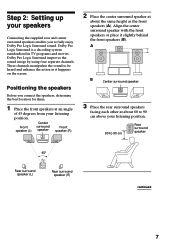
Positioning the speakers Before you to fully enjoy Dolby Pro Logic Surround sound. Dolby Pro Logic Surround is a decoding system standardized in TV programs and movies. Align the center surround speaker with the front speakers or place it ... the best location for them. 1 Place the front speakers at about the same height as it slightly behind the front speakers (B). These channels manipulate the sound to be heard and enhance the action as the front speakers (A). Step 2: Setting up your listening position. 60 to 90 cm Rear surround speaker 45...
Positioning the speakers Before you to fully enjoy Dolby Pro Logic Surround sound. Dolby Pro Logic Surround is a decoding system standardized in TV programs and movies. Align the center surround speaker with the front speakers or place it ... the best location for them. 1 Place the front speakers at about the same height as it slightly behind the front speakers (B). These channels manipulate the sound to be heard and enhance the action as the front speakers (A). Step 2: Setting up your listening position. 60 to 90 cm Rear surround speaker 45...
Operating Instructions
Page 8
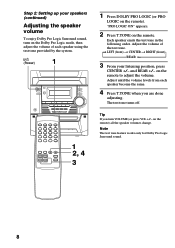
...test tone. t LEFT (front) t CENTER t RIGHT (front) REAR T 3 From your speakers (continued) Adjusting the speaker volume To enjoy Dolby Pro Logic Surround sound, turn VOLUME (or press VOL +/- Adjust the volume of each speaker become the same. 4 Press T.TONE when you are done adjusting. and REAR +/- Note The... test tone feature works only for Dolby Pro Logic Surround sound. 8 on the remote) all the speaker volumes change. The test tone turns off. on the remote to adjust the volume. "PRO LOGIC ON" ...
...test tone. t LEFT (front) t CENTER t RIGHT (front) REAR T 3 From your speakers (continued) Adjusting the speaker volume To enjoy Dolby Pro Logic Surround sound, turn VOLUME (or press VOL +/- Adjust the volume of each speaker become the same. 4 Press T.TONE when you are done adjusting. and REAR +/- Note The... test tone feature works only for Dolby Pro Logic Surround sound. 8 on the remote) all the speaker volumes change. The test tone turns off. on the remote to adjust the volume. "PRO LOGIC ON" ...
Operating Instructions
Page 19
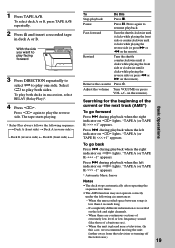
.... Remove the cassette Press A. Basic Operations Searching for the beginning of a baritone sax). - When there are continuous sections of extremely low level or low frequency sound (like those of the current or the next track (AMS*) To go forward Press > during playback when the left and right channels. - With the side...
.... Remove the cassette Press A. Basic Operations Searching for the beginning of a baritone sax). - When there are continuous sections of extremely low level or low frequency sound (like those of the current or the next track (AMS*) To go forward Press > during playback when the left and right channels. - With the side...
Operating Instructions
Page 29
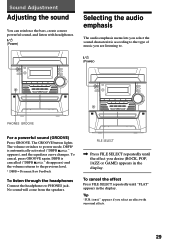
... " appears if you select an effect with headphones. ?/1 (Power) Selecting the audio emphasis The audio emphasis menu lets you select the sound characteristic according to the type of music you desire (ROCK, POP, JAZZ or GAME) appears in the display. The volume switches to ... until the effect you are listening to. ?/1 (Power) PHONES GROOVE For a powerful sound (GROOVE) Press GROOVE. The GROOVE button lights. To cancel, press GROOVE again. Sound Adjustment Adjusting the sound You can reinforce the bass, create a more powerful sound, and listen with surround effects. 29 No...
... " appears if you select an effect with headphones. ?/1 (Power) Selecting the audio emphasis The audio emphasis menu lets you select the sound characteristic according to the type of music you desire (ROCK, POP, JAZZ or GAME) appears in the display. The volume switches to ... until the effect you are listening to. ?/1 (Power) PHONES GROOVE For a powerful sound (GROOVE) Press GROOVE. The GROOVE button lights. To cancel, press GROOVE again. Sound Adjustment Adjusting the sound You can reinforce the bass, create a more powerful sound, and listen with surround effects. 29 No...

Operating Instructions
Page 30
...desire. Changing the spectrum analyzer display You can enjoy surround effects. ?/1 (Power) SPECTRUM , Press SPECTRUM. SURROUND ON: Reproduces stereo sources in surround sound. Each time you press the button, the display changes as follows: PATTERN 1 (Image pattern) Y PATTERN 2 (Normal pattern) DSP , Press .... ?/1 (Power) Selecting surround effects You can enjoy changing the display while listening to select the surround effect you choose other sound effects, the surround effects will be canceled. 30 HALL: Reproduces the acoustics of a concert hall.* THEATER: Reproduces the acoustics ...
...desire. Changing the spectrum analyzer display You can enjoy surround effects. ?/1 (Power) SPECTRUM , Press SPECTRUM. SURROUND ON: Reproduces stereo sources in surround sound. Each time you press the button, the display changes as follows: PATTERN 1 (Image pattern) Y PATTERN 2 (Normal pattern) DSP , Press .... ?/1 (Power) Selecting surround effects You can enjoy changing the display while listening to select the surround effect you choose other sound effects, the surround effects will be canceled. 30 HALL: Reproduces the acoustics of a concert hall.* THEATER: Reproduces the acoustics ...

Operating Instructions
Page 31
...PRO LOGIC button lights up. 31 Enjoying Dolby Pro Logic Surround sound You can enjoy the Dolby Pro Logic Surround sound of videos that are Dolby Surround encoded ( ). Notes • You cannot use both Dolby Pro Logic Surround sound and the DSP surround effects at the same time. • ...When recording the sound, be sure to turn off the indicator on the remote) again to turn off Dolby Pro Logic Surround sound. The indicator on the remote) while playing a program source. Complete the setup and adjustments first (see page 7)....
...PRO LOGIC button lights up. 31 Enjoying Dolby Pro Logic Surround sound You can enjoy the Dolby Pro Logic Surround sound of videos that are Dolby Surround encoded ( ). Notes • You cannot use both Dolby Pro Logic Surround sound and the DSP surround effects at the same time. • ...When recording the sound, be sure to turn off the indicator on the remote) again to turn off Dolby Pro Logic Surround sound. The indicator on the remote) while playing a program source. Complete the setup and adjustments first (see page 7)....

Operating Instructions
Page 38
... from "MD" to "VIDEO" or from "VIDEO" to "MD". Connecting audio components (continued) Connecting an MD deck for listening to music Make sure to the sound of the connected MD deck, press MD (VIDEO). However, you press MD (VIDEO), press ?/1 while pressing MD (VIDEO) when the power is in the Power...
... from "MD" to "VIDEO" or from "VIDEO" to "MD". Connecting audio components (continued) Connecting an MD deck for listening to music Make sure to the sound of the connected MD deck, press MD (VIDEO). However, you press MD (VIDEO), press ?/1 while pressing MD (VIDEO) when the power is in the Power...
Operating Instructions
Page 39
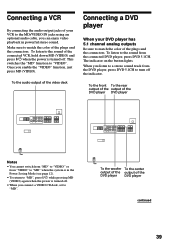
...DVD player Notes • You cannot switch from "MD" to "VIDEO" or from "VIDEO" to "MD" when the system is in powerful stereo sound. To listen to the sound of the connected VCR, hold down MD (VIDEO) and press ?/1 when the power is turned off the indicator. To listen to "VIDEO". The... of the plugs and the connectors. Make sure to match the color of the DVD player DVD player continued 39 When you listen to a stereo sound track from the connected DVD player, press DVD 5.1CH. Connecting a VCR By connecting the audio output jacks of your DVD player has 5.1 channel analog ...
...DVD player Notes • You cannot switch from "MD" to "VIDEO" or from "VIDEO" to "MD" when the system is in powerful stereo sound. To listen to the sound of the connected VCR, hold down MD (VIDEO) and press ?/1 when the power is turned off the indicator. To listen to "VIDEO". The... of the plugs and the connectors. Make sure to match the color of the DVD player DVD player continued 39 When you listen to a stereo sound track from the connected DVD player, press DVD 5.1CH. Connecting a VCR By connecting the audio output jacks of your DVD player has 5.1 channel analog ...
Operating Instructions
Page 40
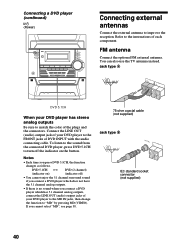
...OUT (audio) output jack of your DVD player has stereo analog outputs Be sure to turn off ) • You cannot enjoy the 5.1 channel surround sound if you connect a DVD player which has 5.1 channel analog outputs, connect the LINE OUT (audio) output jacks of DVD INPUT with the audio connecting ...cable. If you connect a DVD player which does not have the 5.1 channel analog outputs. • If there is no sound when you cannot select "MD", see page 38. 75-ohm coaxial cable (not supplied) Jack type B IEC standard socket connector (not supplied) 40 FM...
...OUT (audio) output jack of your DVD player has stereo analog outputs Be sure to turn off ) • You cannot enjoy the 5.1 channel surround sound if you connect a DVD player which has 5.1 channel analog outputs, connect the LINE OUT (audio) output jacks of DVD INPUT with the audio connecting ...cable. If you connect a DVD player which does not have the 5.1 channel analog outputs. • If there is no sound when you cannot select "MD", see page 38. 75-ohm coaxial cable (not supplied) Jack type B IEC standard socket connector (not supplied) 40 FM...

Operating Instructions
Page 43
...page 10 If you haven't turned on the power (demonstration mode). •Press DISPLAY once (MHC-DX6AV) or twice (MHC-BX6AV) when the power is a power outage lasting longer than half a day. Cleaning the tape... "Step 3: Setting the time" on page 36. Should any problem persist, consult your nearest Sony dealer. There is very elastic. continued 43 Make sure to the instructions of the tape deck ...of the cleaning cassette. there is distorted - the tape does not erase completely - the sound drops out - For details, refer to clean the tape heads before you start an important...
...page 10 If you haven't turned on the power (demonstration mode). •Press DISPLAY once (MHC-DX6AV) or twice (MHC-BX6AV) when the power is a power outage lasting longer than half a day. Cleaning the tape... "Step 3: Setting the time" on page 36. Should any problem persist, consult your nearest Sony dealer. There is very elastic. continued 43 Make sure to the instructions of the tape deck ...of the cleaning cassette. there is distorted - the tape does not erase completely - the sound drops out - For details, refer to clean the tape heads before you start an important...
Operating Instructions
Page 44
... the volume level. •Move the microphone away from the first track. •The player is placed too close . •The CD is no sound from the center speaker. •Set the center level to the appropriate level. jacks are connected correctly. Play does not start from the speakers or...continued) There is severe hum or noise. •A TV or VCR is in program or shuffle mode. The sound from the center speaker only. •The source being played back has limited sound effects. The timer does not function. •Set the clock correctly. Press DOLBY PRO LOGIC to turn it ...
... the volume level. •Move the microphone away from the first track. •The player is placed too close . •The CD is no sound from the center speaker. •Set the center level to the appropriate level. jacks are connected correctly. Play does not start from the speakers or...continued) There is severe hum or noise. •A TV or VCR is in program or shuffle mode. The sound from the center speaker only. •The source being played back has limited sound effects. The timer does not function. •Set the clock correctly. Press DOLBY PRO LOGIC to turn it ...
Operating Instructions
Page 45
..." on page 43). The system is a decrease in the display). •Adjust the antenna. •The signal strength is excessive wow or flutter, or the sound drops out. • The capstans or pinch rollers are dirty. All the settings you made, such as follows: 1 Unplug the power cord. 2 Plug the...). • The tape has reeled to turn the power back on page 43). Tuner There is severe hum or noise ("TUNED" or "STEREO" flashes in sound level. • The heads are dirty. After pressing hH or A, there is a mechanical noise, "EJECT" appears in stereo. •Press STEREO/MONO so that...
..." on page 43). The system is a decrease in the display). •Adjust the antenna. •The signal strength is excessive wow or flutter, or the sound drops out. • The capstans or pinch rollers are dirty. All the settings you made, such as follows: 1 Unplug the power cord. 2 Plug the...). • The tape has reeled to turn the power back on page 43). Tuner There is severe hum or noise ("TUNED" or "STEREO" flashes in sound level. • The heads are dirty. After pressing hH or A, there is a mechanical noise, "EJECT" appears in stereo. •Press STEREO/MONO so that...
Operating Instructions
Page 52
Index A Adjusting the sound 29 the volume 8, 14, 17, 19 Antennas 5, 40 B Batteries 6 C CD player 13, 21-25 CD Synchro Recording 15 Clock setting 9 Connecting 4-6, 37-41 D Daily timer ... 36 Repeat Play 22 Resetting the system 45 S Saving recordings 42 Selecting the audio emphasis 29 Setting the time 9 Shuffle Play 23 Sleep Timer 34 Sound adjustment 29 Speakers 7 Station name 32 T, U, V, W, X, Y, Z Tape Select Edit 28 Timer falling asleep to music 34 timer-recording 36 waking up to music 35 Troubleshooting...
Index A Adjusting the sound 29 the volume 8, 14, 17, 19 Antennas 5, 40 B Batteries 6 C CD player 13, 21-25 CD Synchro Recording 15 Clock setting 9 Connecting 4-6, 37-41 D Daily timer ... 36 Repeat Play 22 Resetting the system 45 S Saving recordings 42 Selecting the audio emphasis 29 Setting the time 9 Shuffle Play 23 Sleep Timer 34 Sound adjustment 29 Speakers 7 Station name 32 T, U, V, W, X, Y, Z Tape Select Edit 28 Timer falling asleep to music 34 timer-recording 36 waking up to music 35 Troubleshooting...

