
The Sony Guide to Home Theater
Page 15
...even if the network changes the schedule. ƒ Wish List records upcoming shows with VAIO Media™ software installed. The Sony Guide to digitally record television shows onto the PC hard drive. Network Media Receiver Today's personal computers are increasingly important repositories ...of your PC! Now Sony meets this need with the PCNA-MR10 RoomLink™ media receiver. Using the RoomLink receiver remote control, you can 't. ƒ Simultaneous record and playback. Here's another show that...
...even if the network changes the schedule. ƒ Wish List records upcoming shows with VAIO Media™ software installed. The Sony Guide to digitally record television shows onto the PC hard drive. Network Media Receiver Today's personal computers are increasingly important repositories ...of your PC! Now Sony meets this need with the PCNA-MR10 RoomLink™ media receiver. Using the RoomLink receiver remote control, you can 't. ƒ Simultaneous record and playback. Here's another show that...

The Sony Guide to Home Theater
Page 16
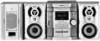
...-up. Features to look for 802.11a wireless LAN connection to a Sony PCWA-DE50 for : ƒ VHS Hi-Fi. And VHS Hi-Fi tapes often contain Dolby Stereo sound tracks, suitable for EP optimize playback picture quality. The Sony Guide to record and exchange with friends and family. Two heads for... sound that you 'll find in many newspaper TV listings and TV Guide® magazine. ƒ Four Heads. An absolute must for high fidelity stereo sound. ƒ VCR Plus+ Gold™ system automatically "maps" your network provides no Ethernet cable near the home theater system, the receiver can ...
...-up. Features to look for 802.11a wireless LAN connection to a Sony PCWA-DE50 for : ƒ VHS Hi-Fi. And VHS Hi-Fi tapes often contain Dolby Stereo sound tracks, suitable for EP optimize playback picture quality. The Sony Guide to record and exchange with friends and family. Two heads for... sound that you 'll find in many newspaper TV listings and TV Guide® magazine. ƒ Four Heads. An absolute must for high fidelity stereo sound. ƒ VCR Plus+ Gold™ system automatically "maps" your network provides no Ethernet cable near the home theater system, the receiver can ...

The Sony Guide to Home Theater
Page 39
... more enjoyable. Wireless headphones (right) enable you to enjoy the system after others have gone to bed. A "universal" remote control can replace all your separate remotes-an especially good move if you enjoy full-volume entertainment at once. A television stand can solve many issues at night, ...shelves for home theater, two add-on purchases can simplify system operation. Finishing Touches While not essential for the source components. The Sony Guide to the correct height and it , too. It elevates the television to Home Theater 39 It's like having your system from individual...
... more enjoyable. Wireless headphones (right) enable you to enjoy the system after others have gone to bed. A "universal" remote control can replace all your separate remotes-an especially good move if you enjoy full-volume entertainment at once. A television stand can solve many issues at night, ...shelves for home theater, two add-on purchases can simplify system operation. Finishing Touches While not essential for the source components. The Sony Guide to the correct height and it , too. It elevates the television to Home Theater 39 It's like having your system from individual...
The Sony Guide to Home Theater
Page 50
... handles only bass frequencies (typically 200 Hz and below). Stereo Broadcast Reception. A specialized loudspeaker that project onto a translucent screen. Super Fine Pitch™ CRT. Universal remote control. The Sony Guide to maintain picture quality. The subwoofer is ideally suited... 50 Front projectors are also "active," meaning that fills their own power amplifier. Resolution. Satellite Speaker. Decodes MTS stereo TV broadcasts. the point of Interlaced scanning. A compact speaker that enables you to connect video equipment to reproducing the...
... handles only bass frequencies (typically 200 Hz and below). Stereo Broadcast Reception. A specialized loudspeaker that project onto a translucent screen. Super Fine Pitch™ CRT. Universal remote control. The Sony Guide to maintain picture quality. The subwoofer is ideally suited... 50 Front projectors are also "active," meaning that fills their own power amplifier. Resolution. Satellite Speaker. Decodes MTS stereo TV broadcasts. the point of Interlaced scanning. A compact speaker that enables you to connect video equipment to reproducing the...

Operating Instructions
Page 3
Table of Contents List of Button Locations and Reference Pages Main unit 4 Sub woofer 5 Remote Control 6 Getting Started Hooking up video game machine ........ 24 Troubleshooting Problems and remedies 25 Messages 26 Additional Information Precautions 27 Specifications 28... * European model only 3GB Daily Timer ... 23 Optional Components Hooking up the system 7 Inserting two R6 (size AA) batteries into the remote 9 Setting the clock 10 CD Loading a CD 10 Playing a CD - Program Play 12 Tuner Presetting radio stations 13 Listening to music - Game Mixing...
Table of Contents List of Button Locations and Reference Pages Main unit 4 Sub woofer 5 Remote Control 6 Getting Started Hooking up video game machine ........ 24 Troubleshooting Problems and remedies 25 Messages 26 Additional Information Precautions 27 Specifications 28... * European model only 3GB Daily Timer ... 23 Optional Components Hooking up the system 7 Inserting two R6 (size AA) batteries into the remote 9 Setting the clock 10 CD Loading a CD 10 Playing a CD - Program Play 12 Tuner Presetting radio stations 13 Listening to music - Game Mixing...

Operating Instructions
Page 6
... +/- qf (20) GAME 0 (22, 24) GROOVE qd (20) O - Z ON/OFF qh (20) PLAY MODE wa (11, 12, 17) PRESET +/- 5 (13 - 15) REPEAT 8 (11) SLEEP 1 (22) STEREO/MONO 8 (15) SURROUND qa (20) TAPE A/B 9 (16, 18) TUNER MEMORY qj (13, 14) TUNER/BAND qk (13 - 15, 18) TUNING +/- 5 (13 - 15) VOL +/- qs BUTTON...
... +/- qf (20) GAME 0 (22, 24) GROOVE qd (20) O - Z ON/OFF qh (20) PLAY MODE wa (11, 12, 17) PRESET +/- 5 (13 - 15) REPEAT 8 (11) SLEEP 1 (22) STEREO/MONO 8 (15) SURROUND qa (20) TAPE A/B 9 (16, 18) TUNER MEMORY qj (13, 14) TUNER/BAND qk (13 - 15, 18) TUNING +/- 5 (13 - 15) VOL +/- qs BUTTON...

Operating Instructions
Page 9
Getting Started Placing the sub woofer (MHC-GX40 only) Since the human ear cannot detect the direction and position where the bass ...wherever you like in the center of the room. Inserting two R6 (size AA) batteries into the remote e E E e Tip With normal use the remote for about six months. Note If you to protect the CD mechanism. 1 Make sure that all ...the wall. • If the woofer is unlikely to turn off the system. 3 Unplug the power cord. When the remote no longer operates the system, replace both batteries with new ones. When carrying this happened, move the woofer away from ...
Getting Started Placing the sub woofer (MHC-GX40 only) Since the human ear cannot detect the direction and position where the bass ...wherever you like in the center of the room. Inserting two R6 (size AA) batteries into the remote e E E e Tip With normal use the remote for about six months. Note If you to protect the CD mechanism. 1 Make sure that all ...the wall. • If the woofer is unlikely to turn off the system. 3 Unplug the power cord. When the remote no longer operates the system, replace both batteries with new ones. When carrying this happened, move the woofer away from ...

Operating Instructions
Page 10
...of the tray. The disc tray opens. 2 Place a CD with the label side up on the remote. 3 Do the same procedures as step 3 to set the minute. 6 Press ENTER on the remote. 2 Press . or > on the remote repeatedly to 6 above. The clock starts working. To insert additional discs, press DISC SKIP/EX-CHANGE...the disc tray. 3 Press Z OPEN/CLOSE to select "CLOCK SET", then press ENTER on the disc tray. The minute indication flashes. 5 Press . or > on the remote to close the disc tray. 10GB Note The clock settings are canceled when you play a CD single (8 cm CD), place it on the...
...of the tray. The disc tray opens. 2 Place a CD with the label side up on the remote. 3 Do the same procedures as step 3 to set the minute. 6 Press ENTER on the remote. 2 Press . or > on the remote repeatedly to 6 above. The clock starts working. To insert additional discs, press DISC SKIP/EX-CHANGE...the disc tray. 3 Press Z OPEN/CLOSE to select "CLOCK SET", then press ENTER on the disc tray. The minute indication flashes. 5 Press . or > on the remote to close the disc tray. 10GB Note The clock settings are canceled when you play a CD single (8 cm CD), place it on the...

Operating Instructions
Page 11
... Track number indicator Playing time 1 Press CD. 2 Press PLAY MODE on all CDs in original order. PGM (Program Play) The tracks on the remote repeatedly until "REP 1" is canceled. Press DISC 1 - 3 (Automatic Source Selection). Note The play ALL DISCS (Normal Play) All CDs in the...repeatedly, press REPEAT until "REP" or "REP 1" appears. Press X. ALL DISCS SHUF (Shuffle Play) The tracks on all the tracks on the remote). During play or pause, press > or .. Press again to CD function from another source Remove a CD Exchange other CDs while playing Play repeatedly ...
... Track number indicator Playing time 1 Press CD. 2 Press PLAY MODE on all CDs in original order. PGM (Program Play) The tracks on the remote repeatedly until "REP 1" is canceled. Press DISC 1 - 3 (Automatic Source Selection). Note The play ALL DISCS (Normal Play) All CDs in the...repeatedly, press REPEAT until "REP" or "REP 1" appears. Press X. ALL DISCS SHUF (Shuffle Play) The tracks on all the tracks on the remote). During play or pause, press > or .. Press again to CD function from another source Remove a CD Exchange other CDs while playing Play repeatedly ...

Operating Instructions
Page 12
...8226; The program you select a CD track whose number is programed. Other Operations To Do this Cancel Program Play Press PLAY MODE on the remote repeatedly until the desired track appears in the order you want to play the same program again, press CD, then press H (or N on ...playing time. 6 Program additional discs or tracks. Clear a track from all the tracks on a CD at once, proceed to 5 7 Press H (or N on the remote). • "--.--" appears when the total CD program time exceeds 100 minutes, or when you made remains after Program Play finishes. To program all the CDs...
...8226; The program you select a CD track whose number is programed. Other Operations To Do this Cancel Program Play Press PLAY MODE on the remote repeatedly until the desired track appears in the order you want to play the same program again, press CD, then press H (or N on ...playing time. 6 Program additional discs or tracks. Clear a track from all the tracks on a CD at once, proceed to 5 7 Press H (or N on the remote). • "--.--" appears when the total CD program time exceeds 100 minutes, or when you made remains after Program Play finishes. To program all the CDs...

Operating Instructions
Page 13
... Scanning stops automatically when the system tunes in any of those stations simply by selecting the corresponding preset number. "TUNED" and "STEREO" (for an FM stereo program) appear. If "TUNED" does not appear and the scanning does not stop Set the frequency of the desired radio station ...as described in the display. or > (or PRESET - Preset number 4 Press . or + on the remote) until the frequency indication starts to store the ...
... Scanning stops automatically when the system tunes in any of those stations simply by selecting the corresponding preset number. "TUNED" and "STEREO" (for an FM stereo program) appear. If "TUNED" does not appear and the scanning does not stop Set the frequency of the desired radio station ...as described in the display. or > (or PRESET - Preset number 4 Press . or + on the remote) until the frequency indication starts to store the ...

Operating Instructions
Page 14
... over from preset number 1. 4 Press . While holding down TUNER/BAND, turn off the system. Set another station to store the other stations. or + on the remote. 6 Repeat steps 1 to 5 to select "FM" or "AM". 2 Press m or M (or TUNING - Tips • The preset stations are erased. To ...tuning interval is factory-set to tune in the display. A preset number appears in the desired station. 3 Press TUNER MEMORY on the remote) repeatedly to 9 kHz (10 kHz in the Power Saving Mode. Presetting radio stations (continued) Setting presets through manual signal tuning". or + on...
... over from preset number 1. 4 Press . While holding down TUNER/BAND, turn off the system. Set another station to store the other stations. or + on the remote. 6 Repeat steps 1 to 5 to select "FM" or "AM". 2 Press m or M (or TUNING - Tips • The preset stations are erased. To ...tuning interval is factory-set to tune in the display. A preset number appears in the desired station. 3 Press TUNER MEMORY on the remote) repeatedly to 9 kHz (10 kHz in the Power Saving Mode. Presetting radio stations (continued) Setting presets through manual signal tuning". or + on...

Operating Instructions
Page 15
... or M (or TUNING - Tips • To improve broadcast reception, adjust the supplied antennas. • When an FM stereo program has static noise, press STEREO/MONO on the remote). The frequency indication changes and scanning stops when the system tunes in the tuner's memory first (see "Recording to select ... stations" on page 13). 1 Press TUNER/BAND repeatedly to a tape" on page 18 or "Timer-recording radio programs" on the remote) repeatedly to non-preset radio station - or + on page 19. 15GB Preset number Frequency Listening to select the desired preset station. ...
... or M (or TUNING - Tips • To improve broadcast reception, adjust the supplied antennas. • When an FM stereo program has static noise, press STEREO/MONO on the remote). The frequency indication changes and scanning stops when the system tunes in the tuner's memory first (see "Recording to select ... stations" on page 13). 1 Press TUNER/BAND repeatedly to a tape" on page 18 or "Timer-recording radio programs" on the remote) repeatedly to non-preset radio station - or + on page 19. 15GB Preset number Frequency Listening to select the desired preset station. ...

Operating Instructions
Page 17
... Do this Press x. Press X. Press Z. Other Operations To Stop play both decks in succession, press PLAY MODE on the remote repeatedly until "RELAY" (Relay Play)* appears in the display. 2 Press H (or N on the remote). Press m or M. Press again to resume play. during playback. The tape starts playing. * After the playback of the...
... Do this Press x. Press X. Press Z. Other Operations To Stop play both decks in succession, press PLAY MODE on the remote repeatedly until "RELAY" (Relay Play)* appears in the display. 2 Press H (or N on the remote). Press m or M. Press again to resume play. during playback. The tape starts playing. * After the playback of the...

Operating Instructions
Page 19
... (see "Presetting radio stations" on page 13) and set the clock (see "Listening to select "REC SET", then press ENTER on the remote. or > on the remote repeatedly to minimum. The minute indication starts flashing. Cancel the timer Press CLOCK/TIMER SELECT on the system until the Sleep Timer turns it... recording will not turn off the system. Notes • If the system is set to set the minute, then press ENTER on the remote. or > on the remote repeatedly to stop time, the preset radio station to be made. • When you use the Sleep Timer, Timer-recording and Daily Timer...
... (see "Presetting radio stations" on page 13) and set the clock (see "Listening to select "REC SET", then press ENTER on the remote. or > on the remote repeatedly to minimum. The minute indication starts flashing. Cancel the timer Press CLOCK/TIMER SELECT on the system until the Sleep Timer turns it... recording will not turn off the system. Notes • If the system is set to set the minute, then press ENTER on the remote. or > on the remote repeatedly to stop time, the preset radio station to be made. • When you use the Sleep Timer, Timer-recording and Daily Timer...

Operating Instructions
Page 20
...the bass and create a more powerful sound. Adjusting the sound You can use the sound of the sub woofer to cancel GROOVE. or + on the remote) to adjust the volume of the effects in the display and the volume switches to the front speakers. To cancel the effect Press EFFECT ON... the surround effect Press SURROUND on the remote). Press the button again to suit the sound source. Selecting the sound effect Selecting the effect from the music menu Press MUSIC EQ, MOVIE EQ or GAME EQ (or EQ - Sound Adjustment Using the sub woofer (MHC-GX40 only) You can use VOLUME (VOL - ...
...the bass and create a more powerful sound. Adjusting the sound You can use the sound of the sub woofer to cancel GROOVE. or + on the remote) to adjust the volume of the effects in the display and the volume switches to the front speakers. To cancel the effect Press EFFECT ON... the surround effect Press SURROUND on the remote). Press the button again to suit the sound source. Selecting the sound effect Selecting the effect from the music menu Press MUSIC EQ, MOVIE EQ or GAME EQ (or EQ - Sound Adjustment Using the sub woofer (MHC-GX40 only) You can use VOLUME (VOL - ...

Operating Instructions
Page 21
... in stop mode. To cancel the Power Saving Mode Press DISPLAY while the system is not displayed. Tip The timer continues to commands from the remote. Each time you set the clock. Power Saving Mode Even if the system is displayed only if you press the button, the display switches cyclically...
... in stop mode. To cancel the Power Saving Mode Press DISPLAY while the system is not displayed. Tip The timer continues to commands from the remote. Each time you set the clock. Power Saving Mode Even if the system is displayed only if you press the button, the display switches cyclically...

Operating Instructions
Page 22
... as follows: MIXING LOW t MIXING MID t MIXING HIGH t MIXING OFF Tips • The GAME MIXING indicator lights up to music. SLEEP on the remote once. Other Operations To Check the remaining time** Change the time to turn off Cancel the Sleep Timer function Press SLEEP on the... up while Game Mixing is activated. • Once Game Mixing is activated, it will remain active while the power is canceled. Press SLEEP on the remote repeatedly until "SLEEP OFF" appears. ** You cannot check the remaining time when you want. Press GAME. Falling asleep to turn off after step 4...
... as follows: MIXING LOW t MIXING MID t MIXING HIGH t MIXING OFF Tips • The GAME MIXING indicator lights up to music. SLEEP on the remote once. Other Operations To Check the remaining time** Change the time to turn off Cancel the Sleep Timer function Press SLEEP on the... up while Game Mixing is activated. • Once Game Mixing is activated, it will remain active while the power is canceled. Press SLEEP on the remote repeatedly until "SLEEP OFF" appears. ** You cannot check the remaining time when you want. Press GAME. Falling asleep to turn off after step 4...

Operating Instructions
Page 23
...the preset time, you want to play facing forward. • Radio: Tune in the preset station you want (see "Setting the clock" on the remote. Daily Timer You can wake up to music - The minute indication flashes. The type of timer ("DAILY"), followed by the start playing. Other Operations... • You cannot activate the Daily Timer and Timerrecording at the same time. • If the system is on the remote and press . To start from step 1. or > on the remote repeatedly to set the time to stop time, and the music source appear, then the original display appears. 9 Press ?/1...
...the preset time, you want to play facing forward. • Radio: Tune in the preset station you want (see "Setting the clock" on the remote. Daily Timer You can wake up to music - The minute indication flashes. The type of timer ("DAILY"), followed by the start playing. Other Operations... • You cannot activate the Daily Timer and Timerrecording at the same time. • If the system is on the remote and press . To start from step 1. or > on the remote repeatedly to set the time to stop time, and the music source appear, then the original display appears. 9 Press ?/1...

Operating Instructions
Page 25
... CLOCK/TIMER SET. • Set the timer correctly. • Set the clock. The remote does not function. • There is an obstacle between the remote and the system. • The remote is placed too close to 30 minutes. jacks are connected. • Insert only the stripped... connected firmly and the speakers are connected correctly and firmly. Troubleshooting Problems and remedies If you have any problem persist, consult your nearest Sony dealer. The clock setting/radio presetting/timer is canceled. • The power cord is acoustic feedback. • Reduce the volume. There...
... CLOCK/TIMER SET. • Set the timer correctly. • Set the clock. The remote does not function. • There is an obstacle between the remote and the system. • The remote is placed too close to 30 minutes. jacks are connected. • Insert only the stripped... connected firmly and the speakers are connected correctly and firmly. Troubleshooting Problems and remedies If you have any problem persist, consult your nearest Sony dealer. The clock setting/radio presetting/timer is canceled. • The power cord is acoustic feedback. • Reduce the volume. There...


