
User Guide
Page 5
The server allows you to connect storage devices that enables recording for extended periods of this unit, refer to chapter 4, "Detailed Descriptions of compatible cameras. You can pan, tilt, and perform zoom operations of Settings and Windows" (page 33). • For details on the various settings for this unit. Other features • The NSR is a network surveillance recorder for network cameras. Access the following URL to easily search for and play back images. In addition...
The server allows you to connect storage devices that enables recording for extended periods of this unit, refer to chapter 4, "Detailed Descriptions of compatible cameras. You can pan, tilt, and perform zoom operations of Settings and Windows" (page 33). • For details on the various settings for this unit. Other features • The NSR is a network surveillance recorder for network cameras. Access the following URL to easily search for and play back images. In addition...
User Guide
Page 7
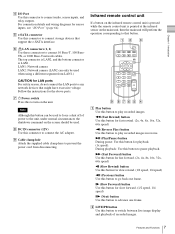
... remote control unit is pressed while the remote control unit is LAN1. E e-SATA connector Use this button to switch between live image display and playback of power to advance one frame. B LIVE/PB button Use this connector to connect the AC adapter. m (Fast Rewind) button Use this button for fast rewind. (2x, 4x, 8x, 16x, 32x, 64x speed) n (Reverse Play) button Use this button for the above ports. T (Slow Forward) button Use this button to connect 10 Base-T, 100 BaseTX, or 1000 Base-T network cables. F LAN connectors (1, 2) Use these connectors...
... remote control unit is pressed while the remote control unit is LAN1. E e-SATA connector Use this button to switch between live image display and playback of power to advance one frame. B LIVE/PB button Use this connector to connect the AC adapter. m (Fast Rewind) button Use this button for fast rewind. (2x, 4x, 8x, 16x, 32x, 64x speed) n (Reverse Play) button Use this button for the above ports. T (Slow Forward) button Use this button to connect 10 Base-T, 100 BaseTX, or 1000 Base-T network cables. F LAN connectors (1, 2) Use these connectors...

User Guide
Page 9
... a Web Browser (WebViewer)" (page 28); for details on the camera and on automatically when the power cord of Settings and Windows" (page 33). After the NSR has been turned off either by a screenbased operation or by pressing the power switch. Default user ID: admin Default password: admin • For details how to change the auto login setting, refer to "Settings Related to the System" (page 35). 9 Overview / Logging On to Chapter 3, "Monitoring...
... a Web Browser (WebViewer)" (page 28); for details on the camera and on automatically when the power cord of Settings and Windows" (page 33). After the NSR has been turned off either by a screenbased operation or by pressing the power switch. Default user ID: admin Default password: admin • For details how to change the auto login setting, refer to "Settings Related to the System" (page 35). 9 Overview / Logging On to Chapter 3, "Monitoring...
User Guide
Page 16
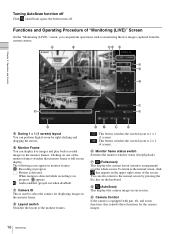
... pan, tilt, and zoom functions, this controls these functions for displaying images in progress : Motion is used to the normal screen by right-clicking and dragging the mouse. E Monitor frame status switch Switches the monitor window status (live images captured from the current camera. You can display live images and play back recorded images in succession. A B CD E F G H Chapter 2 Operation and Control I P J O A During 1 × 1 (1 screen) layout You can perform operations such as monitoring the live /playback). NM L K : This button switches the screen...
... pan, tilt, and zoom functions, this controls these functions for displaying images in progress : Motion is used to the normal screen by right-clicking and dragging the mouse. E Monitor frame status switch Switches the monitor window status (live images captured from the current camera. You can display live images and play back recorded images in succession. A B CD E F G H Chapter 2 Operation and Control I P J O A During 1 × 1 (1 screen) layout You can perform operations such as monitoring the live /playback). NM L K : This button switches the screen...

User Guide
Page 17
... and time, and the current hard disk capacity. Controlling Cameras You can also configure a new preset position. 1 Select the monitor frame displaying the images from the camera for cameras with pan, tilt, and zoom functions is used to the preset position. The camera moves to input text. K (System Setup) This displays the "Setup" screen. J (Save) This exports the image currently displayed as a different user. L (Alarm Status) This displays the status and history of camera images according to preset positions stored in the "Recording Setting" screen. Configuring...
... and time, and the current hard disk capacity. Controlling Cameras You can also configure a new preset position. 1 Select the monitor frame displaying the images from the camera for cameras with pan, tilt, and zoom functions is used to the preset position. The camera moves to input text. K (System Setup) This displays the "Setup" screen. J (Save) This exports the image currently displayed as a different user. L (Alarm Status) This displays the status and history of camera images according to preset positions stored in the "Recording Setting" screen. Configuring...

User Guide
Page 22
... rewind. (1/2 speed, 1/4 speed) (Previous) Use this button to go back one frame. (Rewind) Use this button to play recorded images in Real View mode, use the (Find Next) function, deselect the [Output Event List] check box in real size (dot by dot). K F (Event log) This displays the event/operation/system/network history. Functions and Operating Procedure of "Playback" Screen Chapter 2 Operation and Control A B C D E F G H M I Playback control buttons These are used to set the current playback position as the...
... rewind. (1/2 speed, 1/4 speed) (Previous) Use this button to go back one frame. (Rewind) Use this button to play recorded images in Real View mode, use the (Find Next) function, deselect the [Output Event List] check box in real size (dot by dot). K F (Event log) This displays the event/operation/system/network history. Functions and Operating Procedure of "Playback" Screen Chapter 2 Operation and Control A B C D E F G H M I Playback control buttons These are used to set the current playback position as the...

User Guide
Page 31
... displaying images in this button. Download Playback Download images from a specific camera and a specific time period from a Web Browser (WebViewer) Place a red frame around the image to play back by clicking it, and double-click to play back images recorded on the NSR-S10/S20 unit. The following screen appears when you click this menu: Start Recording Starts the recording of images recorded on the NSR-S10/ S20. You can perform playback controls...
... displaying images in this button. Download Playback Download images from a specific camera and a specific time period from a Web Browser (WebViewer) Place a red frame around the image to play back by clicking it, and double-click to play back images recorded on the NSR-S10/S20 unit. The following screen appears when you click this menu: Start Recording Starts the recording of images recorded on the NSR-S10/ S20. You can perform playback controls...
User Guide
Page 33
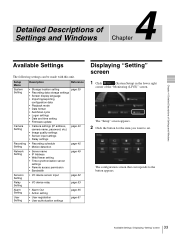
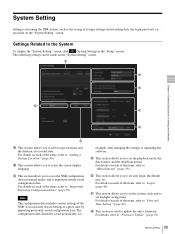
... configuration screen that corresponds to set. Setup Menu System Setting Description Reference • Storage location setting page 35 • Recording data storage settings • Screen display language • Importing/exporting configuration data • Playback mode • Date format • AutoScan cycle • Logon settings • Date and time setting • Firmware update Camera Setting • Camera settings (IP address, camera name, password, etc.) • Image quality settings • Sensor input settings • Relay settings page 40 Recording...
... configuration screen that corresponds to set. Setup Menu System Setting Description Reference • Storage location setting page 35 • Recording data storage settings • Screen display language • Importing/exporting configuration data • Playback mode • Date format • AutoScan cycle • Logon settings • Date and time setting • Firmware update Camera Setting • Camera settings (IP address, camera name, password, etc.) • Image quality settings • Sensor input settings • Relay settings page 40 Recording...
User Guide
Page 35
... update the unit's firmware. C This section allows you to select the screen display language. E This section allows you to add storage locations and the deletion of recorded data. For details on external media, and to import previously saved configuration data. The configuration data should be made on each of the items, refer to "Miscellaneous" (page 39). G This section is used to "Login...
... update the unit's firmware. C This section allows you to select the screen display language. E This section allows you to add storage locations and the deletion of recorded data. For details on external media, and to import previously saved configuration data. The configuration data should be made on each of the items, refer to "Miscellaneous" (page 39). G This section is used to "Login...
User Guide
Page 39
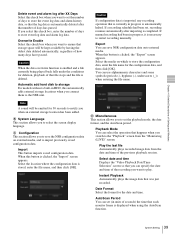
... the "Monitoring (LIVE)" screen. When this button is displayed when using the AutoScan function. 39 System Setting Chapter 4 Detailed Descriptions of Settings and Windows Delete event and alarm log after that number of days has passed. If you to import previously saved configuration data. Caution When the data overwrite function is deleted. Import This button imports saved configuration data. If a recording schedule had been in units of...
... the "Monitoring (LIVE)" screen. When this button is displayed when using the AutoScan function. 39 System Setting Chapter 4 Detailed Descriptions of Settings and Windows Delete event and alarm log after that number of days has passed. If you to import previously saved configuration data. Caution When the data overwrite function is deleted. Import This button imports saved configuration data. If a recording schedule had been in units of...
User Guide
Page 40
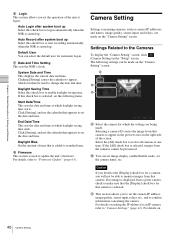
... time. If no image is displayed from that is used to update the unit's firmware. G Firmware This section is added to set for automatic logon. Default User You can be used to change the date and time. Chapter 4 Detailed Descriptions of Settings and Windows E Login This section allows you set the operation of the unit at one time. System Date and Time This displays the current date and time. Clicking [Setting] causes the calendar to "Firmware Update...
... time. If no image is displayed from that is used to update the unit's firmware. G Firmware This section is added to set for automatic logon. Default User You can be used to change the date and time. Chapter 4 Detailed Descriptions of Settings and Windows E Login This section allows you set the operation of the unit at one time. System Date and Time This displays the current date and time. Clicking [Setting] causes the calendar to "Firmware Update...

User Guide
Page 44
... used to configure settings related to preview images. If this check box to change the IP address of the camera. Search List Displays a list of Settings and Windows Authentication Select this check box is selected, set the following items. ID Enter the user ID for images of a camera that were located. Quality Select the image quality for authentication. Video Format Select the video format for the camera. Contrast Adjust...
... used to configure settings related to preview images. If this check box to change the IP address of the camera. Search List Displays a list of Settings and Windows Authentication Select this check box is selected, set the following items. ID Enter the user ID for images of a camera that were located. Quality Select the image quality for authentication. Video Format Select the video format for the camera. Contrast Adjust...

User Guide
Page 45
... restores the default settings. Recording Setting You can set recording to be performed at regular intervals according to the set schedule. • Motion Recording This begins recording only when a moving object is used to set recording to set relays. You can also configure time periods during which is used to start when an alarm occurs. Example 3) Configure periods during which is detected within the time set sensor input and relays. You can enable the recording modes...
... restores the default settings. Recording Setting You can set recording to be performed at regular intervals according to the set schedule. • Motion Recording This begins recording only when a moving object is used to set recording to set relays. You can also configure time periods during which is used to start when an alarm occurs. Example 3) Configure periods during which is detected within the time set sensor input and relays. You can enable the recording modes...
User Guide
Page 52
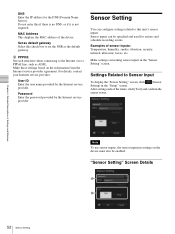
... and used for the DNS (Domain Name Server). Make settings concerning sensor inputs in the "Setup" screen. After setting each item here when connecting to this unit's sensor inputs. "Sensor Setting" Screen Details A B Set as ADSL. For details, contact your Internet service provider. MAC Address This displays the MAC address of the items, click [Test] and confirm the sensor status. Sensor Setting You can be enabled. Sensor inputs can configure settings related...
... and used for the DNS (Domain Name Server). Make settings concerning sensor inputs in the "Setup" screen. After setting each item here when connecting to this unit's sensor inputs. "Sensor Setting" Screen Details A B Set as ADSL. For details, contact your Internet service provider. MAC Address This displays the MAC address of the items, click [Test] and confirm the sensor status. Sensor Setting You can be enabled. Sensor inputs can configure settings related...
User Guide
Page 61
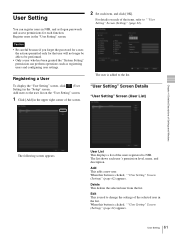
... right corner of the screen. 2 Set each of the users registered to the list. User Setting You can perform operations such as registering users and configuring user settings. User List This displays a list of the items, refer to change the settings of Settings and Windows The following screen appears. Register users in the "Setup" screen. For details on the "User Setting" screen. 1 Click [Add] in the list. When this button is clicked, ""User Setting" Screen (Setting)" (page 62) appears...
... right corner of the screen. 2 Set each of the users registered to the list. User Setting You can perform operations such as registering users and configuring user settings. User List This displays a list of the items, refer to change the settings of Settings and Windows The following screen appears. Register users in the "Setup" screen. For details on the "User Setting" screen. 1 Click [Add] in the list. When this button is clicked, ""User Setting" Screen (Setting)" (page 62) appears...

Quick Start Guide
Page 2
... in response to configure settings. Before connecting the unit to a network, be sure to format the e-SATA storage and add it as a storage location as a guide for your operating environment or purpose of advanced operations • Alarm recording. • Using audio. • Using client computers. • Advanced searching. • Exporting video or still images to external media. • Enlarging the image display or performing relay output to an existing network... Introduction This...
... in response to configure settings. Before connecting the unit to a network, be sure to format the e-SATA storage and add it as a storage location as a guide for your operating environment or purpose of advanced operations • Alarm recording. • Using audio. • Using client computers. • Advanced searching. • Exporting video or still images to external media. • Enlarging the image display or performing relay output to an existing network... Introduction This...
Quick Start Guide
Page 4
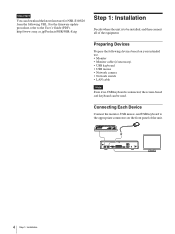
... • USB mouse • Network camera • Network switch • LAN cable Note Even if no USB keyboard is to be used. Connecting Each Device Connect the monitor, USB mouse, and USB keyboard to the User's Guide (PDF). http://www.sony.co.jp/Products/NSR/NSR-S.zip Step 1: Installation Decide where the unit is connected, the screen-based soft keyboard can download the latest firmware for NSR-S10/S20 from...
... • USB mouse • Network camera • Network switch • LAN cable Note Even if no USB keyboard is to be used. Connecting Each Device Connect the monitor, USB mouse, and USB keyboard to the User's Guide (PDF). http://www.sony.co.jp/Products/NSR/NSR-S.zip Step 1: Installation Decide where the unit is connected, the screen-based soft keyboard can download the latest firmware for NSR-S10/S20 from...
Quick Start Guide
Page 6
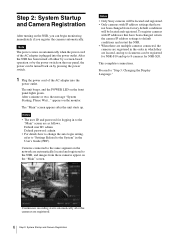
... address settings to default conditions and restart the NSR. • When there are multiple cameras connected, the cameras are registered in the order in the User's Guide (PDF). Note The power comes on the rear panel, the power can begin monitoring immediately if you register the cameras automatically. This completes connections. The unit beeps, and the POWER LED on the monitor. Default user ID: admin Default password: admin • For details how to change the auto login setting...
... address settings to default conditions and restart the NSR. • When there are multiple cameras connected, the cameras are registered in the order in the User's Guide (PDF). Note The power comes on the rear panel, the power can begin monitoring immediately if you register the cameras automatically. This completes connections. The unit beeps, and the POWER LED on the monitor. Default user ID: admin Default password: admin • For details how to change the auto login setting...
Quick Start Guide
Page 12
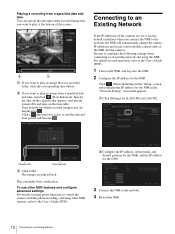
... Time periods 3 Click [OK]. To use other NSR features and configure advanced settings For details on using preset functions to control the camera, enabling alarm recording, and using the NSR. For details on each operation, refer to the User's Guide (PDF). 1 Turn on the NSR, and log onto the NSR. 2 Configure the IP address for the NSR. Click (Network Setting) in the "Setup" screen, and configure the IP address for [LAN1 IP] or [LAN2 IP]. Connecting...
... Time periods 3 Click [OK]. To use other NSR features and configure advanced settings For details on using preset functions to control the camera, enabling alarm recording, and using the NSR. For details on each operation, refer to the User's Guide (PDF). 1 Turn on the NSR, and log onto the NSR. 2 Configure the IP address for the NSR. Click (Network Setting) in the "Setup" screen, and configure the IP address for [LAN1 IP] or [LAN2 IP]. Connecting...
Quick Start Guide
Page 15
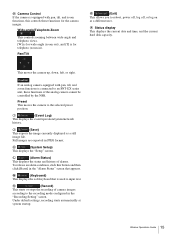
... right. Under default settings, recording starts automatically at system startup. 15 Window Operations Guide Still images are exported in JPEG format. Wide-angle/Telephoto Zoom This controls zooming between wide-angle and telephoto views. [W] is for wide-angle (zoom out), and [T] is for the camera images. H Camera Control If the camera is equipped with pan, tilt, and zoom functions is connected to an SNT-EX series unit, these functions for telephoto (zoom in). N (Record) This...
... right. Under default settings, recording starts automatically at system startup. 15 Window Operations Guide Still images are exported in JPEG format. Wide-angle/Telephoto Zoom This controls zooming between wide-angle and telephoto views. [W] is for wide-angle (zoom out), and [T] is for the camera images. H Camera Control If the camera is equipped with pan, tilt, and zoom functions is connected to an SNT-EX series unit, these functions for telephoto (zoom in). N (Record) This...


