

Quick Start Guide
Page 3
... the ENERGY STAR® guidelines for Canadian customers: Your new VAIO computer includes certain software versions or upgrades, and Internet services or offers that are trademarks or registered trademarks of Sony. It is a registered trademark of computers and other trademarks are office equipment such as computers, displays, printers, facsimiles and copiers. Their standards and logos...
... the ENERGY STAR® guidelines for Canadian customers: Your new VAIO computer includes certain software versions or upgrades, and Internet services or offers that are trademarks or registered trademarks of Sony. It is a registered trademark of computers and other trademarks are office equipment such as computers, displays, printers, facsimiles and copiers. Their standards and logos...

Quick Start Guide
Page 12
VAIO Digital Studio Computer Quick Start Troubleshooting 41 VAIO Recovery Options 43 About Recovery Options 44 About the Recovery Media Kit 46 Using the VAIO Recovery Wizard 50 Support Options 57 Immediate Help and Support 57 Help and Support Resources 58 12
VAIO Digital Studio Computer Quick Start Troubleshooting 41 VAIO Recovery Options 43 About Recovery Options 44 About the Recovery Media Kit 46 Using the VAIO Recovery Wizard 50 Support Options 57 Immediate Help and Support 57 Help and Support Resources 58 12

Quick Start Guide
Page 13
Getting Started Congratulations on your purchase of -the-art computer functionality with the latest audio, video and information technology features. 13 Your new, high-performance, multimedia computer combines state-of the Sony VAIO® computer!
Getting Started Congratulations on your purchase of -the-art computer functionality with the latest audio, video and information technology features. 13 Your new, high-performance, multimedia computer combines state-of the Sony VAIO® computer!
Quick Start Guide
Page 14
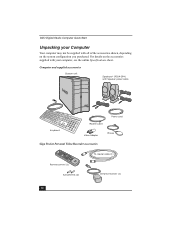
For details on the system configuration you purchased. VAIO Digital Studio Computer Quick Start Unpacking your computer, see the online Specifications sheet. Computer and supplied accessories System unit Speakers* (PCVA-SP4) with all of the accessories shown, depending on the accessories supplied with your Computer Your computer may not be supplied with Speaker power cable Power cord Keyboard Modem cable Video Adapter Mouse Giga Pocket Personal Video Recorder accessories TV coaxial cable (1) Remote control (1) AA batteries (2) Infrared receiver (1) 14
For details on the system configuration you purchased. VAIO Digital Studio Computer Quick Start Unpacking your computer, see the online Specifications sheet. Computer and supplied accessories System unit Speakers* (PCVA-SP4) with all of the accessories shown, depending on the accessories supplied with your Computer Your computer may not be supplied with Speaker power cable Power cord Keyboard Modem cable Video Adapter Mouse Giga Pocket Personal Video Recorder accessories TV coaxial cable (1) Remote control (1) AA batteries (2) Infrared receiver (1) 14
Quick Start Guide
Page 15
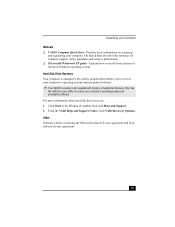
... preinstalled software. ✍ Your VAIO® computer is not supplied with System or Application Recovery CDs. Unpacking your Computer Manuals ❑ VAIO® Computer Quick Start-Provides basic information on setting up and registering your computer's operating system and preinstalled software. Other Software Library containing the Microsoft software license agreement and Sony end-user license agreement. 15...
... preinstalled software. ✍ Your VAIO® computer is not supplied with System or Application Recovery CDs. Unpacking your Computer Manuals ❑ VAIO® Computer Quick Start-Provides basic information on setting up and registering your computer's operating system and preinstalled software. Other Software Library containing the Microsoft software license agreement and Sony end-user license agreement. 15...

Quick Start Guide
Page 18
... Start About the Front Panel The front panel of your VAIO Computer enables access to a 3.5-inch floppy disk. 18 Front panel 1 Optical drive 1 See the online specifications sheet for optical drive information. 2 Optical drive 2 See the online ...
... Start About the Front Panel The front panel of your VAIO Computer enables access to a 3.5-inch floppy disk. 18 Front panel 1 Optical drive 1 See the online specifications sheet for optical drive information. 2 Optical drive 2 See the online ...
Quick Start Guide
Page 20
VAIO Digital Studio Computer Quick Start 14 Floppy disk eject button Ejects a floppy disk from the floppy disk drive. 15 Universal Serial Bus (USB 2.0) ports (4) Connections for compatible high/... the software applications, operating system, and compatible i.LINK devices. Please refer to your compatible i.LINK device for a compatible digital device. ✍ i.LINK is a trademark of Sony used only to designate that came with each other. The i.LINK connection may not communicate with your system, such as an optical or hard disk...
VAIO Digital Studio Computer Quick Start 14 Floppy disk eject button Ejects a floppy disk from the floppy disk drive. 15 Universal Serial Bus (USB 2.0) ports (4) Connections for compatible high/... the software applications, operating system, and compatible i.LINK devices. Please refer to your compatible i.LINK device for a compatible digital device. ✍ i.LINK is a trademark of Sony used only to designate that came with each other. The i.LINK connection may not communicate with your system, such as an optical or hard disk...
Quick Start Guide
Page 22
...audio L In jack Connection for an audio or stereo dubbing cable (optional). Composite video In jack Connection for a microphone (optional). VAIO Digital Studio Computer Quick Start 4 Printer port Connection for a parallel device, such as a printer or scanner. 5 Monitor port* Connection for a... standard display. 6 i.LINK 6-pin S400 port (IEEE 1394) Connection and power for a compatible digital device, such as a Sony Digital Handycam®...
...audio L In jack Connection for an audio or stereo dubbing cable (optional). Composite video In jack Connection for a microphone (optional). VAIO Digital Studio Computer Quick Start 4 Printer port Connection for a parallel device, such as a printer or scanner. 5 Monitor port* Connection for a... standard display. 6 i.LINK 6-pin S400 port (IEEE 1394) Connection and power for a compatible digital device, such as a Sony Digital Handycam®...

Quick Start Guide
Page 24
This section describes the basic functions of your remote control. VAIO Digital Studio Computer Quick Start About the Remote Control Giga Pocket™ Personal Video Recorder features are controlled with the remote control. Remote control MODE III PC 1 2 3 MENU START CLOSE FUNCTION SIZE TV/VIDEO TOOL/TITLE 24 The remote control can start and stop video recording and playback, select channels, and set viewing preferences.
This section describes the basic functions of your remote control. VAIO Digital Studio Computer Quick Start About the Remote Control Giga Pocket™ Personal Video Recorder features are controlled with the remote control. Remote control MODE III PC 1 2 3 MENU START CLOSE FUNCTION SIZE TV/VIDEO TOOL/TITLE 24 The remote control can start and stop video recording and playback, select channels, and set viewing preferences.

Quick Start Guide
Page 26
VAIO Digital Studio Computer Quick Start 7 TITLE button The function of available software applications. See the ... with the Menu button, press to switch from 1 to 3, to raise or lower the volume. 26 The target computer's remote control software determines the assigned number. (Note: The default setting is not available for Giga Pocket software only... switch Set the switch from the TV/recording deck to view a shortcut menu of this button may vary between computers. FUNCTION button When Giga Pocket software is available for other software.) 9 STANDBY button Press to place the system ...
VAIO Digital Studio Computer Quick Start 7 TITLE button The function of available software applications. See the ... with the Menu button, press to switch from 1 to 3, to raise or lower the volume. 26 The target computer's remote control software determines the assigned number. (Note: The default setting is not available for Giga Pocket software only... switch Set the switch from the TV/recording deck to view a shortcut menu of this button may vary between computers. FUNCTION button When Giga Pocket software is available for other software.) 9 STANDBY button Press to place the system ...

Quick Start Guide
Page 27
... to stop playback. REC STOP button Press to stop recording. (Note: The REC, REC MODE, and REC STOP functions are available for details. When using VAIO Media software, press to display the main menu. 17 Direction and ENTER buttons Press a direction arrow to begin recording. Press ENTER to select. 18 RETURN...
... to stop playback. REC STOP button Press to stop recording. (Note: The REC, REC MODE, and REC STOP functions are available for details. When using VAIO Media software, press to display the main menu. 17 Direction and ENTER buttons Press a direction arrow to begin recording. Press ENTER to select. 18 RETURN...

Quick Start Guide
Page 28
If your remote control is not being used for extended periods of time, remove the batteries to be replaced. VAIO Digital Studio Computer Quick Start To set up to six months. If your remote control does not operate properly, the batteries may last up the remote control Insert two AA batteries (supplied) into the remote control _ + _+ ✍ Under normal use, the AA batteries may need to avoid possible damage from battery leakage. 28 Inserting batteries into the remote control as shown.
If your remote control is not being used for extended periods of time, remove the batteries to be replaced. VAIO Digital Studio Computer Quick Start To set up to six months. If your remote control does not operate properly, the batteries may last up the remote control Insert two AA batteries (supplied) into the remote control _ + _+ ✍ Under normal use, the AA batteries may need to avoid possible damage from battery leakage. 28 Inserting batteries into the remote control as shown.

Quick Start Guide
Page 29
...the next. Press the Mute button again to turn off the volume of the speaker. Mute Press the button to restore sound. 29 VAIO Keyboard Function (-) Volume (+) Volume Mute Standby Number Lock Capital Lock Scroll Lock Numeric Keypad Windows Directional arrows Applications KEY DESCRIPTION Function The 12... function keys along the top of the keyboard are used to perform certain tasks. About the Keyboard About the Keyboard Your VAIO® keyboard uses a standard key arrangement with each function key may vary from one application to increase (+) or decrease (-) the ...
...the next. Press the Mute button again to turn off the volume of the speaker. Mute Press the button to restore sound. 29 VAIO Keyboard Function (-) Volume (+) Volume Mute Standby Number Lock Capital Lock Scroll Lock Numeric Keypad Windows Directional arrows Applications KEY DESCRIPTION Function The 12... function keys along the top of the keyboard are used to perform certain tasks. About the Keyboard About the Keyboard Your VAIO® keyboard uses a standard key arrangement with each function key may vary from one application to increase (+) or decrease (-) the ...

Quick Start Guide
Page 30
Applications The Applications key displays a shortcut menu in Standby mode. When the indicator is activated. VAIO Digital Studio Computer Quick Start KEY DESCRIPTION Standby Press the button to place the computer in certain software applications. INDICATORS Num Lock Caps Lock Scroll Lock FUNCTION The Num Lock indicator lights when the numeric keypad is off...
Applications The Applications key displays a shortcut menu in Standby mode. When the indicator is activated. VAIO Digital Studio Computer Quick Start KEY DESCRIPTION Standby Press the button to place the computer in certain software applications. INDICATORS Num Lock Caps Lock Scroll Lock FUNCTION The Num Lock indicator lights when the numeric keypad is off...

Quick Start Guide
Page 32
VAIO Digital Studio Computer Quick Start Connecting a Display (Monitor) 1 Plug the display's cable into the monitor port. 2 If necessary, plug the display's cable into the rear of the display. To connect a display 32
VAIO Digital Studio Computer Quick Start Connecting a Display (Monitor) 1 Plug the display's cable into the monitor port. 2 If necessary, plug the display's cable into the rear of the display. To connect a display 32
Quick Start Guide
Page 34
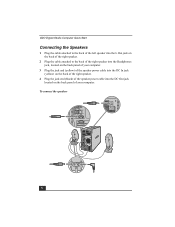
To connect the speakers USB 4 34 VAIO Digital Studio Computer Quick Start Connecting the Speakers 1 Plug the cable attached to the back of the left speaker into the L Out jack on the back of the right speaker. 2 Plug the cable attached to the back of the right speaker into the Headphones jack, located on the back panel of your computer. 3 Plug the jack end (yellow) of the speaker power cable into the DC In jack (yellow) on the back of the right speaker. 4 Plug the jack end (black) of the speaker power cable into the DC Out jack located on the back panel of your computer.
To connect the speakers USB 4 34 VAIO Digital Studio Computer Quick Start Connecting the Speakers 1 Plug the cable attached to the back of the left speaker into the L Out jack on the back of the right speaker. 2 Plug the cable attached to the back of the right speaker into the Headphones jack, located on the back panel of your computer. 3 Plug the jack end (yellow) of the speaker power cable into the DC In jack (yellow) on the back of the right speaker. 4 Plug the jack end (black) of the speaker power cable into the DC Out jack located on the back panel of your computer.
Quick Start Guide
Page 36
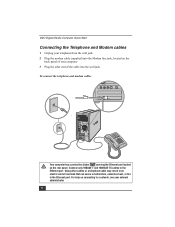
... overload that can cause a malfunction, excessive heat, or fire in the Ethernet port. For help on the back panel of your network administrator. 36 VAIO Digital Studio Computer Quick Start Connecting the Telephone and Modem cables 1 Unplug your telephone from the wall jack. 2 Plug the modem cable (supplied) into the Modem line..., located on connecting to the Ethernet port. Using other end of the cable into the wall jack. To connect the telephone and modem cables Your computer has a protective sticker covering the Ethernet port located on the rear panel.
... overload that can cause a malfunction, excessive heat, or fire in the Ethernet port. For help on the back panel of your network administrator. 36 VAIO Digital Studio Computer Quick Start Connecting the Telephone and Modem cables 1 Unplug your telephone from the wall jack. 2 Plug the modem cable (supplied) into the Modem line..., located on connecting to the Ethernet port. Using other end of the cable into the wall jack. To connect the telephone and modem cables Your computer has a protective sticker covering the Ethernet port located on the rear panel.
Quick Start Guide
Page 38
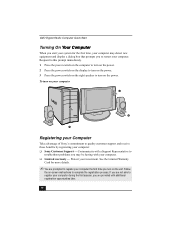
... the registration process. VAIO Digital Studio Computer Quick Start Turning On Your Computer When you start your system for more details. ✍ You are prompted to register your computer during the first session, you are not able to register your computer the first time you turn on your computer Registering your Computer Take advantage of Sony's commitment to...
... the registration process. VAIO Digital Studio Computer Quick Start Turning On Your Computer When you start your system for more details. ✍ You are prompted to register your computer during the first session, you are not able to register your computer the first time you turn on your computer Registering your Computer Take advantage of Sony's commitment to...

Quick Start Guide
Page 41
...control dials are adjusted correctly. (See the manual that came with your display for details.) ❑ Confirm that the computer is not in stand by mode by pressing any key on the keyboard. * Certain VAIO computers are not equipped with all cables are connected firmly. ❑ If you plugged the... computer into a power source and turned on the front panel of the computer. ❑ Confirm that a disk is not in the floppy disk ...
...control dials are adjusted correctly. (See the manual that came with your display for details.) ❑ Confirm that the computer is not in stand by mode by pressing any key on the keyboard. * Certain VAIO computers are not equipped with all cables are connected firmly. ❑ If you plugged the... computer into a power source and turned on the front panel of the computer. ❑ Confirm that a disk is not in the floppy disk ...

Quick Start Guide
Page 42
... status message, "Not responding." 3 Select the application that are currently open files, if possible. 2 Press the Alt+F4 keys. The Turn Off Computer window appears. 3 Click Restart. Pressing and holding the power button for more than six seconds, may result in the loss of data from files that... has a Not Responding status and click End Task. VAIO Digital Studio Computer Quick Start Why did my computer or software stop responding, contact the software publisher or designated technical support provider.
... status message, "Not responding." 3 Select the application that are currently open files, if possible. 2 Press the Alt+F4 keys. The Turn Off Computer window appears. 3 Click Restart. Pressing and holding the power button for more than six seconds, may result in the loss of data from files that... has a Not Responding status and click End Task. VAIO Digital Studio Computer Quick Start Why did my computer or software stop responding, contact the software publisher or designated technical support provider.


