
Quick Start Guide
Page 2
...product(s), or upon certain reinstallations of the software product(s), or reconfigurations of the computer, and may be completed by Internet or telephone (toll charges may not be identical to U.S. Sony, VAIO, the VAIO logo, Click to any time without notice and may require prior arrangements with ...this computer may require a fee and credit card information. All other trademarks are subject to ...
...product(s), or upon certain reinstallations of the software product(s), or reconfigurations of the computer, and may be completed by Internet or telephone (toll charges may not be identical to U.S. Sony, VAIO, the VAIO logo, Click to any time without notice and may require prior arrangements with ...this computer may require a fee and credit card information. All other trademarks are subject to ...
Quick Start Guide
Page 3
... guidelines for energy efficiency. Their standards and logos are office equipment such as computers, displays, printers, facsimiles and copiers. Refer to the model and serial numbers when you call the Sony Service Center. Owner's Record The model and serial numbers are located on the... back of the Environmental Protection Agency. registered trademark of your Sony VAIO® computer. Record the model and serial numbers in the space provided here, and keep in which business proprietors can participate voluntarily. ENERGY...
... guidelines for energy efficiency. Their standards and logos are office equipment such as computers, displays, printers, facsimiles and copiers. Refer to the model and serial numbers when you call the Sony Service Center. Owner's Record The model and serial numbers are located on the... back of the Environmental Protection Agency. registered trademark of your Sony VAIO® computer. Record the model and serial numbers in the space provided here, and keep in which business proprietors can participate voluntarily. ENERGY...

Quick Start Guide
Page 12
VAIO Computer Quick Start Upgrading Your VAIO Computer 45 Installing Memory 46 Troubleshooting 53 Support Options 55 Immediate Help and Support 55 Resources for Additional Help and Support 56 12
VAIO Computer Quick Start Upgrading Your VAIO Computer 45 Installing Memory 46 Troubleshooting 53 Support Options 55 Immediate Help and Support 55 Resources for Additional Help and Support 56 12
Quick Start Guide
Page 13
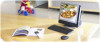
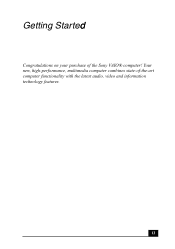
Your new, high-performance, multimedia computer combines state-of the Sony VAIO® computer! Getting Started Congratulations on your purchase of -the-art computer functionality with the latest audio, video and information technology features. 13
Your new, high-performance, multimedia computer combines state-of the Sony VAIO® computer! Getting Started Congratulations on your purchase of -the-art computer functionality with the latest audio, video and information technology features. 13

Quick Start Guide
Page 14
... accessories System unit Wireless keyboard Modem cable AA batteries (4) Wireless mouse Power cord Power cord clamp 14 Use the VAIO Recovery Wizard utility program to recover your computer, see the online Specifications sheet. ✍ Your VAIO® computer is not supplied with all of the accessories shown, depending on the accessories supplied with your...
... accessories System unit Wireless keyboard Modem cable AA batteries (4) Wireless mouse Power cord Power cord clamp 14 Use the VAIO Recovery Wizard utility program to recover your computer, see the online Specifications sheet. ✍ Your VAIO® computer is not supplied with all of the accessories shown, depending on the accessories supplied with your...

Quick Start Guide
Page 15
..., safety guidelines, and owner's information. Online Documentation ❑ VAIO® Computer User Guide - Provides specific information about the preinstalled software on setting up and registering your computer. Go to the Sony Online Support Web site at http://www.sony.com/pcsupport to VAIO life. 15 Unpacking your Computer Giga Pocket® Personal Video Recorder accessories (For models...
..., safety guidelines, and owner's information. Online Documentation ❑ VAIO® Computer User Guide - Provides specific information about the preinstalled software on setting up and registering your computer. Go to the Sony Online Support Web site at http://www.sony.com/pcsupport to VAIO life. 15 Unpacking your Computer Giga Pocket® Personal Video Recorder accessories (For models...
Quick Start Guide
Page 16
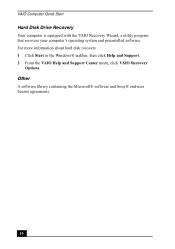
VAIO Computer Quick Start Hard Disk Drive Recovery Your computer is equipped with the VAIO Recovery Wizard, a utility program that recovers your computer's operating system and preinstalled software. Other A software library containing the Microsoft® software and Sony® end-user license agreements. 16 For more information about hard disk recovery 1 Click Start in the Windows® taskbar, then click Help and Support. 2 From the VAIO Help and Support Center menu, click VAIO Recovery Options.
VAIO Computer Quick Start Hard Disk Drive Recovery Your computer is equipped with the VAIO Recovery Wizard, a utility program that recovers your computer's operating system and preinstalled software. Other A software library containing the Microsoft® software and Sony® end-user license agreements. 16 For more information about hard disk recovery 1 Click Start in the Windows® taskbar, then click Help and Support. 2 From the VAIO Help and Support Center menu, click VAIO Recovery Options.

Quick Start Guide
Page 18
Front panel 1 Stereo speakers (built-in speakers. VAIO Computer Quick Start About the Front Panel The front panel of your VAIO® computer is equipped with Giga Pocket ® features, to turn on TV, change TV channels, and raise or lower volume. 3 Optical disc and hard disk drive access indicator Light is supplied with models equipped with indicator lights and built-in ) The stereo speakers provide sound for software, audio, and video media. 2 Infrared receiver Enables communication with the remote control that is amber while reading and writing data. 18
Front panel 1 Stereo speakers (built-in speakers. VAIO Computer Quick Start About the Front Panel The front panel of your VAIO® computer is equipped with Giga Pocket ® features, to turn on TV, change TV channels, and raise or lower volume. 3 Optical disc and hard disk drive access indicator Light is supplied with models equipped with indicator lights and built-in ) The stereo speakers provide sound for software, audio, and video media. 2 Infrared receiver Enables communication with the remote control that is amber while reading and writing data. 18

Quick Start Guide
Page 19
About the attached LCD monitor Your VAIO® computer has an attached LCD monitor. For more information about handling the LCD monitor, see the online VAIO® Computer User guide. 1 Click Start in Stand by mode. Handle the monitor carefully when adjusting the viewing angle. 1 Grasp both ...sides of the monitor firmly. 2 Tilt the monitor backwards, to the computer. Press the power button correctly to...
About the attached LCD monitor Your VAIO® computer has an attached LCD monitor. For more information about handling the LCD monitor, see the online VAIO® Computer User guide. 1 Click Start in Stand by mode. Handle the monitor carefully when adjusting the viewing angle. 1 Grasp both ...sides of the monitor firmly. 2 Tilt the monitor backwards, to the computer. Press the power button correctly to...
Quick Start Guide
Page 20
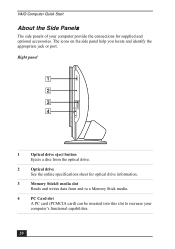
VAIO Computer Quick Start About the Side Panels The side panels of your computer's functional capabilities. 20 Right panel 1 Optical drive eject button Ejects a disc from and to a Memory Stick media. 4 PC Card slot A PC card (PCMCIA card) can be inserted into this slot to increase your computer provide the connections for optical drive information...
VAIO Computer Quick Start About the Side Panels The side panels of your computer's functional capabilities. 20 Right panel 1 Optical drive eject button Ejects a disc from and to a Memory Stick media. 4 PC Card slot A PC card (PCMCIA card) can be inserted into this slot to increase your computer provide the connections for optical drive information...

Quick Start Guide
Page 22
...Video Recorder features. † An optional "1-to-2" jack adapter (splitter) is a trademark of Sony used only to designate that a product contains an IEEE 1394 connection. VAIO Computer Quick Start 6 Microphone jack Connection for an external microphone (optional). 7 Connect button Enables the ... hard disk drive, confirm their operating system compatibility and required operating conditions. 22 Before connecting compatible i.LINK devices to your computer. ✍ i.LINK is required to connect both a telephone and modem line to the documentation supplied with each other. ...
...Video Recorder features. † An optional "1-to-2" jack adapter (splitter) is a trademark of Sony used only to designate that a product contains an IEEE 1394 connection. VAIO Computer Quick Start 6 Microphone jack Connection for an external microphone (optional). 7 Connect button Enables the ... hard disk drive, confirm their operating system compatibility and required operating conditions. 22 Before connecting compatible i.LINK devices to your computer. ✍ i.LINK is required to connect both a telephone and modem line to the documentation supplied with each other. ...

Quick Start Guide
Page 24
... specific applications. Press to increase (+) or decrease (-) the brightness of the LCD screen. 24 Press again to place the computer into Stand by mode. Wireless keyboard (top) Standby S keys (-) Volume (+/-) Brightness Mute (+) Volume Function Windows Applications Directional... arrows Numeric keypad KEY Stand by S keys Brightness DESCRIPTION Press to resume normal operation*. VAIO Computer Quick Start About the Keyboard Your VAIO® computer is supplied with your computer, see the section, "Connecting the Wireless Keyboard" on page 38. Before attempting to use...
... specific applications. Press to increase (+) or decrease (-) the brightness of the LCD screen. 24 Press again to place the computer into Stand by mode. Wireless keyboard (top) Standby S keys (-) Volume (+/-) Brightness Mute (+) Volume Function Windows Applications Directional... arrows Numeric keypad KEY Stand by S keys Brightness DESCRIPTION Press to resume normal operation*. VAIO Computer Quick Start About the Keyboard Your VAIO® computer is supplied with your computer, see the section, "Connecting the Wireless Keyboard" on page 38. Before attempting to use...

Quick Start Guide
Page 26
VAIO Computer Quick Start Wireless keyboard (bottom) 1 Battery compartment Compartment for the supplied AA batteries. 2 Keyboard feet Extend to adjust the keyboard height. 3 CONNECT button Press to enable the wireless keyboard to communicate with the system unit. 26
VAIO Computer Quick Start Wireless keyboard (bottom) 1 Battery compartment Compartment for the supplied AA batteries. 2 Keyboard feet Extend to adjust the keyboard height. 3 CONNECT button Press to enable the wireless keyboard to communicate with the system unit. 26
Quick Start Guide
Page 28
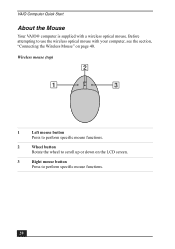
Wireless mouse (top) 1 Left mouse button Press to perform specific mouse functions. 2 Wheel button Rotate the wheel to perform specific mouse functions. 28 Before attempting to use the wireless optical mouse with a wireless optical mouse. VAIO Computer Quick Start About the Mouse Your VAIO® computer is supplied with your computer, see the section, "Connecting the Wireless Mouse" on the LCD screen. 3 Right mouse button Press to scroll up or down on page 40.
Wireless mouse (top) 1 Left mouse button Press to perform specific mouse functions. 2 Wheel button Rotate the wheel to perform specific mouse functions. 28 Before attempting to use the wireless optical mouse with a wireless optical mouse. VAIO Computer Quick Start About the Mouse Your VAIO® computer is supplied with your computer, see the section, "Connecting the Wireless Mouse" on the LCD screen. 3 Right mouse button Press to scroll up or down on page 40.

Quick Start Guide
Page 29
You can check your VAIO® computer and the wireless mouse. Inserting batteries into the wireless mouse as shown. To set up the wireless mouse Insert two AA batteries (supplied) into the ...
You can check your VAIO® computer and the wireless mouse. Inserting batteries into the wireless mouse as shown. To set up the wireless mouse Insert two AA batteries (supplied) into the ...
Quick Start Guide
Page 30
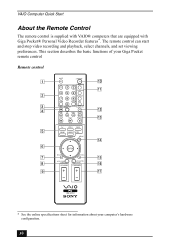
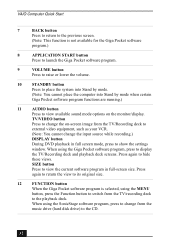
... HOME NETWORK MENU ENTER BACK TOOLS APPLICATION START VOLUME APPLICATION CLOSE CHANNEL RM-GP5U * See the online specifications sheet for information about your computer's hardware configuration. 30 VAIO Computer Quick Start About the Remote Control The remote control is supplied with VAIO® computers that are equipped with Giga Pocket® Personal Video Recorder features*.
... HOME NETWORK MENU ENTER BACK TOOLS APPLICATION START VOLUME APPLICATION CLOSE CHANNEL RM-GP5U * See the online specifications sheet for information about your computer's hardware configuration. 30 VAIO Computer Quick Start About the Remote Control The remote control is supplied with VAIO® computers that are equipped with Giga Pocket® Personal Video Recorder features*.
Quick Start Guide
Page 31
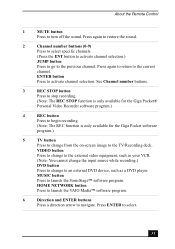
... off the sound. About the Remote Control 1 MUTE button Press to select. 31 MUSIC button Press to navigate. HOME NETWORK button Press to launch the VAIO Media™ software program. 6 Direction and ENTER buttons Press a direction arrow to launch the SonicStage™ software program. Press again to restore the sound. 2 Channel...
... off the sound. About the Remote Control 1 MUTE button Press to select. 31 MUSIC button Press to navigate. HOME NETWORK button Press to launch the VAIO Media™ software program. 6 Direction and ENTER buttons Press a direction arrow to launch the SonicStage™ software program. Press again to restore the sound. 2 Channel...
Quick Start Guide
Page 32
... raise or lower the volume. 10 STANDBY button Press to place the system into Stand by mode. (Note: You cannot place the computer into Stand by mode when certain Giga Pocket software program functions are running.) 11 AUDIO button Press to view available sound mode options on... change the on the monitor/display. Press again to change the input source while recording.) DISPLAY button During DVD playback in full-screen size. VAIO Computer Quick Start 7 BACK button Press to return to the previous screen. (Note: This function is selected, using the Giga Pocket software program,...
... raise or lower the volume. 10 STANDBY button Press to place the system into Stand by mode. (Note: You cannot place the computer into Stand by mode when certain Giga Pocket software program functions are running.) 11 AUDIO button Press to view available sound mode options on... change the on the monitor/display. Press again to change the input source while recording.) DISPLAY button During DVD playback in full-screen size. VAIO Computer Quick Start 7 BACK button Press to return to the previous screen. (Note: This function is selected, using the Giga Pocket software program,...
Quick Start Guide
Page 34
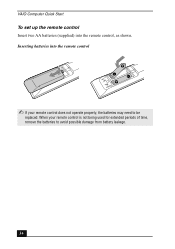
When your remote control does not operate properly, the batteries may need to avoid possible damage from battery leakage. 34 Inserting batteries into the remote control, as shown. VAIO Computer Quick Start To set up the remote control Insert two AA batteries (supplied) into the remote control ✍ If your remote control is not being used for extended periods of time, remove the batteries to be replaced.
When your remote control does not operate properly, the batteries may need to avoid possible damage from battery leakage. 34 Inserting batteries into the remote control, as shown. VAIO Computer Quick Start To set up the remote control Insert two AA batteries (supplied) into the remote control ✍ If your remote control is not being used for extended periods of time, remove the batteries to be replaced.

Quick Start Guide
Page 36
... the supplied power cord clamp to be plugged into the AC input port on its base and the power cord may lose data if your computer. 1 Remove the adhesive backing from the power cord clamp. 2 Press the clamp firmly against the back panel near the AC input port.... VAIO Computer Quick Start Connecting the Power Cord The computer's power cord must be turned on the back panel of the computer. ✍ Install your computer in an area where you can easily reach the power outlet in the event of...
... the supplied power cord clamp to be plugged into the AC input port on its base and the power cord may lose data if your computer. 1 Remove the adhesive backing from the power cord clamp. 2 Press the clamp firmly against the back panel near the AC input port.... VAIO Computer Quick Start Connecting the Power Cord The computer's power cord must be turned on the back panel of the computer. ✍ Install your computer in an area where you can easily reach the power outlet in the event of...


