Operating Instructions
Page 6
... 4 Quick Start Guide - DATE SEARCH 90 Searching for picture quality - Digital program editing (on a tape 8 - Recording on tapes 101 Recording video or TV programs ..... 112 Audio dubbing 116 Setting time values 121 Superimposing a title 126 Making your own titles 129 Labeling a cassette 131 Erasing the cassette memory data .... 133 6 Display function...
... 4 Quick Start Guide - DATE SEARCH 90 Searching for picture quality - Digital program editing (on a tape 8 - Recording on tapes 101 Recording video or TV programs ..... 112 Audio dubbing 116 Setting time values 121 Superimposing a title 126 Making your own titles 129 Labeling a cassette 131 Erasing the cassette memory data .... 133 6 Display function...
Operating Instructions
Page 29
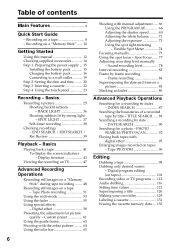
The viewfinder lens adjustment lever Viewfinder backlight You can get the desired audio quality. (1) AttachtheXLRadaptortotheaccessoryshoeonthecamcorderandtightenthe screw of the XLR adaptor. (2) ConnectthehotshoeplugoftheXLRadaptortotheintelligentaccessoryshoe of the backlight. in the viewfinder come into sharp focus. You can change the brightness of the ...
The viewfinder lens adjustment lever Viewfinder backlight You can get the desired audio quality. (1) AttachtheXLRadaptortotheaccessoryshoeonthecamcorderandtightenthe screw of the XLR adaptor. (2) ConnectthehotshoeplugoftheXLRadaptortotheintelligentaccessoryshoe of the backlight. in the viewfinder come into sharp focus. You can change the brightness of the ...
Operating Instructions
Page 30
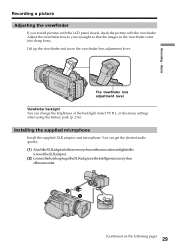
... the screw. (6) ConnecttheplugofthemicrophonetotheINPUT1connector. (7) SettheINPUTLEVELselectortoMICorMICATT. And set to the position of the REC CH SELECT switch are as follows: The position of the REC CH Audio input through The audio is recorded on SELECT switch CH1•CH2 CH1 INPUT1 INPUT2 INPUT1 INPUT2 Channel 1/2 - Channel 1 Channel 2 3 4 5 6 REC CH INPUT SELECT LEVEL +48V INPUT...
... the screw. (6) ConnecttheplugofthemicrophonetotheINPUT1connector. (7) SettheINPUTLEVELselectortoMICorMICATT. And set to the position of the REC CH SELECT switch are as follows: The position of the REC CH Audio input through The audio is recorded on SELECT switch CH1•CH2 CH1 INPUT1 INPUT2 INPUT1 INPUT2 Channel 1/2 - Channel 1 Channel 2 3 4 5 6 REC CH INPUT SELECT LEVEL +48V INPUT...
Operating Instructions
Page 31
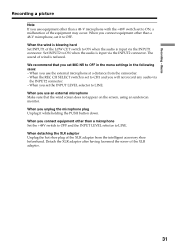
... adaptor from the camcorder. - The sound of the equipment may occur. When you use an external microphone Make sure that you will not record any audio via the INPUT2 connector. - When the REC CH SELECT switch is input via the INPUT2 connector. Recording - Basics Recording a picture Note If you ...unplug the microphone plug Unplug it to ON when the audio is input via the INPUT1 connector. When you set the INPUT LEVEL selector to CH1 and you set to LINE. When you use equipment other...
... adaptor from the camcorder. - The sound of the equipment may occur. When you use an external microphone Make sure that you will not record any audio via the INPUT2 connector. - When the REC CH SELECT switch is input via the INPUT2 connector. Recording - Basics Recording a picture Note If you ...unplug the microphone plug Unplug it to ON when the audio is input via the INPUT1 connector. When you set the INPUT LEVEL selector to CH1 and you set to LINE. When you use equipment other...
Operating Instructions
Page 35
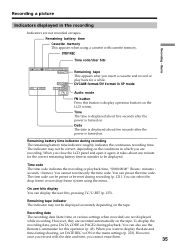
...during recording The remaining battery time indicator roughly indicates the continuous recording time. Remaining battery time Cassette memory This appears when using the menu. DVCAM format/DV format in which you close the LCD panel and open it again, it takes about one minute for this button to be displayed...hours : minutes : seconds : frames). Recording data The recording data (date/time or various settings when recorded) are recorded automatically on the conditions in SP mode Audio mode FN button Press this operation (p. 43). STBY/REC Time code/User bits Recording -
...during recording The remaining battery time indicator roughly indicates the continuous recording time. Remaining battery time Cassette memory This appears when using the menu. DVCAM format/DV format in which you close the LCD panel and open it again, it takes about one minute for this button to be displayed...hours : minutes : seconds : frames). Recording data The recording data (date/time or various settings when recorded) are recorded automatically on the conditions in SP mode Audio mode FN button Press this operation (p. 43). STBY/REC Time code/User bits Recording -

Operating Instructions
Page 47
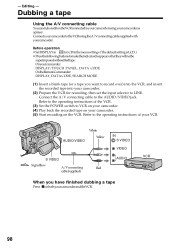
...plug of the A/V connecting cable. With this connection, you connect the white plug, the sound is L (left) signal. This connection produces higher quality DVCAM/DV format pictures. If your TV or VCR is R (right) signal. To display the screen indicators on the VCR to LINE. You can be reproduced... pictures on the VCR by using the AC power adaptor (p. 19). Basics IN White Yellow S VIDEO S VIDEO VIDEO TV :Signalflow A/Vconnectingcable(supplied) AUDIO Red If your TV is already connected to a VCR Connect your camcorder to the LINE IN input on the TV screen, we recommend that you...
...plug of the A/V connecting cable. With this connection, you connect the white plug, the sound is L (left) signal. This connection produces higher quality DVCAM/DV format pictures. If your TV or VCR is R (right) signal. To display the screen indicators on the VCR to LINE. You can be reproduced... pictures on the VCR by using the AC power adaptor (p. 19). Basics IN White Yellow S VIDEO S VIDEO VIDEO TV :Signalflow A/Vconnectingcable(supplied) AUDIO Red If your TV is already connected to a VCR Connect your camcorder to the LINE IN input on the TV screen, we recommend that you...

Operating Instructions
Page 78
... the setting of the channel 1, then press the dial. Sets the recording levels of channel 1 and channel 2 linked (LINKED) or separated (SEPARATE). * LINKEDisonlyavailablewhenbothCH1LEVELandCH2LEVELaresetto MANUAL. (6) Press AUDIO LEVEL to adjust the recording level of the item, then press the dial. Adjusting recording level manually - Sound recording level You can adjust the recording...
... the setting of the channel 1, then press the dial. Sets the recording levels of channel 1 and channel 2 linked (LINKED) or separated (SEPARATE). * LINKEDisonlyavailablewhenbothCH1LEVELandCH2LEVELaresetto MANUAL. (6) Press AUDIO LEVEL to adjust the recording level of the item, then press the dial. Adjusting recording level manually - Sound recording level You can adjust the recording...

Operating Instructions
Page 79
... follows. CH1 CH2 30 20 12 0 dB CH1,2 79 Advanced Recording Operations Adjusting recording level manually - Sound recording level 6,7 [a] CH1 30 20 12 0 dB CH2 AUDIO LEVEL CH1 CH2 [b] [c] 8 CH1 CH2 30 20 12 0 dB CH1 CH2 MENU 3,4 TAPE SET REC MODE AUD I O MODE REMA I N M I C NR M I C LEVEL XLR SET TAPE SET... XLR SET CH1 LEVEL CH2 LEVEL MAN GA I N RETURN AUTO [MENU] : END [MENU] : END [a] Recordinglevelmeter [b] Decreasestherecordinglevel [c] Increasestherecordinglevel To clear the recording level adjustment display Press AUDIO LEVEL.
... follows. CH1 CH2 30 20 12 0 dB CH1,2 79 Advanced Recording Operations Adjusting recording level manually - Sound recording level 6,7 [a] CH1 30 20 12 0 dB CH2 AUDIO LEVEL CH1 CH2 [b] [c] 8 CH1 CH2 30 20 12 0 dB CH1 CH2 MENU 3,4 TAPE SET REC MODE AUD I O MODE REMA I N M I C NR M I C LEVEL XLR SET TAPE SET... XLR SET CH1 LEVEL CH2 LEVEL MAN GA I N RETURN AUTO [MENU] : END [MENU] : END [a] Recordinglevelmeter [b] Decreasestherecordinglevel [c] Increasestherecordinglevel To clear the recording level adjustment display Press AUDIO LEVEL.

Operating Instructions
Page 80
... is set to CAMERA or VCR. (2) Turn the SEL/PUSH EXEC dial to select MANUAL, then press the dial. (3) Press AUDIO LEVEL to display the recording level adjustment display in standby or recording mode. (4) Turn the SEL/PUSH EXEC dial to AUTO in ...M I C LEVEL XLR SET RETURN AUTO MANUAL [MENU] : END TAPE SET REC MODE AUD I O MODE REMA I N M I C NR M I C LEVEL XLR SET RETURN MANUAL [MENU] : END 3,4 [a] AUDIO LEVEL CH1 CH2 30 20 12 0 dB CH1,2 [b] [c] [a] Recordinglevelmeter [b] Decreasestherecordinglevel [c] Increasestherecordinglevel To clear the recording level adjustment display Press...
... is set to CAMERA or VCR. (2) Turn the SEL/PUSH EXEC dial to select MANUAL, then press the dial. (3) Press AUDIO LEVEL to display the recording level adjustment display in standby or recording mode. (4) Turn the SEL/PUSH EXEC dial to AUTO in ...M I C LEVEL XLR SET RETURN AUTO MANUAL [MENU] : END TAPE SET REC MODE AUD I O MODE REMA I N M I C NR M I C LEVEL XLR SET RETURN MANUAL [MENU] : END 3,4 [a] AUDIO LEVEL CH1 CH2 30 20 12 0 dB CH1,2 [b] [c] [a] Recordinglevelmeter [b] Decreasestherecordinglevel [c] Increasestherecordinglevel To clear the recording level adjustment display Press...
Operating Instructions
Page 81
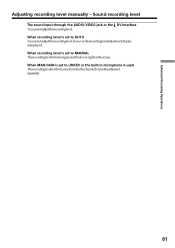
... recording level, however, the recording level adjustment display is displayed. Advanced Recording Operations Adjusting recording level manually - Sound recording level The sound input through the AUDIO/VIDEO jack or the DV Interface You cannot adjust the recording level. When recording level is used The recording level for the channel 1 and for...
... recording level, however, the recording level adjustment display is displayed. Advanced Recording Operations Adjusting recording level manually - Sound recording level The sound input through the AUDIO/VIDEO jack or the DV Interface You cannot adjust the recording level. When recording level is used The recording level for the channel 1 and for...
Operating Instructions
Page 88
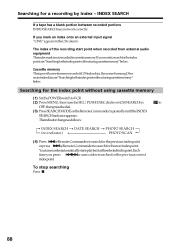
... without using cassette memory" below . or > ,yourcamcordersearchesforthepreviousornext index point. To stop searching Press x. 88 The index of the recording start point when recorded from external audio equipment The index mark is not recorded in the CH column. Each timeyoupress . Searching for a recording by index - ontheRemoteCommandertosearchforthepreviousindexpoint orpress > ontheRemoteCommandertosearchforthenextindexpoint.
... without using cassette memory" below . or > ,yourcamcordersearchesforthepreviousornext index point. To stop searching Press x. 88 The index of the recording start point when recorded from external audio equipment The index mark is not recorded in the CH column. Each timeyoupress . Searching for a recording by index - ontheRemoteCommandertosearchforthepreviousindexpoint orpress > ontheRemoteCommandertosearchforthenextindexpoint.
Operating Instructions
Page 98
... record over) into the VCR, and insert the recorded tape into your camcorder. (5) Start recording on the VCR. VCR 98 Connect your camcorder to the AUDIO/VIDEO jack. AUDIO/VIDEO White Yellow S VIDEO : Signal flow A/V connecting Red cable (supplied) IN S VIDEO VIDEO...
... record over) into the VCR, and insert the recorded tape into your camcorder. (5) Start recording on the VCR. VCR 98 Connect your camcorder to the AUDIO/VIDEO jack. AUDIO/VIDEO White Yellow S VIDEO : Signal flow A/V connecting Red cable (supplied) IN S VIDEO VIDEO...

Operating Instructions
Page 99
...using an S video cable (optional). With this connection, you do not need to the audio input jack on VCRs that support the following systems: 8 mm, Hi8, VHS, S-VHS, VHSC, S-VHSC, Betamax, ED Betamax, DVCAM, miniDV, DV, Digital8, MICRO MV If your VCR is output. Connect an S ...video cable (optional) to the S VIDEO jacks of the A/V connecting cable. Editing 99 This connection produces higher quality DVCAM/DV format pictures. If your VCR has an S video...
...using an S video cable (optional). With this connection, you do not need to the audio input jack on VCRs that support the following systems: 8 mm, Hi8, VHS, S-VHS, VHSC, S-VHSC, Betamax, ED Betamax, DVCAM, miniDV, DV, Digital8, MICRO MV If your VCR is output. Connect an S ...video cable (optional) to the S VIDEO jacks of the A/V connecting cable. Editing 99 This connection produces higher quality DVCAM/DV format pictures. If your VCR has an S video...

Operating Instructions
Page 100
... tape (or a tape you record a playback pause picture with the DV Interface The recorded picture becomes rough. If you want to -digital connection, video and audio signals are not output through the DV Interface. Pictures processed by the digital effect or PB ZOOM These pictures are transmitted in digital form for...
... tape (or a tape you record a playback pause picture with the DV Interface The recorded picture becomes rough. If you want to -digital connection, video and audio signals are not output through the DV Interface. Pictures processed by the digital effect or PB ZOOM These pictures are transmitted in digital form for...

Operating Instructions
Page 101
... scene Switch the order Editing Before operating the Digital program editing on tapes recorded on tapes) You can set up to -digital connection, video and audio signals are transmitted in digital form for high-quality editing. 101 Scenes can skip steps 2 and 3. Step 2 SettingtheVCRforoperation(p.102,106). Operation 2 Performingtheprogram(dubbingatape)(p.111). Dubbing...
... scene Switch the order Editing Before operating the Digital program editing on tapes recorded on tapes) You can set up to -digital connection, video and audio signals are transmitted in digital form for high-quality editing. 101 Scenes can skip steps 2 and 3. Step 2 SettingtheVCRforoperation(p.102,106). Operation 2 Performingtheprogram(dubbingatape)(p.111). Dubbing...

Operating Instructions
Page 103
Brand IR SETUP code Sony 1, 2, 3, 4, 5, 6 Admiral (M. Digital program editing (on IR SETUP codes Digital program editing is not possible if the VCR does not support IR SETUP codes. 103 The .... Be sure to set the correct code to match your camcorder. Editing Dubbing only desired scenes - Wards) 89 Aiwa 47, 54, 80 Akai 49, 51 Audio Dynamic 21, 35 Bell&Howell 36 (M. Wards) Broksonic 21, 70, 82 Canon 77, 78 Citizen 47 Craig 47, 73 Curtis Mathis 8, 77, 80 Daewoo 26...
Brand IR SETUP code Sony 1, 2, 3, 4, 5, 6 Admiral (M. Digital program editing (on IR SETUP codes Digital program editing is not possible if the VCR does not support IR SETUP codes. 103 The .... Be sure to set the correct code to match your camcorder. Editing Dubbing only desired scenes - Wards) 89 Aiwa 47, 54, 80 Akai 49, 51 Audio Dynamic 21, 35 Bell&Howell 36 (M. Wards) Broksonic 21, 70, 82 Canon 77, 78 Citizen 47 Craig 47, 73 Curtis Mathis 8, 77, 80 Daewoo 26...

Operating Instructions
Page 108
Be sure to allow about 50 seconds. • Ifyoustartrecordingfromtheverybeginningofthetape,thefirstfewsecondsofthe tape may not record properly. Video and audio are sent by digital signals. 108 Digital program editing (on tapes) 2,3 VIDEO EDIT 00:08:55:06 EDIT SET CONTROL ADJ TEST RETURN "CUT-IN" ...
Be sure to allow about 50 seconds. • Ifyoustartrecordingfromtheverybeginningofthetape,thefirstfewsecondsofthe tape may not record properly. Video and audio are sent by digital signals. 108 Digital program editing (on tapes) 2,3 VIDEO EDIT 00:08:55:06 EDIT SET CONTROL ADJ TEST RETURN "CUT-IN" ...

Operating Instructions
Page 112
....(ThedefaultsettingisLCD.) (1) Insert a blank tape (or a tape you want to start recording from. 3 REC PAUSE AUDIO/ VIDEO OUT S VIDEO VIDEO Yellow White AUDIO VCR Red : Signal flow S VIDEO A/V connecting cable (supplied) When you are recording a tape from a... or a TV program from a VCR. In step 5, 112 If you record a tape from a TV that has video/ audio outputs. Using the Remote Commander Instep3,press zRECandMARKsimultaneously,thenimmediatelypress press Xatthescenewhereyouwanttostartrecordingfrom. Use your camcorder. (4) Press N on your camcorder as a...
....(ThedefaultsettingisLCD.) (1) Insert a blank tape (or a tape you want to start recording from. 3 REC PAUSE AUDIO/ VIDEO OUT S VIDEO VIDEO Yellow White AUDIO VCR Red : Signal flow S VIDEO A/V connecting cable (supplied) When you are recording a tape from a... or a TV program from a VCR. In step 5, 112 If you record a tape from a TV that has video/ audio outputs. Using the Remote Commander Instep3,press zRECandMARKsimultaneously,thenimmediatelypress press Xatthescenewhereyouwanttostartrecordingfrom. Use your camcorder. (4) Press N on your camcorder as a...
Operating Instructions
Page 113
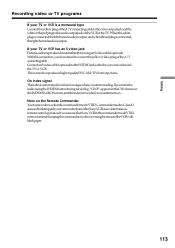
...automatically marked on a tape when you mark the index using an S video cable (optional). This connection produces higher quality DVCAM/DV format pictures. With this connection, you use another Sony VCR in the commander mode VTR 2, we recommend changing the commander mode or covering the sensor of the VCR with ... more faithfully by using the INDEX button during recording, "LINE" appears in the commander mode VTR 2. If you do not need to the audio output jack on cassette memory. Editing Recording video or TV programs If your TV or VCR is a monaural type Connect the yellow plug of ...
...automatically marked on a tape when you mark the index using an S video cable (optional). This connection produces higher quality DVCAM/DV format pictures. With this connection, you use another Sony VCR in the commander mode VTR 2, we recommend changing the commander mode or covering the sensor of the VCR with ... more faithfully by using the INDEX button during recording, "LINE" appears in the commander mode VTR 2. If you do not need to the audio output jack on cassette memory. Editing Recording video or TV programs If your TV or VCR is a monaural type Connect the yellow plug of ...
Operating Instructions
Page 114
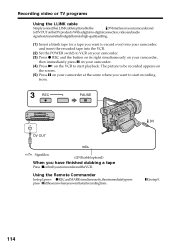
... the VCR to start recording from. 3 REC PAUSE DV DV DV OUT : Signal flow i.LINK cable (optional) When you want to -digital connection, video and audio signals are transmitted in digital form for high-quality editing. (1) Insert a blank tape (or a tape you have finished dubbing a tape Press xonbothyourcamcorderandtheVCR. Using the Remote...
... the VCR to start recording from. 3 REC PAUSE DV DV DV OUT : Signal flow i.LINK cable (optional) When you want to -digital connection, video and audio signals are transmitted in digital form for high-quality editing. (1) Insert a blank tape (or a tape you have finished dubbing a tape Press xonbothyourcamcorderandtheVCR. Using the Remote...


