
Instruction Manual
Page 2
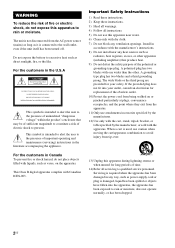
... intended to alert the user to rain or moisture. This Class B digital apparatus complies with Canadian ICES-003. Important Safety Instructions 1) Read these instructions. 2) Keep these instructions. 3) Heed all warnings. 4) Follow all servicing to persons. The wide blade or the third prong are provided for replacement of the obsolete outlet. 10) Protect the power cord from being walked on the...
... intended to alert the user to rain or moisture. This Class B digital apparatus complies with Canadian ICES-003. Important Safety Instructions 1) Read these instructions. 2) Keep these instructions. 3) Heed all warnings. 4) Follow all servicing to persons. The wide blade or the third prong are provided for replacement of the obsolete outlet. 10) Protect the power cord from being walked on the...
Instruction Manual
Page 3
... protection against harmful interference in a residential installation. However, there This stand incorporates High-Definition is no guarantee that any changes or modifications not expressly approved in Surround and the DTS** Digital Surround System. * Manufactured under license from Dolby Laboratories. US - Consult the dealer or an experienced radio/TV technician for a Class B digital device, pursuant to Part 15 of HDMI Licensing LLC. RHT-G800...
... protection against harmful interference in a residential installation. However, there This stand incorporates High-Definition is no guarantee that any changes or modifications not expressly approved in Surround and the DTS** Digital Surround System. * Manufactured under license from Dolby Laboratories. US - Consult the dealer or an experienced radio/TV technician for a Class B digital device, pursuant to Part 15 of HDMI Licensing LLC. RHT-G800...
Instruction Manual
Page 4
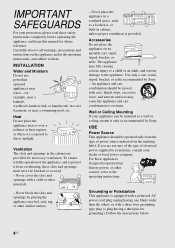
.... USE Power Source This appliance should be moved with a three-wire grounding type plug (a plug having a third pin for example, near or over a radiator or heat register, or where it from battery power, or other similar surface. - For those appliances designed to operate from overheating, these safety instructions completely before operating the appliance, and keep this manual for necessary ventilation. INSTALLATION Water...
.... USE Power Source This appliance should be moved with a three-wire grounding type plug (a plug having a third pin for example, near or over a radiator or heat register, or where it from battery power, or other similar surface. - For those appliances designed to operate from overheating, these safety instructions completely before operating the appliance, and keep this manual for necessary ventilation. INSTALLATION Water...
Instruction Manual
Page 6
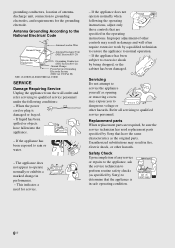
... service. - Replacement parts When replacement parts are specified in Wire Antenna Discharge Unit (NEC Section 810-20) Electric Service Equipment Grounding Conductors (NEC Section 810-21) Ground Clamps Power Service Grounding Electrode System (NEC Art 250 Part H) NEC -NATIONAL ELECTRICAL CODE SERVICE Damage Requiring Service Unplug the appliance from the wall outlet and refer servicing to the National Electrical Code Ground Clamp Antenna Lead-in the operating instructions. This indicates a need...
... service. - Replacement parts When replacement parts are specified in Wire Antenna Discharge Unit (NEC Section 810-20) Electric Service Equipment Grounding Conductors (NEC Section 810-21) Ground Clamps Power Service Grounding Electrode System (NEC Art 250 Part H) NEC -NATIONAL ELECTRICAL CODE SERVICE Damage Requiring Service Unplug the appliance from the wall outlet and refer servicing to the National Electrical Code Ground Clamp Antenna Lead-in the operating instructions. This indicates a need...
Instruction Manual
Page 7
... HDMI cable 15 Listening to the sound of the TV from the stand 17 Connecting a DVD/Blu-ray Disc player (recorder 18 Connecting a satellite tuner 19 Connecting a "PlayStation 2 20 Connecting a VCR or audio component 21 Playback Index to parts and controls 22 Enjoying TV 25 Enjoying other components 26 Enjoying the surround effect 27 Advanced Settings Programming the remote for TV operation (Input SYNC: Sony TV only)..........29 Programming the remote for other components 30 Controlling the connected components 33 Settings and adjustments using the amplifier menu...
... HDMI cable 15 Listening to the sound of the TV from the stand 17 Connecting a DVD/Blu-ray Disc player (recorder 18 Connecting a satellite tuner 19 Connecting a "PlayStation 2 20 Connecting a VCR or audio component 21 Playback Index to parts and controls 22 Enjoying TV 25 Enjoying other components 26 Enjoying the surround effect 27 Advanced Settings Programming the remote for TV operation (Input SYNC: Sony TV only)..........29 Programming the remote for other components 30 Controlling the connected components 33 Settings and adjustments using the amplifier menu...
Instruction Manual
Page 9
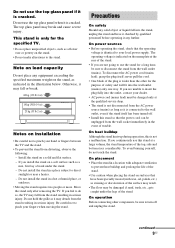
... as staining or discoloration of trouble. On power sources • Before operating the stand, check that the power cord can be sure to insert the plug fully into the outlet, contact your fingers when moving the stand. If you are unable to turn off . • Install this stand so that the operating voltage is not a malfunction. Install the stand on the...
... as staining or discoloration of trouble. On power sources • Before operating the stand, check that the power cord can be sure to insert the plug fully into the outlet, contact your fingers when moving the stand. If you are unable to turn off . • Install this stand so that the operating voltage is not a malfunction. Install the stand on the...

Instruction Manual
Page 16
... matter what input is selected for the stand, video signals from the HDMI input jack (DVD/ BD or SAT) that you use a Sony HDMI cable. • Check the setup of the connected component if an image is poor or the sound does not come out of a component connected via the HDMI cable. • Audio signals (sampling frequency, bit length, etc.) transmitted from an HDMI jack may be suppressed by the connected component. • Sound may be not output. We...
... matter what input is selected for the stand, video signals from the HDMI input jack (DVD/ BD or SAT) that you use a Sony HDMI cable. • Check the setup of the connected component if an image is poor or the sound does not come out of a component connected via the HDMI cable. • Audio signals (sampling frequency, bit length, etc.) transmitted from an HDMI jack may be suppressed by the connected component. • Sound may be not output. We...
Instruction Manual
Page 17
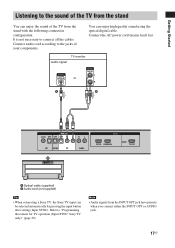
... sound using the optical digital cable. Connect audio cord according to the jacks of the TV from the INPUT OPT jack have priority when you connect either the INPUT OPT or AUDIO jack. 17US Refer to connect all the cables. You can enjoy the sound of your components. TV monitor Audio signal or A B A Optical cable (supplied) B Audio cord (not supplied) Tip • When connecting a Sony TV, the Sony TV input can be selected automatically by pressing the input button after setting (Input SYNC). Note • Audio signals...
... sound using the optical digital cable. Connect audio cord according to the jacks of the TV from the INPUT OPT jack have priority when you connect either the INPUT OPT or AUDIO jack. 17US Refer to connect all the cables. You can enjoy the sound of your components. TV monitor Audio signal or A B A Optical cable (supplied) B Audio cord (not supplied) Tip • When connecting a Sony TV, the Sony TV input can be selected automatically by pressing the input button after setting (Input SYNC). Note • Audio signals...
Instruction Manual
Page 18
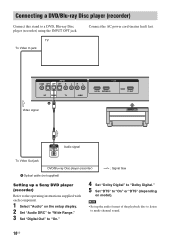
... Audio signal To Video Out jack DVD/Blu-ray Disc player (recorder) l : Signal flow A Optical cable (not supplied) Setting up the audio format of the playback disc to listen to multi-channel sound. 18US Connect the AC power cord (mains lead) last. Note • Set up a Sony DVD player (recorder) Refer to the operating instructions supplied with each component. 1 Select "Audio" on the setup display. 2 Set "Audio DRC" to "Wide Range." 3 Set "Digital Out" to "On." 4 Set "Dolby Digital" to "Dolby Digital." 5 Set "DTS" to a DVD, Blu-ray Disc player (recorder) using the INPUT OPT jack...
... Audio signal To Video Out jack DVD/Blu-ray Disc player (recorder) l : Signal flow A Optical cable (not supplied) Setting up the audio format of the playback disc to listen to multi-channel sound. 18US Connect the AC power cord (mains lead) last. Note • Set up a Sony DVD player (recorder) Refer to the operating instructions supplied with each component. 1 Select "Audio" on the setup display. 2 Set "Audio DRC" to "Wide Range." 3 Set "Digital Out" to "On." 4 Set "Dolby Digital" to "Dolby Digital." 5 Set "DTS" to a DVD, Blu-ray Disc player (recorder) using the INPUT OPT jack...
Instruction Manual
Page 20
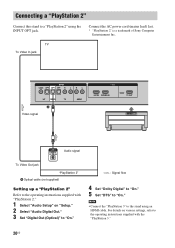
For details on "Setup." 2 Select "Audio Digital Out." 3 Set "Digital Out (Optical)" to a "PlayStation 2" using an HDMI cable. l : Signal flow 4 Set "Dolby Digital" to "On." 5 Set "DTS" to the operating instructions supplied with "PlayStation 2." 1 Select "Audio Setup" on various settings, refer to "On." TV To Video In jack A Video signal Audio signal To Video Out jack "PlayStation 2" A Optical cable (not supplied) Setting up a "PlayStation 2" Refer to the operating instructions supplied with the "PlayStation 3." 20US Connect the AC power cord (mains lead) last. * "...
For details on "Setup." 2 Select "Audio Digital Out." 3 Set "Digital Out (Optical)" to a "PlayStation 2" using an HDMI cable. l : Signal flow 4 Set "Dolby Digital" to "On." 5 Set "DTS" to the operating instructions supplied with "PlayStation 2." 1 Select "Audio Setup" on various settings, refer to "On." TV To Video In jack A Video signal Audio signal To Video Out jack "PlayStation 2" A Optical cable (not supplied) Setting up a "PlayStation 2" Refer to the operating instructions supplied with the "PlayStation 3." 20US Connect the AC power cord (mains lead) last. * "...
Instruction Manual
Page 24
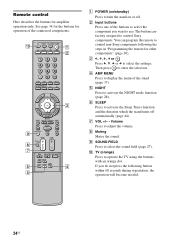
... Sleep Timer function and the duration which the stand turns off . D AMP MENU Press to display the menu of the connected components. H Muting Mutes the sound. B Input buttons Press one of the buttons to use. F SLEEP Press to enter the selection. If you want to select the component you do not press the following the steps in "Programming the remote for amplifier operation only. Remote control Here describes the buttons for other components" (page...
... Sleep Timer function and the duration which the stand turns off . D AMP MENU Press to display the menu of the connected components. H Muting Mutes the sound. B Input buttons Press one of the buttons to use. F SLEEP Press to enter the selection. If you want to select the component you do not press the following the steps in "Programming the remote for amplifier operation only. Remote control Here describes the buttons for other components" (page...
Instruction Manual
Page 26
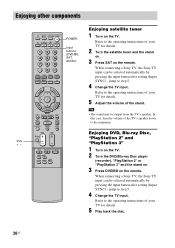
... selected automatically by pressing the input button after setting (Input SYNC) - "PlayStation 3" 1 Turn on the TV. 2 Turn the DVD/Blu-ray Disc player (recorder), "PlayStation 2" or "PlayStation 3" and the stand on. 3 Press DVD/BD on the remote. When connecting a Sony TV, the Sony TV input can be output from the TV's speaker. Enjoying other components IDE DIS N O HOME MENU POWER Input buttons (DVD/BD, SAT, AUDIO) Enjoying satellite tuner 1 Turn on the TV. Refer to the operating instructions of your TV for details. 5 Adjust...
... selected automatically by pressing the input button after setting (Input SYNC) - "PlayStation 3" 1 Turn on the TV. 2 Turn the DVD/Blu-ray Disc player (recorder), "PlayStation 2" or "PlayStation 3" and the stand on. 3 Press DVD/BD on the remote. When connecting a Sony TV, the Sony TV input can be output from the TV's speaker. Enjoying other components IDE DIS N O HOME MENU POWER Input buttons (DVD/BD, SAT, AUDIO) Enjoying satellite tuner 1 Turn on the TV. Refer to the operating instructions of your TV for details. 5 Adjust...
Instruction Manual
Page 29
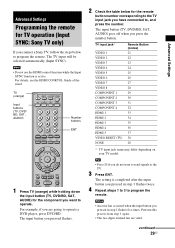
.... • The two digits entered last are going to operate a DVD player, press DVD/BD. The input button (TV, DVD/BD, SAT, AUDIO) goes off when you press the number button. Notes • An error has occurred when the input button you pressed in step 1 flashes twice. 4 Repeat steps 1 to 3 to program the remote. Advanced Settings PLAY RETUR Advanced Settings Programming the remote for TV operation (Input SYNC: Sony TV only) If you connect a Sony TV, follow the...
.... • The two digits entered last are going to operate a DVD player, press DVD/BD. The input button (TV, DVD/BD, SAT, AUDIO) goes off when you press the number button. Notes • An error has occurred when the input button you pressed in step 1 flashes twice. 4 Repeat steps 1 to 3 to program the remote. Advanced Settings PLAY RETUR Advanced Settings Programming the remote for TV operation (Input SYNC: Sony TV only) If you connect a Sony TV, follow the...
Instruction Manual
Page 34
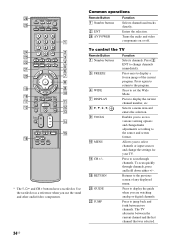
Common operations Remote Button 1 Number buttons 2 ENT wh AV POWER Function Selects channels and tracks directly. Turns the audio and video components on or off. GUIDE ws JUMP Function Selects channels. Press to scan through channels, press and hold down either +/-. Enters the selection. Press 2 ENT to change /make adjustments according to the source and screen format. Press to display the current channel number, etc. Returns to access various viewing options and change channels immediately. Press to set the Wide Mode. Enables you to the...
Common operations Remote Button 1 Number buttons 2 ENT wh AV POWER Function Selects channels and tracks directly. Turns the audio and video components on or off. GUIDE ws JUMP Function Selects channels. Press to scan through channels, press and hold down either +/-. Enters the selection. Press 2 ENT to change /make adjustments according to the source and screen format. Press to display the current channel number, etc. Returns to access various viewing options and change channels immediately. Press to set the Wide Mode. Enables you to the...
Instruction Manual
Page 35
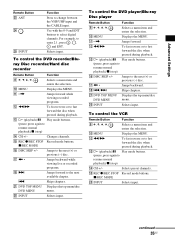
...Skips chapters. wa DVD TOP MENU Displays the top menu/disc DVD MENU menu. q; MENU Displays the MENU. Selects preset channels. qg REC z/REC STOP Record mode buttons. q; qj < • Jumps backward while viewing live or recorded programs. qk > Jumps forward to change between the VHF/UHF input and the CABLE input. To control the DVD player/Blu-ray Disc player Remote Button Function 8 C, X, x, c, Selects a menu item and enters the selection. MENU Displays the MENU. Advanced Settings Remote Button wd ANT wf wg INPUT Function Press to the next...
...Skips chapters. wa DVD TOP MENU Displays the top menu/disc DVD MENU menu. q; MENU Displays the MENU. Selects preset channels. qg REC z/REC STOP Record mode buttons. q; qj < • Jumps backward while viewing live or recorded programs. qk > Jumps forward to change between the VHF/UHF input and the CABLE input. To control the DVD player/Blu-ray Disc player Remote Button Function 8 C, X, x, c, Selects a menu item and enters the selection. MENU Displays the MENU. Advanced Settings Remote Button wd ANT wf wg INPUT Function Press to the next...
Instruction Manual
Page 36
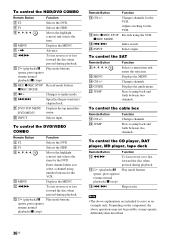
... channel when you select a channel using the VCR. q; To control the SAT Remote Button 8 C, X, x, c, q; qs m/M To fast reverse or to resume normal playback)/x (stop ) qk ./> Skips tracks. wa DVD TOP MENU Displays the top menu/disc DVD MENU menu. qd H (playback)/X Play mode buttons. (pause, press again to fast forward the disc when pressed during playback. Records using number buttons for the VCR. Press to serve as an example only. ws JUMP Function Changes channels...
... channel when you select a channel using the VCR. q; To control the SAT Remote Button 8 C, X, x, c, q; qs m/M To fast reverse or to resume normal playback)/x (stop ) qk ./> Skips tracks. wa DVD TOP MENU Displays the top menu/disc DVD MENU menu. qd H (playback)/X Play mode buttons. (pause, press again to fast forward the disc when pressed during playback. Records using number buttons for the VCR. Press to serve as an example only. ws JUMP Function Changes channels...

Instruction Manual
Page 37
... Settings Settings and adjustments using the amplifier menu Using the AMP menu You can set the following pages show details for each setting. 37US AMP MENU LEVEL CNT LEVEL (center level) SW LEVEL (subwoofer level) -6 to +6 (0) -6 to +6 (0) CUSTOMIZE HDMI* CTRL CTRL ON CTRL OFF DUAL MONO A/V SYNC MAIN SUB MAIN+SUB SYNC ON SYNC OFF AUDIO DRC DIMMER DISPLAY OFF STD MAX DIMMER ON DIMMER OFF DSPL ON DSPL OFF * Refer HDMI CONTROL Guide supplied with AMP MENU on the AMP menu. 2 Press C/X/x/c repeatedly to select...
... Settings Settings and adjustments using the amplifier menu Using the AMP menu You can set the following pages show details for each setting. 37US AMP MENU LEVEL CNT LEVEL (center level) SW LEVEL (subwoofer level) -6 to +6 (0) -6 to +6 (0) CUSTOMIZE HDMI* CTRL CTRL ON CTRL OFF DUAL MONO A/V SYNC MAIN SUB MAIN+SUB SYNC ON SYNC OFF AUDIO DRC DIMMER DISPLAY OFF STD MAX DIMMER ON DIMMER OFF DSPL ON DSPL OFF * Refer HDMI CONTROL Guide supplied with AMP MENU on the AMP menu. 2 Press C/X/x/c repeatedly to select...
Instruction Manual
Page 40
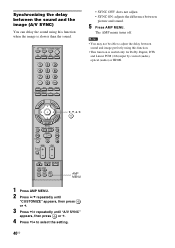
... X/x to adjust the delay between sound and image perfectly using this function when the image is slower than the sound. • SYNC OFF: does not adjust. • SYNC ON: adjusts the difference between the sound and the image (A/V SYNC) You can delay the sound using this function. • This function is useful only for Dolby Digital, DTS and Linear PCM (2ch) input by coaxial (audio), optical (audio) or HDMI. The AMP menu turns off. Synchronizing the delay between picture and sound. 5 Press AMP MENU.
... X/x to adjust the delay between sound and image perfectly using this function when the image is slower than the sound. • SYNC OFF: does not adjust. • SYNC ON: adjusts the difference between the sound and the image (A/V SYNC) You can delay the sound using this function. • This function is useful only for Dolby Digital, DTS and Linear PCM (2ch) input by coaxial (audio), optical (audio) or HDMI. The AMP menu turns off. Synchronizing the delay between picture and sound. 5 Press AMP MENU.
Instruction Manual
Page 45
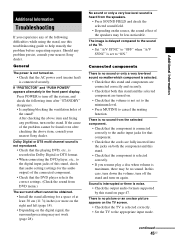
... appropriate input mode. Press POWER to "ON." Dolby Digital or DTS multi channel sound is not reproduced. • Check that the playing DVD, etc., is no sound or only a very low-level sound no picture or an unclear picture appears on both this case, turn down the volume, turn off the system, and check the following difficulties while using the stand, use this stand, check that audio setting (settings for the audio output) of the connected component. •...
... appropriate input mode. Press POWER to "ON." Dolby Digital or DTS multi channel sound is not reproduced. • Check that the playing DVD, etc., is no sound or only a very low-level sound no picture or an unclear picture appears on both this case, turn down the volume, turn off the system, and check the following difficulties while using the stand, use this stand, check that audio setting (settings for the audio output) of the connected component. •...
Instruction Manual
Page 50
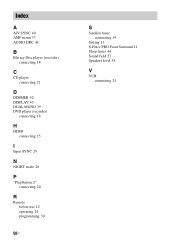
Index A A/V SYNC 40 AMP menu 37 AUDIO DRC 41 B Blu-ray Disc player (recorder) connecting 18 C CD player connecting 21 D DIMMER 42 DISPLAY 43 DUAL MONO 39 DVD player (recorder) connecting 18 H HDMI connecting 15 I Input SYNC 29 N NIGHT mode 28 P "PlayStation 2" connecting 20 R Remote before use 12 operating 24 programming 30 50US S Satellite tuner connecting 19 Setting 13 S-Force PRO Front Surround 11 Sleep timer 44 Sound field 27 Speakers level 38 V VCR connecting 21
Index A A/V SYNC 40 AMP menu 37 AUDIO DRC 41 B Blu-ray Disc player (recorder) connecting 18 C CD player connecting 21 D DIMMER 42 DISPLAY 43 DUAL MONO 39 DVD player (recorder) connecting 18 H HDMI connecting 15 I Input SYNC 29 N NIGHT mode 28 P "PlayStation 2" connecting 20 R Remote before use 12 operating 24 programming 30 50US S Satellite tuner connecting 19 Setting 13 S-Force PRO Front Surround 11 Sleep timer 44 Sound field 27 Speakers level 38 V VCR connecting 21


