
Instruction Manual
Page 3
...stand incorporates High-Definition is encouraged to try to correct the interference by turning the equipment off Multimedia Interface are trademarks or and on a circuit different from Dolby Laboratories. Model No. accordance with the limits for help. Consult the dealer or an experienced radio/TV... "DTS Digital Surround" are located at the rear of HDMI Licensing LLC. RHT-G800 Serial No. 3US US - CAUTION You are designed to provide reasonable protection ...Sony dealer regarding this equipment does cause Multimedia Interface (HDMI™) technology.
...stand incorporates High-Definition is encouraged to try to correct the interference by turning the equipment off Multimedia Interface are trademarks or and on a circuit different from Dolby Laboratories. Model No. accordance with the limits for help. Consult the dealer or an experienced radio/TV... "DTS Digital Surround" are located at the rear of HDMI Licensing LLC. RHT-G800 Serial No. 3US US - CAUTION You are designed to provide reasonable protection ...Sony dealer regarding this equipment does cause Multimedia Interface (HDMI™) technology.
Instruction Manual
Page 7
... 11 Getting Started Supplied accessories 12 Setting this stand 13 Connecting a TV/DVD/Blu-ray Disc player (recorder) using an HDMI cable 15 Listening to the sound of the TV from the stand 17 Connecting a DVD/Blu-ray Disc player ...(recorder 18 Connecting a satellite tuner 19 Connecting a "PlayStation 2 20 Connecting a VCR or audio component 21 Playback Index to parts and controls 22 Enjoying TV 25 Enjoying other components 26 Enjoying the surround effect 27 Advanced Settings Programming the remote for TV operation (Input SYNC: Sony TV...
... 11 Getting Started Supplied accessories 12 Setting this stand 13 Connecting a TV/DVD/Blu-ray Disc player (recorder) using an HDMI cable 15 Listening to the sound of the TV from the stand 17 Connecting a DVD/Blu-ray Disc player ...(recorder 18 Connecting a satellite tuner 19 Connecting a "PlayStation 2 20 Connecting a VCR or audio component 21 Playback Index to parts and controls 22 Enjoying TV 25 Enjoying other components 26 Enjoying the surround effect 27 Advanced Settings Programming the remote for TV operation (Input SYNC: Sony TV...

Instruction Manual
Page 8
... "tempered" glass with an anti-scatter film, but care should still be careful not to remove the TV and other equipment installed on the stand may lose balance and topple over , causing injury. If the glass breaks, glass fragments could fly around and cause injury. 8US Do not move , climbing ...on it with the TV or other equipment when moving the stand, be taken. Do not climb on the stand. The top glass panel may break and cause injury. Or, it easy to the legs of a top glass...
... "tempered" glass with an anti-scatter film, but care should still be careful not to remove the TV and other equipment installed on the stand may lose balance and topple over , causing injury. If the glass breaks, glass fragments could fly around and cause injury. 8US Do not move , climbing ...on it with the TV or other equipment when moving the stand, be taken. Do not climb on the stand. The top glass panel may break and cause injury. Or, it easy to the legs of a top glass...
Instruction Manual
Page 9
... safety Should any solid object or liquid fall into the wall outlet (mains) only one way. Do not install the stand in serious injury. To avoid burning yourself, do so, the TV may fall or break. 60 kg (132 lb 4 oz) 14 kg (30 lb 14 oz) 25 kg (55 lb 2 oz... capacity Do not place any further. Note on the stand. • Do not make alterations to pinch your hand or fingers between the TV and the stand. • To prevent the stand from the stand resulting in a hot or humid place, or outdoors. • Moving the stand requires two people or more. If you are not...
... safety Should any solid object or liquid fall into the wall outlet (mains) only one way. Do not install the stand in serious injury. To avoid burning yourself, do so, the TV may fall or break. 60 kg (132 lb 4 oz) 14 kg (30 lb 14 oz) 25 kg (55 lb 2 oz... capacity Do not place any further. Note on the stand. • Do not make alterations to pinch your hand or fingers between the TV and the stand. • To prevent the stand from the stand resulting in a hot or humid place, or outdoors. • Moving the stand requires two people or more. If you are not...

Instruction Manual
Page 13
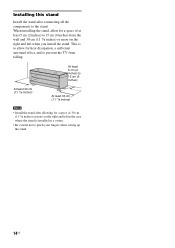
...) into the cord manager as a protective measure if you have a Sony LCD TV. 3 Fit the support belt to the stand, then firmly fasten with the large screw (supplied) using a screw driver or coin, etc. 4 While supporting the TV, tighten the support belt to secure in place. Bundling the cables 1...the screw horizontally. Perform following steps as shown in the stand. 2 Fit the shelf board over As a protective measure, secure the TV. Preventing the TV from tangling. Install the TV so that the TV does not hide the front display of the stand. For details, refer to pages 15 to 21. 2...
...) into the cord manager as a protective measure if you have a Sony LCD TV. 3 Fit the support belt to the stand, then firmly fasten with the large screw (supplied) using a screw driver or coin, etc. 4 While supporting the TV, tighten the support belt to secure in place. Bundling the cables 1...the screw horizontally. Perform following steps as shown in the stand. 2 Fit the shelf board over As a protective measure, secure the TV. Preventing the TV from tangling. Install the TV so that the TV does not hide the front display of the stand. For details, refer to pages 15 to 21. 2...
Instruction Manual
Page 14
... falling. This is to allow for heat dissipation, a sufficient surround effect, and to the stand. When installing the stand, allow for a space of 30 cm (11 7/8 inches) or more on the right and left when you install the stand. At least 5 cm (2 inches) to 15 cm (6 inches) At least 30 cm (11 7/8 inches...) At least 30 cm (11 7/8 inches) Notes • Install the stand after connecting all the components to prevent the TV from the wall and 30 cm (11 7/8 inches) or more on the right and left in the case where the...
... falling. This is to allow for heat dissipation, a sufficient surround effect, and to the stand. When installing the stand, allow for a space of 30 cm (11 7/8 inches) or more on the right and left when you install the stand. At least 5 cm (2 inches) to 15 cm (6 inches) At least 30 cm (11 7/8 inches...) At least 30 cm (11 7/8 inches) Notes • Install the stand after connecting all the components to prevent the TV from the wall and 30 cm (11 7/8 inches) or more on the right and left in the case where the...
Instruction Manual
Page 15
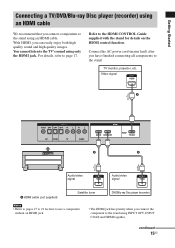
.../Blu-ray Disc player (recorder) using an HDMI cable We recommend that you connect components to the TV's sound using only the HDMI jack. You cannot listen to the stand using INPUT OPT, INPUT COAX and HDMI together. Connect the AC power cord (mains lead) after you have ...all components to page 17. For details, refer to the stand. TV monitor, projector, etc. continued 15US With HDMI, you connect the component to the HDMI CONTROL Guide supplied with the stand for details on the HDMI control function. Refer to the stand using an HDMI cable. Video signal A A A Audio/video...
.../Blu-ray Disc player (recorder) using an HDMI cable We recommend that you connect components to the TV's sound using only the HDMI jack. You cannot listen to the stand using INPUT OPT, INPUT COAX and HDMI together. Connect the AC power cord (mains lead) after you have ...all components to page 17. For details, refer to the stand. TV monitor, projector, etc. continued 15US With HDMI, you connect the component to the HDMI CONTROL Guide supplied with the stand for details on the HDMI control function. Refer to the stand using an HDMI cable. Video signal A A A Audio/video...

Instruction Manual
Page 16
... connected component. • We do not recommend using an HDMI cable with copyright protection technology (HDCP), the image and/or the sound from the HDMI TV output jack. 16US Notes on HDMI connections • You can enjoy high quality images using an HDMI-DVI conversion cable. • No matter what input... is selected for the stand, video signals from the HDMI input jack (DVD/ BD or SAT) that you use a Sony HDMI cable. • Check the setup of the connected component if an image is poor or the sound...
... connected component. • We do not recommend using an HDMI cable with copyright protection technology (HDCP), the image and/or the sound from the HDMI TV output jack. 16US Notes on HDMI connections • You can enjoy high quality images using an HDMI-DVI conversion cable. • No matter what input... is selected for the stand, video signals from the HDMI input jack (DVD/ BD or SAT) that you use a Sony HDMI cable. • Check the setup of the connected component if an image is poor or the sound...
Instruction Manual
Page 17
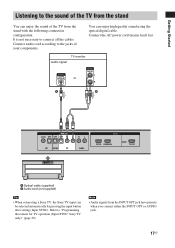
... cord (mains lead) last. Getting Started Listening to the sound of the TV from the stand You can enjoy the sound of your components. TV monitor Audio signal or A B A Optical cable (supplied) B Audio cord (not supplied) Tip • When connecting a Sony TV, the Sony TV input can enjoy high quality sound using the optical digital cable. It...
... cord (mains lead) last. Getting Started Listening to the sound of the TV from the stand You can enjoy the sound of your components. TV monitor Audio signal or A B A Optical cable (supplied) B Audio cord (not supplied) Tip • When connecting a Sony TV, the Sony TV input can enjoy high quality sound using the optical digital cable. It...
Instruction Manual
Page 18
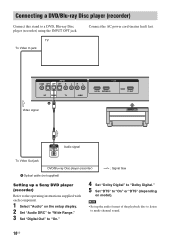
Connect the AC power cord (mains lead) last. TV To Video In jack A Video signal Audio signal To Video Out jack DVD/Blu-ray Disc player (recorder) l : Signal flow A Optical cable (not supplied) Setting ..." to "Wide Range." 3 Set "Digital Out" to "On." 4 Set "Dolby Digital" to "Dolby Digital." 5 Set "DTS" to multi-channel sound. 18US Note • Set up a Sony DVD player (recorder) Refer to the operating instructions supplied with each component. 1 Select "Audio" on model). Connecting a DVD/Blu-ray Disc player (recorder) Connect this...
Connect the AC power cord (mains lead) last. TV To Video In jack A Video signal Audio signal To Video Out jack DVD/Blu-ray Disc player (recorder) l : Signal flow A Optical cable (not supplied) Setting ..." to "Wide Range." 3 Set "Digital Out" to "On." 4 Set "Dolby Digital" to "Dolby Digital." 5 Set "DTS" to multi-channel sound. 18US Note • Set up a Sony DVD player (recorder) Refer to the operating instructions supplied with each component. 1 Select "Audio" on model). Connecting a DVD/Blu-ray Disc player (recorder) Connect this...
Instruction Manual
Page 19
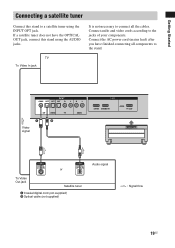
Connect audio and video cords according to a satellite tuner using the AUDIO jacks. TV To Video In jack A B Video signal or To Video Out jack Satellite tuner A Coaxial digital cord (not supplied) B Optical cable (not supplied) Audio signal l : Signal ...flow 19US If a satellite tuner does not have finished connecting all the cables. It is not necessary to connect all components to the stand. Connect the AC power cord (mains lead) after you have the OPTICAL OUT jack, connect this...
Connect audio and video cords according to a satellite tuner using the AUDIO jacks. TV To Video In jack A B Video signal or To Video Out jack Satellite tuner A Coaxial digital cord (not supplied) B Optical cable (not supplied) Audio signal l : Signal ...flow 19US If a satellite tuner does not have finished connecting all the cables. It is not necessary to connect all components to the stand. Connect the AC power cord (mains lead) after you have the OPTICAL OUT jack, connect this...
Instruction Manual
Page 20
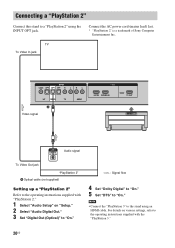
...." Connect the AC power cord (mains lead) last. * "PlayStation 2" is a trademark of Sony Computer Entertainment Inc. Note • Connect the "PlayStation 3" to the stand using the INPUT OPT jack. Connecting a "PlayStation 2" Connect this stand to a "PlayStation 2" using an HDMI cable. TV To Video In jack A Video signal Audio signal To Video Out jack "PlayStation...
...." Connect the AC power cord (mains lead) last. * "PlayStation 2" is a trademark of Sony Computer Entertainment Inc. Note • Connect the "PlayStation 3" to the stand using the INPUT OPT jack. Connecting a "PlayStation 2" Connect this stand to a "PlayStation 2" using an HDMI cable. TV To Video In jack A Video signal Audio signal To Video Out jack "PlayStation...
Instruction Manual
Page 21
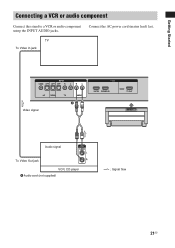
TV To Video In jack A Video signal Audio signal To Video Out jack VCR, CD player A Audio cord (not supplied) l : Signal flow 21US Connect the AC power cord (mains lead) last. Getting Started Connecting a VCR or audio component Connect this stand to a VCR or audio component using the INPUT AUDIO jacks.
TV To Video In jack A Video signal Audio signal To Video Out jack VCR, CD player A Audio cord (not supplied) l : Signal flow 21US Connect the AC power cord (mains lead) last. Getting Started Connecting a VCR or audio component Connect this stand to a VCR or audio component using the INPUT AUDIO jacks.
Instruction Manual
Page 24
... buttons are factory assigned to adjust the volume. Volume Press to control Sony components. J TV (orange) Press to display the menu of the stand (page 37). F SLEEP Press to activate the Sleep Timer function and the duration which the stand turns off . G VOL +/- - See page 34 for the buttons... for amplifier operation only. H Muting Mutes the sound. B Input buttons Press one of the buttons to turn the stand on or off automatically (page 44). D AMP MENU Press to operate the TV using the buttons with an orange dot. C C, X, x, c or Press C, X, x or c to enter the...
... buttons are factory assigned to adjust the volume. Volume Press to control Sony components. J TV (orange) Press to display the menu of the stand (page 37). F SLEEP Press to activate the Sleep Timer function and the duration which the stand turns off . G VOL +/- - See page 34 for the buttons... for amplifier operation only. H Muting Mutes the sound. B Input buttons Press one of the buttons to turn the stand on or off automatically (page 44). D AMP MENU Press to operate the TV using the buttons with an orange dot. C C, X, x, c or Press C, X, x or c to enter the...

Instruction Manual
Page 25
... instructions for details. 2 Turn the stand on. 3 Press TV (white) on the setting, refer to "Programming the remote for 60 seconds after setting. For details on the remote. 4 Adjust the volume of the TV's speaker down to these buttons (5, H, CH +). Use it as a TV remote for TV operation (Input SYNC: Sony TV only)" (page 29). • You...
... instructions for details. 2 Turn the stand on. 3 Press TV (white) on the setting, refer to "Programming the remote for 60 seconds after setting. For details on the remote. 4 Adjust the volume of the TV's speaker down to these buttons (5, H, CH +). Use it as a TV remote for TV operation (Input SYNC: Sony TV only)" (page 29). • You...
Instruction Manual
Page 26
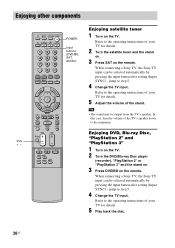
... to the operating instructions of the stand. GU TO POTILOSNS PLAY RETUR Enjoying DVD, Blu-ray Disc, "PlayStation 2" and VOL +, - Refer to the operating instructions of your TV for details. 5 Adjust the volume of your TV for details. 5 Play back the disc. 26US When connecting a Sony TV, the Sony TV input can be selected automatically by pressing...
... to the operating instructions of the stand. GU TO POTILOSNS PLAY RETUR Enjoying DVD, Blu-ray Disc, "PlayStation 2" and VOL +, - Refer to the operating instructions of your TV for details. 5 Adjust the volume of your TV for details. 5 Play back the disc. 26US When connecting a Sony TV, the Sony TV input can be selected automatically by pressing...
Instruction Manual
Page 29
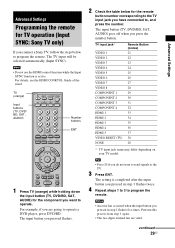
Advanced Settings PLAY RETUR Advanced Settings Programming the remote for TV operation (Input SYNC: Sony TV only) If you connect a Sony TV, follow the steps below for the component you pressed in step 1 flashes five times. For details, see the HDMI CONRTOL Guide of the stand. TV input jack* VIDEO 1 VIDEO 2 VIDEO 3 VIDEO 4 VIDEO 5 VIDEO 6 VIDEO 7 VIDEO 8 COMPONENT...
Advanced Settings PLAY RETUR Advanced Settings Programming the remote for TV operation (Input SYNC: Sony TV only) If you connect a Sony TV, follow the steps below for the component you pressed in step 1 flashes five times. For details, see the HDMI CONRTOL Guide of the stand. TV input jack* VIDEO 1 VIDEO 2 VIDEO 3 VIDEO 4 VIDEO 5 VIDEO 6 VIDEO 7 VIDEO 8 COMPONENT...
Instruction Manual
Page 30
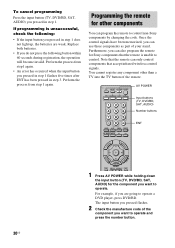
...the remote for other than a TV into the TV button of the remote. You cannot...registration, the operation will become invalid. AV POWER Input buttons (TV, DVD/BD, SAT, AUDIO) Number buttons ENT 30US IDE ...AV POWER while holding down the input button (TV, DVD/BD, SAT, AUDIO) for Sony components that accept infrared wireless control signals. Note...pressed in step 3. To cancel programming Press the input button (TV, DVD/BD, SAT, AUDIO) you pressed in step 1 ...components as part of the component you want to control non-Sony components by changing the code. Perform the process from step ...
...the remote for other than a TV into the TV button of the remote. You cannot...registration, the operation will become invalid. AV POWER Input buttons (TV, DVD/BD, SAT, AUDIO) Number buttons ENT 30US IDE ...AV POWER while holding down the input button (TV, DVD/BD, SAT, AUDIO) for Sony components that accept infrared wireless control signals. Note...pressed in step 3. To cancel programming Press the input button (TV, DVD/BD, SAT, AUDIO) you pressed in step 1 ...components as part of the component you want to control non-Sony components by changing the code. Perform the process from step ...
Instruction Manual
Page 34
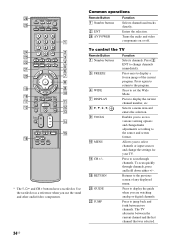
... immediately. The TV alternates between two channels. Turns the audio and video components on or off. Allows you to the previous screen of the current program. Press to the program. Press once to display the guide when you use the stand and other audio... or digital channels. Common operations Remote Button 1 Number buttons 2 ENT wh AV POWER Function Selects channels and tracks directly. Enters the selection. To control the TV Remote Button 1 Number buttons 3 FREEZE 4 WIDE 7 DISPLAY 8 C, X, x, c, 9 TOOLS q; MENU qf CH +/- GUIDE ws JUMP Function Selects channels. Press...
... immediately. The TV alternates between two channels. Turns the audio and video components on or off. Allows you to the previous screen of the current program. Press to the program. Press once to display the guide when you use the stand and other audio... or digital channels. Common operations Remote Button 1 Number buttons 2 ENT wh AV POWER Function Selects channels and tracks directly. Enters the selection. To control the TV Remote Button 1 Number buttons 3 FREEZE 4 WIDE 7 DISPLAY 8 C, X, x, c, 9 TOOLS q; MENU qf CH +/- GUIDE ws JUMP Function Selects channels. Press...
Instruction Manual
Page 44
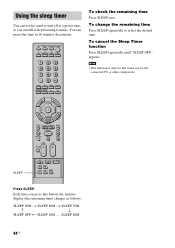
.... To check the remaining time Press SLEEP once. You can preset the time in 10 minutes decrements. Using the sleep timer You can set the stand to turn off at a preset time, so you press this...
.... To check the remaining time Press SLEEP once. You can preset the time in 10 minutes decrements. Using the sleep timer You can set the stand to turn off at a preset time, so you press this...


