
Instruction Manual
Page 7
... parts and controls 22 Enjoying TV 25 Enjoying other components 26 Enjoying the surround effect 27 Advanced Settings Programming the remote for TV operation (Input SYNC: Sony TV only)..........29 Programming the remote for other components 30 Controlling the connected components 33 Settings and adjustments using the amplifier menu 37 Using the sleep...
... parts and controls 22 Enjoying TV 25 Enjoying other components 26 Enjoying the surround effect 27 Advanced Settings Programming the remote for TV operation (Input SYNC: Sony TV only)..........29 Programming the remote for other components 30 Controlling the connected components 33 Settings and adjustments using the amplifier menu 37 Using the sleep...
Instruction Manual
Page 11
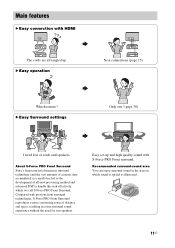
B Easy operation b Which remote? About S-Force PRO Front Surround Sony's long-term involvement in a true surround sound experience without the need lots of all tangled up and high quality sound with previous front surround technologies, S-...
B Easy operation b Which remote? About S-Force PRO Front Surround Sony's long-term involvement in a true surround sound experience without the need lots of all tangled up and high quality sound with previous front surround technologies, S-...
Instruction Manual
Page 12
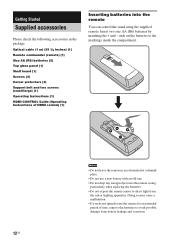
...8226; If you do not intend to use a new battery with an old one. • Do not drop any foreign object into the remote You can control the stand using the supplied remote. ends on the batteries to the markings inside the compartment. 12US Notes • Do not leave the...the following accessories in an extremely hot or humid place. • Do not use the remote for an extended period of HDMI control) (1) Inserting batteries into the remote casing, particularly when replacing the batteries. • Do not expose the remote sensor to direct light from battery leakage and corrosion.
...8226; If you do not intend to use a new battery with an old one. • Do not drop any foreign object into the remote You can control the stand using the supplied remote. ends on the batteries to the markings inside the compartment. 12US Notes • Do not leave the...the following accessories in an extremely hot or humid place. • Do not use the remote for an extended period of HDMI control) (1) Inserting batteries into the remote casing, particularly when replacing the batteries. • Do not expose the remote sensor to direct light from battery leakage and corrosion.
Instruction Manual
Page 17
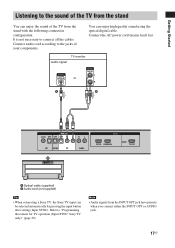
It is not necessary to "Programming the remote for TV operation (Input SYNC: Sony TV only)" (page 29). Refer to connect all the cables. Connect the AC power cord (mains lead) last. Connect audio cord according to the jacks ... either the INPUT OPT or AUDIO jack. 17US TV monitor Audio signal or A B A Optical cable (supplied) B Audio cord (not supplied) Tip • When connecting a Sony TV, the Sony TV input can enjoy high quality sound using the optical digital cable. Getting Started Listening to the sound of the TV from the stand...
It is not necessary to "Programming the remote for TV operation (Input SYNC: Sony TV only)" (page 29). Refer to connect all the cables. Connect the AC power cord (mains lead) last. Connect audio cord according to the jacks ... either the INPUT OPT or AUDIO jack. 17US TV monitor Audio signal or A B A Optical cable (supplied) B Audio cord (not supplied) Tip • When connecting a Sony TV, the Sony TV input can enjoy high quality sound using the optical digital cable. Getting Started Listening to the sound of the TV from the stand...
Instruction Manual
Page 22
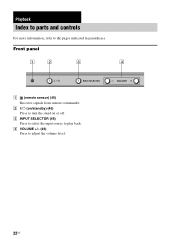
C INPUT SELECTOR (46) Press to select the input source to adjust the volume level. 22US D VOLUME +/- (46) Press to play back. Playback Index to parts and controls For more information, refer to turn the stand on /standby) (46) Press to the pages indicated in parentheses. Front panel A (remote sensor) (46) Receives signals from remote commander. B ?/1 (on or off.
C INPUT SELECTOR (46) Press to select the input source to adjust the volume level. 22US D VOLUME +/- (46) Press to play back. Playback Index to parts and controls For more information, refer to turn the stand on /standby) (46) Press to the pages indicated in parentheses. Front panel A (remote sensor) (46) Receives signals from remote commander. B ?/1 (on or off.
Instruction Manual
Page 24
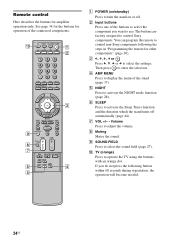
... control non-Sony components following button within 60 seconds during registration, the operation will become invalid. 24US E NIGHT Press to select the settings. H Muting Mutes the sound. If you want to select the component you do not press the following the steps in "Programming the remote for amplifier operation only. Remote control Here...
... control non-Sony components following button within 60 seconds during registration, the operation will become invalid. 24US E NIGHT Press to select the settings. H Muting Mutes the sound. If you want to select the component you do not press the following the steps in "Programming the remote for amplifier operation only. Remote control Here...

Instruction Manual
Page 25
... the volume of the TV's speaker down to the minimum. To cancel this case, turn the volume of the stand. Use it as a TV remote for 60 seconds after setting. VOL +, - 25US For details on the TV and choose a program. Playback PLAY RETUR Enjoying TV TV (white) IDE DIS ...GU TO POTILOSNS POWER 1 Turn on the setting, refer to "Programming the remote for TV operation (Input SYNC: Sony TV only)" (page 29). • You can use the remote as a guide during operation. • When connecting a Sony TV, the Sony TV input can be output from the TV's speaker. In this function, ...
... the volume of the TV's speaker down to the minimum. To cancel this case, turn the volume of the stand. Use it as a TV remote for 60 seconds after setting. VOL +, - 25US For details on the TV and choose a program. Playback PLAY RETUR Enjoying TV TV (white) IDE DIS ...GU TO POTILOSNS POWER 1 Turn on the setting, refer to "Programming the remote for TV operation (Input SYNC: Sony TV only)" (page 29). • You can use the remote as a guide during operation. • When connecting a Sony TV, the Sony TV input can be output from the TV's speaker. In this function, ...
Instruction Manual
Page 26
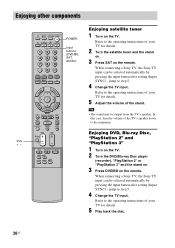
...Sony TV input can be selected automatically by pressing the input button after setting (Input SYNC) - Refer to the operating instructions of the stand. jump to step 5. 4 Change the TV input. Enjoying other components IDE DIS N O HOME MENU POWER Input buttons (DVD/BD, SAT, AUDIO) Enjoying satellite tuner 1 Turn on the remote... 3" and the stand on. 3 Press DVD/BD on the TV. jump to step 5. 4 Change the TV input. When connecting a Sony TV, the Sony TV input can be output from the TV's speaker. In this case, turn the volume of your TV for details. 5 Play back the...
...Sony TV input can be selected automatically by pressing the input button after setting (Input SYNC) - Refer to the operating instructions of the stand. jump to step 5. 4 Change the TV input. Enjoying other components IDE DIS N O HOME MENU POWER Input buttons (DVD/BD, SAT, AUDIO) Enjoying satellite tuner 1 Turn on the remote... 3" and the stand on. 3 Press DVD/BD on the TV. jump to step 5. 4 Change the TV input. When connecting a Sony TV, the Sony TV input can be output from the TV's speaker. In this case, turn the volume of your TV for details. 5 Play back the...
Instruction Manual
Page 27
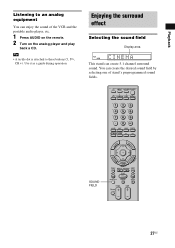
... buttons (5, H, CH +). You can create the desired sound field by selecting one of the VCR and the portable audio player, etc. 1 Press AUDIO on the remote. 2 Turn on the analog player and play back a CD. GU TO POTILOSNS PLAY RETUR SOUND FIELD IDE DIS N O HOME MENU 27US
... buttons (5, H, CH +). You can create the desired sound field by selecting one of the VCR and the portable audio player, etc. 1 Press AUDIO on the remote. 2 Turn on the analog player and play back a CD. GU TO POTILOSNS PLAY RETUR SOUND FIELD IDE DIS N O HOME MENU 27US
Instruction Manual
Page 29
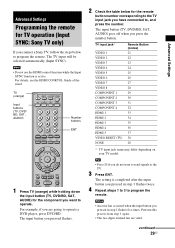
... 1 Press TV (orange) while holding down the input button (TV, DVD/BD, SAT, AUDIO) for TV operation (Input SYNC: Sony TV only) If you connect a Sony TV, follow the steps below for the remote button number corresponding to the TV input jack you are valid. TV input jack* VIDEO 1 VIDEO 2 VIDEO 3 VIDEO 4 VIDEO...
... 1 Press TV (orange) while holding down the input button (TV, DVD/BD, SAT, AUDIO) for TV operation (Input SYNC: Sony TV only) If you connect a Sony TV, follow the steps below for the remote button number corresponding to the TV input jack you are valid. TV input jack* VIDEO 1 VIDEO 2 VIDEO 3 VIDEO 4 VIDEO...
Instruction Manual
Page 30
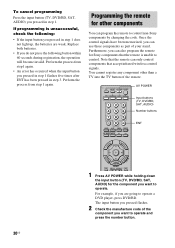
...1 flashes five times after ENT has been pressed in step 3. Once the control signals have been memorized, you can program the remote to control non-Sony components by changing the code. For example, if you are weak. If programming is unable to control. AV POWER Input buttons (... a DVD player, press DVD/BD. Furthermore, you pressed in step 1. Perform the process from step 1 again. Note that the remote can also program the remote for Sony components that accept infrared wireless control signals. Replace both batteries. • If you do not press the following : • If ...
...1 flashes five times after ENT has been pressed in step 3. Once the control signals have been memorized, you can program the remote to control non-Sony components by changing the code. For example, if you are weak. If programming is unable to control. AV POWER Input buttons (... a DVD player, press DVD/BD. Furthermore, you pressed in step 1. Perform the process from step 1 again. Note that the remote can also program the remote for Sony components that accept infrared wireless control signals. Replace both batteries. • If you do not press the following : • If ...

Instruction Manual
Page 31
... while pressing and holding the first two buttons, press AV POWER. Since the remote signal that a component accepts differs depending on pages 32 to 33 to control non-Sony components and also Sony components that your remote using other components. If you pressed in step 3. Default Settings The default settings... DVD/BD TV SAT AUDIO Code(s) DVD 401 TV 501 Satellite Tuner 801 NONE continued 31US The setting is a chance, however, that the remote is valid. • For the numeric codes, only the three digits entered last are underlined. Perform the process from step1 again. •...
... while pressing and holding the first two buttons, press AV POWER. Since the remote signal that a component accepts differs depending on pages 32 to 33 to control non-Sony components and also Sony components that your remote using other components. If you pressed in step 3. Default Settings The default settings... DVD/BD TV SAT AUDIO Code(s) DVD 401 TV 501 Satellite Tuner 801 NONE continued 31US The setting is a chance, however, that the remote is valid. • For the numeric codes, only the three digits entered last are underlined. Perform the process from step1 again. •...
Instruction Manual
Page 33
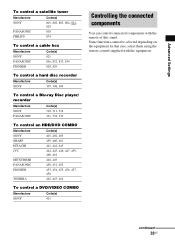
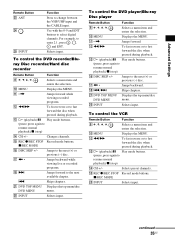
... equipment. continued 33US In that case, select them using the remote control supplied with the remote of this stand. Advanced Settings To control a satellite tuner Manufacture SONY PANASONIC PHILIPS Code(s) 801, 802, 803, 804, 824, 825 818 874 To control a cable box Manufacture SONY PANASONIC PIONEER Code(s) 821 816, 832, 833, 834 828, 829...
... equipment. continued 33US In that case, select them using the remote control supplied with the remote of this stand. Advanced Settings To control a satellite tuner Manufacture SONY PANASONIC PHILIPS Code(s) 801, 802, 803, 804, 824, 825 818 874 To control a cable box Manufacture SONY PANASONIC PIONEER Code(s) 821 816, 832, 833, 834 828, 829...
Instruction Manual
Page 34
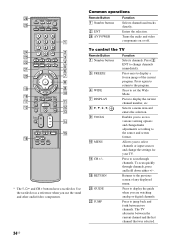
...your TV. GU TO POTILOSNS PLAY RETUR IDE DIS N O HOME MENU * The 5, H and CH + buttons have a tactile dot. Common operations Remote Button 1 Number buttons 2 ENT wh AV POWER Function Selects channels and tracks directly. Press 2 ENT to the source and screen format. Press again to..., etc. Press to the program. Selects a menu item and enters the selection. Turns the audio and video components on or off. To control the TV Remote Button 1 Number buttons 3 FREEZE 4 WIDE 7 DISPLAY 8 C, X, x, c, 9 TOOLS q; Press to the previous screen of the current program. Allows you ...
...your TV. GU TO POTILOSNS PLAY RETUR IDE DIS N O HOME MENU * The 5, H and CH + buttons have a tactile dot. Common operations Remote Button 1 Number buttons 2 ENT wh AV POWER Function Selects channels and tracks directly. Press 2 ENT to the source and screen format. Press again to..., etc. Press to the program. Selects a menu item and enters the selection. Turns the audio and video components on or off. To control the TV Remote Button 1 Number buttons 3 FREEZE 4 WIDE 7 DISPLAY 8 C, X, x, c, 9 TOOLS q; Press to the previous screen of the current program. Allows you ...
Instruction Manual
Page 35
...REC MODE wg INPUT Selects input. Selects input. MENU Displays the MENU. Jumps to select digital channels. qk ./> Skips chapters. To control the VCR Remote Button Function 8 C, X, x, c, Selects a menu item and enters the selection. Use with the 0-9 and ENT buttons to the next (+) or...enter 2.1, press 2 , , 1 and ENT. For example, to fast forward the disc when pressed during playback. Skips chapters. Advanced Settings Remote Button wd ANT wf wg INPUT Function Press to the next (+) or previous (-) disc. Changes channels. qg REC z/REC STOP Record mode buttons...
...REC MODE wg INPUT Selects input. Selects input. MENU Displays the MENU. Jumps to select digital channels. qk ./> Skips chapters. To control the VCR Remote Button Function 8 C, X, x, c, Selects a menu item and enters the selection. Use with the 0-9 and ENT buttons to the next (+) or...enter 2.1, press 2 , , 1 and ENT. For example, to fast forward the disc when pressed during playback. Skips chapters. Advanced Settings Remote Button wd ANT wf wg INPUT Function Press to the next (+) or previous (-) disc. Changes channels. qg REC z/REC STOP Record mode buttons...
Instruction Manual
Page 36
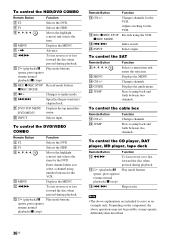
...MENU Displays the MENU. MENU qf CH +/- ws JUMP Function Changes channels. To control the CD player, DAT player, MD player, tape deck Remote Button Function qs m/M To fast reverse or to resume normal playback)/x (stop ) qg REC z/REC STOP Record mode buttons. qs m/M To ...Displays the MENU. Press to fast forward the disc when pressed during playback. qa • , Advance. To control the cable box Remote Button qf CH +/- To control the HDD/DVD COMBO Remote Button Function 5 F2 Selects the DVD. 6 F1 Selects the HDD. 8 C, X, x, c, Moves the highlight (cursor) and...
...MENU Displays the MENU. MENU qf CH +/- ws JUMP Function Changes channels. To control the CD player, DAT player, MD player, tape deck Remote Button Function qs m/M To fast reverse or to resume normal playback)/x (stop ) qg REC z/REC STOP Record mode buttons. qs m/M To ...Displays the MENU. Press to fast forward the disc when pressed during playback. qa • , Advance. To control the cable box Remote Button qf CH +/- To control the HDD/DVD COMBO Remote Button Function 5 F2 Selects the DVD. 6 F1 Selects the HDD. 8 C, X, x, c, Moves the highlight (cursor) and...

Instruction Manual
Page 37
... can set the following pages show details for each setting. 37US The following items with this operating instructions. 1 Press AMP MENU to turn on the remote.
... can set the following pages show details for each setting. 37US The following items with this operating instructions. 1 Press AMP MENU to turn on the remote.
Instruction Manual
Page 46
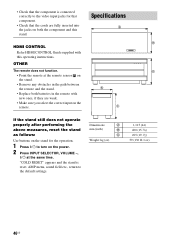
... are weak. • Make sure you select the correct input on the power. 2 Press INPUT SELECTOR, VOLUME -, ?/1 at the remote sensor on the stand. • Remove any obstacles in the remote with this stand. "COLD RESET" appears and the stand is connected correctly to the video input jacks for the operation... Refer HDMI CONTROL Guide supplied with new ones, if they are fully inserted into the jacks on both batteries in the path between the remote and the stand. • Replace both the component and this operating instructions. AMP menu, sound field etc., return to turn on the...
... are weak. • Make sure you select the correct input on the power. 2 Press INPUT SELECTOR, VOLUME -, ?/1 at the remote sensor on the stand. • Remove any obstacles in the remote with this stand. "COLD RESET" appears and the stand is connected correctly to the video input jacks for the operation... Refer HDMI CONTROL Guide supplied with new ones, if they are fully inserted into the jacks on both batteries in the path between the remote and the stand. • Replace both the component and this operating instructions. AMP menu, sound field etc., return to turn on the...
Instruction Manual
Page 48
... Watts HDMI CONTROL is ON: 1.5 Watts or more advanced than Dolby Surround Pro Logic. projecting parts 59 kg (130 lb 1 oz) Optical cable (1 m) (39 3/8 inches) (1) Remote commander (remote) (1) Size AA (R6) batteries (2) Top glass panel (1) Shelf board (1) Screws (4) Corner protectors (4) Support belt and two screws (small/large) (1) Operating Instructions (1) HDMI CONTROL Guide...
... Watts HDMI CONTROL is ON: 1.5 Watts or more advanced than Dolby Surround Pro Logic. projecting parts 59 kg (130 lb 1 oz) Optical cable (1 m) (39 3/8 inches) (1) Remote commander (remote) (1) Size AA (R6) batteries (2) Top glass panel (1) Shelf board (1) Screws (4) Corner protectors (4) Support belt and two screws (small/large) (1) Operating Instructions (1) HDMI CONTROL Guide...
Instruction Manual
Page 50
Index A A/V SYNC 40 AMP menu 37 AUDIO DRC 41 B Blu-ray Disc player (recorder) connecting 18 C CD player connecting 21 D DIMMER 42 DISPLAY 43 DUAL MONO 39 DVD player (recorder) connecting 18 H HDMI connecting 15 I Input SYNC 29 N NIGHT mode 28 P "PlayStation 2" connecting 20 R Remote before use 12 operating 24 programming 30 50US S Satellite tuner connecting 19 Setting 13 S-Force PRO Front Surround 11 Sleep timer 44 Sound field 27 Speakers level 38 V VCR connecting 21
Index A A/V SYNC 40 AMP menu 37 AUDIO DRC 41 B Blu-ray Disc player (recorder) connecting 18 C CD player connecting 21 D DIMMER 42 DISPLAY 43 DUAL MONO 39 DVD player (recorder) connecting 18 H HDMI connecting 15 I Input SYNC 29 N NIGHT mode 28 P "PlayStation 2" connecting 20 R Remote before use 12 operating 24 programming 30 50US S Satellite tuner connecting 19 Setting 13 S-Force PRO Front Surround 11 Sleep timer 44 Sound field 27 Speakers level 38 V VCR connecting 21


