
Instruction Manual
Page 2
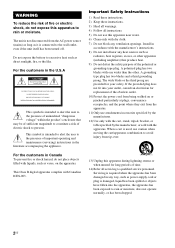
... within the product's enclosure that produce heat. 9) Do not defeat the safety purpose of important operating and maintenance (servicing) instructions in Canada To prevent fire or shock hazard, do not expose this apparatus to rain or moisture. For the customers in the...is damaged, liquid has been spilled or objects have fallen into your outlet, consult an electrician for your safety. Important Safety Instructions 1) Read these instructions. 2) Keep these instructions. 3) Heed all warnings. 4) Follow all servicing to excessive heat such as radiators, heat registers, stoves, or other ....
... within the product's enclosure that produce heat. 9) Do not defeat the safety purpose of important operating and maintenance (servicing) instructions in Canada To prevent fire or shock hazard, do not expose this apparatus to rain or moisture. For the customers in the...is damaged, liquid has been spilled or objects have fallen into your outlet, consult an electrician for your safety. Important Safety Instructions 1) Read these instructions. 2) Keep these instructions. 3) Heed all warnings. 4) Follow all servicing to excessive heat such as radiators, heat registers, stoves, or other ....
Instruction Manual
Page 3
...in a residential installation. WARNING This stand incorporates Dolby* Digital and Pro Logic This equipment has been tested and found to comply with the instructions, may cause harmful interference to Part 15 of the FCC Rules. "Dolby", "Pro Logic" and the double-D symbol are trademarks of...against harmful interference in this manual could void your authority to them whenever you call upon your Sony dealer regarding this equipment does cause Multimedia Interface (HDMI™) technology. RHT-G800 Serial No. 3US Connect the equipment into an outlet on , the user is encouraged to ...
...in a residential installation. WARNING This stand incorporates Dolby* Digital and Pro Logic This equipment has been tested and found to comply with the instructions, may cause harmful interference to Part 15 of the FCC Rules. "Dolby", "Pro Logic" and the double-D symbol are trademarks of...against harmful interference in this manual could void your authority to them whenever you call upon your Sony dealer regarding this equipment does cause Multimedia Interface (HDMI™) technology. RHT-G800 Serial No. 3US Connect the equipment into an outlet on , the user is encouraged to ...
Instruction Manual
Page 4
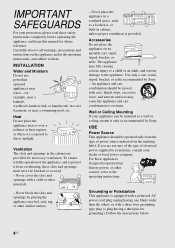
...sources, refer to your home, consult your dealer or local power company. For those appliances designed to operate from overheating, these safety instructions completely before operating the appliance, and keep this manual for example, near a bathtub, washbowl, kitchen sink, or laundry tub, ... openings in a wet basement, or near water - Use only a cart, stand, tripod, bracket, or table recommended by Sony. - Follow the instructions below: 4US Grounding or Polarization This appliance is provided. IMPORTANT SAFEGUARDS For your protection, please read these slots and openings must ...
...sources, refer to your home, consult your dealer or local power company. For those appliances designed to operate from overheating, these safety instructions completely before operating the appliance, and keep this manual for example, near a bathtub, washbowl, kitchen sink, or laundry tub, ... openings in a wet basement, or near water - Use only a cart, stand, tripod, bracket, or table recommended by Sony. - Follow the instructions below: 4US Grounding or Polarization This appliance is provided. IMPORTANT SAFEGUARDS For your protection, please read these slots and openings must ...
Instruction Manual
Page 6
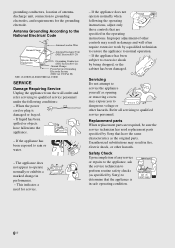
...the grounding electrode. Replacement parts When replacement parts are required, be sure the service technician has used replacement parts specified by Sony that are specified in Wire Antenna Discharge Unit (NEC Section 810-20) Electric Service Equipment Grounding Conductors (NEC Section 810-21...Requiring Service Unplug the appliance from the wall outlet and refer servicing to qualified service personnel under the following the operating instructions, adjust only those controls that have fallen into the appliance. - Antenna Grounding According to the National Electrical Code Ground...
...the grounding electrode. Replacement parts When replacement parts are required, be sure the service technician has used replacement parts specified by Sony that are specified in Wire Antenna Discharge Unit (NEC Section 810-20) Electric Service Equipment Grounding Conductors (NEC Section 810-21...Requiring Service Unplug the appliance from the wall outlet and refer servicing to qualified service personnel under the following the operating instructions, adjust only those controls that have fallen into the appliance. - Antenna Grounding According to the National Electrical Code Ground...
Instruction Manual
Page 12
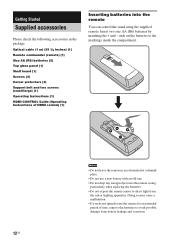
...) (1) Remote commander (remote) (1) Size AA (R6) batteries (2) Top glass panel (1) Shelf board (1) Screws (4) Corner protectors (4) Support belt and two screws (small/large) (1) Operating Instructions (1) HDMI CONTROL Guide (Operating Instructions of time, remove the batteries to avoid possible damage from the sun or lighting apparatus. Doing so may cause a malfunction. • If you...
...) (1) Remote commander (remote) (1) Size AA (R6) batteries (2) Top glass panel (1) Shelf board (1) Screws (4) Corner protectors (4) Support belt and two screws (small/large) (1) Operating Instructions (1) HDMI CONTROL Guide (Operating Instructions of time, remove the batteries to avoid possible damage from the sun or lighting apparatus. Doing so may cause a malfunction. • If you...
Instruction Manual
Page 18
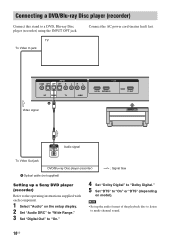
... "On." 4 Set "Dolby Digital" to "Dolby Digital." 5 Set "DTS" to a DVD, Blu-ray Disc player (recorder) using the INPUT OPT jack. Note • Set up a Sony DVD player (recorder) Refer to the operating instructions supplied with each component. 1 Select "Audio" on model).
... "On." 4 Set "Dolby Digital" to "Dolby Digital." 5 Set "DTS" to a DVD, Blu-ray Disc player (recorder) using the INPUT OPT jack. Note • Set up a Sony DVD player (recorder) Refer to the operating instructions supplied with each component. 1 Select "Audio" on model).
Instruction Manual
Page 20
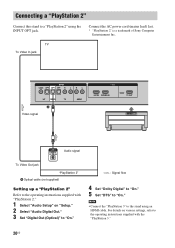
...HDMI cable. Connect the AC power cord (mains lead) last. * "PlayStation 2" is a trademark of Sony Computer Entertainment Inc. For details on "Setup." 2 Select "Audio Digital Out." 3 Set "Digital Out (Optical)" to the operating instructions supplied with "PlayStation 2." 1 Select "Audio Setup" on various settings, refer to "On." l : Signal... Audio signal To Video Out jack "PlayStation 2" A Optical cable (not supplied) Setting up a "PlayStation 2" Refer to the operating instructions supplied with the "PlayStation 3." 20US Note • Connect the "PlayStation 3" to "On."
...HDMI cable. Connect the AC power cord (mains lead) last. * "PlayStation 2" is a trademark of Sony Computer Entertainment Inc. For details on "Setup." 2 Select "Audio Digital Out." 3 Set "Digital Out (Optical)" to the operating instructions supplied with "PlayStation 2." 1 Select "Audio Setup" on various settings, refer to "On." l : Signal... Audio signal To Video Out jack "PlayStation 2" A Optical cable (not supplied) Setting up a "PlayStation 2" Refer to the operating instructions supplied with the "PlayStation 3." 20US Note • Connect the "PlayStation 3" to "On."

Instruction Manual
Page 25
...; A tactile dot is attached to "Programming the remote for TV operation (Input SYNC: Sony TV only)" (page 29). • You can use the remote as a guide during operation. • When connecting a Sony TV, the Sony TV input can be output from the TV's speaker. For details on the remote. 4... Adjust the volume of the TV's speaker down to the minimum. Refer to the TV's operating instructions for 60 seconds after setting. To cancel this...
...; A tactile dot is attached to "Programming the remote for TV operation (Input SYNC: Sony TV only)" (page 29). • You can use the remote as a guide during operation. • When connecting a Sony TV, the Sony TV input can be output from the TV's speaker. For details on the remote. 4... Adjust the volume of the TV's speaker down to the minimum. Refer to the TV's operating instructions for 60 seconds after setting. To cancel this...
Instruction Manual
Page 26
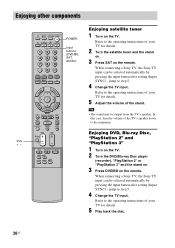
Refer to the operating instructions of your TV for details. 5 Play back the disc. 26US jump to step 5. 4 Change the TV input. When connecting a Sony TV, the Sony TV input can be output from the TV's speaker. In this case, turn the volume of the stand. "PlayStation 3" 1 Turn ..., the Sony TV input can be selected automatically by pressing the input button after setting (Input SYNC) - GU TO POTILOSNS PLAY RETUR Enjoying DVD, Blu-ray Disc, "PlayStation 2" and VOL +, - Refer to the minimum. Refer to the operating instructions of your TV for details. 5 Adjust ...
Refer to the operating instructions of your TV for details. 5 Play back the disc. 26US jump to step 5. 4 Change the TV input. When connecting a Sony TV, the Sony TV input can be output from the TV's speaker. In this case, turn the volume of the stand. "PlayStation 3" 1 Turn ..., the Sony TV input can be selected automatically by pressing the input button after setting (Input SYNC) - GU TO POTILOSNS PLAY RETUR Enjoying DVD, Blu-ray Disc, "PlayStation 2" and VOL +, - Refer to the minimum. Refer to the operating instructions of your TV for details. 5 Adjust ...

Instruction Manual
Page 37
... the amplifier menu Using the AMP menu You can set the following pages show details for each setting. 37US The following items with this operating instructions. 1 Press AMP MENU to turn on the remote. The default settings are underlined. AMP MENU LEVEL CNT LEVEL (center level) SW LEVEL (subwoofer level) -6 to...
... the amplifier menu Using the AMP menu You can set the following pages show details for each setting. 37US The following items with this operating instructions. 1 Press AMP MENU to turn on the remote. The default settings are underlined. AMP MENU LEVEL CNT LEVEL (center level) SW LEVEL (subwoofer level) -6 to...
Instruction Manual
Page 46
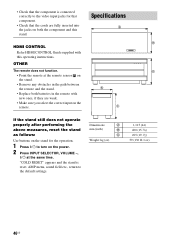
... on the remote. • Check that the cords are weak. • Make sure you select the correct input on both the component and this operating instructions. AMP menu, sound field etc., return to turn on the power. 2 Press INPUT SELECTOR, VOLUME -, ?/1 at the remote sensor on the stand. • Remove any...
... on the remote. • Check that the cords are weak. • Make sure you select the correct input on both the component and this operating instructions. AMP menu, sound field etc., return to turn on the power. 2 Press INPUT SELECTOR, VOLUME -, ?/1 at the remote sensor on the stand. • Remove any...
Instruction Manual
Page 48
...) (1) Remote commander (remote) (1) Size AA (R6) batteries (2) Top glass panel (1) Shelf board (1) Screws (4) Corner protectors (4) Support belt and two screws (small/large) (1) Operating Instructions (1) HDMI CONTROL Guide (Operating Instructions of high quality digital audio. General Power requirements Power consumption AC 120 V/60 Hz On: 110 Watts HDMI CONTROL is ON: 1.5 Watts or...
...) (1) Remote commander (remote) (1) Size AA (R6) batteries (2) Top glass panel (1) Shelf board (1) Screws (4) Corner protectors (4) Support belt and two screws (small/large) (1) Operating Instructions (1) HDMI CONTROL Guide (Operating Instructions of high quality digital audio. General Power requirements Power consumption AC 120 V/60 Hz On: 110 Watts HDMI CONTROL is ON: 1.5 Watts or...


