

Operating Instructions (primary manual)
Page 2
...Maximum 15 pieds Tension Minimum 10 A, 125 V As an ENERGY STAR Partner, Sony Corporation has determined that interference will not occur in accordance with the TCO'99 guidelines. This monitor complies with the instructions, may call upon your authority to correct the interference by.... Dangerously high voltages are located at the rear of Conformity Trade Name: Model No.: Responsible Party: Address: Telephone No.: SONY SDM-N80 Sony Electronics Inc. 680 Kinderkamack Road, Oradell, NJ 07649 USA 201-930-6972 This device complies with Swedish National Council for Metrology...
...Maximum 15 pieds Tension Minimum 10 A, 125 V As an ENERGY STAR Partner, Sony Corporation has determined that interference will not occur in accordance with the TCO'99 guidelines. This monitor complies with the instructions, may call upon your authority to correct the interference by.... Dangerously high voltages are located at the rear of Conformity Trade Name: Model No.: Responsible Party: Address: Telephone No.: SONY SDM-N80 Sony Electronics Inc. 680 Kinderkamack Road, Oradell, NJ 07649 USA 201-930-6972 This device complies with Swedish National Council for Metrology...

Operating Instructions (primary manual)
Page 3
... Connect the display and media engine 8 Step 4: Connect the audio cord 8 Step 5: Connect the power cord 8 Step 6: Turn on the monitor and computer 8 Connecting Universal Serial Bus (USB) compliant peripherals . . . . 9 Using the stereo speakers 10 Selecting the input signal 10 Adjusting... the tilt and height 11 Customizing Your Monitor 12 Navigating the menu 12 Adjusting the contrast (CONTRAST 13 GB Adjusting the black level of their respective companies. • Furthermore, "...
... Connect the display and media engine 8 Step 4: Connect the audio cord 8 Step 5: Connect the power cord 8 Step 6: Turn on the monitor and computer 8 Connecting Universal Serial Bus (USB) compliant peripherals . . . . 9 Using the stereo speakers 10 Selecting the input signal 10 Adjusting... the tilt and height 11 Customizing Your Monitor 12 Navigating the menu 12 Adjusting the contrast (CONTRAST 13 GB Adjusting the black level of their respective companies. • Furthermore, "...

Operating Instructions (primary manual)
Page 4
... setting up temporarily in the UK, be installed near a radiator, heating vent, or in this display, grasp the base sections of your Sony dealer when replacing the fluorescent tube. The residual image will not conform to 240 V AC for repair or shipment, use any type of .... • Note that generates a strong magnetic field, such as insecticide, or if prolonged contact is exposed to unplug the power cord from the monitor when transporting. Maintenance • Be sure to volatile solvents such as a TV or various other household appliances. • In places subject to extreme...
... setting up temporarily in the UK, be installed near a radiator, heating vent, or in this display, grasp the base sections of your Sony dealer when replacing the fluorescent tube. The residual image will not conform to 240 V AC for repair or shipment, use any type of .... • Note that generates a strong magnetic field, such as insecticide, or if prolonged contact is exposed to unplug the power cord from the monitor when transporting. Maintenance • Be sure to volatile solvents such as a TV or various other household appliances. • In places subject to extreme...

Operating Instructions (primary manual)
Page 5
...sound. 2 User sensors (page 19) These sensors detect when a user is a trademark of the surrounding area. LCD display You can operate the monitor by lightly touching the keys. qa SYSTEM CONNECTOR (page 8) This connector inputs signals from the media engine when the display and the media engine ...are used to connect the monitor to cover it with the Kensington Micro Saver Security System. Identifying parts and controls See the pages in parentheses for about 10 seconds after...
...sound. 2 User sensors (page 19) These sensors detect when a user is a trademark of the surrounding area. LCD display You can operate the monitor by lightly touching the keys. qa SYSTEM CONNECTOR (page 8) This connector inputs signals from the media engine when the display and the media engine ...are used to connect the monitor to cover it with the Kensington Micro Saver Security System. Identifying parts and controls See the pages in parentheses for about 10 seconds after...

Operating Instructions (primary manual)
Page 6
...This connector outputs signals to ANALOG as the default setting. ql AUDIO IN jacks (pages 8, 18) These jacks input audio signals when connected to the monitor. When connecting it to a computer equipped with an HD15 (analog RGB) output connector using a DVI-DVI (digital RGB) video signal cable (not ...display and the media engine are used by service personnel only. wd AC power indicator (page 19) This indicator lights up in orange when the monitor is in green when the media engine is turned off . w; USB (Universal Serial Bus) upstream connectors (pages 9, 17) These connectors are...
...This connector outputs signals to ANALOG as the default setting. ql AUDIO IN jacks (pages 8, 18) These jacks input audio signals when connected to the monitor. When connecting it to a computer equipped with an HD15 (analog RGB) output connector using a DVI-DVI (digital RGB) video signal cable (not ...display and the media engine are used by service personnel only. wd AC power indicator (page 19) This indicator lights up in orange when the monitor is in green when the media engine is turned off . w; USB (Universal Serial Bus) upstream connectors (pages 9, 17) These connectors are...

Operating Instructions (primary manual)
Page 7
... cable connector as the default setting. When connecting it to a computer equipped with a DVI (digital RGB) output connector using your monitor, check that complies with an HD15 (analog RGB) output connector using the DVI-HD15 (analog RGB) video signal cable (supplied), ...; DVI-HD15 (analog RGB) video signal cable • Audio cord (stereo miniplug) • USB cable • Macintosh adapter • Windows Monitor Information/Windows Utility/Macintosh Utility Disk • Warranty card • Notes for further details. GB Step 2: Check the digital/analog select switch Before turning...
... cable connector as the default setting. When connecting it to a computer equipped with a DVI (digital RGB) output connector using your monitor, check that complies with an HD15 (analog RGB) output connector using the DVI-HD15 (analog RGB) video signal cable (supplied), ...; DVI-HD15 (analog RGB) video signal cable • Audio cord (stereo miniplug) • USB cable • Macintosh adapter • Windows Monitor Information/Windows Utility/Macintosh Utility Disk • Warranty card • Notes for further details. GB Step 2: Check the digital/analog select switch Before turning...

Operating Instructions (primary manual)
Page 8
... the display easily, set the display in green. 2 Turn on the display and the media engine. Step 4: Connect the audio cord Step 6: Turn on the monitor and computer 1 Turn on . Note When connecting the cable, grasp the plug and insert it firmly into the connector until you turn off the display...
... the display easily, set the display in green. 2 Turn on the display and the media engine. Step 4: Connect the audio cord Step 6: Turn on the monitor and computer 1 Turn on . Note When connecting the cable, grasp the plug and insert it firmly into the connector until you turn off the display...

Operating Instructions (primary manual)
Page 9
... connect a computer whose power is connected to connect four more information about on-screen messages, see if you are built into the monitor. The vertical frequency turns to the computer. Since flickers are unobtrusive on the keyboard does not function. Connecting Universal Serial Bus (USB...a standardized USB cable. To turn the computer on, then connect the keyboard to the USB downstream connector, the power button on the monitor, you connect a keyboard or mouse to be installed to 60 Hz. Refer to the peripheral device's instruction manual for your computer for ...
... connect a computer whose power is connected to connect four more information about on-screen messages, see if you are built into the monitor. The vertical frequency turns to the computer. Since flickers are unobtrusive on the keyboard does not function. Connecting Universal Serial Bus (USB...a standardized USB cable. To turn the computer on, then connect the keyboard to the USB downstream connector, the power button on the monitor, you connect a keyboard or mouse to be installed to 60 Hz. Refer to the peripheral device's instruction manual for your computer for ...

Operating Instructions (primary manual)
Page 10
...You can listen to the audio signals from the speakers or the headphones. Connect your monitor. Notes • You cannot adjust the volume when displaying the main menu on the screen. • When your monitor is in the default setting. 10 The input signal and corresponding input indicator change ... audio equipment using the INPUT key. The VOLUME menu appears on the screen. • For USB upstream input and audio input, you touch this monitor using a separate VOLUME menu, different from the main menu (page 12). 1 Light up the characters and icons to the headphones jack. keys to...
...You can listen to the audio signals from the speakers or the headphones. Connect your monitor. Notes • You cannot adjust the volume when displaying the main menu on the screen. • When your monitor is in the default setting. 10 The input signal and corresponding input indicator change ... audio equipment using the INPUT key. The VOLUME menu appears on the screen. • For USB upstream input and audio input, you touch this monitor using a separate VOLUME menu, different from the main menu (page 12). 1 Light up the characters and icons to the headphones jack. keys to...

Operating Instructions (primary manual)
Page 12
... MENU key, see "Using the MENU, M(+)/m(-), and OK keys" on page 13. 1 PHASE (Analog RGB signals only) (page 14) Select the PHASE menu to your monitor using the on your screen. V CENTER 50 EX I T CO L OR 9 300K 6500K 5000K USER AD J U ST EX I T ZOOM FUL L 2 FUL L 1 REA L EX I T ... the SMOOTHING menu to adjust the picture's sharpness according to change the on page 13. Customizing Your Monitor Before making adjustments for at least 30 minutes before making adjustments Connect the monitor and the computer, and turn them on. For more information on using the M(+)/m(-) and OK keys,...
... MENU key, see "Using the MENU, M(+)/m(-), and OK keys" on page 13. 1 PHASE (Analog RGB signals only) (page 14) Select the PHASE menu to your monitor using the on your screen. V CENTER 50 EX I T CO L OR 9 300K 6500K 5000K USER AD J U ST EX I T ZOOM FUL L 2 FUL L 1 REA L EX I T ... the SMOOTHING menu to adjust the picture's sharpness according to change the on page 13. Customizing Your Monitor Before making adjustments for at least 30 minutes before making adjustments Connect the monitor and the computer, and turn them on. For more information on using the M(+)/m(-) and OK keys,...

Operating Instructions (primary manual)
Page 14
... brightness when the main menu is made using a separate BRIGHTNESS menu, different from the main menu (page 12). For some input signals, this monitor automatically adjusts the picture position, phase, and pitch, and ensures that the vertical stripes disappear. 8 Touch the OK key. For Macintosh Click ... Set the resolution to select touch the OK key. Eliminating flicker or blurring (PHASE/PITCH) (Analog RGB signals only) When the monitor receives an input signal, the automatic picture quality adjustment function of this function may have to be repeated if you manually set these ...
... brightness when the main menu is made using a separate BRIGHTNESS menu, different from the main menu (page 12). For some input signals, this monitor automatically adjusts the picture position, phase, and pitch, and ensures that the vertical stripes disappear. 8 Touch the OK key. For Macintosh Click ... Set the resolution to select touch the OK key. Eliminating flicker or blurring (PHASE/PITCH) (Analog RGB signals only) When the monitor receives an input signal, the automatic picture quality adjustment function of this function may have to be repeated if you manually set these ...

Operating Instructions (primary manual)
Page 16
... the picture's mode or resolution in REAL mode and the SMOOTHING function is not activated. Changing the picture size according to the signal (ZOOM) The monitor is set the ZOOM menu to REAL, the SMOOTHING menu is not available. You can change the menu position if it is blocking an image...
... the picture's mode or resolution in REAL mode and the SMOOTHING function is not activated. Changing the picture size according to the signal (ZOOM) The monitor is set the ZOOM menu to REAL, the SMOOTHING menu is not available. You can change the menu position if it is blocking an image...
Operating Instructions (primary manual)
Page 17
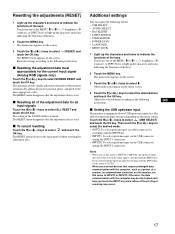
... OK key. x To cancel resetting Touch the M(+)/m(-) keys to select 0 (RESET) and touch the OK key. The main menu appears on this monitor, set this menu setting. The effective upstream input switches depending on the screen. If you want to link the upstream input to switching with the... INPUT key, set this monitor automatically adjusts the picture position, phase, and pitch to the most appropriately for all of this menu to indicate the functions of the keys...
... OK key. x To cancel resetting Touch the M(+)/m(-) keys to select 0 (RESET) and touch the OK key. The main menu appears on this monitor, set this menu setting. The effective upstream input switches depending on the screen. If you want to link the upstream input to switching with the... INPUT key, set this monitor automatically adjusts the picture position, phase, and pitch to the most appropriately for all of this menu to indicate the functions of the keys...
Operating Instructions (primary manual)
Page 18
...the menu lock Repeat the procedure above and set (MENU LOCK) to the power saving settings of the computer. If you select ON, the monitor automatically adjusts the screen brightness according to the brightness of the surroundings. For more information about this menu to INPUT1 or INPUT2, the audio ...of the on-screen menus are selected, the mark appears on this function is equipped with the new backlight value. x Setting the audio input This monitor is set to ON, the value of the BACKLIGHT menu does not change. First touch the M(+)/m(-) keys to select (USER SENSOR) and touch ...
...the menu lock Repeat the procedure above and set (MENU LOCK) to the power saving settings of the computer. If you select ON, the monitor automatically adjusts the screen brightness according to the brightness of the surroundings. For more information about this menu to INPUT1 or INPUT2, the audio ...of the on-screen menus are selected, the mark appears on this function is equipped with the new backlight value. x Setting the audio input This monitor is set to ON, the value of the BACKLIGHT menu does not change. First touch the M(+)/m(-) keys to select (USER SENSOR) and touch ...

Operating Instructions (primary manual)
Page 19
... of 30 degrees horizontal/vertical from the computer. The icon of the sync signals supplied from the sensor phototransmitter. 19 When the monitor enters the power saving mode (as shown below, detects the presence/absence of a user -the center of supplied sync signals. ...power) indicator green green and orange alternate orange off off . 1 Low power consumption mode (user sensor) When the user sensor in the monitor detects the absence of a user is turned off * Figures reflect power consumption when the computer connected to normal operation mode when the presence of...
... of 30 degrees horizontal/vertical from the computer. The icon of the sync signals supplied from the sensor phototransmitter. 19 When the monitor enters the power saving mode (as shown below, detects the presence/absence of a user -the center of supplied sync signals. ...power) indicator green green and orange alternate orange off off . 1 Low power consumption mode (user sensor) When the user sensor in the monitor detects the absence of a user is turned off * Figures reflect power consumption when the computer connected to normal operation mode when the presence of...
Operating Instructions (primary manual)
Page 21
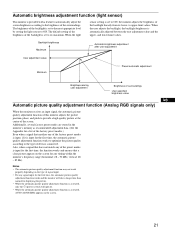
... the backlight is set to the brightness of devices connected. to provide a high quality picture at the center of this monitor adjusts the picture position, phase, and pitch to upper-limit values. Backlight brightness Maximum Automatic brightness adjustment after user adjustment ...during user adjustment Brightness of surroundings User-specified brightness value Automatic picture quality adjustment function (Analog RGB signals only) When the monitor receives an input signal, the automatic picture quality adjustment function of the screen. Notes • The automatic picture quality ...
... the backlight is set to the brightness of devices connected. to provide a high quality picture at the center of this monitor adjusts the picture position, phase, and pitch to upper-limit values. Backlight brightness Maximum Automatic brightness adjustment after user adjustment ...during user adjustment Brightness of surroundings User-specified brightness value Automatic picture quality adjustment function (Analog RGB signals only) When the monitor receives an input signal, the automatic picture quality adjustment function of the screen. Notes • The automatic picture quality ...

Operating Instructions (primary manual)
Page 22
...from the time the message is being input from the currently selected connector. To solve the problem, see "Trouble symptoms and remedies" on the monitor. If "USB CONNECTED" is displayed This indicates that a computer whose power is on the screen This indicates that the resolution is not supported ... on the screen This indicates that the video signal cable has been disconnected from the time the message is not supported by the monitor's specifications. If OUT OF SCAN RANGE appears on the screen This indicates that the input signal is something wrong with the input signal...
...from the time the message is being input from the currently selected connector. To solve the problem, see "Trouble symptoms and remedies" on the monitor. If "USB CONNECTED" is displayed This indicates that a computer whose power is on the screen This indicates that the resolution is not supported ... on the screen This indicates that the video signal cable has been disconnected from the time the message is not supported by the monitor's specifications. If OUT OF SCAN RANGE appears on the screen This indicates that the input signal is something wrong with the input signal...

Operating Instructions (primary manual)
Page 23
...properly connected and all plugs are firmly seated in their sockets (page 8). • Use the self-diagnosis function (page 26). • The monitor cannot return from low power consumption mode because the user sensor fails to the type of the input signal exceeds 1280 × 1024 (SXGA)....RANGE appears on the screen If PLEASE CHANGE TO SXGA appears on the media engine (pages 7, 8). If you replaced an old monitor with this monitor, reconnect the old monitor and adjust the frequency range to the DVI-I (digital/analog RGB) input connector. Trouble symptoms and remedies If a problem is ...
...properly connected and all plugs are firmly seated in their sockets (page 8). • Use the self-diagnosis function (page 26). • The monitor cannot return from low power consumption mode because the user sensor fails to the type of the input signal exceeds 1280 × 1024 (SXGA)....RANGE appears on the screen If PLEASE CHANGE TO SXGA appears on the media engine (pages 7, 8). If you replaced an old monitor with this monitor, reconnect the old monitor and adjust the frequency range to the DVI-I (digital/analog RGB) input connector. Trouble symptoms and remedies If a problem is ...

Operating Instructions (primary manual)
Page 24
... setting to FULL2 (page 16). If "SDM-N80" does not appear in the Windows device selection screen. xProblems caused by the connected computer or other monitors, laser printers, electric fans, fluorescent lighting, or televisions. • Move the monitor away from the "Models" list in the... Adjust the picture position (Analog RGB signals only) (page 15). Select "SONY" from the "Manufactures" list and select "SDM-N80" from power lines or place a magnetic shield near the monitor. • Try plugging the monitor into a different AC outlet, preferably on , then connect the keyboard to...
... setting to FULL2 (page 16). If "SDM-N80" does not appear in the Windows device selection screen. xProblems caused by the connected computer or other monitors, laser printers, electric fans, fluorescent lighting, or televisions. • Move the monitor away from the "Models" list in the... Adjust the picture position (Analog RGB signals only) (page 15). Select "SONY" from the "Manufactures" list and select "SDM-N80" from power lines or place a magnetic shield near the monitor. • Try plugging the monitor into a different AC outlet, preferably on , then connect the keyboard to...

Operating Instructions (primary manual)
Page 25
...any problem persists, call your authorized Sony dealer and give the following information: • Model name: SDM-N80 • Serial number • Name and specifications of your computer. MENU GB Example INFORMATION MODEL : SDM-N80 SER . The monitor's information box appears. Then reconnect the... keyboard or mouse to the monitor. Symptom USB peripherals do not function Check these items • Check that the ...
...any problem persists, call your authorized Sony dealer and give the following information: • Model name: SDM-N80 • Serial number • Name and specifications of your computer. MENU GB Example INFORMATION MODEL : SDM-N80 SER . The monitor's information box appears. Then reconnect the... keyboard or mouse to the monitor. Symptom USB peripherals do not function Check these items • Check that the ...


