Operating Instructions
Page 1
..., Park Ridge, NJ.07656 USA Telephone No.: 201-930-6972 This device complies with Part 15 of Conformity Trade Name: SONY Model No.: SLV-N81/N71 Responsible Party: Sony Electronics Inc. Operation is subject to the following two conditions: (1) This device may not cause harmful interference, and (2) this product, you have any questions about ...
..., Park Ridge, NJ.07656 USA Telephone No.: 201-930-6972 This device complies with Part 15 of Conformity Trade Name: SONY Model No.: SLV-N81/N71 Responsible Party: Sony Electronics Inc. Operation is subject to the following two conditions: (1) This device may not cause harmful interference, and (2) this product, you have any questions about ...

Operating Instructions
Page 5
... Selecting a language 28 Setting the clock 35 Setting up the cable box control (SLV-N81 only) 41 Presetting channels 48 Setting up the VCR Plus+® GOLD system (SLV-N81 only) 55 Setting up the VCR Plus+® system (SLV-N71 only) Basic Operations 59 Playing a tape 62 Recording TV programs 65 Recording TV... programs using the Dial Timer 70 Recording TV programs using the VCR Plus+ or VCR Plus+ GOLD system...
... Selecting a language 28 Setting the clock 35 Setting up the cable box control (SLV-N81 only) 41 Presetting channels 48 Setting up the VCR Plus+® GOLD system (SLV-N81 only) 55 Setting up the VCR Plus+® system (SLV-N71 only) Basic Operations 59 Playing a tape 62 Recording TV programs 65 Recording TV... programs using the Dial Timer 70 Recording TV programs using the VCR Plus+ or VCR Plus+ GOLD system...

Operating Instructions
Page 6
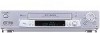
Getting Started Step 1 : Unpacking Check that you have received the following items with the VCR: • Remote commander • 75-ohm coaxial cable with F-type connectors • Size AA (R6) batteries Check your VCR. Any difference in operation is the model used for illustration purposes. Check your model name by looking at the rear panel of your model name The instructions in the text, for the 2 models: SLV-N81 and N71. SLV-N81 is clearly indicated in this manual are for example, "SLV-N81 only." 6 Unpacking
Getting Started Step 1 : Unpacking Check that you have received the following items with the VCR: • Remote commander • 75-ohm coaxial cable with F-type connectors • Size AA (R6) batteries Check your VCR. Any difference in operation is the model used for illustration purposes. Check your model name by looking at the rear panel of your model name The instructions in the text, for the 2 models: SLV-N81 and N71. SLV-N81 is clearly indicated in this manual are for example, "SLV-N81 only." 6 Unpacking

Operating Instructions
Page 9
... 2 Refer to Pages 12 to 14 Pages 15 to 17 For both SLV-N81 and N71 If you have A/V inputs, go directly to using the VCR" on the procedure described, page numbers are completed. • Be sure to use the Sony RM-CM101 Cable Mouse (cable box controller) (not supplied). For an overview... scan through the table below. Loose connections may cause picture distortion. • If your TV doesn't match any of the hookups below . For SLV-N81 only If you have A cable box that is compatible with the Cable Mouse A digital broadcast service's digital satellite receiver that it works best for...
... 2 Refer to Pages 12 to 14 Pages 15 to 17 For both SLV-N81 and N71 If you have A/V inputs, go directly to using the VCR" on the procedure described, page numbers are completed. • Be sure to use the Sony RM-CM101 Cable Mouse (cable box controller) (not supplied). For an overview... scan through the table below. Loose connections may cause picture distortion. • If your TV doesn't match any of the hookups below . For SLV-N81 only If you have A cable box that is compatible with the Cable Mouse A digital broadcast service's digital satellite receiver that it works best for...

Operating Instructions
Page 20
Set ANTENNA/CABLE to page 55 for VCR Plus+ system channel set the clock manually. For SLV-N81: Go to page 48 for VCR Plus+ GOLD system channel set up the VCR, it automatically sets the clock the first time you turn off the VCR, it checks the time and adjusts the clock, even for recording, go... UP SET UP IS DONE PLEASE WAIT You have now completed hookup. If you want to use the timer to the page listed below. For SLV-N71: Go to CABLE and press OK. Note • If the clock is not set up .
Set ANTENNA/CABLE to page 55 for VCR Plus+ system channel set the clock manually. For SLV-N81: Go to page 48 for VCR Plus+ GOLD system channel set up the VCR, it automatically sets the clock the first time you turn off the VCR, it checks the time and adjusts the clock, even for recording, go... UP SET UP IS DONE PLEASE WAIT You have now completed hookup. If you want to use the timer to the page listed below. For SLV-N71: Go to CABLE and press OK. Note • If the clock is not set up .

Operating Instructions
Page 23
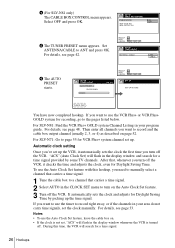
For SLV-N71: Go to page 48 for Daylight Saving Time. For details, see page 42. Select OFF and press OK. SET UP CABLE BOX CONTROL CABLE MOUSE BOX CODE NO. SET UP TUNER PRESET For details, see page 33. If you 've set up . For SLV-N81: Go to page 55 for a time signal... : OK CANCEL : EASY SET UP CH 2 4 SET UP SET UP IS DONE PLEASE WAIT You have now completed hookup. If you turn off the VCR. Getting Started 4 (For SLV-N81 only) The CABLE BOX CONTROL menu appears. ANTENNA / CABLE ANT CABLE 6 The AUTO PRESET starts. "ACS" (Auto Clock Set) will search for recording...
For SLV-N71: Go to page 48 for Daylight Saving Time. For details, see page 42. Select OFF and press OK. SET UP CABLE BOX CONTROL CABLE MOUSE BOX CODE NO. SET UP TUNER PRESET For details, see page 33. If you 've set up . For SLV-N81: Go to page 55 for a time signal... : OK CANCEL : EASY SET UP CH 2 4 SET UP SET UP IS DONE PLEASE WAIT You have now completed hookup. If you turn off the VCR. Getting Started 4 (For SLV-N81 only) The CABLE BOX CONTROL menu appears. ANTENNA / CABLE ANT CABLE 6 The AUTO PRESET starts. "ACS" (Auto Clock Set) will search for recording...
Operating Instructions
Page 26
... OK CANCEL : EASY SET UP 5 The TUNER PRESET menu appears. Set ANTENNA/CABLE to turn off the VCR. If you want to the pages listed below. For details, see page 42. "ACS" (Auto Clock ...the cable box on the Auto Clock Set feature. 3 Turn off the VCR. Then enter all channels you 've set up. 4 (For SLV-N81 only) The CABLE BOX CONTROL menu appears. Select OFF and press OK....page 33. For SLV-N81: Find the VCR Plus+ GOLD system Channel Listing in the CLOCK SET menu to ANT and press OK. For SLV-N71: Go to a channel that , whenever you turn off the VCR, it automatically sets...
... OK CANCEL : EASY SET UP 5 The TUNER PRESET menu appears. Set ANTENNA/CABLE to turn off the VCR. If you want to the pages listed below. For details, see page 42. "ACS" (Auto Clock ...the cable box on the Auto Clock Set feature. 3 Turn off the VCR. Then enter all channels you 've set up. 4 (For SLV-N81 only) The CABLE BOX CONTROL menu appears. Select OFF and press OK....page 33. For SLV-N81: Find the VCR Plus+ GOLD system Channel Listing in the CLOCK SET menu to ANT and press OK. For SLV-N71: Go to a channel that , whenever you turn off the VCR, it automatically sets...

Operating Instructions
Page 55
...want to record a TV program, all you need to coordinate these numbers using the following procedure. To set up your VCR Setting up your VCR involves coordinating the TV channel number (the number you turn to on channel 5, you need to do is automatically programmed ...VCR receives HBO on your TV or VCR to watch a program) with the guide channel (the number that's assigned to that simple. Getting Started Setting up the VCR Plus+® system (SLV-N71 only) How the VCR Plus+ system works Whenever you want and the VCR is look at the "Channel Line-up the VCR Plus+® system (SLV-N71...
...want to record a TV program, all you need to coordinate these numbers using the following procedure. To set up your VCR Setting up your VCR involves coordinating the TV channel number (the number you turn to on channel 5, you need to do is automatically programmed ...VCR receives HBO on your TV or VCR to watch a program) with the guide channel (the number that's assigned to that simple. Getting Started Setting up the VCR Plus+® system (SLV-N71 only) How the VCR Plus+ system works Whenever you want and the VCR is look at the "Channel Line-up the VCR Plus+® system (SLV-N71...
Operating Instructions
Page 56
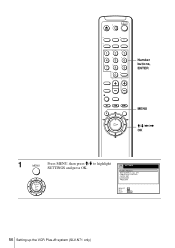
123 456 789 0 Number buttons, ENTER MENU M/m/
123 456 789 0 Number buttons, ENTER MENU M/m/
Operating Instructions
Page 57
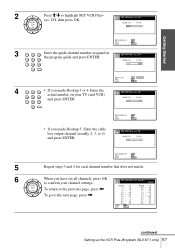
... the cable box output channel (usually 2, 3, or 4) and press ENTER. Getting Started 2 Press M/m to the previous page, press CH, then press OK. PLAY OK SET VCR Plus+ sys. SET GUIDE CH LIST QUIT : 0-9 : OK : MENU 3 Enter the guide channel number assigned in 123 the program guide and press ENTER. 456 789... 0 SET VCR Plus+ sys. CH GUIDE CH 25 TV CH - 58 SET GUIDE CH LIST QUIT : 0-9 : OK : MENU • If you made Hookup 3 or 4: Enter the 123...
... the cable box output channel (usually 2, 3, or 4) and press ENTER. Getting Started 2 Press M/m to the previous page, press CH, then press OK. PLAY OK SET VCR Plus+ sys. SET GUIDE CH LIST QUIT : 0-9 : OK : MENU 3 Enter the guide channel number assigned in 123 the program guide and press ENTER. 456 789... 0 SET VCR Plus+ sys. CH GUIDE CH 25 TV CH - 58 SET GUIDE CH LIST QUIT : 0-9 : OK : MENU • If you made Hookup 3 or 4: Enter the 123...
Operating Instructions
Page 58
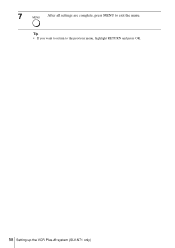
7 After all settings are complete, press MENU to the previous menu, highlight RETURN and press OK. 58 Setting up the VCR Plus+® system (SLV-N71 only) MENU Tip • If you want to return to exit the menu.
7 After all settings are complete, press MENU to the previous menu, highlight RETURN and press OK. 58 Setting up the VCR Plus+® system (SLV-N71 only) MENU Tip • If you want to return to exit the menu.

Operating Instructions
Page 100
... time Approx. 3 min. (with F-type connectors (1) Design and specifications are subject to change without notice. As an ENERGY STAR® Partner, Sony Corporation has determined that this product meets the ENERGY STAR® guidelines for VHF/UHF Inputs and outputs LINE-1 IN and -2 IN VIDEO IN, ...Built-in self-charging capacitor Back-up duration: up to 1 hour at a time General Power requirements 120 V AC, 60 Hz Power consumption 22 W (SLV-N81) 21 W (SLV-N71) Operating temperature 5°C to 40°C (41°F to 104°F) Storage temperature -20°C to 60°C (-4°F to 140°...
... time Approx. 3 min. (with F-type connectors (1) Design and specifications are subject to change without notice. As an ENERGY STAR® Partner, Sony Corporation has determined that this product meets the ENERGY STAR® guidelines for VHF/UHF Inputs and outputs LINE-1 IN and -2 IN VIDEO IN, ...Built-in self-charging capacitor Back-up duration: up to 1 hour at a time General Power requirements 120 V AC, 60 Hz Power consumption 22 W (SLV-N81) 21 W (SLV-N71) Operating temperature 5°C to 40°C (41°F to 104°F) Storage temperature -20°C to 60°C (-4°F to 140°...
Operating Instructions
Page 103
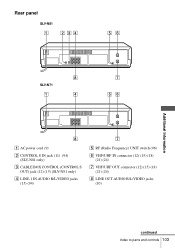
Rear panel SLV-N81 SLV-N71 Additional Information A AC power cord (9) B CONTROL S IN jack (11) (94) (SLV-N81 only) C CABLE BOX CONTROL (CONTROL S OUT) jack (12) (15) (SLV-N81 only) D LINE-1 IN AUDIO R/L/VIDEO jacks (15) (94) E RF (Radio Frequency) UNIT switch (96) F VHF/UHF IN connector (12) (15) (18) (21) (24) G VHF/UHF OUT connector (12) (15) (18) (21) (24) H LINE OUT AUDIO R/L/VIDEO jacks (10) continued Index to parts and controls 103
Rear panel SLV-N81 SLV-N71 Additional Information A AC power cord (9) B CONTROL S IN jack (11) (94) (SLV-N81 only) C CABLE BOX CONTROL (CONTROL S OUT) jack (12) (15) (SLV-N81 only) D LINE-1 IN AUDIO R/L/VIDEO jacks (15) (94) E RF (Radio Frequency) UNIT switch (96) F VHF/UHF IN connector (12) (15) (18) (21) (24) G VHF/UHF OUT connector (12) (15) (18) (21) (24) H LINE OUT AUDIO R/L/VIDEO jacks (10) continued Index to parts and controls 103