
User Guide
Page 6
This User's Guide instructs on SNC-M3 and SNC-M3W at the factory or in the instructions. Installation Manual (printed matter) The supplied Installation Manual describes the names and functions of parts and controls of powerful electromagnetic radiation, such as portrayed on using the User's... how to follow the general safety precautions and the "Operating Precautions." As this section gives tips on your screen. Precautions This Sony product has been designed with safety in the User's Guide are mainly used properly electrical products can cause fires which appear as originally...
This User's Guide instructs on SNC-M3 and SNC-M3W at the factory or in the instructions. Installation Manual (printed matter) The supplied Installation Manual describes the names and functions of parts and controls of powerful electromagnetic radiation, such as portrayed on using the User's... how to follow the general safety precautions and the "Operating Precautions." As this section gives tips on your screen. Precautions This Sony product has been designed with safety in the User's Guide are mainly used properly electrical products can cause fires which appear as originally...

User Guide
Page 8
...how to continue the installation. 5 Start the IP Setup Program. The "File Download" dialog opens. 3 Click Open. The program detects the SNC-M3 or SNC-M3W cameras connected to the local network and lists them on the Network tab window. 6 Click on the CD-ROM. 2 Click the Setup ... follows. IP address: 192.168.0.100 Subnet mask: 255.0.0.0 Wireless LAN setting (SNC-M3W only) Type: Adhoc SSID: snc-mw Channel: 11 ch WEP: Nothing 8 Assigning the IP Address to "Connections" in the supplied Installation Manual. Before starting, connect the camera to a local network, referring to the Camera...
...how to continue the installation. 5 Start the IP Setup Program. The "File Download" dialog opens. 3 Click Open. The program detects the SNC-M3 or SNC-M3W cameras connected to the local network and lists them on the Network tab window. 6 Click on the CD-ROM. 2 Click the Setup ... follows. IP address: 192.168.0.100 Subnet mask: 255.0.0.0 Wireless LAN setting (SNC-M3W only) Type: Adhoc SSID: snc-mw Channel: 11 ch WEP: Nothing 8 Assigning the IP Address to "Connections" in the supplied Installation Manual. Before starting, connect the camera to a local network, referring to the Camera...

User Guide
Page 9
... the Camera To obtain the IP address automatically from a DHCP server: Select Obtain an IP address automatically. To specify the IP address manually: Select Use the following DNS server address, and type the Primary DNS server address and Secondary DNS server address in the relevant boxes..... The welcome page of both items are assigned automatically. Normally select 80 for this display. The default settings of the network camera SNC-M3 or SNC-M3W is not set the IP address again. 9 Assigning the IP Address to set correctly, the welcome page does not appear after step...
... the Camera To obtain the IP address automatically from a DHCP server: Select Obtain an IP address automatically. To specify the IP address manually: Select Use the following DNS server address, and type the Primary DNS server address and Secondary DNS server address in the relevant boxes..... The welcome page of both items are assigned automatically. Normally select 80 for this display. The default settings of the network camera SNC-M3 or SNC-M3W is not set the IP address again. 9 Assigning the IP Address to set correctly, the welcome page does not appear after step...

User Guide
Page 10
... Proxy server manually. For setting the Proxy server, consult your computer. Use Internet Explorer as the Web browser. 1 Start the Web browser on Windows 2000 or Windows XP, you should have logged in the Local Area Network (LAN) Settings on the Network tab of "Network Camera SNC-M3" or "Network Camera SNC-M3W" is optimized...
... Proxy server manually. For setting the Proxy server, consult your computer. Use Internet Explorer as the Web browser. 1 Start the Web browser on Windows 2000 or Windows XP, you should have logged in the Local Area Network (LAN) Settings on the Network tab of "Network Camera SNC-M3" or "Network Camera SNC-M3W" is optimized...
User Guide
Page 22
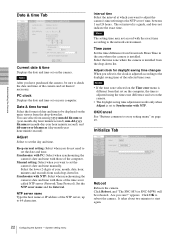
.... NTP server name Type the host name or IP address of the time sever called NTP server (Network Time Protocol). Click Reboot, and "The SNC-M3 (or SNC-M3W) will be displayed on the camera. Click OK to start again. 22 Configuring the System - Administrating the Camera Date & time Tab Current date ... set on the Time zone menu is different from Greenwich Mean Time in the area where the camera is set the camera's date and time manually. Notes • If the time zone selected on your computer. Date & time format Select the format of the computer. Synchronize with PC: ...
.... NTP server name Type the host name or IP address of the time sever called NTP server (Network Time Protocol). Click Reboot, and "The SNC-M3 (or SNC-M3W) will be displayed on the camera. Click OK to start again. 22 Configuring the System - Administrating the Camera Date & time Tab Current date ... set on the Time zone menu is different from Greenwich Mean Time in the area where the camera is set the camera's date and time manually. Notes • If the time zone selected on your computer. Date & time format Select the format of the computer. Synchronize with PC: ...

User Guide
Page 42
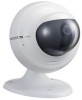
SNC-M3: Approx. 350 g (12.3 oz) SNC-M3W: Approx. 380 g (13.4 oz) Dimensions Stand: Approx. 80 g (2.8 oz) Camera: φ110 × 104 mm (d/h) (φ 4 3/8 × 4 1/8 inches) not including the projecting ... Wall-mounting bracket (1), Rubber foot (4), Drop prevention strap (1), Tapping screws (4 × 20) (4), + PSW screws (3 × 8) (2), CD-ROM (User's Guide and supplied programs) (1), Installation manual (1) Design and specifications are subject to 95 % Mass Camera: Approx. Storage temperature -20 °C to +60 °C (-4 °F to 140 °F) Storage humidity 20 to...
SNC-M3: Approx. 350 g (12.3 oz) SNC-M3W: Approx. 380 g (13.4 oz) Dimensions Stand: Approx. 80 g (2.8 oz) Camera: φ110 × 104 mm (d/h) (φ 4 3/8 × 4 1/8 inches) not including the projecting ... Wall-mounting bracket (1), Rubber foot (4), Drop prevention strap (1), Tapping screws (4 × 20) (4), + PSW screws (3 × 8) (2), CD-ROM (User's Guide and supplied programs) (1), Installation manual (1) Design and specifications are subject to 95 % Mass Camera: Approx. Storage temperature -20 °C to +60 °C (-4 °F to 140 °F) Storage humidity 20 to...


