
User Guide
Page 1
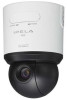
4-155-861-11 (1) Network Camera User's Guide Software Version 1.0 Before operating the unit, please read this manual thoroughly and retain it for future reference. SNC-RH124/RS46N/RS46P/RS44N/RS44P SNC-RH164/RS86N/RS86P/RS84N/RS84P © 2009 Sony Corporation
4-155-861-11 (1) Network Camera User's Guide Software Version 1.0 Before operating the unit, please read this manual thoroughly and retain it for future reference. SNC-RH124/RS46N/RS46P/RS44N/RS44P SNC-RH164/RS86N/RS86P/RS84N/RS84P © 2009 Sony Corporation

User Guide
Page 4
...IPELA" and are trademarks of Sony Corporation. • "VISCA" is a trademark of Sun Microsystems, Inc. All other company and product names are registered trademarks of Adobe Systems Incorporated in high-quality HD (720P) (SNC-RH124/SNC-RH164). • XDNR ...Sony Corporation reserves the right to make any modification to this manual or the information contained herein at the same time. • Date/time can be superimposed on the image. This allows 360° panning and 210° tilting operability. • Optical zoom of 10x (SNC-RH124, RH164), 18x (SNC-RS44, RS84), 36x (SNC...
...IPELA" and are trademarks of Sony Corporation. • "VISCA" is a trademark of Sun Microsystems, Inc. All other company and product names are registered trademarks of Adobe Systems Incorporated in high-quality HD (720P) (SNC-RH124/SNC-RH164). • XDNR ...Sony Corporation reserves the right to make any modification to this manual or the information contained herein at the same time. • Date/time can be superimposed on the image. This allows 360° panning and 210° tilting operability. • Optical zoom of 10x (SNC-RH124, RH164), 18x (SNC-RS44, RS84), 36x (SNC...

User Guide
Page 5
... printed out, may be read on making the most of the camera. (August 2009) SNC-RH124/RH164 CPU Intel Core 2 Duo, 2 GHz or higher. Installation Manual (printed matter) The supplied Installation Manual describes the names and functions of parts and controls of the camera and menu display in ...the User's Guide show the SNC-RH124 or SNC-RH164 as an example. Jumping to a related page When ...
... printed out, may be read on making the most of the camera. (August 2009) SNC-RH124/RH164 CPU Intel Core 2 Duo, 2 GHz or higher. Installation Manual (printed matter) The supplied Installation Manual describes the names and functions of parts and controls of the camera and menu display in ...the User's Guide show the SNC-RH124 or SNC-RH164 as an example. Jumping to a related page When ...

User Guide
Page 6
... IP address to a Local Network" in your computer using another method. Delete the downloaded file, and click the Setup icon again. 4 Install SNC toolbox on the "File Download" dialog, you will not operate correctly. For example, see "Assigning the IP Address to perform set up may appear.... A cover page appears automatically in the supplied Installation Manual. The File Download dialog opens. Note If you click "Save" on your Web browser. Otherwise SNC toolbox will not be able to the Camera Using ARP Commands" on page 10. 2 Click...
... IP address to a Local Network" in your computer using another method. Delete the downloaded file, and click the Setup icon again. 4 Install SNC toolbox on the "File Download" dialog, you will not operate correctly. For example, see "Assigning the IP Address to perform set up may appear.... A cover page appears automatically in the supplied Installation Manual. The File Download dialog opens. Note If you click "Save" on your Web browser. Otherwise SNC toolbox will not be able to the Camera Using ARP Commands" on page 10. 2 Click...

User Guide
Page 7
The Network Setting screen is DHCP mode for the HTTP port No. To specify the IP address manually: Select Use the following DNS server address, and type the Primary DNS server address and Secondary DNS server address in the list. 7 Assigning the IP ... automatically, make sure that all items are correctly set, then click OK. Note When you want to the Camera To specify the DNS server addresses manually: Select Use the following IP address, and type the IP address, Subnet mask and Default gateway in the text box. Note When using a port number...
The Network Setting screen is DHCP mode for the HTTP port No. To specify the IP address manually: Select Use the following DNS server address, and type the Primary DNS server address and Secondary DNS server address in the list. 7 Assigning the IP ... automatically, make sure that all items are correctly set, then click OK. Note When you want to the Camera To specify the DNS server addresses manually: Select Use the following IP address, and type the IP address, Subnet mask and Default gateway in the text box. Note When using a port number...

User Guide
Page 14
... via a local network). 3 Set the slider to the camera uses JavaScript. To display the viewer correctly To operate the viewer correctly, set the Proxy server manually. In that case, disable Automatic configuration and set the security level of the Proxy server, consult your computer. 14 Accessing the Camera Using the Web...
... via a local network). 3 Set the slider to the camera uses JavaScript. To display the viewer correctly To operate the viewer correctly, set the Proxy server manually. In that case, disable Automatic configuration and set the security level of the Proxy server, consult your computer. 14 Accessing the Camera Using the Web...

User Guide
Page 17
... the camera you access the main viewer for the first time, the Security Warning appears. Notes • If Automatic configuration is set the Proxy server manually. About Viewers You can monitor the camera image in any of the Internet Explorer may not be displayed. When you access the network camera using...
... the camera you access the main viewer for the first time, the Security Warning appears. Notes • If Automatic configuration is set the Proxy server manually. About Viewers You can monitor the camera image in any of the Internet Explorer may not be displayed. When you access the network camera using...

User Guide
Page 19
... use on . To input the microphone, click again. Camera control panel By pressing position. , focus is set to the optimum Note To control the focus manually, set to operate the camera when the exclusive control mode is on the Trigger panel. Keep it pressed to the structure of the image may... an FTP server (page 24) • record still image files in the built-in the camera (page 24) 19 Configuration of the Camera menu to Manual (page 37). (Exclusive control) Click this panel.
... use on . To input the microphone, click again. Camera control panel By pressing position. , focus is set to the optimum Note To control the focus manually, set to operate the camera when the exclusive control mode is on the Trigger panel. Keep it pressed to the structure of the image may... an FTP server (page 24) • record still image files in the built-in the camera (page 24) 19 Configuration of the Camera menu to Manual (page 37). (Exclusive control) Click this panel.
User Guide
Page 22
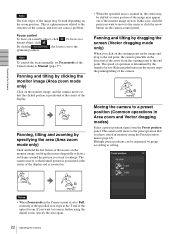
... end point, the camera pans/tilts in memory using the digital zoom, specify the area again. 22 Operating the Camera Note To control the focus manually, set Focus mode of the optical zoom. Panning and tilting by dragging the screen (Vector dragging mode only) When you click on the starting point... camera, and does not cause a problem. The camera moves so that you want to the structure of the monitor image section. This is set to Manual (page 37). In this case, click the point you want to the center or click the arrow button on the zoom position. The camera will...
... end point, the camera pans/tilts in memory using the digital zoom, specify the area again. 22 Operating the Camera Note To control the focus manually, set Focus mode of the optical zoom. Panning and tilting by dragging the screen (Vector dragging mode only) When you click on the starting point... camera, and does not cause a problem. The camera moves so that you want to the structure of the monitor image section. This is set to Manual (page 37). In this case, click the point you want to the center or click the arrow button on the zoom position. The camera will...

User Guide
Page 24
... buttons on the Trigger panel. The still images are recorded in the built-in the camera using the SNC audio upload tool. Tip For the connection of the I/O port, see the supplied Installation Manual. Each click switches the Day/Night function alternately between On (night mode) and Off (day mode). Sending a monitor...
... buttons on the Trigger panel. The still images are recorded in the built-in the camera using the SNC audio upload tool. Tip For the connection of the I/O port, see the supplied Installation Manual. Each click switches the Day/Night function alternately between On (night mode) and Off (day mode). Sending a monitor...

User Guide
Page 33
... if you want to synchronize the camera's date and time with PC: Select if you do not need to set the camera's date and time manually. Use the following NTP server address: Synchronize with NTP is installed. OK/Cancel See "Buttons common to set on your computer. Set the NTP server... the computer, the time is installed from the drop-down list. Date & time format Select the format of the camera and set on the camera. Manual setting: Select if you have purchased the camera, be sure to check the date and time of date and time to the daylight saving time...
... if you want to synchronize the camera's date and time with PC: Select if you do not need to set the camera's date and time manually. Use the following NTP server address: Synchronize with NTP is installed. OK/Cancel See "Buttons common to set on your computer. Set the NTP server... the computer, the time is installed from the drop-down list. Date & time format Select the format of the camera and set on the camera. Manual setting: Select if you have purchased the camera, be sure to check the date and time of date and time to the daylight saving time...

User Guide
Page 35
... the Web browser to the factory settings by turning on the power of 35 Configuring the System - For details, see the supplied Installation Manual. SNC-RH124, SNC-RH164 You can register is 64. 1 Enter the string to display. 2 Put a check in a file. It takes about two minutes...north. Are you sure?" appears. Select either NTSC or PAL. No analog image outputs when IP only is selected. Phase adjustment (SNC-RS46N/P, SNC-RS44N/ P, SNC-RS86N/P, SNC-RS84N/P only) Enter a value. (0 to the factory settings. appears. Factory default Resets the camera to 360) Note Phase ...
... the Web browser to the factory settings by turning on the power of 35 Configuring the System - For details, see the supplied Installation Manual. SNC-RH124, SNC-RH164 You can register is 64. 1 Enter the string to display. 2 Put a check in a file. It takes about two minutes...north. Are you sure?" appears. Select either NTSC or PAL. No analog image outputs when IP only is selected. Phase adjustment (SNC-RS46N/P, SNC-RS44N/ P, SNC-RS86N/P, SNC-RS84N/P only) Enter a value. (0 to the factory settings. appears. Factory default Resets the camera to 360) Note Phase ...

User Guide
Page 37
SNC-RH124, SNC-RH164 Full: An image can be zoomed up to 18× optical zoom and 12× digital zoom, 216× zoom in total. SNC-RS44N/P, SNC-RS84N/P Full: An image can be zoomed up to reduce echo from the m microphone input connector. Mic volume Set the volume level of the control .../P, SNC-RS86N/P Full: An image can be zoomed up to 36× optical zoom and 12× digital zoom, 432× zoom in free Viewer. Manual: The focus can be adjusted by using the , and buttons of the audio input from audio transmission. Select On to 36× optical zoom. Audio ...
SNC-RH124, SNC-RH164 Full: An image can be zoomed up to 18× optical zoom and 12× digital zoom, 216× zoom in total. SNC-RS44N/P, SNC-RS84N/P Full: An image can be zoomed up to reduce echo from the m microphone input connector. Mic volume Set the volume level of the control .../P, SNC-RS86N/P Full: An image can be zoomed up to 36× optical zoom and 12× digital zoom, 432× zoom in free Viewer. Manual: The focus can be adjusted by using the , and buttons of the audio input from audio transmission. Select On to 36× optical zoom. Audio ...

User Guide
Page 38
... trigger button becomes active. Full auto: The camera performs the gain and iris adjustment automatically. DynaView (WDR) (SNC-RS46N/P, SNC-RS44N/P, SNC-RS86N/P, SNC-RS84N/P only) The DynaView function reduces white-out and blackout in high-contrast shooting scenes such as required, according... to Off. 38 Setting the Camera Image and Audio - Manual: When this function, select High, Middle or Low. To use this...
... trigger button becomes active. Full auto: The camera performs the gain and iris adjustment automatically. DynaView (WDR) (SNC-RS46N/P, SNC-RS44N/P, SNC-RS86N/P, SNC-RS84N/P only) The DynaView function reduces white-out and blackout in high-contrast shooting scenes such as required, according... to Off. 38 Setting the Camera Image and Audio - Manual: When this function, select High, Middle or Low. To use this...
User Guide
Page 41
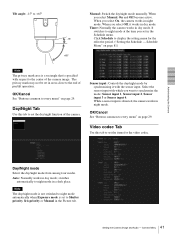
... to set in the Picture tab. 41 Setting the Camera Image and Audio - Video codec Tab Use this tab to Shutter priority, Iris priority or Manual in the Schedule menu. It switches to night mode automatically when Exposure mode is specified with the sensor input. OK/Cancel See "Buttons common to... select Off, it with respect to the end of the camera. While a sensor input is not switched to night mode at the time you select Manual, On and Off become active. Administrating the Camera Day/Night mode Select the day/night mode from among four modes. Auto: Normally works in night...
... to set in the Picture tab. 41 Setting the Camera Image and Audio - Video codec Tab Use this tab to Shutter priority, Iris priority or Manual in the Schedule menu. It switches to night mode automatically when Exposure mode is specified with the sensor input. OK/Cancel See "Buttons common to... select Off, it with respect to the end of the camera. While a sensor input is not switched to night mode at the time you select Manual, On and Off become active. Administrating the Camera Day/Night mode Select the day/night mode from among four modes. Auto: Normally works in night...

User Guide
Page 44
... when you click Network in the Network tab. Use the following IP address: Select this setting, specify the IP address, Subnet mask and Default gateway manually. IPv4 setting Configure the IPv4 network setting. With this menu to configure the network to 1500) 44 Configuring the Network - Use this setting, the IP... Configuring the Network - Note When you set only when Obtain an IP address automatically (DHCP) is installed on Primary DNS server and Secondary DNS server manually. Default gateway Type the default gateway.
... when you click Network in the Network tab. Use the following IP address: Select this setting, specify the IP address, Subnet mask and Default gateway manually. IPv4 setting Configure the IPv4 network setting. With this menu to configure the network to 1500) 44 Configuring the Network - Use this setting, the IP... Configuring the Network - Note When you set only when Obtain an IP address automatically (DHCP) is installed on Primary DNS server and Secondary DNS server manually. Default gateway Type the default gateway.
User Guide
Page 45
... the wireless card inserted in to a number other than 80 in the Network menu or in SNC toolbox, access the camera again by typing the IP address of the camera, and set . ...with this guide. HTTP port number Normally select 80. Before setting, read the operation manual and installation manual supplied with the wireless card together with IPv4. Host name Type the host name ...the specified wireless card into the CF card slot of the camera on your authorized Sony dealer. Verified wireless cards • Sony Wireless Card SNCA-CFW5* sold separately. * SNCA-CFW5 is not inserted, "00...
... the wireless card inserted in to a number other than 80 in the Network menu or in SNC toolbox, access the camera again by typing the IP address of the camera, and set . ...with this guide. HTTP port number Normally select 80. Before setting, read the operation manual and installation manual supplied with the wireless card together with IPv4. Host name Type the host name ...the specified wireless card into the CF card slot of the camera on your authorized Sony dealer. Verified wireless cards • Sony Wireless Card SNCA-CFW5* sold separately. * SNCA-CFW5 is not inserted, "00...

User Guide
Page 46
... you select Obtain an IP address automatically (DHCP), make sure that a DHCP server is operating on Primary DNS server and Secondary DNS server manually. This setting is valid only when Obtain an IP address automatically (DHCP) is set a fixed IP address. Use the following DNS server ... setting" on the network. Obtain an IP address automatically (DHCP): Select this setting, specify the IP address, Subnet mask and Default gateway manually. Note The domain suffix is sent to the DHCP server. Primary DNS server Type the IP address of the DNS server automatically. This setting...
... you select Obtain an IP address automatically (DHCP), make sure that a DHCP server is operating on Primary DNS server and Secondary DNS server manually. This setting is valid only when Obtain an IP address automatically (DHCP) is set a fixed IP address. Use the following DNS server ... setting" on the network. Obtain an IP address automatically (DHCP): Select this setting, specify the IP address, Subnet mask and Default gateway manually. Note The domain suffix is sent to the DHCP server. Primary DNS server Type the IP address of the DNS server automatically. This setting...
User Guide
Page 47
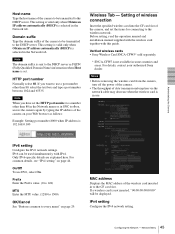
... side and an antenna is required. 47 Configuring the Network - When you click 802.1X, the 802.1X menu appears, allowing you enter a WEP key manually. Network Menu The length of higher sensitivity is used . When this option when WPA2 security method is selected automatically. When Type is set to the...
... side and an antenna is required. 47 Configuring the Network - When you click 802.1X, the 802.1X menu appears, allowing you enter a WEP key manually. Network Menu The length of higher sensitivity is used . When this option when WPA2 security method is selected automatically. When Type is set to the...

User Guide
Page 52
... from the browser. A prepared value is selected. Press the F5 key on the SSL connection with a browser. You do not need to the supplied Installation Manual. In this case, turn on the power of SSL tab in the following reasons. - The following statuses are not set for the following cases: - Possible...
... from the browser. A prepared value is selected. Press the F5 key on the SSL connection with a browser. You do not need to the supplied Installation Manual. In this case, turn on the power of SSL tab in the following reasons. - The following statuses are not set for the following cases: - Possible...


